AML and CFT Compliant dApp
The AML and CFT Compliant dApp enables secure ETH staking with integrated compliance features. Built on Base and compatible with any Ethereum-based network, it leverages Chainlink Functions and Quicknode’s Risk Assessment API to ensure only low-risk wallets can participate in the staking pool.


Introduction
The AML and CFT Compliant dApp enables secure ETH staking with a compliance layer powered by Chainlink Functions and the Risk Assessment API from the Quicknode Marketplace. Built on Base and compatible with any Ethereum-based network, this project demonstrates a practical integration of off-chain data into smart contracts, ensuring only low-risk wallets can participate in the staking pool.
This project is deployed on Base Mainnet by default. If you choose to use a different network, make sure to update the relevant environment variables accordingly.
We have a detailed step-by-step guide that walks you through the entire setup process, including deploying the smart contract, configuring Chainlink Functions, and integrating the Risk Assessment API. If you're new to Chainlink Functions or Quicknode add-ons, this guide will help you understand the integration in more depth.
Project Overview
The primary goal of AML and CFT Compliant dApp is to provide a secure staking experience by incorporating an on-chain compliance check. The application:
- Accepts ETH deposits only from wallets that pass a risk evaluation.
- Facilitates withdrawals after verifying wallet compliance via an oracle-provided risk score.
- Integrates off-chain risk data from a dedicated Risk Assessment API using Chainlink Functions.
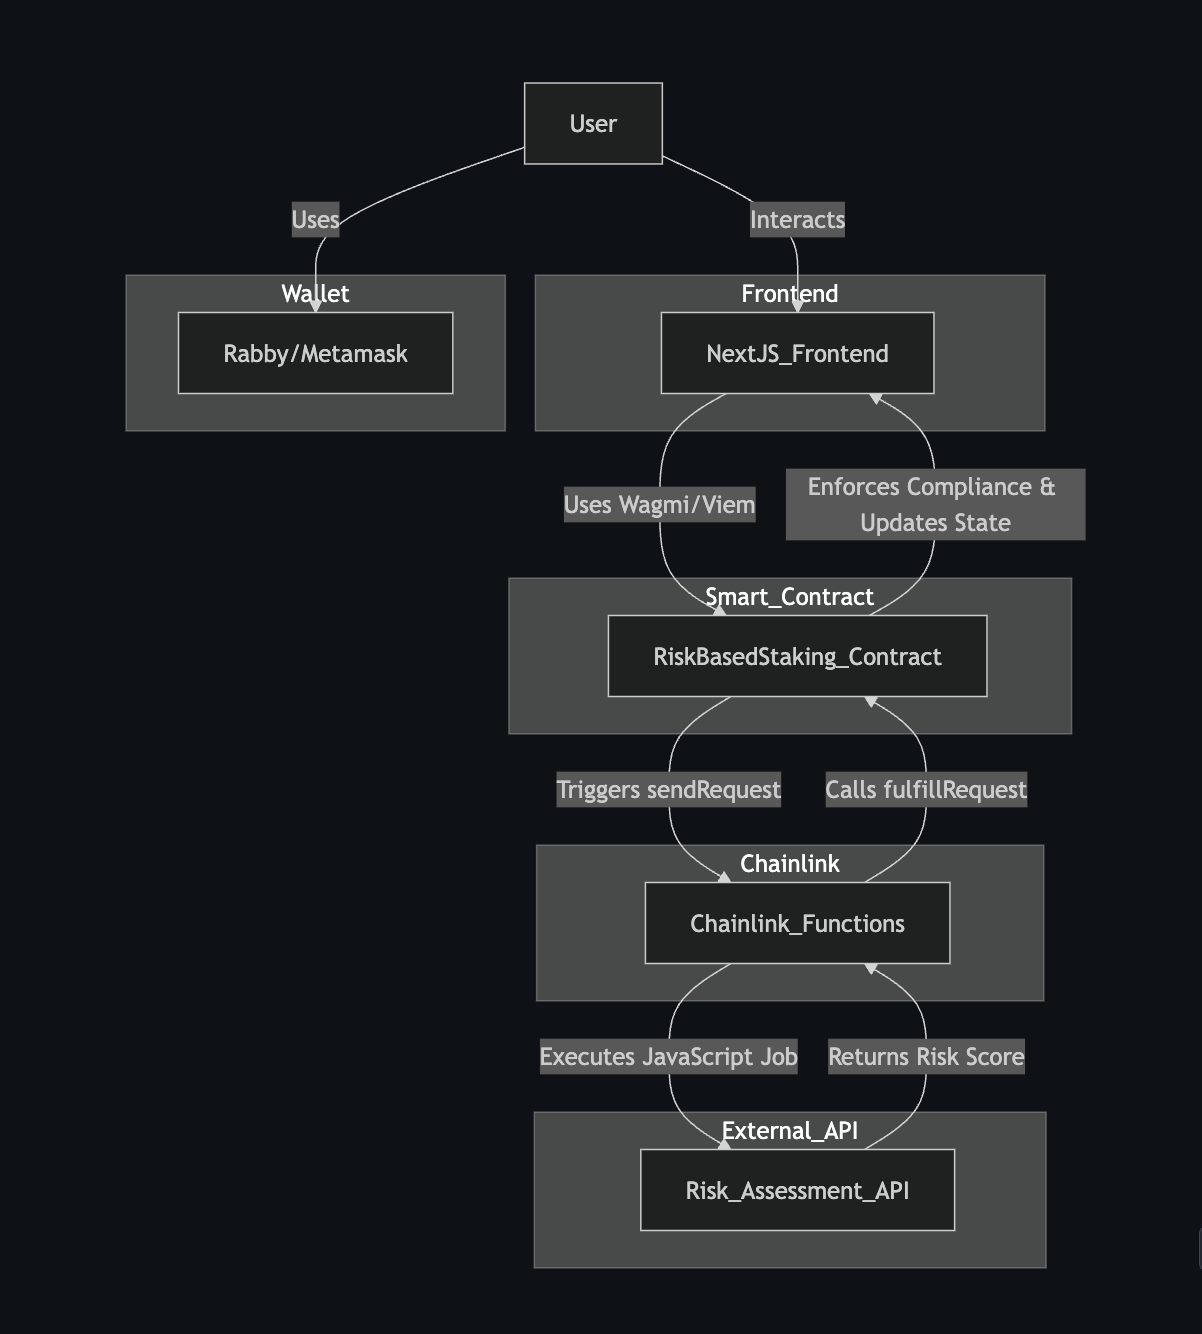
Technical Architecture
- Risk Assessment API: A Quicknode marketplace add-on that provides a numeric risk score (0-100, where higher scores indicate lower risk) based on off-chain analysis (e.g., transaction patterns, known associations).
- Chainlink Functions: A decentralized oracle solution that fetches data from the API, processes it, and updates the smart contract. It uses DON-hosted or user-hosted secrets for API key management and a callback mechanism to deliver results.
- Smart Contract: A Solidity contract that enforces staking rules based on risk scores. It integrates with Chainlink Functions to request and receive risk data.
- Next.js Frontend: A TypeScript-based React application using Next.js, Wagmi, and Viem for blockchain interactions.
This project implements security checks at both the smart contract and frontend levels for a fully compliant dApp. If you opt for a frontend-only security check (e.g., querying the API directly), Chainlink Functions can be bypassed, but this will disable on-chain compliance enforcement.
Data Flow:
- User initiates a risk check if they don't have a risk score yet.
- The Next.js API (
/api/check-risk) triggers a Chainlink Functions request with the wallet address. - Chainlink Functions calls the Risk Assessment API, processes the response, and returns the risk score.
- The smart contract updates the user's risk profile and enforces compliance.
- The frontend reflects changes via post-action refetching and displays the user's risk score and progress bar and allows them to stake or withdraw based on their risk score.
Key Components
1. Smart Contract: RiskBasedStaking.sol
This Solidity contract handles staking and withdrawal operations with an integrated risk assessment:
- Deposit Function: Accepts ETH deposits if the wallet's risk score is below a set threshold.
- Withdraw Function: Allows users to withdraw their staked ETH, subject to compliance checks.
- Risk Score Storage: Records the latest risk score for each wallet (updated via a Chainlink Functions callback).
- Configurable Threshold: Only wallets with a risk score below a predetermined threshold (e.g., 50 out of 100) are allowed to stake.
Technical Details:
- Language: Solidity (v0.8.18)
- State Variables:
mapping(address => uint256) public stakedBalances– User ETH deposits.mapping(address => uint256) public riskScores– Latest wallet risk scores.uint256 public riskThreshold– Maximum acceptable risk score.mapping(address => bool) public pendingRequests– Tracks ongoing risk check requests.
- Core Functions:
stake(): Deposits ETH if the risk score is acceptable.withdraw(uint256 amount): Withdraws staked ETH after validating balances.sendRequest(...): Owner-only function to trigger a Chainlink Functions request for risk evaluation.fulfillRequest(bytes32, bytes, bytes): Internal callback to update the risk score.setRiskThreshold(uint256): Owner-only function to modify the risk threshold.
2. Chainlink Functions Integration
Chainlink Functions acts as the bridge between off-chain risk data and the on-chain staking contract:
- Data Source: Retrieves a wallet's risk score from the Risk Assessment API.
- Job Execution: Executes a JavaScript job (via Chainlink Functions) to call the API and return a numeric risk score.
- Callback Mechanism: The smart contract's
fulfillRequestfunction updates the wallet's risk profile based on the returned score.
3. Risk Assessment API
The Risk Assessment API delivers real-time risk evaluations for wallet addresses:
- Risk Scoring: Returns a numeric score (0–100) based on off-chain analysis (e.g., transaction history, known associations).
- Multi-Chain Compatibility: Works with Ethereum and other EVM-based networks.
Sample API Response:
{
  "jsonrpc": "2.0",
  "result": {
    "score": 1,
    "severity": "CRITICAL_RISK",
    "entityType": "Sanction list",
    "entityName": "Sinbad.io"
  },
  "id": 1
}
4. Next.js Frontend
The Next.js frontend provides an intuitive interface for users to interact with the staking contract:
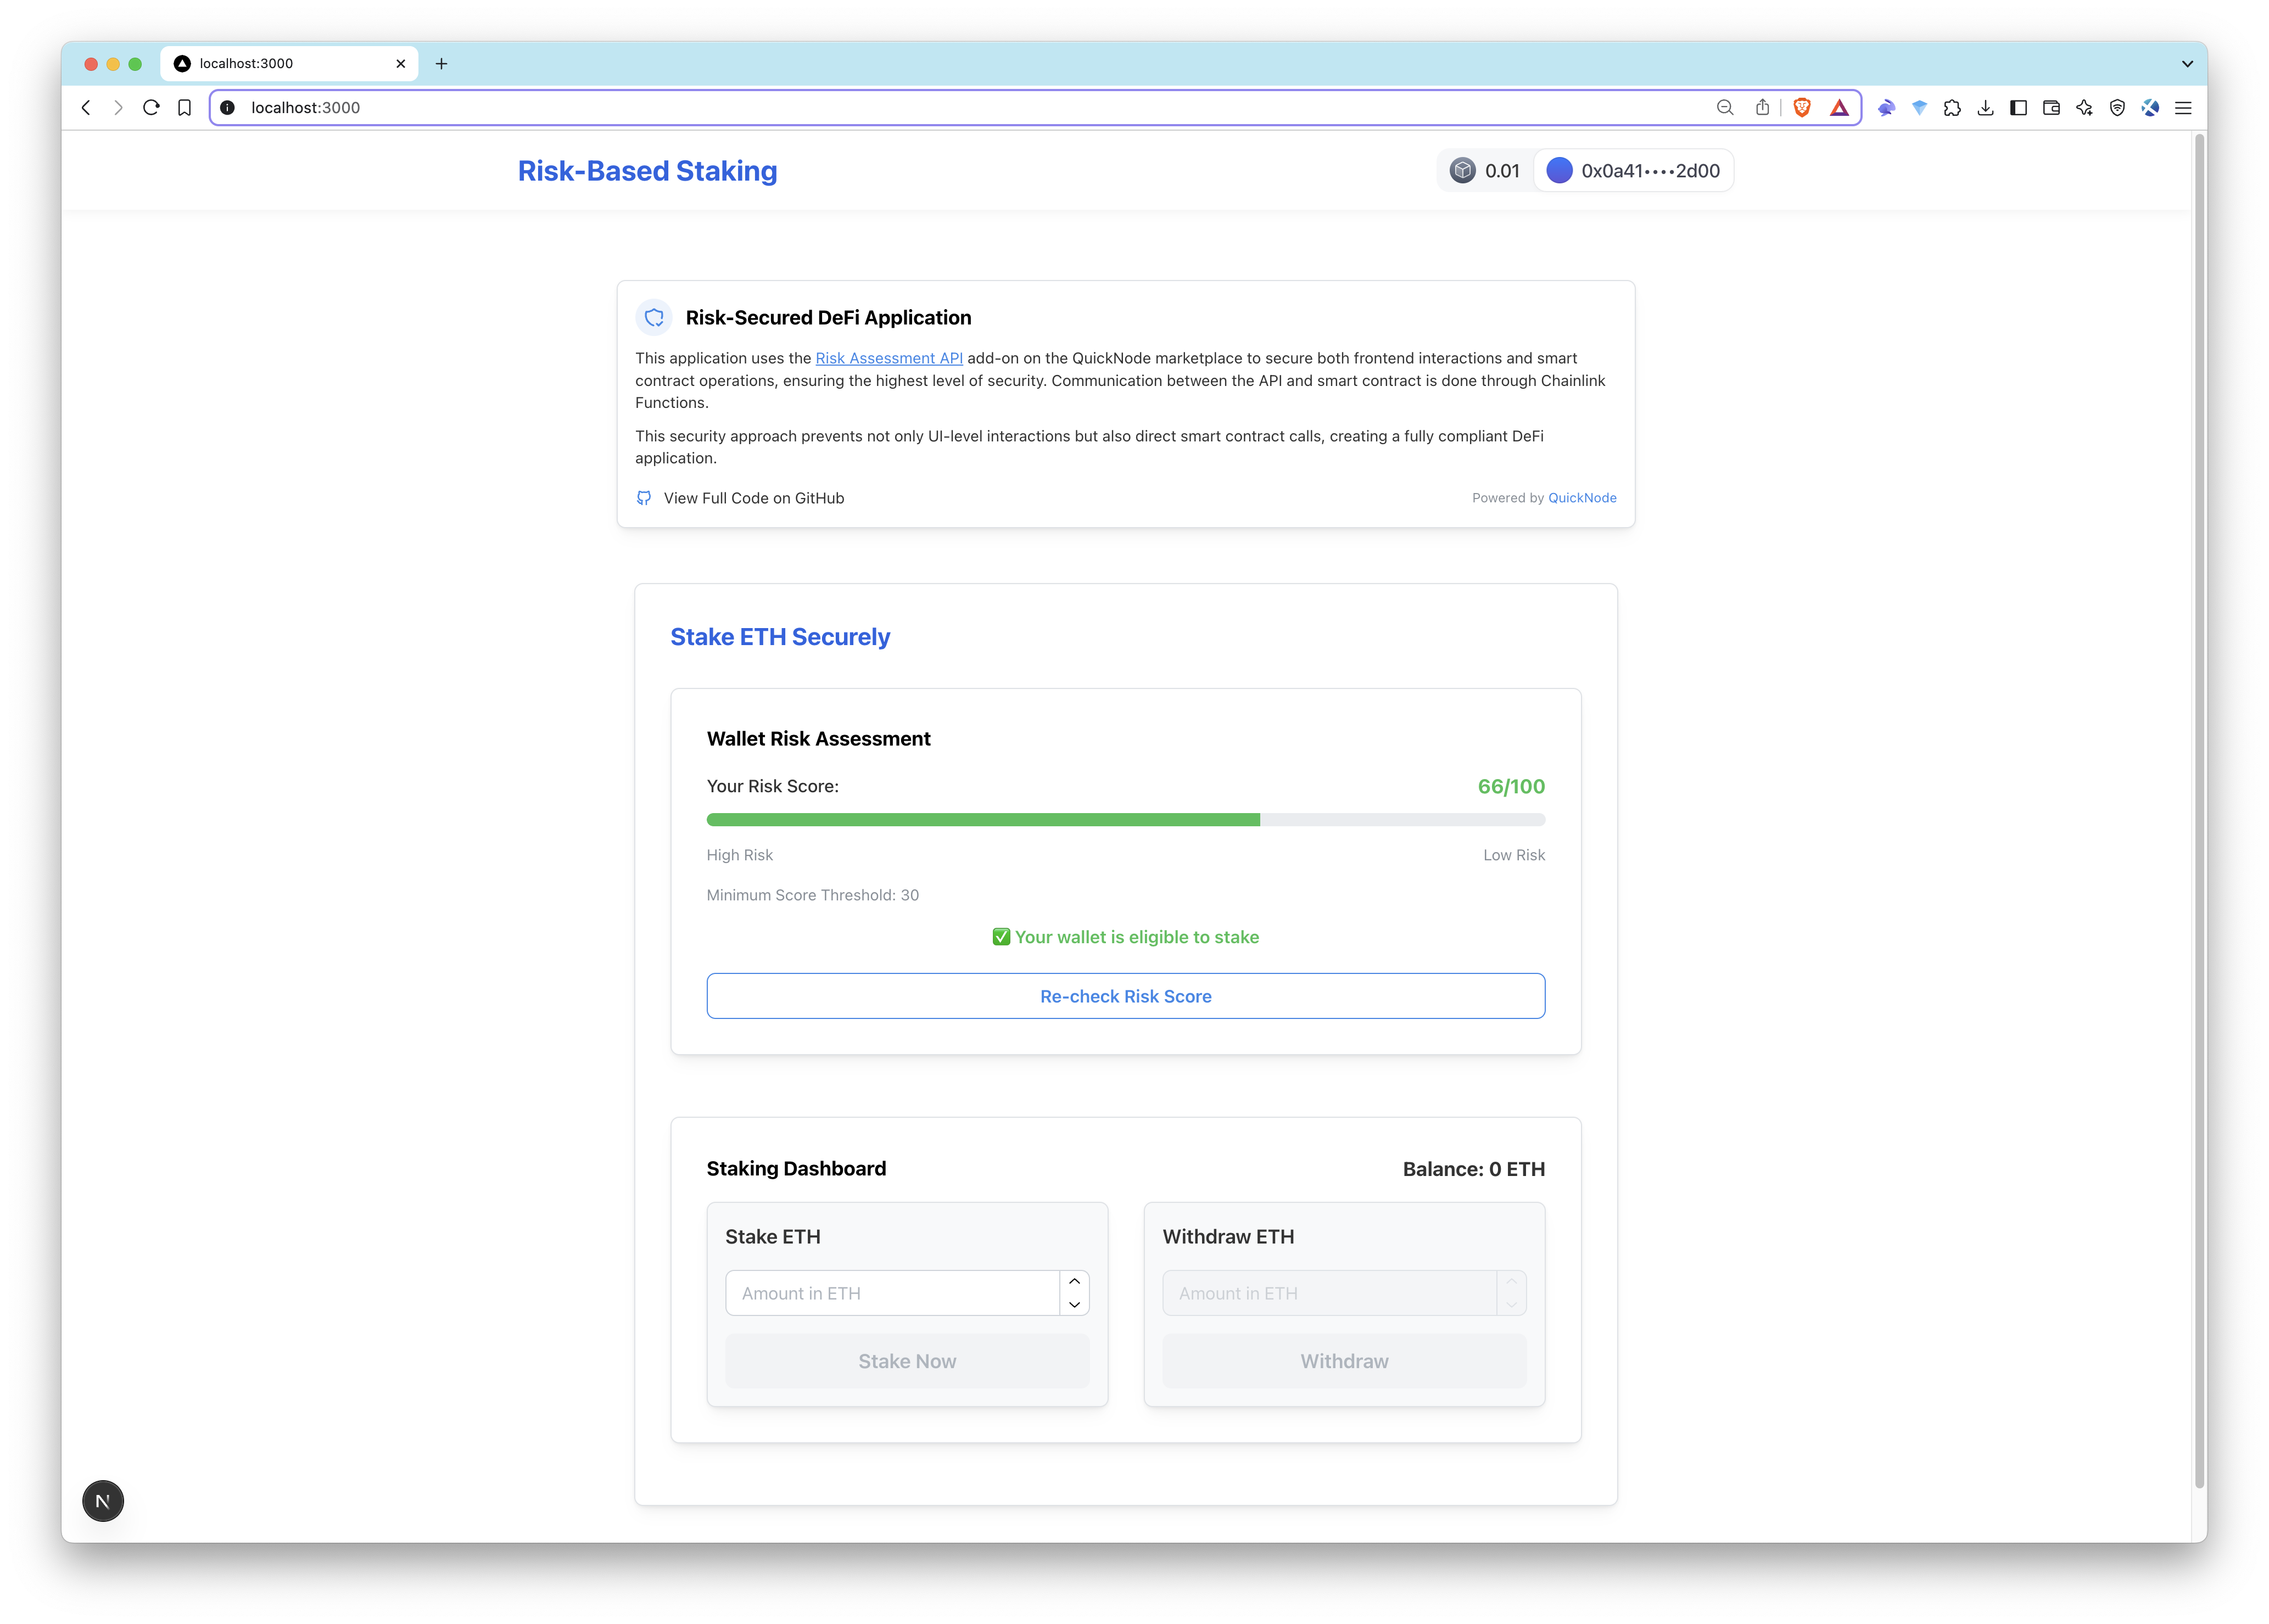
- Risk Score Display: Shows the evaluated risk score of the connected wallet.
- Deposit Section: Allows users to stake ETH if they meet the compliance criteria.
- Withdrawal Section: Enables withdrawals of staked ETH.
- Blockchain Interaction: Built with Next.js, TypeScript, Wagmi, Viem, and Mantine UI for a modern user experience.
Architecture Overview
Project Structure
Foundry Project
The smart contract is developed and deployed using Foundry. The directory structure is as follows:
├── README.md
├── foundry.toml
├── lib
│   ├── forge-std
│   └── foundry-chainlink-toolkit
├── remappings.txt
├── script
│   └── RiskBasedStaking.s.sol
├── src
│   └── RiskBasedStaking.sol
└── test
foundry.toml: Foundry configuration file.lib/: Contains dependencies for testing and Chainlink integration.remappings.txt: Remappings for Foundry dependencies.script/RiskBasedStaking.s.sol: Foundry deployment script.src/RiskBasedStaking.sol: The smart contract that handles staking and withdrawal operations with an integrated risk assessment.
Next.js Directory
The frontend is built with Next.js, leveraging modern React patterns and blockchain libraries. The structure is:
├── README.md
├── next.config.ts
├── package.json
├── public
├── src
│   ├── app
│   │   ├── api                         # API routes, including the Chainlink Functions integration
│   │   ├── favicon.ico
│   │   ├── globals.css
│   │   ├── layout.tsx
│   │   ├── page.module.css
│   │   └── page.tsx
│   ├── components                     # Reusable UI components (e.g., header, forms, banners)
│   │   ├── Header.tsx
│   │   ├── InfoBanner.tsx
│   │   ├── Providers.tsx
│   │   └── StakingForm.tsx
│   ├── config                          # Wagmi/Viem configuration for wallet and contract interactions
│   │   └── wagmiConfig.ts
│   ├── hooks                           # Custom hooks for contract interactions and risk assessment
│   │   ├── useRiskCheck.ts
│   │   └── useStakingContract.ts
│   ├── lib                             # Smart contract helper functions and ABIs
│   │   └── RiskBasedStaking.ts
│   └── pages                           # Main page structure and routing
│       └── HomePage.tsx
└── tsconfig.json
- API Route: Located in
src/app/api, this API route leverages the Chainlink Functions Toolkit to call Chainlink Functions. - Components & Hooks: Manage UI and blockchain interactions with Mantine and Wagmi/Viem.
- Configuration: Centralizes wallet connectivity and contract addresses.
Getting Started
Prerequisites
- Node.js (v18+)
- Foundry (install with
curl -L https://foundry.paradigm.xyz | bashthenfoundryup) - A Web3 Wallet: e.g., Rabby, MetaMask
- Base Mainnet RPC URL: Provided by Quicknode with the Risk Assessment API enabled
- Chainlink Functions Subscription
Installation
Follow these steps to set up and deploy the AML and CFT Compliant dApp project.
1. Clone the Repository
Start by cloning the repository and navigating to the project directory:
git clone https://github.com/quiknode-labs/qn-guide-examples.git
cd qn-guide-examples/sample-dapps/aml-and-cft-compliant-dapp
2. Set Up Your Quicknode Endpoint
Before proceeding, ensure you have a Quicknode endpoint with the Risk Assessment API enabled:
-
Create a Quicknode Endpoint
- Visit Quicknode and set up an endpoint on your preferred network.
- Ensure the selected network is supported by the Risk Assessment API (check supported networks).
-
Enable the Risk Assessment API Add-on
- Go to your Quicknode dashboard.
- Navigate to your endpoint settings and enable the Risk Assessment API add-on.
- Follow any configuration instructions if required.
3. Configure Foundry and Smart Contract Deployment
-
Install Foundry
If you haven't installed Foundry, do so with:curl -L https://foundry.paradigm.xyz | bash
foundryup -
Install Dependencies
Navigate to the Foundry directory and install required dependencies:cd foundry
forge install smartcontractkit/foundry-chainlink-toolkit
forge install foundry-rs/forge-std -
Create the Remappings File Run the following command to add remappings for the Chainlink Toolkit and Foundry dependencies:
forge remappings > remappings.txt
- Import Your Wallet
Securely import your wallet to Foundry using:cast wallet import your-wallet-name --interactive
Update the your-wallet-name with the name of your wallet. You will be prompted to enter your private key and set a password for encryption.
-interactive flag allows you to enter the private key without saving it in your shell history.
- Set Up Environment Variables
- Copy the sample
.envfile and update it with your configuration:cp .env.sample .env
- Open
.envand update the following:BASE_RPC_URL=<your-base-rpc-url>
BASESCAN_API_KEY=<your-basescan-api-key>
- Load the variables:
source .env
-
Update Deployment Script
- Modify the
routeraddress in the deployment script (script/RiskBasedStaking.s.sol) to the router address of the chain and network you're using. - Refer to Chainlink Functions Supported Networks for the correct router address.
- Modify the
-
Deploy the Smart Contract
Deploy the contract using Foundry:forge script script/RiskBasedStaking.s.sol:RiskBasedStakingScript --rpc-url $BASE_RPC_URL --account your-wallet-name --broadcast --verify -vvv
- Update the
your-wallet-namewith the name of your wallet. - Remove
--verifyif you don't want to verify the contract. - Save the contract address, as you will need it for Chainlink Functions and frontend configurations.
4. Set Up Chainlink Functions Subscription
After deploying the smart contract, you need to set up a Chainlink Functions subscription to allow the contract to request risk assessments. Follow these steps:
-
Create a Chainlink Functions Subscription
- Go to the Chainlink Functions UI for your desired network.
- Follow the instructions to create a new subscription.
- Fund the subscription with LINK tokens (you can bridge LINK if needed, see LINK token docs).
-
Add Your Smart Contract as a Consumer
- Once the subscription is set up, add your deployed contract address as a consumer.
- This allows the contract to make requests via Chainlink Functions.
-
Check Network-Specific Details
- Each network has its own Functions router address and DON ID (Decentralized Oracle Network).
- Refer to the Chainlink Functions Supported Networks page to find the correct values for your network.
For a detailed setup guide, refer to the Chainlink Functions Documentation.
5. Deploy the Project
- Install Dependencies
Go back to your project's root directory (i.e aml-and-cft-compliant-dapp), then run the following command:
cd next-app
npm install
- Set Up Environment Variables
Before running the frontend, configure the required environment variables in a .env file inside the next-app directory:
WALLETCONNECT_PROJECT_ID=<your-walletconnect-project-id>
PRIVATE_KEY=<your-private-key>
QUICKNODE_ENDPOINT=<your-quicknode-endpoint>
CONTRACT_ADDRESS=<deployed-contract-address>
SUBSCRIPTION_ID=<chainlink-subscription-id>
WALLETCONNECT_PROJECT_ID– Your WalletConnect project ID, required for enabling wallet connections.PRIVATE_KEY– The private key of a designated wallet used to sign risk check requests.- This ensures that only authorized users can trigger Chainlink Functions requests.
- Without this, the Chainlink subscription could be abused by unauthorized users.
QUICKNODE_ENDPOINT– Your Quicknode RPC endpoint URL with the Risk Assessment API enabled.CONTRACT_ADDRESS– The deployed Risk-Based Staking smart contract address.SUBSCRIPTION_ID– The Chainlink Functions subscription ID linked to your contract for off-chain risk evaluations.
- Update Chainlink Functions Configuration
Update the src/app/api/check-risk/route.ts file with the correct router address and DON ID for your chain and network.
  // Chainlink Functions configuration
  const routerAddress = "0xf9B8fc078197181C841c296C876945aaa425B278";
  const donId = "fun-base-mainnet-1";
  const gatewayUrls = [
    "https://01.functions-gateway.chain.link/",
    "https://02.functions-gateway.chain.link/",
  ];
- Run the Frontend Application
Start the development server:
npm run dev
- Open http://localhost:3000 in your browser.
Screenshots
Usage
-
Connect Your Wallet:
Use a supported Web3 wallet (e.g., MetaMask, Rabby) to connect. -
Check Your Risk Score:
If your wallet has not been evaluated, click the "Check Risk" button to initiate a risk evaluation via Chainlink Functions. -
Stake ETH:
After passing the risk check, use the stake function to deposit ETH. -
Withdraw ETH:
Withdraw your staked ETH at any time, provided your wallet remains compliant.
- Fork the repository
- Create a feature branch:git checkout -b feature/amazing-feature
- Commit your changes:git commit -m "Add amazing feature"
- Push your branch:git push origin feature/amazing-feature
- Open a Pull Request.


