29 min read
Overview
The Model Context Protocol (MCP) allows you to extend AI assistants like Claude with custom tools that interact with external data sources and services. In this guide, you'll build a Solana MCP server that gives tools like Claude Desktop (or Cursor) the ability to query the Solana blockchain directly. This integration will enable Claude to perform tasks like checking wallet balances, viewing token accounts, retrieving transaction details, and analyzing account information—all while you maintain control over these interactions. There are a lot of great tools bridging AI and Solana, like Goat SDK and SendAI.fun, but if you want to build your own, this guide is for you! By the end of this tutorial, you'll have a fully functional Solana MCP server that you can connect to Claude Desktop, allowing for seamless blockchain interactions through natural language:
What You Will Do
- Set up a Solana MCP server using TypeScript and the MCP SDK
- Implement Solana-specific functionality with Solana Kit
- Test your server with Claude Desktop
- Add increasingly complex capabilities like token account retrieval and transaction details
- Create helpful prompts to guide the AI's usage of your tools
What You Will Need
- Basic experience with TypeScript
- Experience with Solana Basics and Solana Kit
- Node.js
- Claude Desktop installed on your computer
- A Solana RPC endpoint (get a free one here)
| Dependency | Version |
|---|---|
| node | >=23.0.0 |
| @modelcontextprotocol/sdk | ^1.9.0 |
| @solana/kit | ^2.1.0 |
| zod | ^3.24.2 |
| typescript | ^5.8.3 |
| Claude Desktop | 0.9.2 |
Understanding MCPs
The Model Context Protocol (MCP) is an open protocol that bridges the gap between AI models and external data sources or tools. It creates a standardized way for applications to provide context to large language models (LLMs), enabling them to access real-time information and perform actions beyond their training data. Think of MCP like a universal adapter that allows AI models to safely and securely interact with various data sources, APIs, and functionalities. At its core, MCP follows a client-server architecture where AI applications like Claude act as clients that connect to MCP servers. These servers expose three primary capabilities:
- Tools: Functions that AI can call to execute actions (like checking a wallet balance)
- Resources: File-like data that can be read by the AI (like docs)
- Prompts: Pre-written templates to guide AI's interactions with your tools
Whether you're building a data visualization tool, a code analyzer, or an interface to external systems, MCP provides a structured, secure framework for extending AI capabilities. This can be particularly handy for making blockchain data more accessible and easier to work with.
MCP and Solana
The Model Context Protocol enables secure communication between AI assistants and external services like QuickNode, enabling access to Solana (or any other blockchain) data:

For our Solana MCP, we'll primarily focus on tools using RPC calls, but we'll also implement a resource and some prompts to demonstrate a complete integration. Let's build!
Set Up Your Environment
Let's start by creating a new project and installing the necessary dependencies:
mkdir solana-mcp && cd solana-mcp
Initialize a new npm project
npm init -y
Install dependencies
npm install @modelcontextprotocol/sdk @solana/kit zod
npm install --save-dev typescript @types/node
Create a tsconfig.json file with the following configuration:
{
    "compilerOptions": {
      "target": "ES2022",
      "module": "NodeNext",
      "moduleResolution": "NodeNext",
      "esModuleInterop": true,
      "strict": true,
      "outDir": "./build",
      "rootDir": "./",
      "skipLibCheck": true,
      "forceConsistentCasingInFileNames": true
    },
    "include": ["*.ts", "src/**/*.ts"],
    "exclude": ["node_modules", "build"]
}
Ensure you have these scripts in your package.json:
"scripts": {
  "build": "tsc",
  "start": "node build/index.js"
}
Create a new directory, src and index.ts file inside it:
mkdir src && touch src/index.ts
Build Your MCP Server
Let's start by implementing a single tool that will allow our client fetch a wallet's SOL balance.
Import Dependencies
Open src/index.ts and add the following code:
import {
  McpServer,
} from "@modelcontextprotocol/sdk/server/mcp.js";
import { StdioServerTransport } from "@modelcontextprotocol/sdk/server/stdio.js";
import { z } from "zod";
import {
  createSolanaRpc,
  address,
  isSolanaError,
  assertIsAddress,
  assertIsSignature,
} from "@solana/kit";
Here we are importing the necessary dependencies to create our MCP server. The @modelcontextprotocol/sdk package provides the core functionality for building MCP servers, while @solana/kit provides utilities for working with Solana RPC calls. We also import zod for schema validation which will help the server validate inputs and outputs.
Define Constants
Next, we need to define some constants for our server. This includes the RPC endpoint and the SPL program keys. Add the following code to src/index.ts:
const CONFIG = {
  rpcEndpoint:
    process.env.SOLANA_RPC_ENDPOINT || "https://api.mainnet-beta.solana.com",
};
const SPL_PROGRAM_KEYS = {
  TOKEN_PROGRAM: address("TokenkegQfeZyiNwAJbNbGKPFXCWuBvf9Ss623VQ5DA"),
  TOKEN_2022_PROGRAM: address("TokenzQdBNbLqP5VEhdkAS6EPFLC1PHnBqCXEpPxuEb"),
};

const solanaRpc = createSolanaRpc(CONFIG.rpcEndpoint);
You'll notice that we are referencing environment variables without using a library like dotenv. The MCP server will load environment variables as configured by the client (e.g., claude_desktop_config.json). We will set that up later.
Create the MCP Server
Now, let's create the MCP server. This server will handle incoming requests from the client and respond with the appropriate data. Add the following code to src/index.ts:
const server = new McpServer({
  name: "SolanaMCP",
  version: "1.0.0",
});
Our new variable, server initiates a new instance of the McpServer class. The name and version properties are used to identify the server and its version. Now all we need to do is define the tools, resources, and prompts that our server will expose to the client. We can do this simply by using the server.tool() method (or .resource() or .prompt() as needed).
Create the Balance Tool
The first tool we will create is a simple balance checker. This tool will take a Solana address as input and return the balance of that address. Add the following code to src/index.ts:
server.tool(
  "getBalance",
  {
    walletAddress: z
      .string()
      .describe("Solana wallet address to check the balance for"),
  },
  async (args: { walletAddress: string }) => {
    try {
      assertIsAddress(args.walletAddress);
      const accountAddress = address(args.walletAddress);

      const { value: lamports } = await solanaRpc
        .getBalance(accountAddress)
        .send();

      const solBalance = Number(lamports) / 1_000_000_000;

      return {
        content: [
          {
            type: "text" as const,
            text: `Balance for ${args.walletAddress}: ${solBalance} SOL (${lamports.toString()} lamports)`,
          },
        ],
      };
    } catch (error) {
      return {
        content: [
          {
            type: "text",
            text: `Error while getting balance: ${isSolanaError(error) ? error.message : "Unknown error"}`,
          },
        ],
        isError: true,
      };
    }
  },
);
This code defines a new tool called getBalance. The tool takes a single argument, walletAddress, which is a string representing the Solana address to check the balance for. The tool() method takes three arguments:
- the name of the tool,
- the zod input schema, and
- the callback function to execute when the tool is called.
The callback function uses the assertIsAddress function from @solana/kit to validate the address format. If the address is valid, it calls the getBalance method on the Solana RPC client and returns the balance in SOL and lamports. If an error occurs, it returns an error message.
Initialize the Server
Great! We now have the basics of our server set up. Next, we need to initialize the server and start listening for incoming requests. Add the following code to src/index.ts:
async function runServer() {
  const transport = new StdioServerTransport();
  await server.connect(transport);
}

runServer().catch((error) => {
  console.error("Fatal error:", error);
  process.exit(1);
});
We are using the Standard Input/Output class to handle incoming requests (recommended for local integrations). This transport allows the server to communicate with the client over standard input and output. The connect() method starts the server and begins listening for incoming requests. As you build more with MCP, you may require additional transport options--you can refer to the MCP SDK documentation for more details.
Build the Server
Now that we have our server set up, let's build and run it. In your terminal, run the following command:
npm run build
This will compile your TypeScript code into JavaScript and place the output in the build directory. We can now run the server, but with Claude Desktop--we don't actually need to, as it will initialize the server for us.
Setup Claude Desktop
Now that we have our MCP server compiled, we need to make sure that Claude can find it and is configured to use it. Make sure you have Claude Desktop installed. From the app, go to "Claude" -> "Settings" and click "Developer". Click "Edit Config":
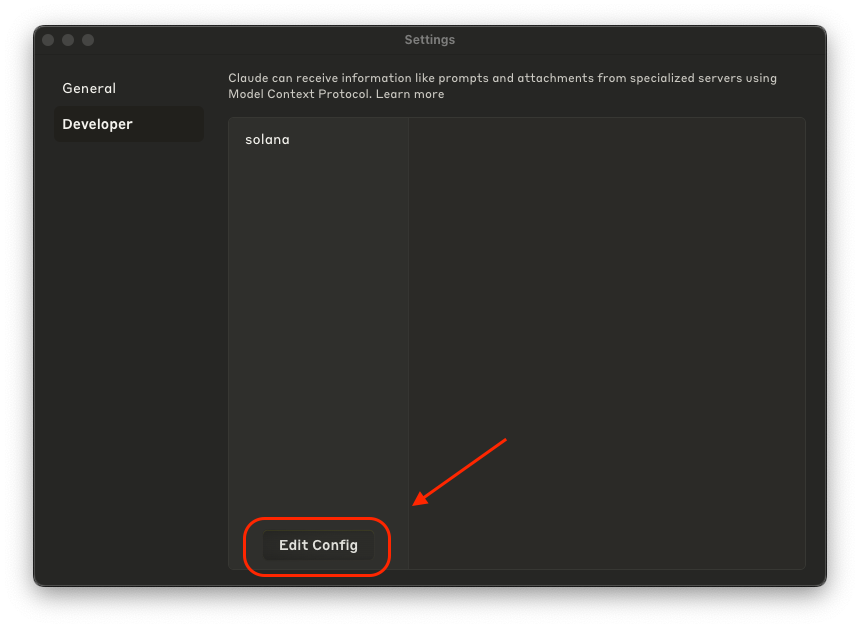
This should open a claude_desktop_config.json file (or its parent directory). If you don't see the file, check the latest reference documentation to see where it is located.
You should see a JSON object of MCP Severs. If this is your first MCP--it should be empty. We're going to add a new solana object to the mcpServers oject. This object will contain the configuration for our Solana MCP server. Update claude_desktop_config.json with:
{
    "mcpServers": {
        "solana": {
            "command": "node",
            "args": [
                "/absolute/path/to/build/index.js"
            ],
            "env": {
                "SOLANA_RPC_ENDPOINT": "https://example.solana-mainnet.quiknode.pro/123456/"
            }
        }
        // other MCP servers that you already have configured...
    }
}
Make sure that you:
- replace
/absolute/path/to/build/index.jswith the absolute path to yourbuild/index.jsfile. You can find this by runningpwdin your terminal. - replace
https://example.solana-mainnet.quiknode.pro/123456/with your own Solana RPC endpoint. If you do not have one, you can get a free one here. Make sure to use yourhttpsendpoint.
Note: this is where the SOLANA_RPC_ENDPOINT environment variable is being defined. For more information on environment variables in MCP Servers, check out the official documentation.
Save and close the file. You should not need to edit this further for this guide.
Test Your MCP Server
Now that we have updated our Claude Config, you will need to close and reopen Claude Desktop. Do that, and on restart Claude Desktop should start your MCP Server. You should see something like this when you get started:
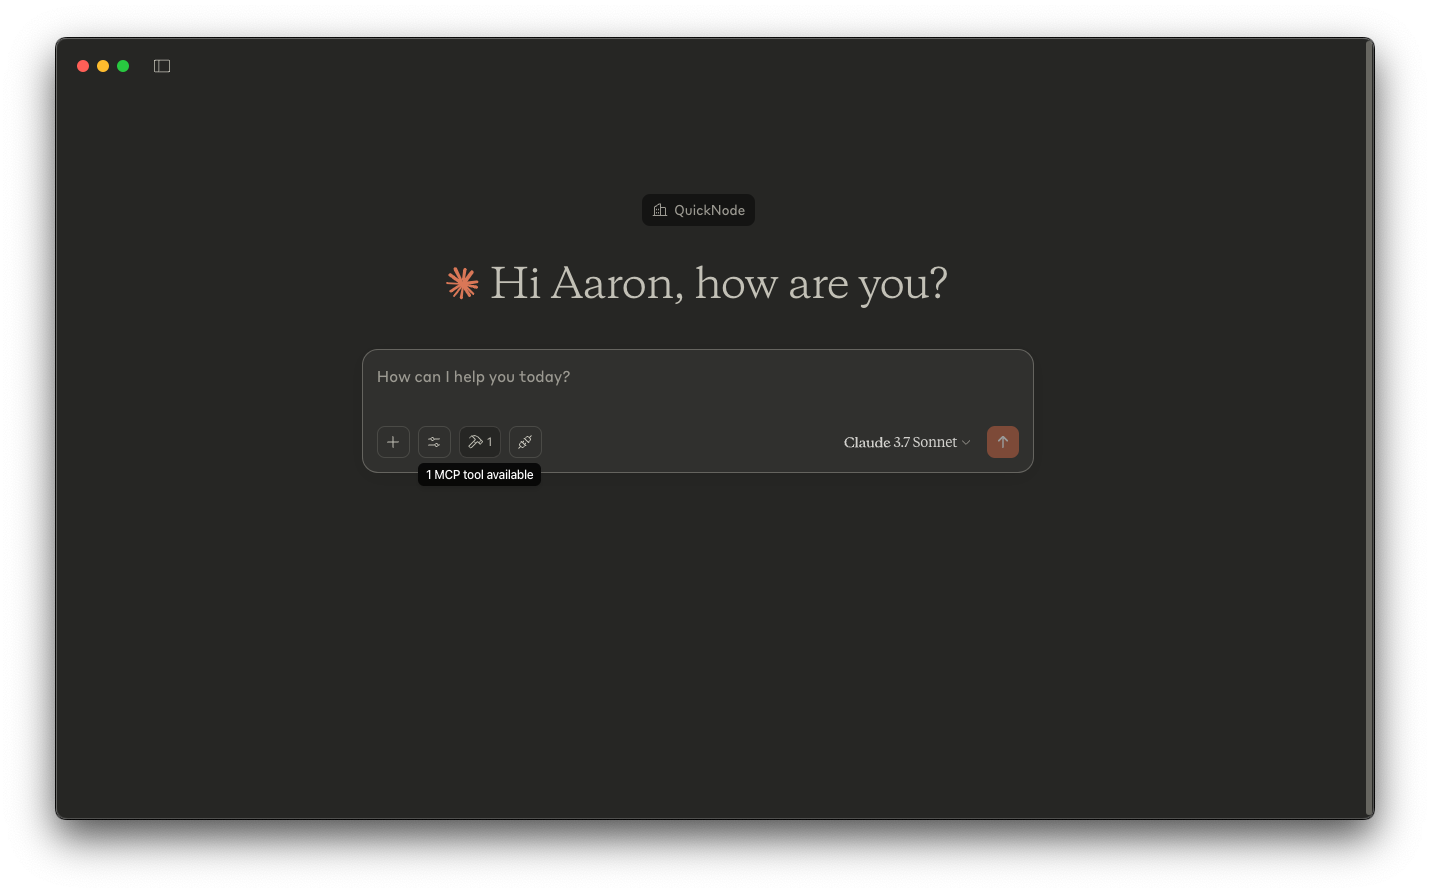
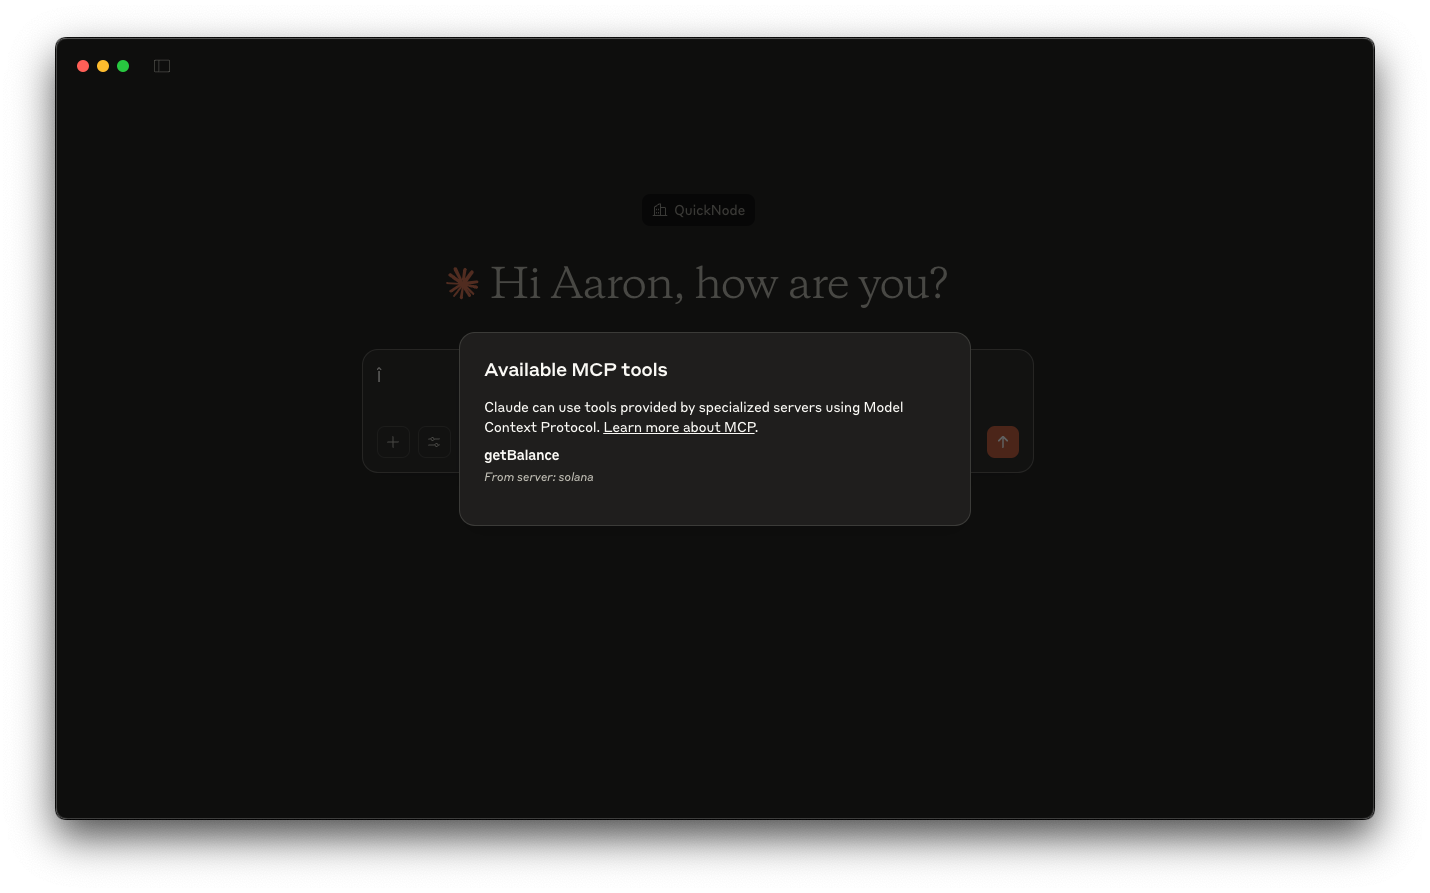
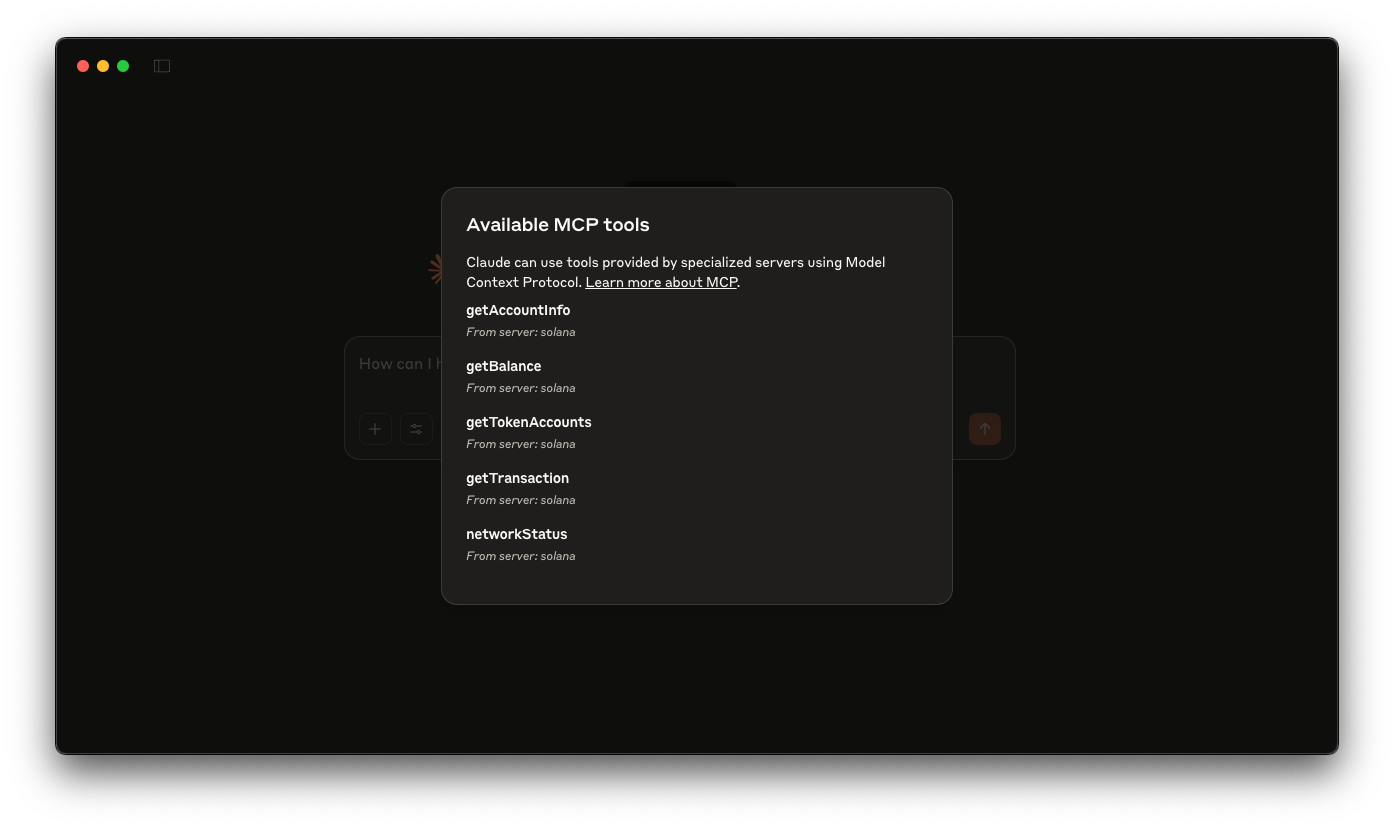
Click on the "🔨 Tools" Button and you should see the available tools that you can use (in our case, getBalance) 👀:
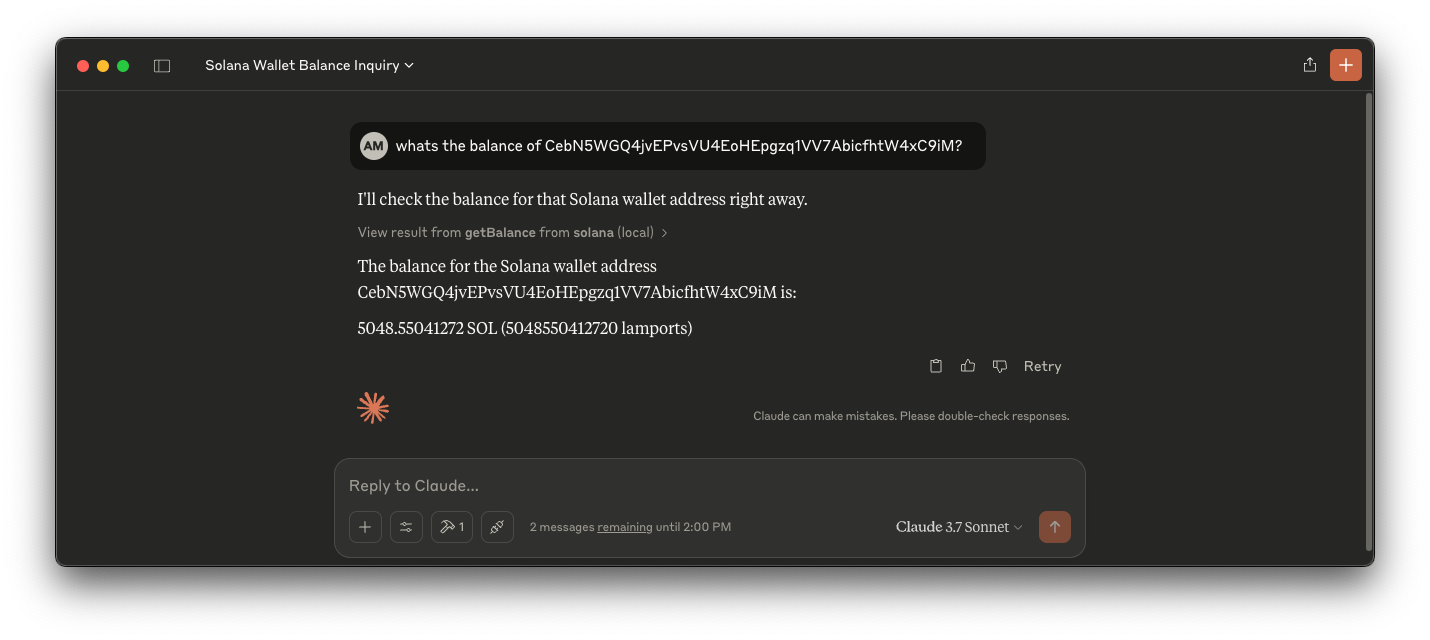
Let's test it out. Go ahead and ask Claude to fetch the balance of your wallet (e.g., "whats the balance of CebN5WGQ4jvEPvsVU4EoHEpgzq1VV7AbicfhtW4xC9iM?"). After thinking for a moment, Claude should ask for permission to use the MCP Tool:
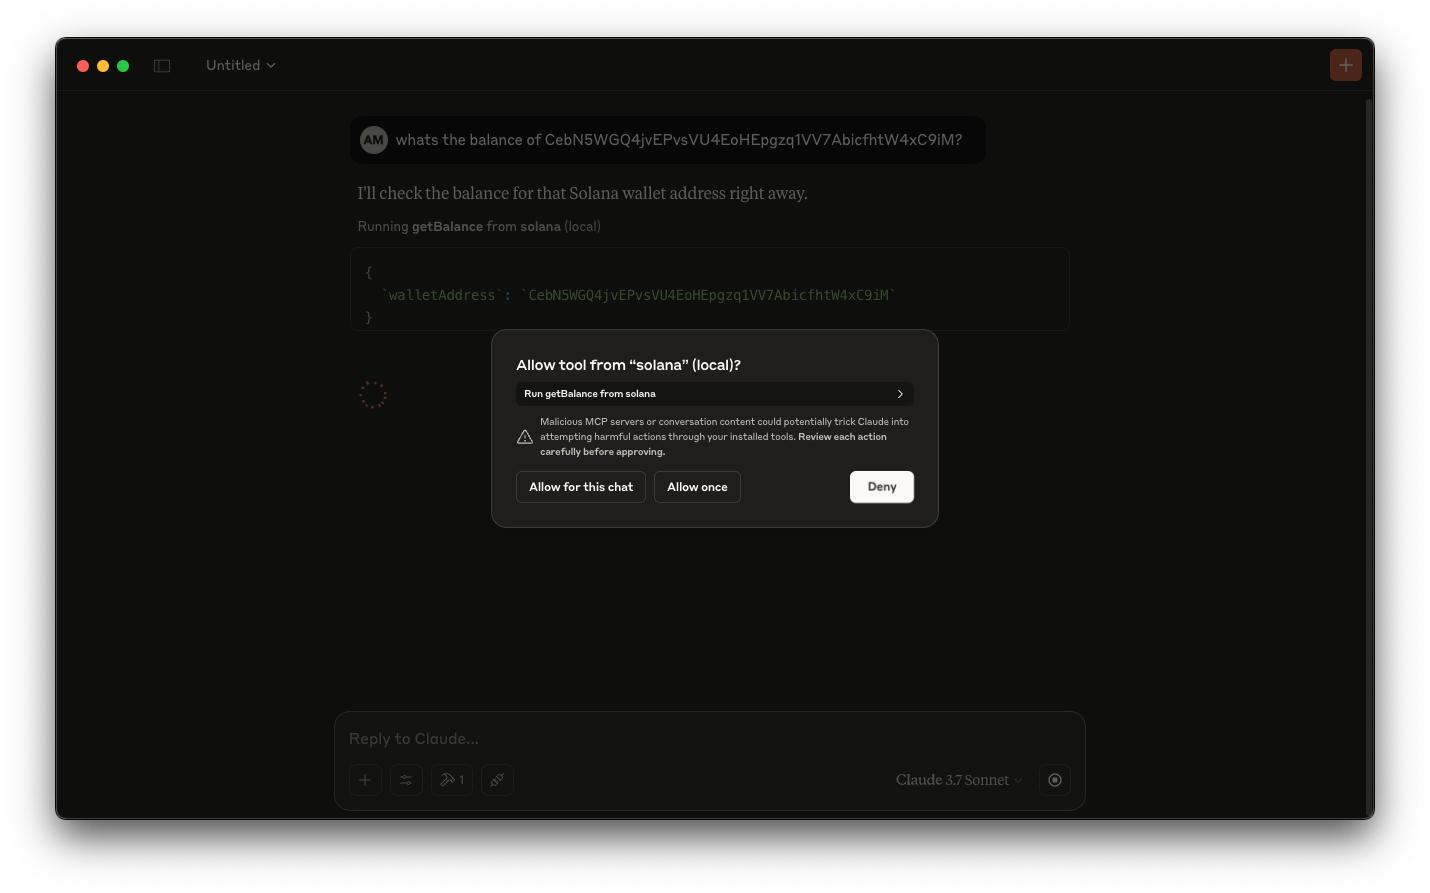
Click to allow the tool to be used, and Claude should fetch the data from the blockchain and return it in your response:
Congratulations! You've successfully created a basic Solana MCP server and integrated it with Claude Desktop.
Enhance Your MCP Server
Now that the basic integration is working, let's enhance our server with more capabilities. We'll add:
- A tool to retrieve token accounts
- A tool to check network status
- A tool to get transaction details
- A tool to get account information
- A simple resource example
- Helpful prompts for common tasks
Adding these is straightforward--all we have to do is register each with a single method call. Let's go through each one--feel free to skip around and only implement the ones you want.
Token Accounts Tool
We already have a tool to get a user's SOL balance, but what if we also want their token balances. Our token accounts tool will allow us to retrieve all token accounts for a given wallet address. Add the following code to src/index.ts:
server.tool(
  "getTokenAccounts",
  {
    walletAddress: z
      .string()
      .describe("Solana wallet address to check token accounts for"),
  },
  async ({ walletAddress }) => {
    try {
      assertIsAddress(walletAddress);

      const accounts = await Promise.all([
        solanaRpc
          .getTokenAccountsByOwner(
            walletAddress,
            { programId: SPL_PROGRAM_KEYS.TOKEN_PROGRAM },
            { encoding: "jsonParsed" },
          )
          .send(),
        solanaRpc
          .getTokenAccountsByOwner(
            walletAddress,
            { programId: SPL_PROGRAM_KEYS.TOKEN_2022_PROGRAM },
            { encoding: "jsonParsed" },
          )
          .send(),
      ]);
      const tokenAccounts = accounts.flat();

      const tokenAccountDetails = tokenAccounts.flatMap((account) => {
        return account.value.map((account) => {
          const address = account.pubkey;
          const mint = account.account.data.parsed.info.mint;
          const amount = account.account.data.parsed.info.tokenAmount.uiAmount;
          const decimals =
            account.account.data.parsed.info.tokenAmount.decimals;
          return { address, mint, amount, decimals };
        });
      });

      // Format data as a markdown table
      let markdownTable = "| Token Address | Mint | Amount | Decimals |\n";
      markdownTable += "|-------------|------|--------|----------|\n";

      tokenAccountDetails
        .filter((account) => account.amount !== null)
        .filter((account) => account.amount !== 0)
        .filter((account) => account.amount !== 1) // removing possible NFTs
        .sort((a, b) => b.amount! - a.amount!) // we already removed null and 0 amounts
        .forEach((account) => {
          markdownTable += `| ${account.address} | ${account.mint} | ${account.amount} | ${account.decimals} |\n`;
        });

      return {
        content: [
          {
            type: "text",
            text: `Found ${tokenAccountDetails.length} token accounts for ${walletAddress}`,
          },
          {
            type: "text",
            text: markdownTable,
          },
        ],
      };
    } catch (error) {
      return {
        content: [
          {
            type: "text",
            text: `Error while getting balance: ${isSolanaError(error) ? error.message : "Unknown error"}`,
          },
        ],
        isError: true,
      };
    }
  },
);
This is structurally, very similar to the getBalance tool. The main difference is that we are using the getTokenAccountsByOwner method to retrieve all token accounts for a given wallet address. We have included support for both the legacy SPL Token Program and Token 2022 Program. Because the response can be quite large, we are filtering out any accounts with a balance of 0 or 1 (which is likely an NFT) and doing some processing to format a subset of the data into a markdown table. Feel free to experiement with different response structures to see what works best for your use case.
Network Status Tool
Next, let's add a tool to check the network status. This tool will return the current epoch, block height, and slot number. Add the following code to src/index.ts:
server.tool("networkStatus", {}, async () => {
  try {
    await solanaRpc.getHealth().send();
  } catch (error) {
    return {
      content: [
        {
          type: "text",
          text: `Network is down`,
        },
      ],
    };
  }
  try {
    const { epoch, blockHeight, absoluteSlot } = await solanaRpc
      .getEpochInfo()
      .send();

    const status = {
      health: "okay",
      currentEpoch: epoch.toString(),
      blockHeight: blockHeight.toString(),
      currentSlot: absoluteSlot.toString(),
    };

    return {
      content: [
        {
          type: "text",
          text: JSON.stringify(status, null, 2),
        },
      ],
    };
  } catch (error) {
    return {
      content: [
        {
          type: "text",
          text: `Error while getting network status: ${isSolanaError(error) ? error.message : "Unknown error"}`,
        },
      ],
      isError: true,
    };
  }
});
Here we are actually doing two RPC calls. The first is a simple health check to see if the network is up. If this returns an error, we return a simple message saying the network is down. If it is up, we call getEpochInfo to get the current epoch, block height, and slot number. We return this data in a JSON format. Note that we convert bigint values to strings to avoid serialization issues with JSON.stringify.
Transaction Details Tool
Next, let's add a tool to get transaction details. This tool will take a transaction signature as input and return the transaction details. Add the following code to src/index.ts:
server.tool(
  "getTransaction",
  {
    signature: z.string().describe("Solana transaction signature to look up"),
  },
  async ({ signature }) => {
    try {
      assertIsSignature(signature);
    } catch (error) {
      return {
        content: [
          {
            type: "text",
            text: `not a vaid signature: ${signature}`,
          },
        ],
        isError: true,
      };
    }
    try {
      const transaction = await solanaRpc
        .getTransaction(signature, {
          maxSupportedTransactionVersion: 0,
          encoding: "json",
        })
        .send();

      if (!transaction) {
        return {
          content: [
            { type: "text", text: `Transaction ${signature} not found` },
          ],
          isError: true,
        };
      }

      const programIndices = transaction.transaction.message.instructions.map(
        (instruction) => instruction.programIdIndex,
      );
      const programsInvoked = programIndices.map((index) => {
        const programId = transaction.transaction.message.accountKeys[index];
        return programId.toString();
      });

      // Format the transaction data for readability
      const formattedTx = {
        signature,
        computeUnits: transaction.meta?.computeUnitsConsumed?.toString(),
        logs: transaction.meta?.logMessages,
        accountKeys: transaction.transaction.message.accountKeys,
        programsInvoked: programsInvoked,
        instructions: transaction.transaction.message.instructions,
        slot: transaction.slot.toString(),
        blockTime: transaction.blockTime
          ? new Date(Number(transaction.blockTime) * 1000).toISOString()
          : null,
        fee: transaction.meta?.fee.toString(),
        status: transaction.meta?.err ? "Failed" : "Success",
        preBalances: transaction.meta?.preBalances.map((balance) =>
          balance.toString(),
        ),
        postBalances: transaction.meta?.postBalances.map((balance) =>
          balance.toString(),
        ),
        preTokenBalances: transaction.meta?.preTokenBalances,
        postTokenBalances: transaction.meta?.postTokenBalances,
      };

      return {
        content: [
          {
            type: "text",
            text: `Transaction ${signature}:\n${JSON.stringify(formattedTx, null, 2)}`,
          },
        ],
      };
    } catch (error) {
      return {
        content: [
          {
            type: "text",
            text: `Error while getting balance: ${isSolanaError(error) ? error.message : "Unknown error"}`,
          },
        ],
        isError: true,
      };
    }
  },
);
Similar to our balance checkers, we can use a Solana Kit assertion to verify our params (in this case, assertIsSignature). We then call the getTransaction method to retrieve the transaction details. We are parsing the data and only returning a subset of the data that we think will be useful to the LLM to analyze a transaction. In thise case, are extracting the program IDs invoked in the transaction, transaction signature, compute units consumed, logs, account keys, programs invoked, instructions, slot number, block time, fee, status, pre-balances, post-balances, and pre/post token balances. Like last tool, we are making sure to convert bigint values to strings to avoid serialization issues.
As you experiment with MCPs, you might consider expanding on the response data a bit by leveraging IDLs to parse instruction data or adding any other additional context/mappings that you think would be useful.
Account Information Tool
Next, let's add a tool to get account information. This tool will take an account address as input and return the account information. Add the following code to src/index.ts:
server.tool(
  "getAccountInfo",
  {
    walletAddress: z
      .string()
      .describe("Solana wallet address to check account information for"),
  },
  async ({ walletAddress }) => {
    try {
      assertIsAddress(walletAddress);
      const accountAddress = address(walletAddress);

      const { value: accountInfo } = await solanaRpc
        .getAccountInfo(accountAddress)
        .send();

      if (!accountInfo) {
        return {
          content: [
            {
              type: "text",
              text: `Account ${walletAddress} not found or has no SOL balance`,
            },
          ],
          isError: true,
        };
      }

      const info = {
        executable: accountInfo.executable,
        lamports: accountInfo.lamports.toString(),
        owner: accountInfo.owner.toString(),
        rentEpoch: accountInfo.rentEpoch.toLocaleString(),
        space: accountInfo.data.length,
      };

      return {
        content: [
          {
            type: "text",
            text: JSON.stringify(info, null, 2),
          },
        ],
      };
    } catch (error) {
      console.error("Error fetching account info:", error);
      return {
        content: [
          {
            type: "text",
            text: `Error while getting account info: ${isSolanaError(error) ? error.message : "Unknown error"}`,
          },
        ],
        isError: true,
      };
    }
  },
);
These patters should be familiar by now. We are using the getAccountInfo method to retrieve the account information.
Resource Example
Resources in MCP provide a way for servers to expose structured data that can be referenced and used by LLMs. Unlike tools, which execute operations when called, resources are more like "read-only endpoints" that expose data in a standardized format. They're identified by URIs (Uniform Resource Identifiers) that follow schemes like file://, https://, or custom schemes like solana:// in our example.
Here's a consolidated example of how you might pull in a documentation resource into your server. This is a condensed version of the content from our Solana transaction optimization docs:
server.resource(
  "transaction-optimization",
  "solana://docs/transaction-optimization",
  async (uri) => {
    const optimizationGuide = {
      title: "Solana Transaction Optimization Strategies",
      strategies: {
        priority_fees: {
          description: "Increase transaction priority in validator queues",
          implementation:
            "Use ComputeBudgetProgram.setComputeUnitPrice({microLamports})",
          best_practice:
            "Use QN Priority Fee API to determine optimal fee based on network conditions",
        },
        compute_units: {
          description:
            "Optimize compute unit usage to prevent transaction drops",
          current_limits: {
            per_block: "48 million",
            per_account_per_block: "12 million",
            per_transaction: "1.4 million",
            transaction_default: "200,000",
          },
          implementation:
            "Use ComputeBudgetProgram.setComputeUnitLimit({units}) after simulation",
        },
        transaction_assembly: {
          steps: [
            "Create transaction with instructions",
            "Fetch and add priority fees",
            "Simulate transaction to determine compute usage",
            "Set compute limit based on simulation",
            "Add recent blockhash",
            "Sign and send",
          ],
        },
        jito_bundles: {
          description: "Bundle multiple transactions for atomic execution",
          requires: "SOL transfer to Jito Tip Account",
        },
        confirmation: {
          description: "Poll transaction status to ensure it landed",
          method: "Use getSignatureStatuses and implement retry logic",
        },
      },
      moreInfo: "https://www.quicknode.com/docs/solana/transactions",
    };

    return {
      contents: [
        {
          uri: uri.href,
          text: JSON.stringify(optimizationGuide, null, 2),
        },
      ],
    };
  },
);
This resource provides a structured overview of transaction optimization strategies for Solana. The LLM can use this resource to answer questions about transaction optimization without needing to call a tool or API. The URI scheme (solana://) indicates that this is a custom resource type, and the contents are returned in a structured format.
Helpful Prompts
Prompts in MCP are pre-defined message templates that help guide AI interactions with your tools and resources. Unlike tools (which execute code) or resources (which provide data), prompts are recipes that structure how the LLM should approach specific tasks.
Let's add some helpful prompts to guide the LLM in using our tools. Add the following code to src/index.ts:
server.prompt(
  "analyze-wallet",
  { walletAddress: z.string() },
  ({ walletAddress }) => ({
    description:
      "Analyze a Solana wallet address and provide a summary of its balances and activity",
    messages: [
      {
        role: "user",
        content: {
          type: "text",
          text: `Please analyze this Solana wallet address: ${walletAddress}

1. What is the SOL balance of this wallet?
2. What token balances does this wallet hold?
3. Provide a summary of recent activity if possible.`,
        },
      },
    ],
  }),
);

server.prompt(
  "explain-transaction",
  { signature: z.string() },
  ({ signature }) => ({
    description: "Analyze and explain a Solana transaction in simple terms",
    messages: [
      {
        role: "user",
        content: {
          type: "text",
          text: `Please analyze this Solana transaction signature: ${signature}

1. Was this transaction successful?
2. What type of transaction is this? (e.g., token transfer, swap, NFT mint)
3. What accounts were involved?
4. Explain what happened in simple terms.`,
        },
      },
    ],
  }),
);
Each prompt consists of:
- A unique name (like "analyze-wallet")
- Parameter schema (using Zod for type validation)
- A function that generates message content based on those parameters
When users select a prompt in Claude Desktop, they're presented with a form to fill in the parameters. Once submitted, Claude receives the formatted message template and responds accordingly. Prompts are particularly useful for:
- Standardizing common workflows
- Ensuring clients approaches tasks consistently
- Helping users formulate effective queries
- Guiding clients to use your tools in the most efficient sequence
Build Your Server Again
Now that we have added all of our tools, resources, and prompts, let's build the server again:
npm run build
Test Your Enhanced MCP Server
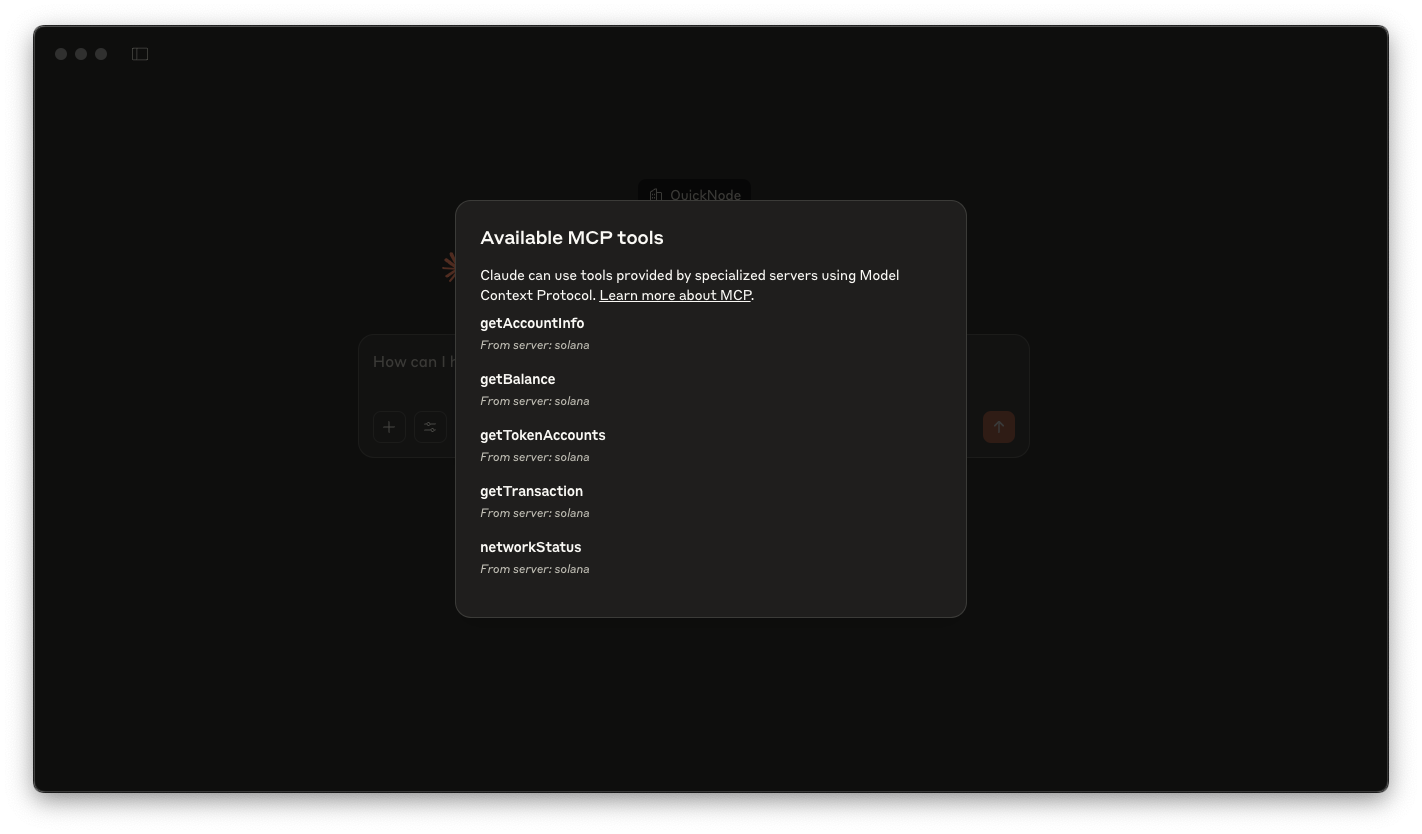
Now that we've expanded our server's capabilities, let's test the new features with Claude Desktop. Make sure you close Claude Desktop and reopen it to restart the server after our configuration changes. Upon opening Claude Desktop, you should see your tools menu now has all 5 tools available:
Feel free to test this out a bit--you can try things like:
- What's the Status of the Solana Network?
- Create a table of the tokens in this walllet: XYZ...ABC
- Give me the transaction information about: XYZ...ABC
- Tell me the account information for: XYZ...ABC
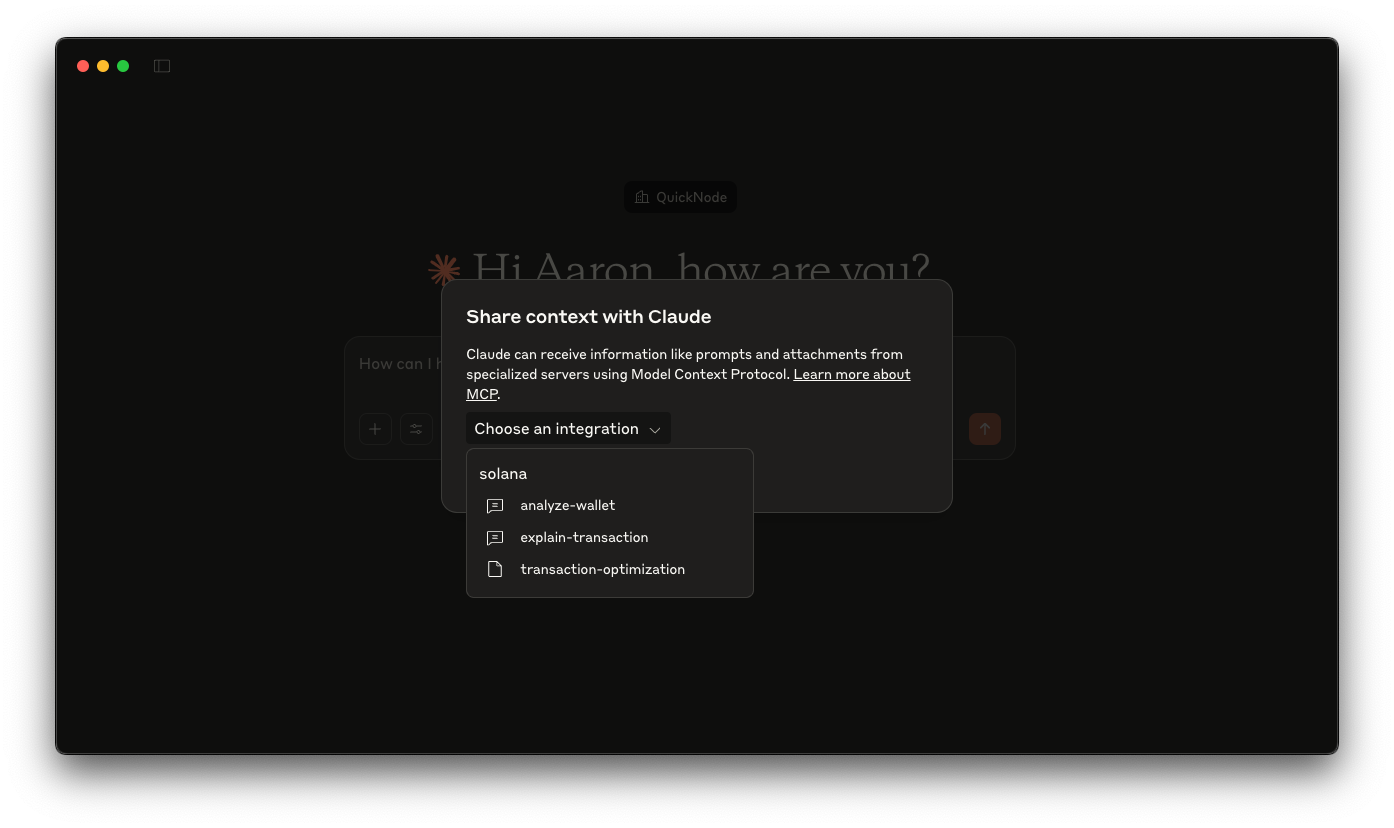
You should also notice a 🔌 "Attach from MCP" button. Click it, and you should see your resource and prompts available for use:
If you click on one of your prompts, you should see a form that allows you to fill in the parameters (e.g., wallet address or txid):
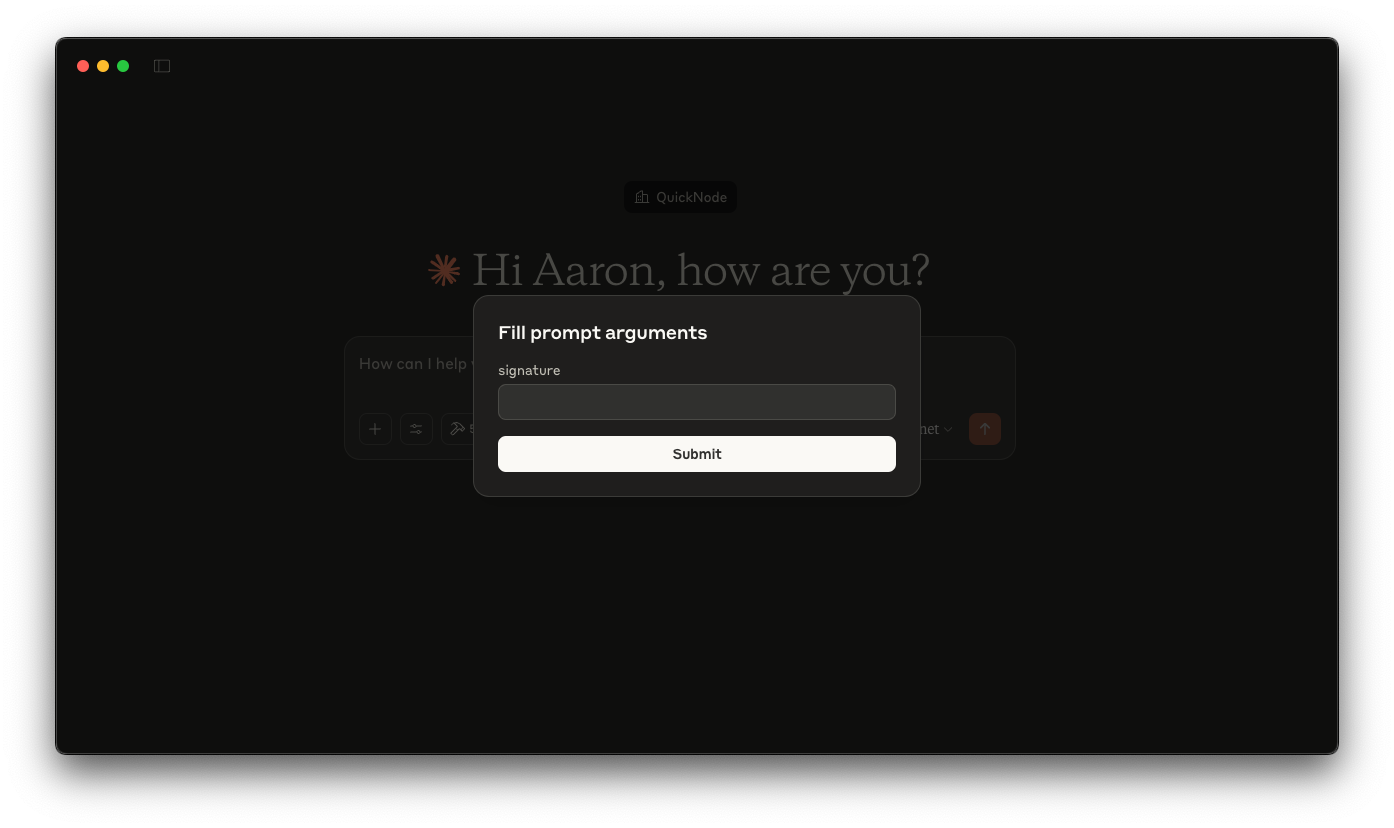
Once you fill in the parameters and click "Submit", Claude will use the prompt to generate a message (leveraging the necessary tools) and respond accordingly. Give it a shot.
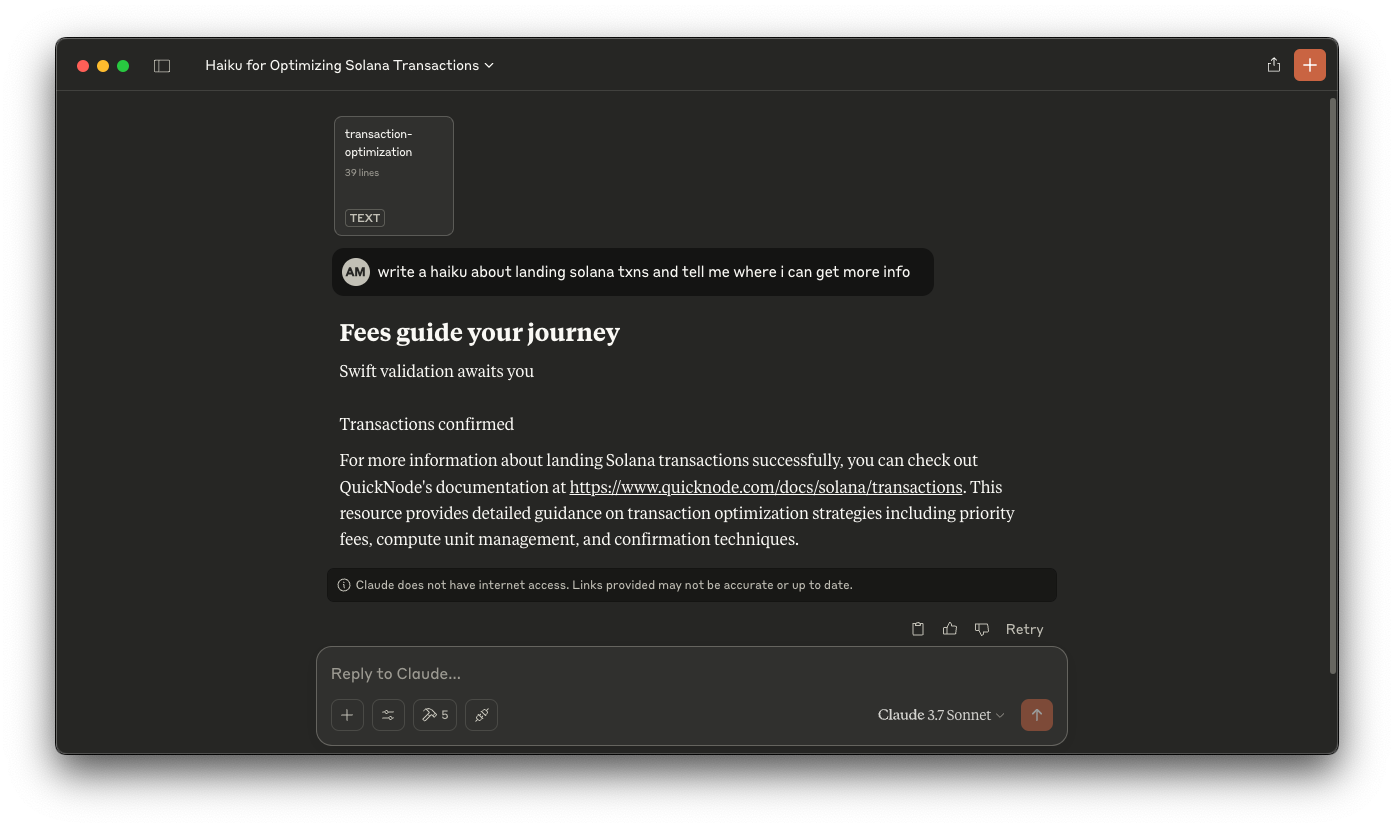
Finally, we can test our resource. You can do this by adding the transaction-optimization in your prompt and then asking Claude something relevant to it. Give it a shot:
Great job!
Wrap Up
You've successfully built a Solana MCP server that enhances LLMs' capabilities with blockchain functionality. This integration allows Claude to interact directly with the Solana blockchain—checking balances, retrieving token information, examining transactions, and more. By combining the natural language understanding of an AI assistant with the data access capabilities of an MCP server, you've created a powerful tool for blockchain interaction. Whether you're a developer, trader, or just curious about Solana, this integration makes blockchain data more accessible and easier to understand. The MCP framework is flexible and extensible, so you can continue to enhance your server with additional capabilities as your needs evolve. The possibilities are virtually limitless—from simple data queries to complex analytics, transaction construction (with appropriate security measures), and agent assembly. We hope this guide helps you get started with MCP and Solana integration. Want to expand what you've already built? Here are some ideas for continued development:
Expanding Your Solana MCP Server
Now that you have a functional MCP server, here are some ideas for further enhancements:
- Token Metadata Retrieval: Use QuickNode's DAS API to fetch NFTs and token metadata from sources to display names, symbols, and logos alongside token balances.
- Price Information: Integrate with the CoinGecko API or Metis Jupiter API to provide current prices for SOL and SPL tokens.
- Transaction History: Implement a tool to fetch recent transactions for a wallet address.
- Parse Your Program's Account and Transaction Data: Since we built this MCP with Solana Kit, you can generate a client for your own programs with Codama and integrate your Program's codecs into your MCP server.
- Stake Account Information: Add tools to retrieve information about stake accounts and delegation status (Sample use of Fetching Stake Accounts with Solana Kit)
- Integrate QuickNode Add-ons for extended functionality
Get creative! We're excited to see what you build. If you have any questions or need help, feel free to reach out to us on Discord or Twitter.
Additional Resources
- Code for this Guide
- Model Context Protocol Documentation
- Solana Docs
- Solana Kit Documentation
- MCP Inspector - A helpful tool for debugging your MCP server
- MCP Security Considerations - Important security considerations when building your MCP server
We ❤️ Feedback!
Let us know if you have any feedback or requests for new topics. We'd love to hear from you.