12 min read
Overview
Prefer a video walkthrough? Follow along with Sahil and learn how Wormhole protocol works and how it can be used to transfer cross-chain messages.
Building cross-chain infrastructure can be time-consuming and complex. Fortunately, Wormhole helps developers and businesses create cross-chain infrastructure to send/receive information like messages and arbitrary data.
In this guide, we'll learn how to build a cross-chain messaging application that can send messages between Avalanche Fuji and Ethereum Sepolia testnets. We'll use Quicknode to gain access to blockchain nodes, Foundry for smart contract development, and Wormhole's messaging protocol to enable secure cross-chain communication.
Let's get started!
What You Will Need
- A Quicknode account
- Foundry installed
- Node.js installed
- You will need tokens on Ethereum Sepolia and Avalanche Fuji testnets (use the Quicknode Multi-Chain Faucet
- An .env file with your private key
What You Will Do
- Set up a development environment with Foundry and Node.js
- Create Quicknode RPC endpoints for Avalanche Fuji and Ethereum Sepolia
- Deploy sender and receiver smart contracts on different chains
- Configure cross-chain message passing using Wormhole
- Test the messaging system by sending cross-chain messages
- Monitor the transaction using Wormhole Explorer
| Dependency | Version |
|---|---|
| node.js | v22.12.0 |
| forge | forge 0.3.0 |
What is Wormhole?
Wormhole is a messaging protocol that enables communication between different blockchain networks. It acts as a cross-chain communication infrastructure layer that allows developers to build interoperable applications across multiple chains.
Key features of Wormhole include:
- Support for 20+ blockchain networks including Ethereum, Avalanche, Solana, and more
- Fast and secure message delivery with cryptographic verification
- Developer-friendly SDKs and tools
- Chain-agnostic architecture allowing seamless integration
- Battle-tested security with multiple audits
How Cross-Chain Messaging with Wormhole Works
Cross-chain messaging through Wormhole follows these key steps:
-
Message Initiation: The process begins when a user or contract on the source chain (e.g., Avalanche) calls a function that triggers a message to be sent through Wormhole. This message contains the payload data and destination chain information.
-
Guardian Network: Wormhole's decentralized Guardian network observes the source chain for these messages. When a message is detected, the Guardians:
- Verify the validity of the message
- Reach consensus on the message content
- Create and sign a Verified Action Approval (VAA)
-
Message Delivery: Once the VAA is created:
- The signed message can be retrieved by the recipient
- Anyone can submit the VAA to the target chain (e.g., Ethereum)
- The receiving contract verifies the VAA's signatures
- If valid, the message is processed and the intended action is executed
-
Message Processing: On the destination chain:
- The receiver contract implements Wormhole's
IWormholeReceiverinterface - It verifies the incoming message through Wormhole's core contracts
- Once verified, it processes the message contents and executes the intended logic
- The receiver contract implements Wormhole's
This process ensures:
- Messages are delivered exactly once
- Message ordering is preserved
- Messages cannot be tampered with
- Only authorized senders can initiate messages
- Only intended recipients can process messages
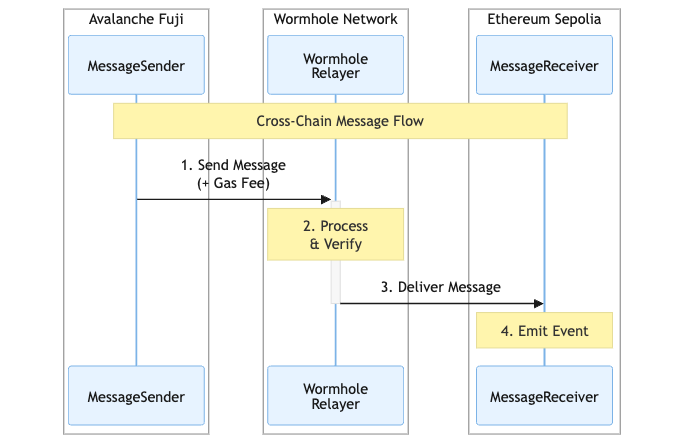
A high-level diagram of this process looks like this:

In our example app, we'll be sending messages from Avalanche Fuji to Ethereum Sepolia, but the same principles apply to any supported chain pair.
Project Prerequisite: Create a Quicknode Endpoint
Before getting into the code, let's set up some prerequisites like getting the RPC URLs we need. You're welcome to use public nodes or deploy and manage your own infrastructure; however, if you'd like 8x faster response times, you can leave the heavy lifting to us. Sign up for an account here.
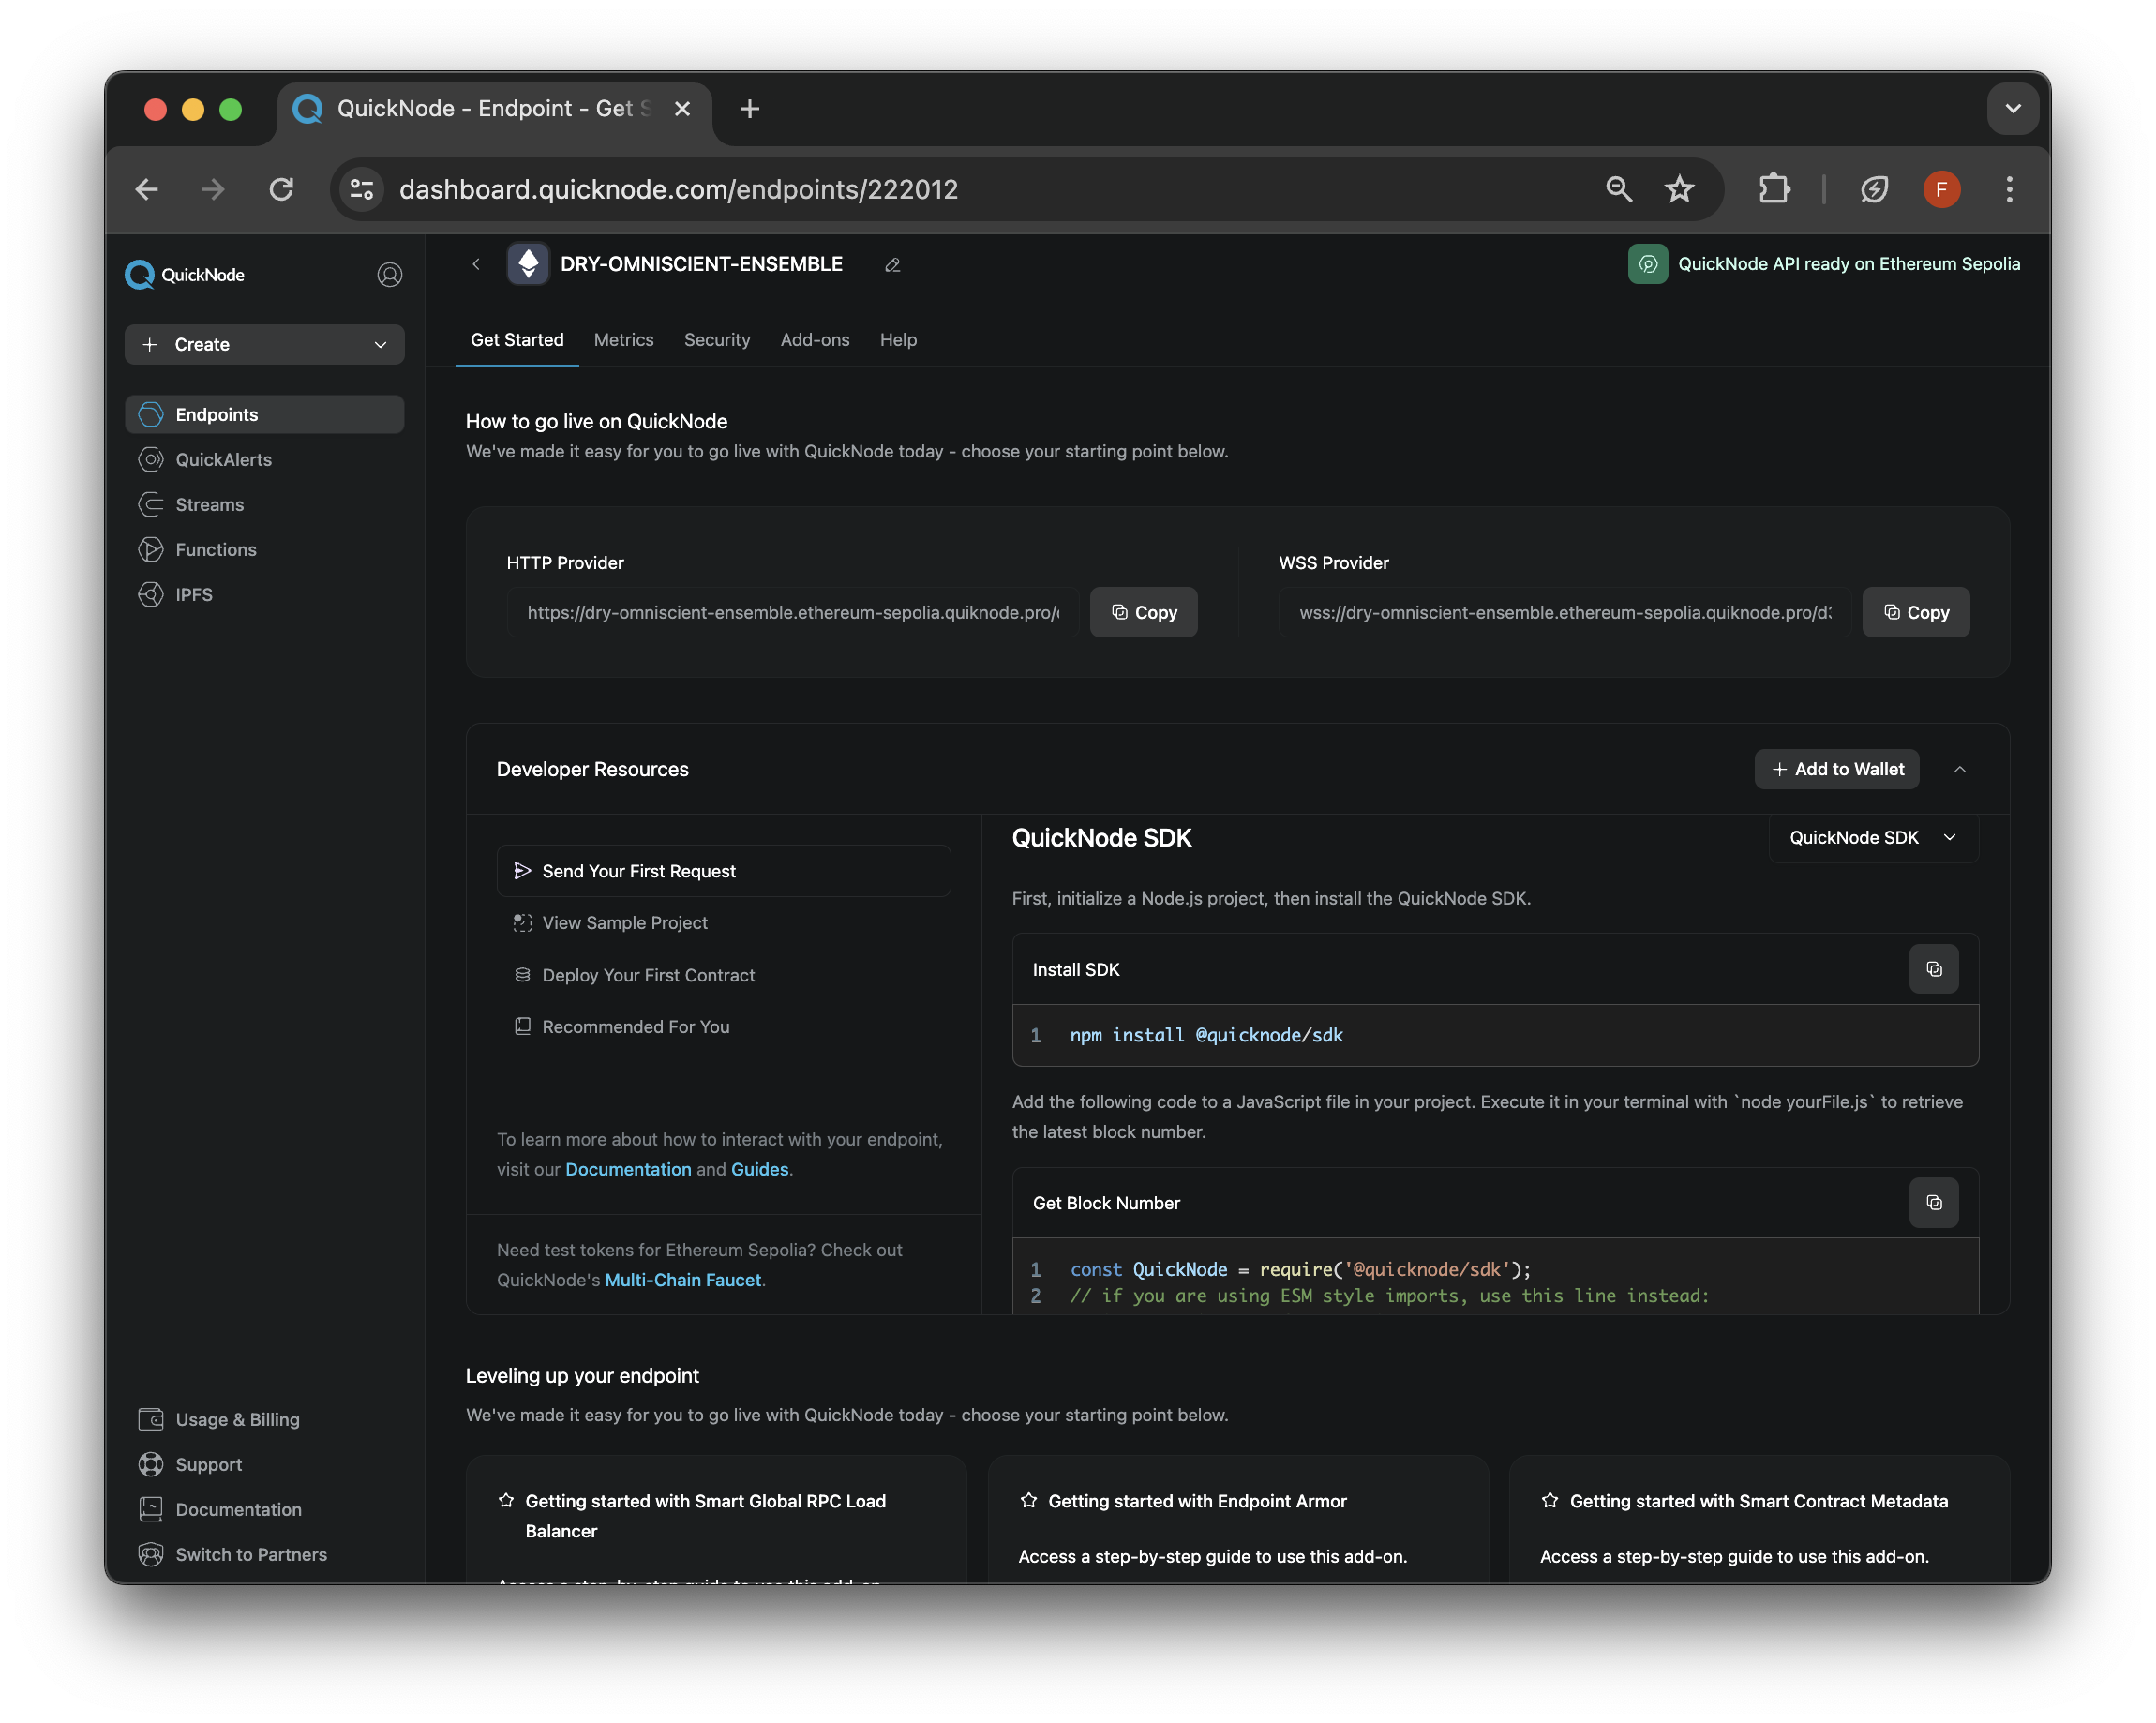
Once logged into Quicknode, click the Create an endpoint button, then select the Ethereum chain and Sepolia network.
After creating your endpoint, copy the HTTP Provider URL link and keep it handy, as you'll need it later. Now, do the same steps for the Avalanche chain and Fuji testnet network before moving onto the next section.

Project Prequisites: Create and Fund an EVM Wallet
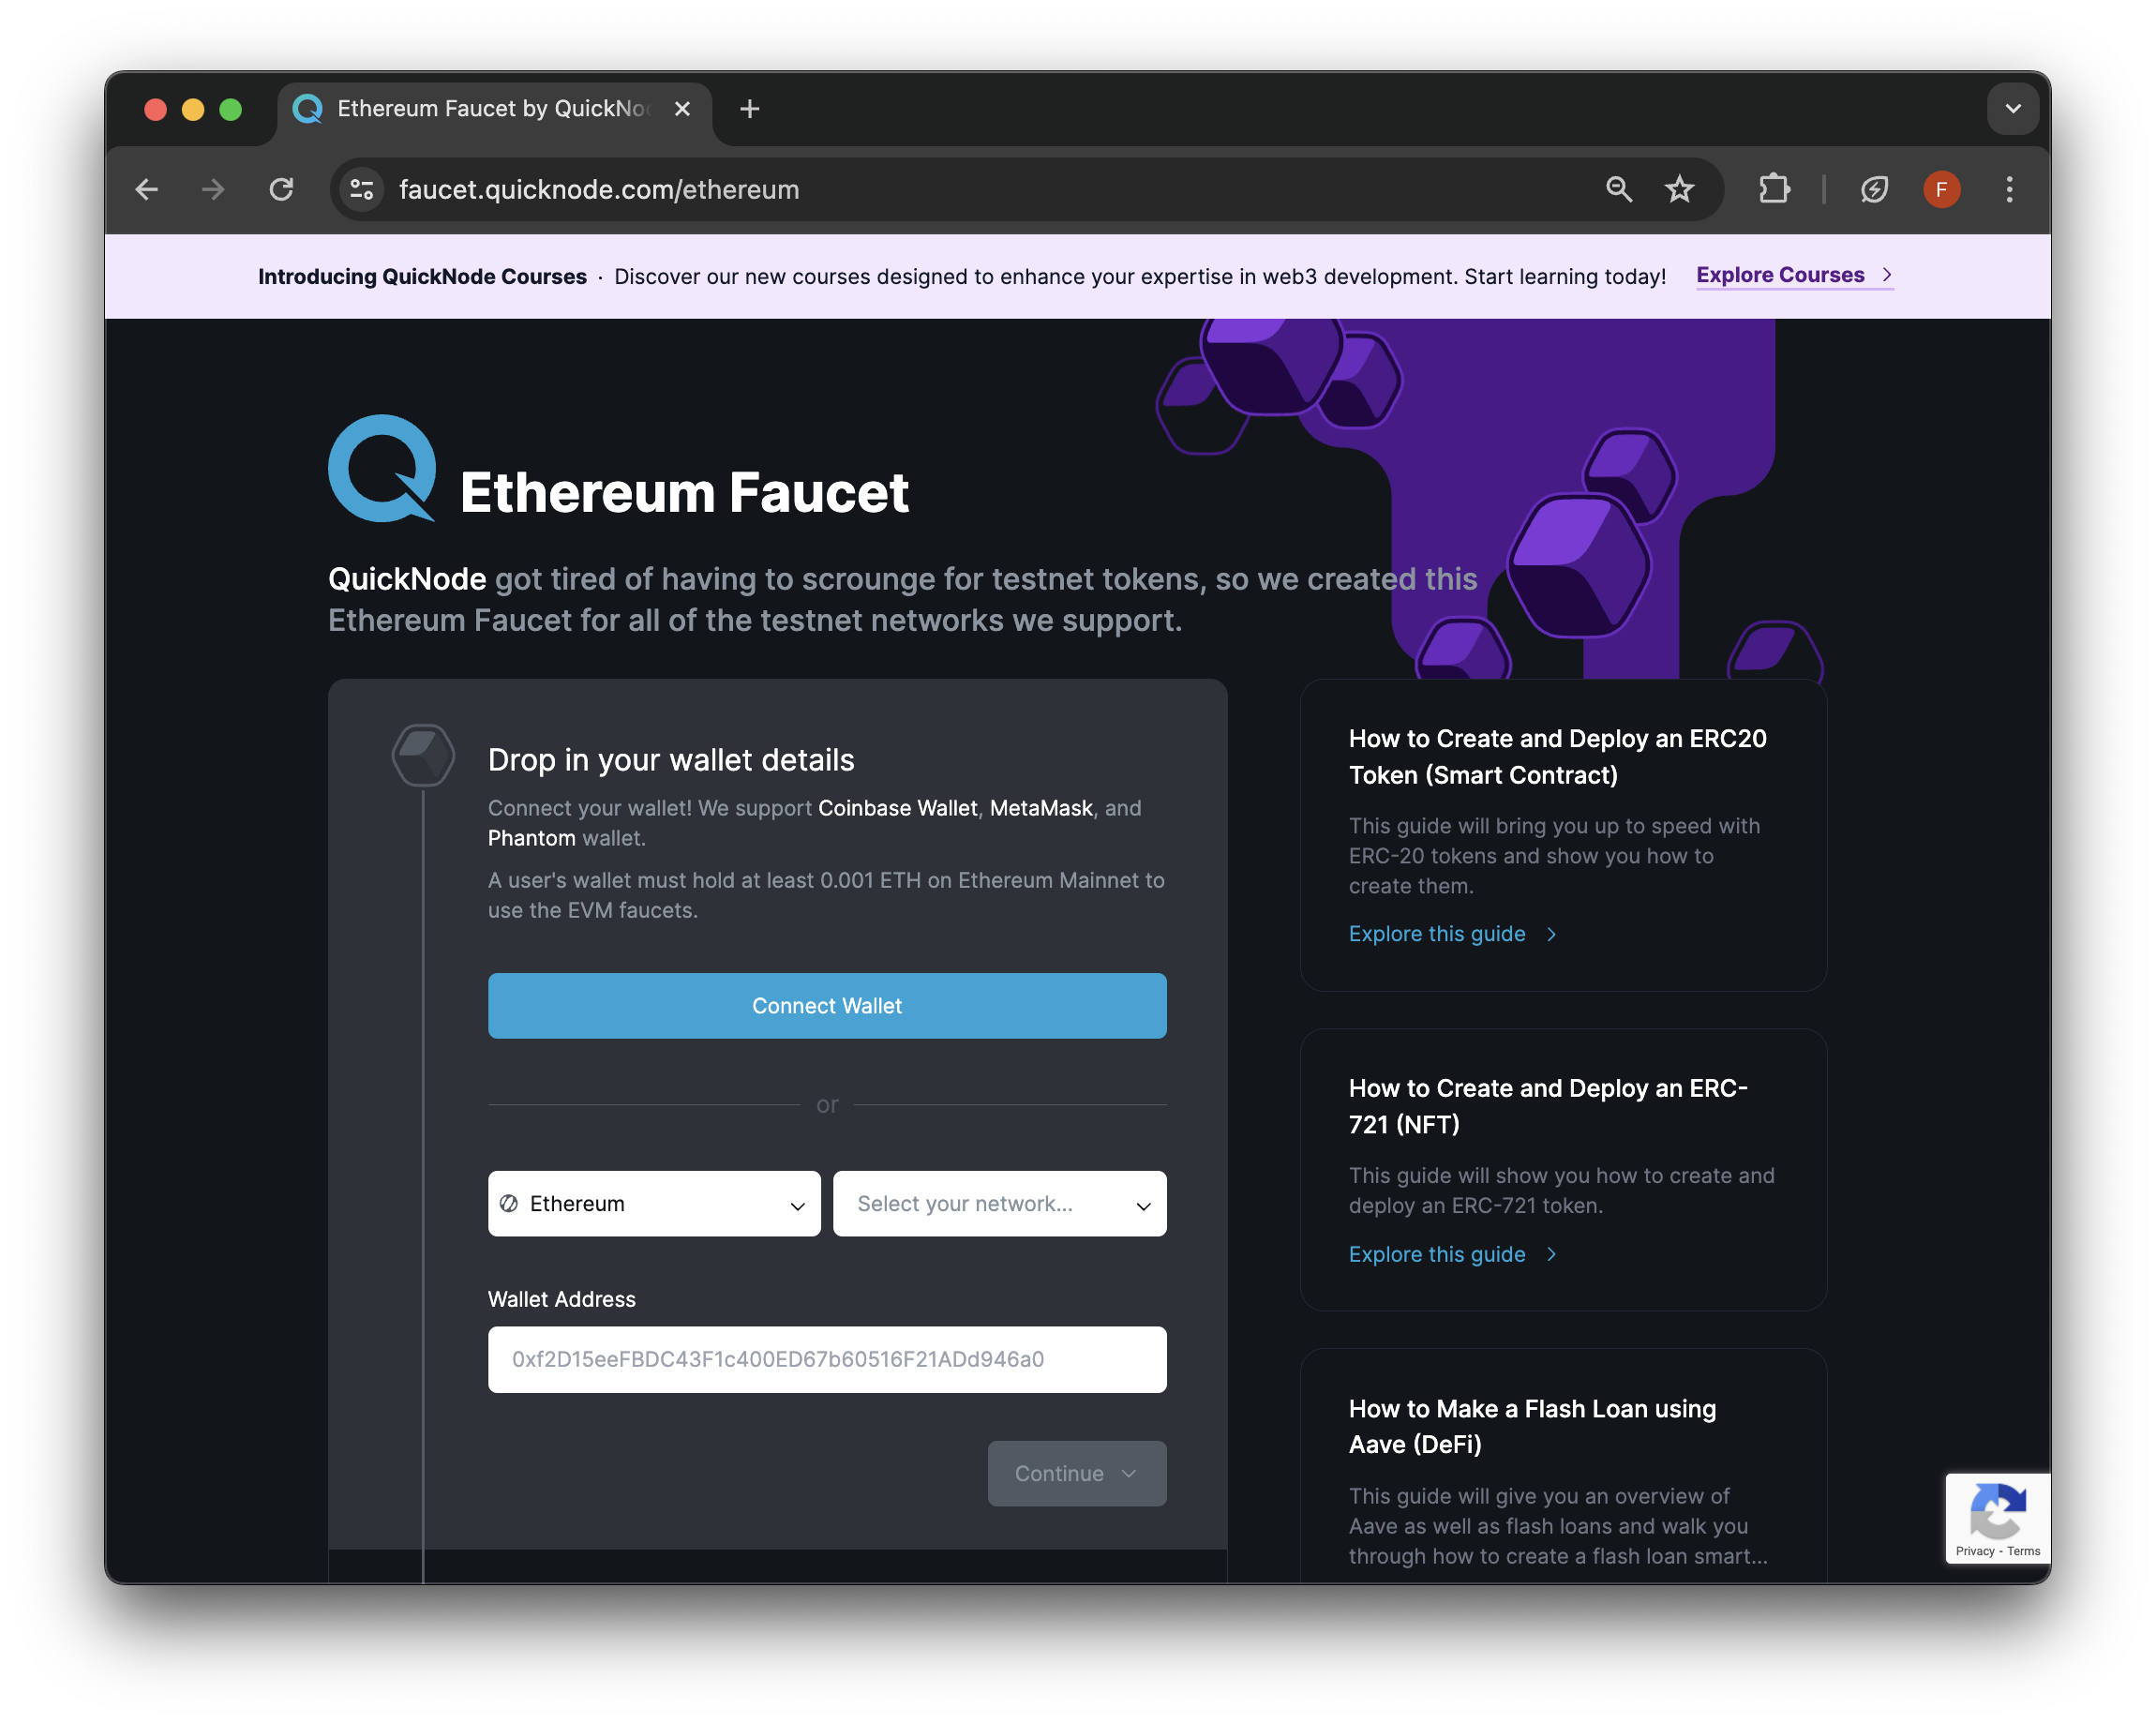
To conduct cross-chain messages, you'll need both Sepolia ETH and Fuji AVAX to cover gas fees on their respective networks. You can obtain these test tokens for free from the Multi-Chain Quicknode Faucet.
Navigate to the Multi-Chain Quicknode Faucet and connect your wallet (e.g., MetaMask, Coinbase Wallet) or paste in your wallet address to retrieve test ETH. Note that there is a mainnet balance requirement of 0.001 ETH on Ethereum Mainnet to use the EVM faucets. You can also tweet or log in with your Quicknode account to get a bonus!

Building the Cross-Chain Messaging App
For this guide, we'll be using the demo-wormhole-messaging sample app created by Wormhole.
Our project structure will look like this:
script/ - deployment and interaction scripts
deploy-config/ - chain configuration and deployed contract addresses
out/ - compiled contract artifacts
lib/ - external dependencies (auto-managed by Foundry)
test/ - unit tests for smart contracts
Before getting into the meat of the code, let's cover the architecture of how the smart contracts we deploy will relay messages from one chain to another.
Smart Contract Architecture
Our cross-chain messaging system consists of three main contracts:
- MessageSender.sol - Deployed on the source chain (Avalanche Fuji)
- MessageReceiver.sol - Deployed on the destination chain (Ethereum Sepolia)
- WormholeRelayer.sol - Deployed by Wormhome itself and is the contract that all messages pass through. We won't need to deploy this as we'll be using the one deployed by Wormhole.
Message Sender Contract
Now, let's get into the details of each contract. The sender contract is responsible for initiating cross-chain messages. Here's the contract code:
// SPDX-License-Identifier: MIT
pragma solidity ^0.8.18;

import "lib/wormhole-solidity-sdk/src/interfaces/IWormholeRelayer.sol";

contract MessageSender {
    IWormholeRelayer public wormholeRelayer;
    uint256 constant GAS_LIMIT = 50000; // Adjust the gas limit as needed

    `constructor`(address _wormholeRelayer) {
        wormholeRelayer = IWormholeRelayer(_wormholeRelayer);
    }

    function quoteCrossChainCost(uint16 targetChain) public view returns (uint256 cost) {
        (cost,) = wormholeRelayer.quoteEVMDeliveryPrice(targetChain, 0, GAS_LIMIT);
    }

    function sendMessage(uint16 targetChain, address targetAddress, string memory message) external payable {
        uint256 cost = quoteCrossChainCost(targetChain); // Dynamically calculate the cross-chain cost
        require(msg.value >= cost, "Insufficient funds for cross-chain delivery");

        wormholeRelayer.sendPayloadToEvm{value: cost}(
            targetChain,
            targetAddress,
            abi.encode(message, msg.sender), // Payload contains the message and sender address
            0, // No receiver value needed
            GAS_LIMIT // Gas limit for the transaction
        );
    }
}
The important things to know are:
- We import the
IWormholeRelayer.solrelayer interface via the Wormhole SDK. - The
constructortakes in the_wormholeRelayeraddress upon deployment. - The
quoteCrossChainCostfunction returns us a cost estimate of our cross-chain message transfer based on thetargetChain. - The
sendMessagefunction is the main function and takes atargetChain,targetAddress, andmessage. Note that you can also send data assets (e.g., tokens, NFTs) but this is done via entities, a seperate workflow.
Message Receiver Contract
The receiver contract handles incoming messages on the destination chain. Here is the contract code:
// SPDX-License-Identifier: MIT
pragma solidity ^0.8.18;

import "lib/wormhole-solidity-sdk/src/interfaces/IWormholeRelayer.sol";
import "lib/wormhole-solidity-sdk/src/interfaces/IWormholeReceiver.sol";

contract MessageReceiver is IWormholeReceiver {
    IWormholeRelayer public wormholeRelayer;
    address public registrationOwner;

    // Mapping to store registered senders for each chain
    mapping(uint16 => bytes32) public registeredSenders;

    event MessageReceived(string message);
    event SourceChainLogged(uint16 sourceChain);

    constructor(address _wormholeRelayer) {
        wormholeRelayer = IWormholeRelayer(_wormholeRelayer);
        registrationOwner = msg.sender;  // Set contract deployer as the owner
    }

    // Modifier to check if the sender is registered for the source chain
    modifier isRegisteredSender(uint16 sourceChain, bytes32 sourceAddress) {
        require(registeredSenders[sourceChain] == sourceAddress, "Not registered sender");
        _;
    }

    // Function to register the valid sender address for a specific chain
    function setRegisteredSender(uint16 sourceChain, bytes32 sourceAddress) public {
        require(msg.sender == registrationOwner, "Not allowed to set registered sender");
        registeredSenders[sourceChain] = sourceAddress;
    }

    // Update receiveWormholeMessages to include the source address check
    function receiveWormholeMessages(
        bytes memory payload,
        bytes[] memory, // additional VAAs (optional, not needed here)
        bytes32 sourceAddress,
        uint16 sourceChain,
        bytes32 // delivery hash
    )
        public
        payable
        override
        isRegisteredSender(sourceChain, sourceAddress)
    {
        require(msg.sender == address(wormholeRelayer), "Only the Wormhole relayer can call this function");

        // Decode the payload to extract the message
        (string memory message) = abi.decode(payload, (string));

        // Example use of sourceChain for logging
        if (sourceChain != 0) {
            emit SourceChainLogged(sourceChain);
        }

        // Emit an event with the received message
        emit MessageReceived(message);
    }
}
Let's recap the code:
- We again import the
IWormholeRelayer.solrelayer interface via the Wormhole SDK, and additionally theIWormholeReceiverinterface. - The
constructorinitializes the contract with theIWormholeRelayerinterface and address and sets theregistrationOwneras the contract deployer. - The
isRegisteredSendermodifier checks to ensure the message is coming from a registered sender. - The
receiveWormholeMessagesfunction recieves the message from theMessageSendercontract.
To recap at a high level, this is how the flow will look:
Message Flow
- User calls
sendMessage()on the sender contract with:
- Target chain ID
- Receiver contract address
- Message content
Sendercontract:
- Calculates delivery cost
- Encodes the message
- Calls Wormhole relayer with required funds
- On the destination chain:
- Wormhole relayer calls
receiveWormholeMessages() - Receiver verifies the source and decodes the message
- Message receipt is logged via an event
Some things to note are that only registered contracts can send messages, cross-chain costs are handled automatically, and message delivery can be verified on both chains.
Now, let's move onto the technical coding portion of the guide.
Set Up Project
First, let's create a project folder and clone the project:
mkdir messaging-app && cd messaging-app
git clone git@github.com:wormhole-foundation/demo-wormhole-messaging.git # SSH
or
git clone https://github.com/wormhole-foundation/demo-wormhole-messaging.git # HTTPS
Then navigate inside the project and install the required dependencies:
cd demo-wormhole-messaging
npm install
forge install
Next, let's create an .env file with your private key within the project's root directory:
echo > .env
Remember to only use
.envfiles locally and delete them when not in use.
Then, open the file and input your private key:
PRIVATE_KEY=0x...
Before we continue we need to update the deploy-config/chains.json file, open the file and update it to match the following:
{
    "chains": [
      {
        "description": "Avalanche testnet fuji",
        "chainId": 6,
        "rpc": "YOUR_QUICKNODE_AVALANCHE-FUJI_ENDPOINT",
        "tokenBridge": "0x61E44E506Ca5659E6c0bba9b678586fA2d729756",
        "wormholeRelayer": "0xA3cF45939bD6260bcFe3D66bc73d60f19e49a8BB",
        "wormhole": "0x7bbcE28e64B3F8b84d876Ab298393c38ad7aac4C"
      },
      {
        "description": "Sepolia Testnet",
        "chainId": 10002,
        "rpc": "YOUR_QUICKNODE_SEPOLIA_ENDPOINT",
        "tokenBridge": "0xDB5492265f6038831E89f495670FF909aDe94bd9",
        "wormholeRelayer": "0x7B1bD7a6b4E61c2a123AC6BC2cbfC614437D0470",
        "wormhole": "0x4a8bc80Ed5a4067f1CCf107057b8270E0cC11A78"
      }
    ]
  }
Remember to replace the placeholders with your actual RPC URLs. Also ensure that the
/ext/bc/C/rpc/path is appended to the end of your Avalanche Fuji RPC URL (e.g., https://amazing-grace.avalanche-testnet.quiknode.pro/TOKEN/ext/bc/C/rpc/).
You'll notice that the chain IDs being used in this file is not the chain ID that corresponds to public chains ID. Instead, this chain ID is specific to the Wormhole protocol. You can see the full list of chain IDs for Wormhole here: Reference
Compile and Test Smart Contracts
In this section, we will compile and test the smart contracts for our cross-chain messaging app before we deploy them.
The project includes three main test cases:
testDeployment(): Verifies contracts deploy correctly with proper initializationtestReceiveMessage(): Ensures the receiver contract can handle incoming messagestestSendMessage(): Validates the sender contract can properly send messages
First, let's compile the smart contracts:
forge build
Now we'll run tests to ensure everything is working before deploying the smart contracts:
forge test
You will see an output similar to the following:
[⠊] Compiling...
No files changed, compilation skipped

Ran 3 tests for test/CrossChainMessagingTest.sol:CrossChainMessagingTest
[PASS] testDeployment() (gas: 13008)
[PASS] testReceiveMessage() (gas: 19766)
[PASS] testSendMessage() (gas: 20922)
Suite result: ok. 3 passed; 0 failed; 0 skipped; finished in 2.98ms (1.93ms CPU time)

Ran 1 test suite in 109.55ms (2.98ms CPU time): 3 tests passed, 0 failed, 0 skipped (3 total tests)
Deploy Smart Contracts
Next, we'll deploy the sender contract on the Avalanche Fuji testnet with the script/deploySender.js file. This is a Foundry script that at a high level does the following:
- Loads configuration for different blockchain networks from a local JSON file
- Finds the specific configuration for Avalanche's testnet (Fuji)
- Sets up an Ethereum provider and wallet using environment variables for the private key
- Loads the compiled contract's ABI and bytecode from the build output
- Creates and deploys the
MessageSendercontract, passing in Wormhole's relayer address as a constructor argument - After successful deployment, saves the contract's address and deployment timestamp to a
deployedContracts.jsonfile
Now to deploy the contract, run the command below:
npm run deploy:sender
You will see an output similar to the below but with a different contract address:
> wormhole-cross-chain@1.0.0 deploy:sender
> node script/deploySender.js

MessageSender deployed to: 0x92e548134Ab78d3F6C722E1D35A59139b5DA06Ea
Then, we'll deploy the receiver smart contract on the receiving network which for this guide will be the Ethereum Sepolia testnet. This code is located at script/deployReceiver.js and does the following at a high level:
- Loads network configs and sets up a wallet/provider, but this time for Sepolia instead of Avalanche
- Deploys the
MessageReceivercontract to Sepolia, again using Wormhole's relayer address - The key difference comes after deployment: it reads the previously deployed
MessageSenderaddress from Avalanche and registers it with this receiver contract usingsetRegisteredSender() - Finally saves the deployment info to the same
deployedContracts.jsonfile, but under thesepoliakey
npm run deploy:receiver
The output will look like the below but with different contract addresses.
> wormhole-cross-chain@1.0.0 deploy:receiver
> node script/deployReceiver.js

MessageReceiver deployed to: 0x92e548134Ab78d3F6C722E1D35A59139b5DA06Ea
Registered MessageSender (0x92e548134Ab78d3F6C722E1D35A59139b5DA06Ea) for Avalanche chain (6)
Send Cross-Chain Message
Now that we have the sender and receiver smart contracts deployed, we can move onto sending the cross-chain message. The script/sendMessage.js file has the send message logic and does the following:
- Loads all the previously deployed contract addresses and configurations
- Sets up a connection to Avalanche Fuji again, where our sender contract lives
Then performs the key operations:
- Gets a quote for how much gas is needed to send a cross-chain message
- Sends a message
YOUR_MESSAGEto the receiver contract on Sepolia (chain ID 10002). Update the variablemessageon line 47 to input your own custom message. - Finally provides a link to track the cross-chain message on Wormhole's explorer
To execute a message transfer, run the following command:
npm run send:message
The output will show details such as:
> wormhole-cross-chain@1.0.0 send:message
> node script/sendMessage.js

Sender Contract Address:  0x92e548134Ab78d3F6C722E1D35A59139b5DA06Ea
Receiver Contract Address:  0x92e548134Ab78d3F6C722E1D35A59139b5DA06Ea
...
Transaction sent, waiting for confirmation...
...
Message sent! Transaction hash: 0x42d1fb860c94589a6f058778166217b90fed9d28849f1193f029a9127d22e49f
You may see the transaction status on the Wormhole Explorer: https://wormholescan.io/#/tx/0x42d1fb860c94589a6f058778166217b90fed9d28849f1193f029a9127d22e49f?network=TESTNET
Note that depending on the chain you are transferring messages to and the current network congestion, message transfers can take several minutes.
To see your message on the Wormhole explorer, go to the Advanced tab on your transaction page and navigate to the Payload section and in the Transaction data object, you'll see the long hexadecimal string:
"payload":"000000000000000000000000000000000000000000000000000000000000004000000000000000000000000018e2bd42c078ce9e8a647463ce7bd62a46b1999b000000000000000000000000000000000000000000000000000000000000001e48656c6c6f2066726f6d20466572686174202620517569636b4e6f6465210000",
The format follows the standard Ethereum ABI encoding where, the first 32 bytes contain the offset to the string data, the next 32 bytes contain the address, and the following bytes contain the string data (length + actual string). Using a script or simple online hexadecimal decoder we can see the last part of the payload (1e48656c6c6f2066726f6d20466572686174202620517569636b4e6f6465210000 translates to: Hello from Ferhat & Quicknode!
Final Thoughts
That's it! You just created a cross-chain messaging app using Wormhole and Quicknode. Your new foundational learning in cross-chain development opens up possibilities for building more complex interoperable applications across blockchain networks.
If you have any questions, feel free to use our dedicated channel on Discord or provide feedback using the form below. Stay up to date with the latest by following us on Twitter and our Telegram announcement channel.
We ❤️ Feedback!
Let us know if you have any feedback or requests for new topics. We'd love to hear from you.