41 min read
Overview
Compliant reporting solutions are crucial for today's digital finance professionals. This tutorial guides you through using Quicknode's EVM Blockbook JSON-RPC add-on to craft detailed reports on Ethereum transactions, including ERC-20, ERC-721, and ERC-1155 token transfers. Designed for developers and financial analysts, this guide provides a comprehensive toolkit for extracting, analyzing, and presenting transaction data in a format that meets regulatory standards.
Quicknode supports multiple EVM-based chains through separate Blockbook add-ons:
- EVM (Ethereum) Blockbook Add-On
- Polygon Blockbook Add-On
- (coming soon) Binance Smart Chain Blockbook Add-On
What You Will Do
-
Learn how to use Quicknode's EVM Blockbook JSON-RPC Add-On to generate detailed transaction reports for transactions such as ether transfers, token transfers (e.g., ERC-20, ERC-721, ERC-1155) and internal transactions.
-
Build a UI using React that utilizes EVM Blockbook JSON-RPC Add-On in the backend to retrieve Ethereum transactions based on a given address
If you prefer to start using the app immediately without building it from scratch, we have a ready-to-use solution available. Simply visit our GitHub repository to clone the sample app. All you need is to provide your own endpoint URL. Follow the README in the repository for step-by-step instructions on setting up and running the app quickly.
What You Will Need
- Basic understanding of Ethereum, how Transactions work and Smart Contracts
- A Quicknode account with the EVM Blockbook JSON-RPC add-on enabled
- Node.js (version 18.16 or higher) installed on your system.
- Typescript and ts-node - installation instructions are indicated in the guide
- Familiarity with JavaScript or TypeScript
| Dependency | Version |
|---|---|
| node.js | >18.16 |
| typescript | latest |
| ts-node | latest |
Overview of the EVM Blockbook JSON-RPC Add-on
The EVM Blockbook JSON-RPC Add-On gives you access to balances, transactions, and address balance history for addresses via JSON-RPC. This add-on utilizes the Blockbook REST API, which is designed to offer efficient querying of blockchain data, including detailed analyses of smart contracts, native ETH transfers, internal transactions, and token transfers.
Benefits Over Standard EVM Methods
- Detailed Data: The Blockbook JSON-RPC Add-on returns more detailed data compared to standard EVM methods, including internal transactions and token transfers.
- Efficient Querying: It simplifies executing efficient queries on transactions and balances, reducing the complexity of interacting with the blockchain.
- Currency Conversion: Allows retrieving the currency rate for a specific currency (e.g., USD, EUR) and date for the specific timestamp, making it easier to perform financial analysis and reporting.
As of this writing, the EVM Blockbook add-on provides 8 RPC methods. We will use one of them in this guide:
bb_getAddress: Returns balances and transactions of an address. The returned transactions are sorted by block height, newest blocks first.
Setting Up an Ethereum Endpoint
Before you begin, please note that the EVM Blockbook JSON-RPC is a paid add-on. Please check the details here and compare plans based on your needs.
Setting up your Ethereum endpoint with the EVM Blockbook JSON-RPC is quite easy. If you haven't signed up already, you can create an account here.
Once you have logged in, navigate to the Endpoints page and click Create an endpoint. Select Ethereum mainnet, then click Next. Then, you'll be prompted to configure the add-on. Activate EVM Blockbook JSON-RPC. Afterward, simply click Create Endpoint.
If you already have a Ethereum endpoint without the add-on, go to the Add-ons page within your Ethereum endpoint, select the EVM Blockbook JSON-RPC, and activate it.
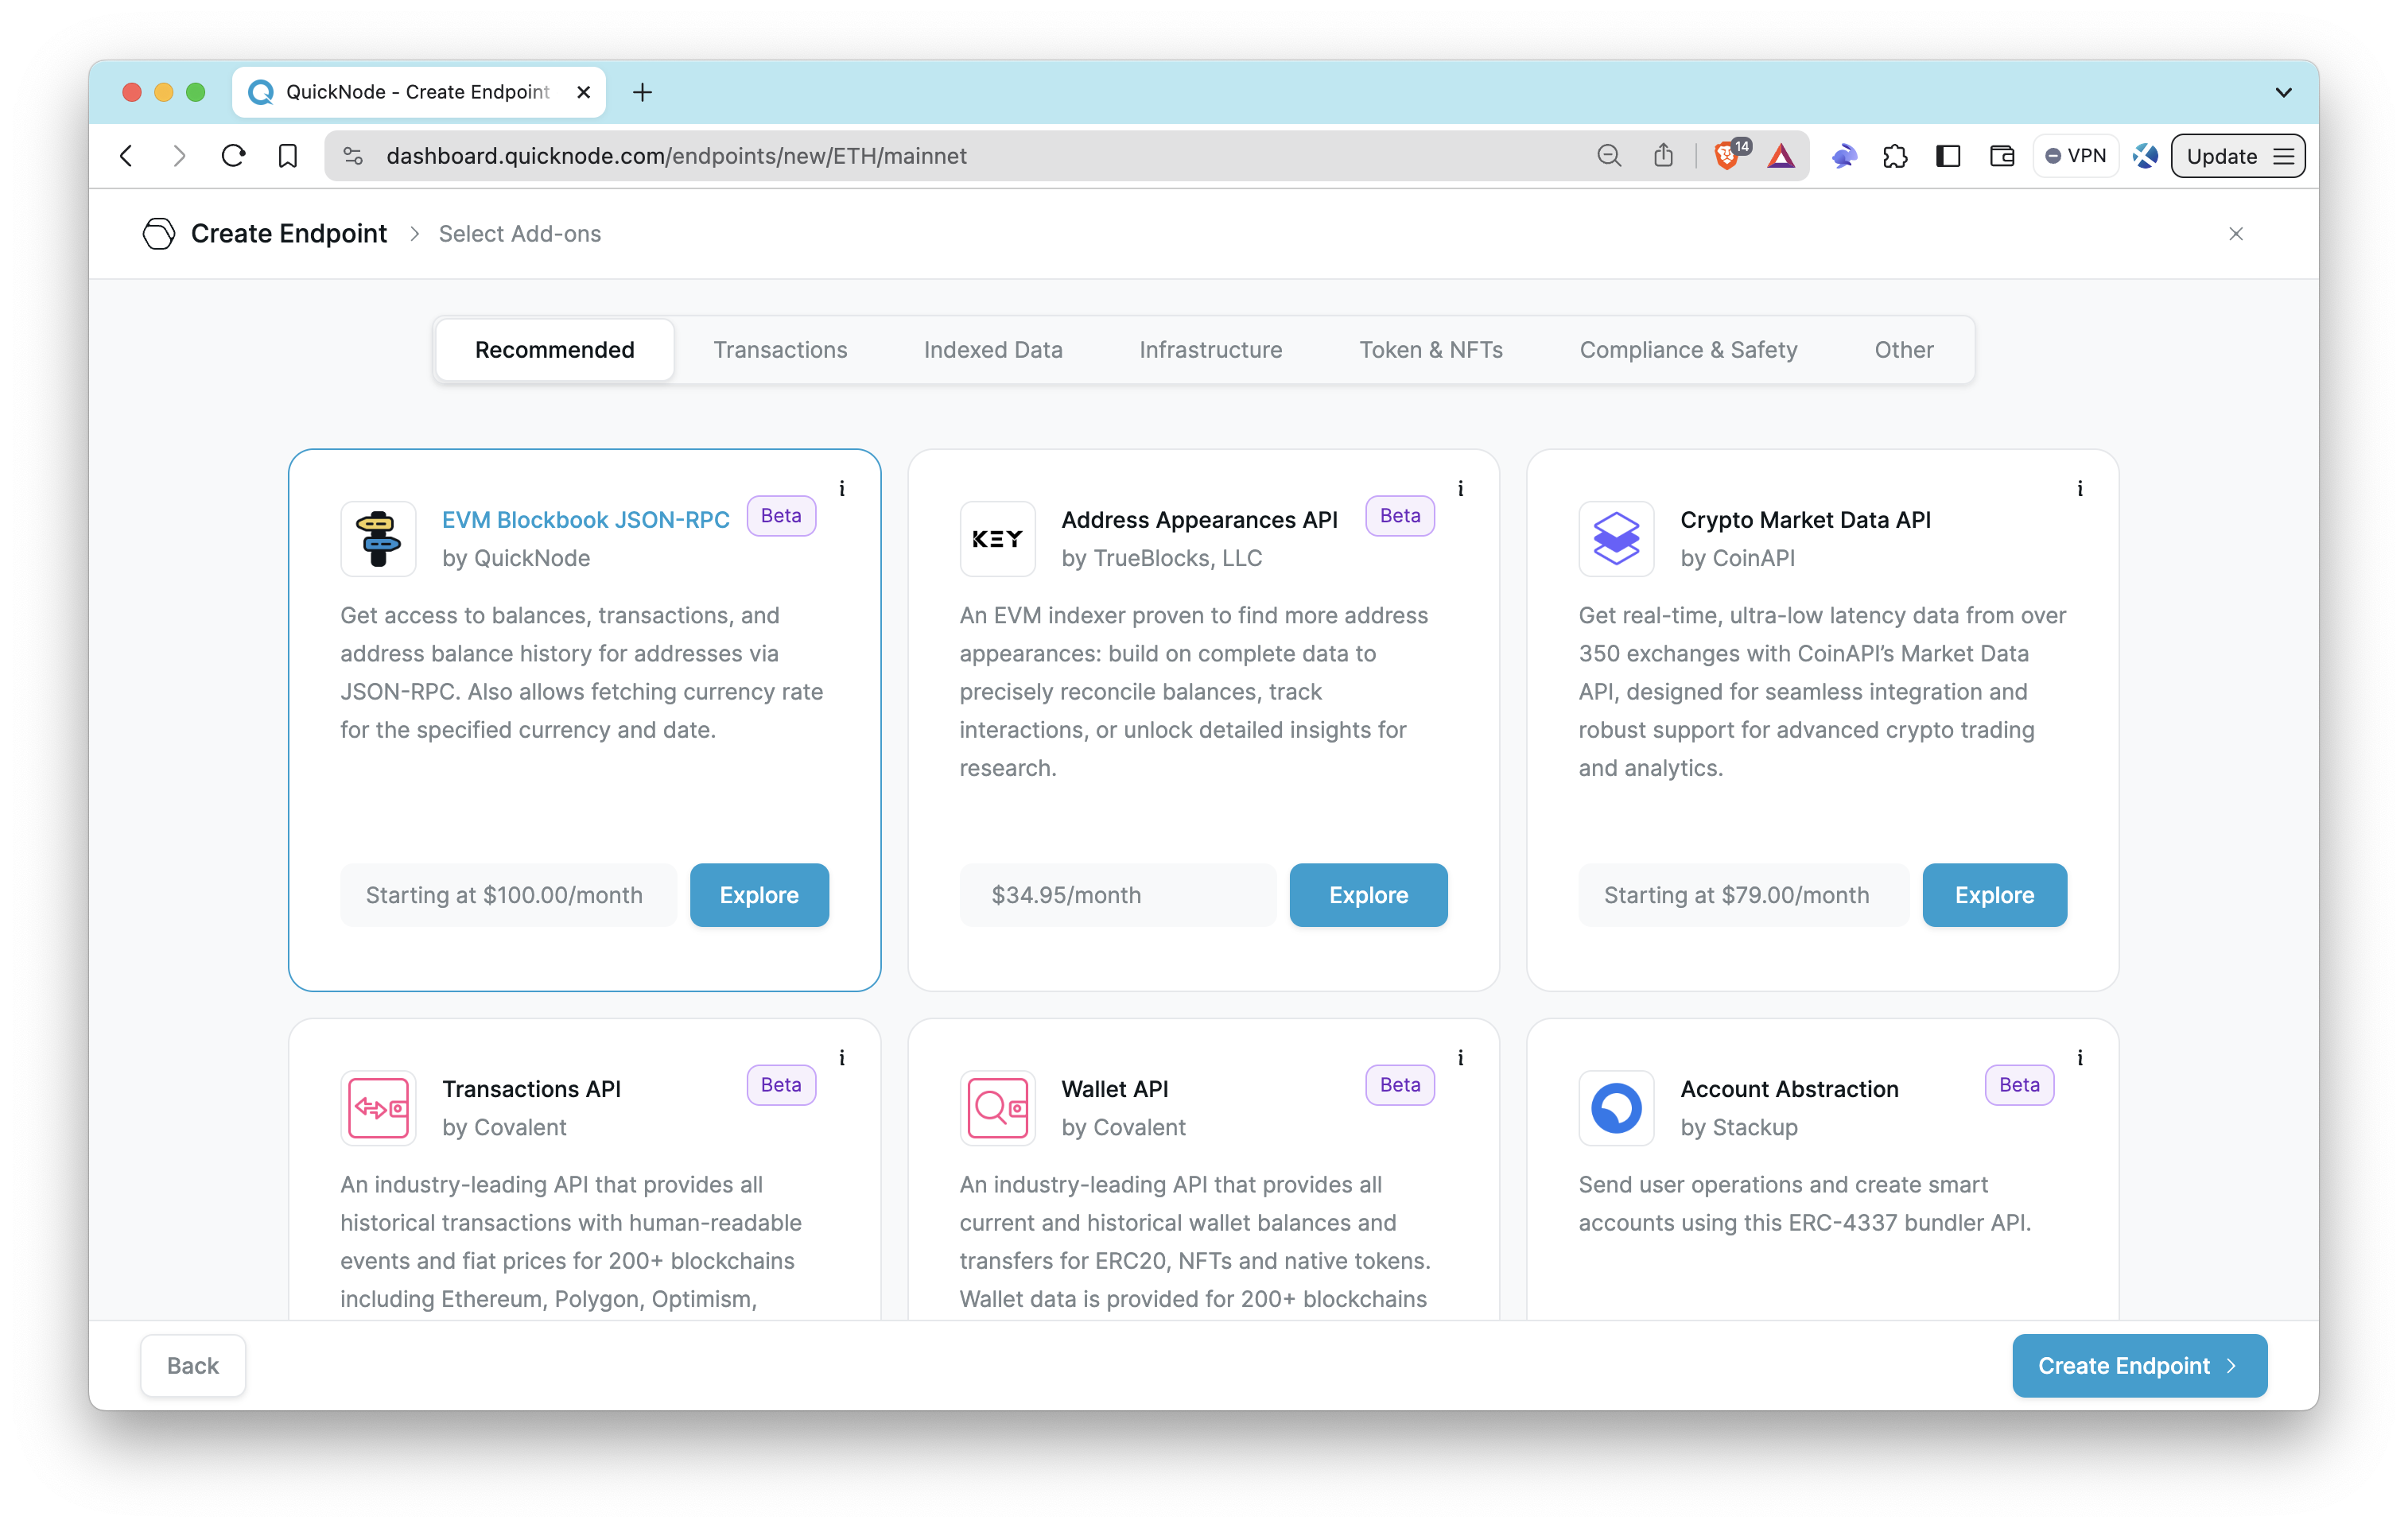
Once your endpoint is ready, copy the HTTP Provider link and keep it handy, as you'll need it in the next section.
Building an Ethereum Transaction Report Generator with EVM Blockbook JSON-RPC
Before you start, make sure Node.js is installed on your machine. Node.js will be the backbone for running your application, and npm, the default package manager included with Node.js, will handle all dependencies efficiently. You can find installation instructions on their official page.
Additionally, if you haven't already installed TypeScript, set it up globally to make it available across all your projects by running the following commands:
npm install -g typescript ts-node
Setting Up the Project
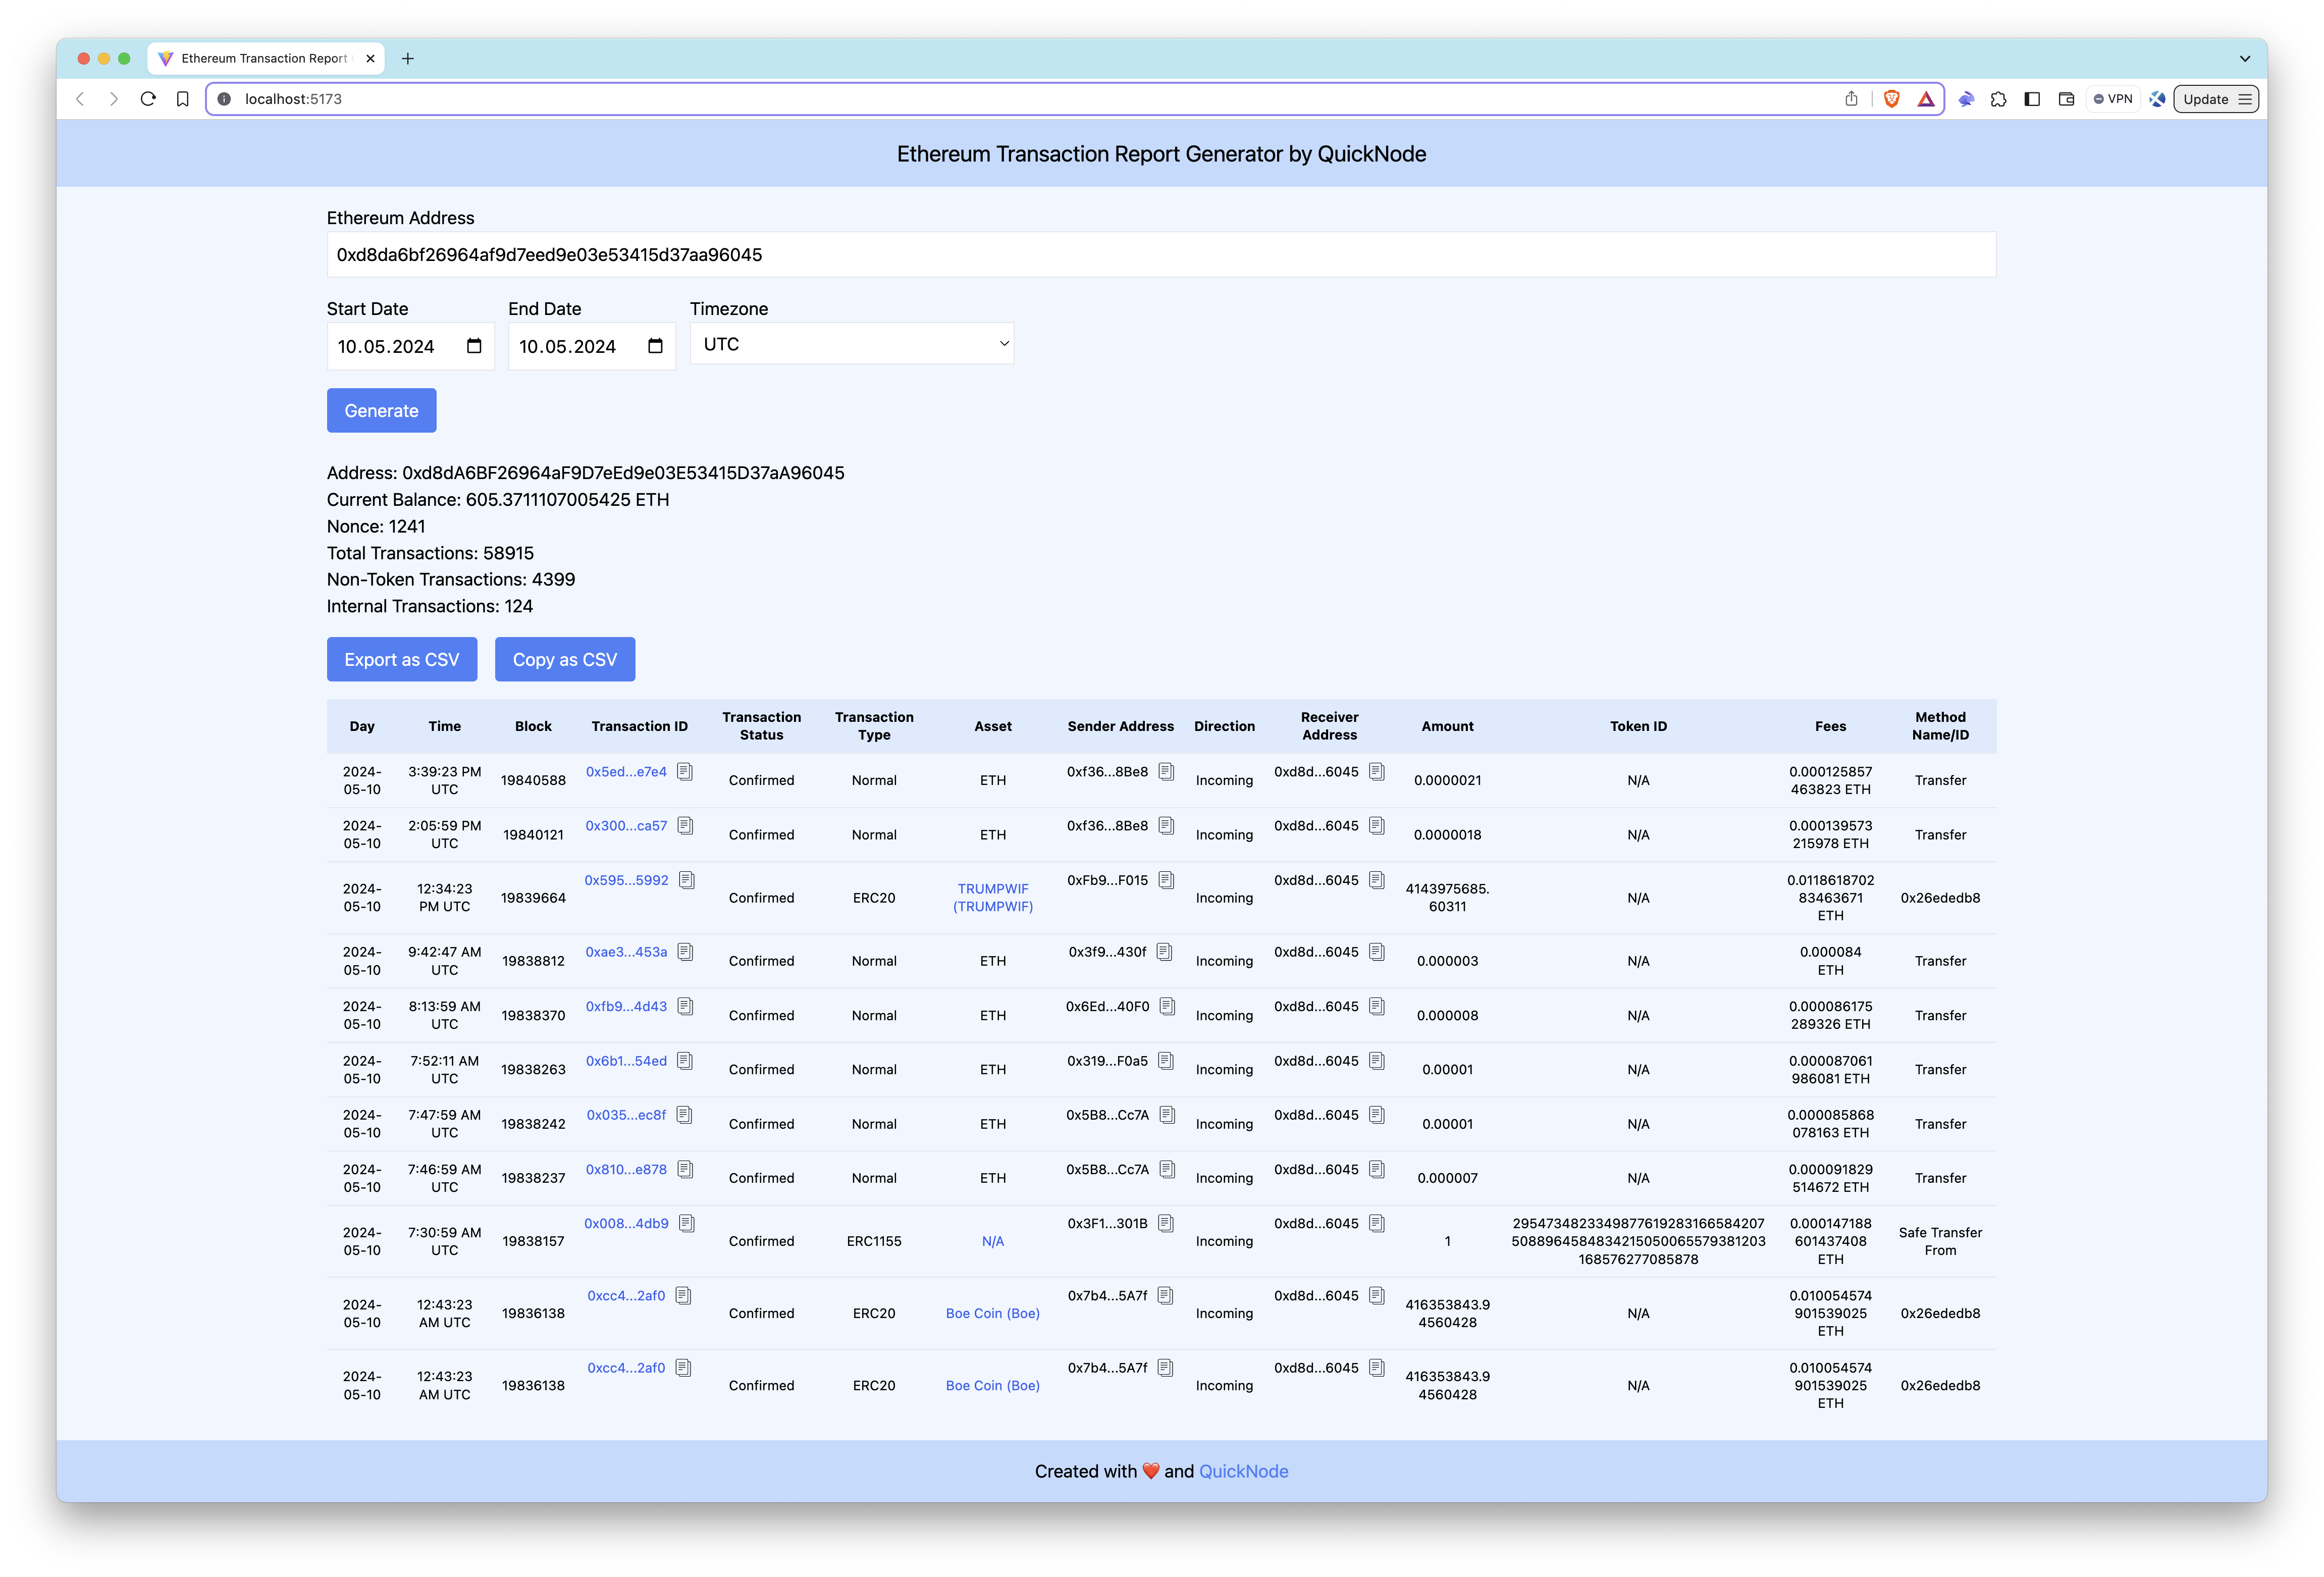
Before we start coding, let's take a look at what we will build. In the end, our app will resemble the one shown below.
Step 1: Initialize a New Vite Project
Create a directory for your project and initialize a new Vite project within it:
npm create vite@latest ethereum-transaction-reports -- --template react-ts
cd ethereum-transaction-reports
This command will create a new directory named ethereum-transaction-reports with the Vite project template for React and TypeScript, then change your current directory to the new project folder.
Step 2: Install Necessary Packages
Proceed to install the necessary packages:
npm install axios luxon dotenv fs-extra @quicknode/sdk
npm i --save-dev @types/fs-extra @types/luxon tailwindcss postcss autoprefixer
- axios: A promise-based HTTP client for making requests to external services, ideal for fetching data from APIs.
- luxon: A powerful, modern library for working with dates and times in JavaScript. Luxon is used to handle and manipulate dates and times, which is crucial for processing transaction timestamps effectively.
- dotenv: A zero-dependency module that loads environment variables from a .env file into process.env, ensuring sensitive information is kept secure.
- fs-extra: A module for interacting with the file system, such as writing files and reading files.
- @quicknode/sdk: The Quicknode SDK provides convenient access to Quicknode's infrastructure, facilitating easier interaction with the Ethereum blockchain. This SDK enhances the application's capability to connect, query, and interact with Ethereum, streamlining complex blockchain operations.
- @types/fs-extra and @types/luxon: These are DefinitelyTyped packages that provide TypeScript type definitions for
fs-extraandluxon. - tailwindcss: A utility-first CSS framework that provides a set of predefined classes to help build custom designs without writing custom CSS. Tailwind CSS promotes a design system based approach and speeds up the styling process.
- postcss: A tool for transforming CSS with JavaScript plugins. PostCSS allows you to use plugins to automate routine CSS tasks, such as optimizing styles or integrating with CSS preprocessors and frameworks.
- autoprefixer: A PostCSS plugin that parses your CSS and adds vendor prefixes to CSS rules. It helps ensure compatibility with different browsers by automatically applying the necessary prefixes.
Step 3: Set Up Tailwind CSS
Now, set up Tailwind CSS in the project by running the command:
npx tailwindcss init -p
Modify the tailwind.config.js file to add the paths in the configuration file:
/** @type {import('tailwindcss').Config} */
export default {
  content: ['./index.html', './src/**/*.{js,ts,jsx,tsx}'],
  theme: {
    extend: {},
  },
  plugins: [],
}
Delete all code in the ./src/index.css file and add the @tailwind directives in it.
@tailwind base;
@tailwind components;
@tailwind utilities;
After these commands, the required packages are installed, and Tailwind configuration files are completed.
Building the Project
Before diving into the coding of our Ethereum transaction reports tool, it's crucial to understand its operational flow. This overview ensures that our development is guided by a clear understanding of how each component contributes towards achieving our goal. Here is a breakdown of the operational flow:
-
Import Dependencies: Each component and helper file begins by importing necessary libraries and modules. For instance,
App.tsxmight import React,ReportForm.tsx, andResultTable.tsxto assemble the user interface, while helper functions fromblockbookMethods.tsandcalculateVariables.tsmanage data retrieval and processing. -
User Input: The user interacts with the
ReportForm.tsxcomponent, inputting an Ethereum address and selecting a date range for the transaction report. This data is then submitted to the main application logic inApp.tsx. -
Fetch Transaction Data: Upon form submission, App.tsx calls the function
bb_getAddressfromblockbookMethods.ts, using the provided Ethereum address to gather its transaction history from Blockbook, including details of ERC-20, ERC-721, and ERC-1155 token transfers. -
Process Data: After data retrieval, the
calculateVariablesfunction fromcalculateVariables.tsprocesses this data. This function handles different aspects like token transfers, smart contract interactions, and standard Ethereum transactions to provide a structured dataset. -
Display Results: Once the data is processed, the data is passed to
ResultTable.tsx, which renders the data in a user-friendly table format on the front end, allowing users to view and analyze their Ethereum transaction history. -
Generate Report: If a user wants to copy or export the data in a CSV format, the
convertToCsvfunction organizes the processed data into a CSV format, making it suitable for analysis and reporting.
Now, let's start coding.
Step 1: Creating Necessary Files
Create the necessary files in your project's directory (i.e., ethereum-transaction-reports):
mkdir src/helpers
mkdir src/components

echo > .env
echo > src/interfaces.ts
echo > src/helpers/blockbookMethods.ts
echo > src/helpers/calculateVariables.ts
echo > src/helpers/convertToCsv.ts
echo > src/components/CopyIcon.tsx
echo > src/components/ReportForm.tsx
echo > src/components/ResultTable.tsx
-
.env: Stores environment variables such as your Quicknode endpoint URL. This setup ensures sensitive information like API keys is securely managed and easily configurable.
-
src/interfaces.ts: Defines TypeScript interfaces to ensure type safety and consistency across the application. This file includes type definitions for the data structures used in and returned by various functions, enhancing code reliability and maintainability.
-
src/helpers/blockbookMethods.ts: Contains functions to interface with the Ethereum Blockbook API, fetching transaction and smart contract interaction data for specified Ethereum addresses.
-
src/helpers/calculateVariables.ts: Processes the Ethereum blockchain data retrieved by blockbookMethods.ts, including calculations for transactions, token transfers, and interactions with contracts.
-
src/helpers/convertToCsv.ts: Converts the processed blockchain data into a CSV format, making it suitable for analysis and distribution.
-
src/components/CopyIcon.tsx: A React component that provides a user interface element for copying text to the clipboard.
-
src/components/ReportForm.tsx: A React component that renders a form for users to input parameters such as Ethereum addresses and date ranges. This form is used to generate specific transaction reports based on user input.
-
src/components/ResultTable.tsx: A React component that displays the transaction report data in a tabular format, making it easy for users to read and analyze the information.
Step 2: Configuring Environment Variables
Store your Quicknode endpoint and other sensitive information, if you have them, in a .env file.
Open the .env file and modify it as follows. Do not forget to replace the YOUR_QUICKNODE_ETHEREUM_ENDPOINT_URL placeholder with your Quicknode Ethereum HTTP provider URL.
VITE_QUICKNODE_ENDPOINT = "YOUR_QUICKNODE_ETHEREUM_ENDPOINT_URL"
Step 3: Creating Interfaces
The interfaces.ts file defines TypeScript interfaces to ensure type safety and consistency across the application. This file includes type definitions for the data structures used in and returned by various functions, enhancing code reliability and maintainability.
Open the src/interfaces.ts file with your code editor and modify the file as follows:
import { DateTime } from "luxon";

export interface CalculateVariablesOptions {
  startDate?: DateTime;
  endDate?: DateTime;
  userTimezone?: string;
}

export interface Config {
  startDate?: {
    year: number;
    month: number;
    day: number;
  };
  endDate?: {
    year: number;
    month: number;
    day: number;
  };
  userTimezone?: string;
}

export interface Result {
  page: number;
  totalPages: number;
  itemsOnPage: number;
  address: string;
  balance: string;
  unconfirmedBalance: string;
  unconfirmedTxs: number;
  txs: number;
  nonTokenTxs: number;
  internalTxs: number;
  transactions: Transaction[];
  nonce: string;
}

export interface Transaction {
  txid: string;
  version: number;
  vin: Vin[];
  vout: Vout[];
  ethereumSpecific?: EthereumSpecific;
  tokenTransfers?: TokenTransfer[];
  blockHash: string;
  blockHeight: number;
  confirmations: number;
  blockTime: number;
  size: number;
  vsize: number;
  value: string;
  valueIn: string;
  fees: string;
  hex?: string;
}

export interface EthereumSpecific {
  internalTransfers?: InternalTransfer[];
  parsedData?: ParsedData;
}

export interface InternalTransfer {
  from: string;
  to: string;
  value: string;
}

export interface ParsedData {
  methodId: string;
  name: string;
}

export interface TokenTransfer {
  type: string;
  from: string;
  to: string;
  contract: string;
  name: string;
  symbol: string;
  decimals: number;
  value: string;
  multiTokenValues?: MultiTokenValues[];
}

export interface MultiTokenValues {
  id: string;
  value: string;
}

export interface ExtractedTransaction {
  txid: string;
  blockHeight: number;
  direction: "Incoming" | "Outgoing";
  txType: string;
  assetType: string;
  senderAddress: string;
  receiverAddress: string;
  value: string;
  fee: string;
  day: string;
  timestamp: string;
  userTimezone: string;
  status: string;
  methodNameOrId: string;
  contract?: string;
  tokenId?: string;
}

export interface ExtendedResult extends Result {
  extractedTransaction: ExtractedTransaction[];
  startDate: DateTime;
  endDate: DateTime;
}

export interface Vin {
  txid: string;
  vout?: number;
  sequence: number;
  n: number;
  addresses: string[];
  isAddress: boolean;
  value: string;
  hex: string;
  isOwn?: boolean;
}

export interface Vout {
  value: string;
  n: number;
  hex: string;
  addresses: string[];
  isAddress: boolean;
  spent?: boolean;
  isOwn?: boolean;
}
Step 4: Fetching Data with Blockbook
The blockbookMethods.ts file includes functions designed to interact with a Quicknode endpoint using the Blockbook API. These functions facilitate fetching detailed transaction data for a specific Ethereum address and obtaining token transfer details.
Open the src/helpers/blockbookMethods.ts file with your code editor and modify the file as follows:
// Import necessary types and libraries
import { Result } from "../interfaces";
import axios from "axios";

// Retrieve the Quicknode endpoint URL from environment variables
const QUICKNODE_ENDPOINT = import.meta.env.VITE_QUICKNODE_ENDPOINT as string;

// Fetches detailed transaction data for a specified Ethereum address
export async function bb_getAddress(address: string): Promise<Result> {
  try {
    // Prepare the request payload for the bb_getAddress method
    const postData = {
      method: "bb_getAddress",
      params: [
        address,
        { page: "1", size: "1000", fromHeight: "0", details: "txs" }, // Query parameters
      ],
      id: 1,
      jsonrpc: "2.0",
    };

    // Make the POST request to the Quicknode endpoint
    const response = await axios.post(QUICKNODE_ENDPOINT, postData, {
      headers: { "Content-Type": "application/json" },
      maxBodyLength: Infinity,
    });

    // Check for a successful response and return the data
    if (response.status === 200 && response.data) {
      return response.data.result;
    } else {
      throw new Error("Failed to fetch transactions");
    }
  } catch (error) {
    console.error(error);
    throw error;
  }
}
Step 5: Processing Data
The calculateVariables.ts file processes the Ethereum blockchain data retrieved by blockbookMethods.ts. This file handles calculations for transactions, token transfers, and interactions with contracts.
Open the src/helpers/calculateVariables.ts file with your code editor and modify the file as follows:
// Import necessary types and libraries
import { DateTime } from "luxon";
import { viem } from "@quicknode/sdk";
import {
  Result,
  ExtractedTransaction,
  ExtendedResult,
  CalculateVariablesOptions,
} from "../interfaces";

export async function calculateVariables(
  result: Result,
  options: CalculateVariablesOptions = {}
): Promise<ExtendedResult> {
  const userTimezone = options.userTimezone || DateTime.local().zoneName;
  const startDate = options.startDate || DateTime.now().setZone(userTimezone);
  const endDate = options.endDate || DateTime.now().setZone(userTimezone);

  const startOfPeriod = startDate.startOf("day");
  const endOfPeriod = endDate.endOf("day");

  const extractedData: ExtractedTransaction[] = [];

  for (const transaction of result.transactions) {
    const blockTime = DateTime.fromMillis(transaction.blockTime * 1000, {
      zone: userTimezone,
    });
    const day = blockTime.toFormat("yyyy-MM-dd");
    const timestamp: string = blockTime.toString() || "";

    const status = transaction.confirmations > 0 ? "Confirmed" : "Pending";

    let methodNameOrId = "";
    if (transaction.ethereumSpecific?.parsedData) {
      const { name, methodId } = transaction.ethereumSpecific.parsedData;
      if (name && methodId) {
        methodNameOrId = `${name} (${methodId})`;
      } else {
        methodNameOrId = name || methodId || "Unknown";
      }
    }

    if (blockTime < startOfPeriod || blockTime > endOfPeriod) continue;

    // Handle normal ETH transactions
    for (const vin of transaction.vin) {
      if (vin.addresses && vin.addresses.includes(result.address)) {
        for (const vout of transaction.vout) {
          if (vout.value === "0") continue;
          extractedData.push({
            txid: transaction.txid,
            blockHeight: transaction.blockHeight,
            direction: "Outgoing",
            txType: "Normal",
            assetType: "ETH",
            senderAddress: result.address,
            receiverAddress: vout.addresses.join(", "),
            value: viem.formatEther(BigInt(vout.value)),
            fee: viem.formatEther(BigInt(transaction.fees)),
            day,
            timestamp,
            userTimezone,
            status,
            methodNameOrId,
          });
        }
      }
    }

    for (const vout of transaction.vout) {
      if (vout.addresses && vout.addresses.includes(result.address)) {
        extractedData.push({
          txid: transaction.txid,
          blockHeight: transaction.blockHeight,
          direction: "Incoming",
          txType: "Normal",
          assetType: "ETH",
          senderAddress: transaction.vin.map((vin) => vin.addresses).join(", "),
          receiverAddress: result.address,
          value: viem.formatEther(BigInt(vout.value)),
          fee: viem.formatEther(BigInt(transaction.fees)),
          day,
          timestamp,
          userTimezone,
          status,
          methodNameOrId,
        });
      }
    }

    // Handle internal ETH transfers
    if (transaction.ethereumSpecific?.internalTransfers) {
      for (const transfer of transaction.ethereumSpecific.internalTransfers) {
        if (
          transfer.from === result.address ||
          transfer.to === result.address
        ) {
          const direction =
            transfer.from === result.address ? "Outgoing" : "Incoming";

          extractedData.push({
            txid: transaction.txid,
            blockHeight: transaction.blockHeight,
            direction: direction as "Outgoing" | "Incoming",
            txType: "Internal",
            assetType: "ETH",
            senderAddress: transfer.from,
            receiverAddress: transfer.to,
            value: viem.formatEther(BigInt(transfer.value)),
            fee: viem.formatEther(BigInt(transaction.fees)),
            day,
            timestamp,
            userTimezone,
            status,
            methodNameOrId,
          });
        }
      }
    }

    // Handle token transfers
    if (transaction.tokenTransfers) {
      for (const tokenTransfer of transaction.tokenTransfers) {
        if (
          tokenTransfer.from === result.address ||
          tokenTransfer.to === result.address
        ) {
          const direction =
            tokenTransfer.from === result.address ? "Outgoing" : "Incoming";

          const assetType =
            tokenTransfer.name && tokenTransfer.symbol
              ? `${tokenTransfer.name} (${tokenTransfer.symbol})`
              : "N/A";

          let value = "";
          let tokenId = "";

          switch (tokenTransfer.type) {
            case "ERC1155":
              if (tokenTransfer.multiTokenValues) {
                const tokens = tokenTransfer.multiTokenValues;
                tokens.forEach((token, index) => {
                  tokenId += token.id + (index < tokens.length - 1 ? ", " : "");
                  value +=
                    token.value + (index < tokens.length - 1 ? ", " : "");
                });
              } else {
                // Handle the case where there are no multiTokenValues
                tokenId = "N/A";
                value = "N/A";
              }
              break;
            case "ERC721":
              value = "1";
              tokenId = tokenTransfer.value;
              break;
            case "ERC20":
              // Standard handling for ERC20 tokens using their decimal value
              value = viem.formatUnits(
                BigInt(tokenTransfer.value),
                tokenTransfer.decimals
              );
              tokenId = "N/A";
              break;
            default:
              continue;
          }

          extractedData.push({
            txid: transaction.txid,
            blockHeight: transaction.blockHeight,
            direction: direction as "Outgoing" | "Incoming",
            txType: tokenTransfer.type,
            assetType: assetType,
            senderAddress: tokenTransfer.from,
            receiverAddress: tokenTransfer.to,
            value: value,
            fee: viem.formatEther(BigInt(transaction.fees)),
            day,
            timestamp,
            userTimezone,
            status,
            methodNameOrId,
            contract: tokenTransfer.contract,
            tokenId: tokenId,
          });
        }
      }
    }
  }

  const extendedResult: ExtendedResult = {
    ...result,
    extractedTransaction: extractedData,
    startDate: startOfPeriod,
    endDate: endOfPeriod,
  };

  return extendedResult;
}
Step 6: Converting Data to CSV
The convertToCsv.ts file converts the processed blockchain data into a CSV format, making it suitable for analysis and distribution.
Open the src/helpers/convertToCsv.ts file with your code editor and modify the file as follows:
import { ExtractedTransaction } from "../interfaces.ts";

const convertToCSV = (data: ExtractedTransaction[]) => {
  const csvRows = [];
  // Headers
  csvRows.push(
    [
      "Day",
      "Time",
      "Block",
      "Transaction ID",
      "Transaction Status",
      "Transaction Type",
      "Asset",
      "Sender Address",
      "Direction",
      "Receiver Address",
      "Amount",
      "Token ID",
      "Fees [ETH]",
      "Method Name/ID",
    ].join(",")
  );

  // Rows
  data.forEach((tx) => {
    const row = []; // Create an empty array for this row
    row.push(tx.day);
    row.push(
      new Date(tx.timestamp).toLocaleTimeString("en-US", {
        timeZone: tx.userTimezone,
        timeZoneName: "short",
      })
    );
    row.push(tx.blockHeight);
    row.push(tx.txid);
    row.push(tx.status);
    row.push(tx.txType);
    row.push(tx.assetType);
    row.push(tx.senderAddress);
    row.push(tx.direction);
    row.push(tx.receiverAddress);
    row.push(tx.value);
    row.push(tx.tokenId ? tx.tokenId : "N/A");
    row.push(tx.fee);
    row.push(
      tx.methodNameOrId.startsWith("0x")
        ? `"${tx.methodNameOrId}"`
        : tx.methodNameOrId
    );
    csvRows.push(row.join(",")); // Join each row's columns and push
  });

  return csvRows.join("\n"); // Join all rows
};

export const copyAsCSV = (data: ExtractedTransaction[]) => {
  const csvData = convertToCSV(data);
  navigator.clipboard.writeText(csvData).then(
    () => console.log("CSV copied to clipboard"),
    (err) => console.error("Failed to copy CSV: ", err)
  );
};

export const exportAsCSV = (
  data: ExtractedTransaction[],
  filename = "ethereum-report.csv"
) => {
  const csvData = convertToCSV(data);
  const blob = new Blob([csvData], { type: "text/csv;charset=utf-8;" });

  // Create a link to download the blob
  const link = document.createElement("a");
  link.href = URL.createObjectURL(blob);
  link.download = filename;
  link.style.visibility = "hidden";

  // Append to the document and trigger the download
  document.body.appendChild(link);
  link.click();

  // Clean up
  document.body.removeChild(link);
};
Step 7: Creating the Copy Icon Component
The CopyIcon.tsx file is a React component that provides a user interface element for copying text to the clipboard.
Open the src/components/CopyIcon.tsx file with your code editor and modify the file as follows:
import React from "react";

const CopyIcon: React.FC = () => (
  <svg
    fill="#000000"
    height="16"
    width="16"
    version="1.1"
    id="Layer_1"
    xmlns="http://www.w3.org/2000/svg"
    viewBox="0 0 64 64"
    enableBackground="new 0 0 64 64"
  >
    <g id="Text-files">
      <path
        d="M53.9791489,9.1429005H50.010849c-0.0826988,0-0.1562004,0.0283995-0.2331009,0.0469999V5.0228
		C49.7777481,2.253,47.4731483,0,44.6398468,0h-34.422596C7.3839517,0,5.0793519,2.253,5.0793519,5.0228v46.8432999
		c0,2.7697983,2.3045998,5.0228004,5.1378999,5.0228004h6.0367002v2.2678986C16.253952,61.8274002,18.4702511,64,21.1954517,64
		h32.783699c2.7252007,0,4.9414978-2.1725998,4.9414978-4.8432007V13.9861002
		C58.9206467,11.3155003,56.7043495,9.1429005,53.9791489,9.1429005z M7.1110516,51.8661003V5.0228
		c0-1.6487999,1.3938999-2.9909999,3.1062002-2.9909999h34.422596c1.7123032,0,3.1062012,1.3422,3.1062012,2.9909999v46.8432999
		c0,1.6487999-1.393898,2.9911003-3.1062012,2.9911003h-34.422596C8.5049515,54.8572006,7.1110516,53.5149002,7.1110516,51.8661003z
		 M56.8888474,59.1567993c0,1.550602-1.3055,2.8115005-2.9096985,2.8115005h-32.783699
		c-1.6042004,0-2.9097996-1.2608986-2.9097996-2.8115005v-2.2678986h26.3541946
		c2.8333015,0,5.1379013-2.2530022,5.1379013-5.0228004V11.1275997c0.0769005,0.0186005,0.1504021,0.0469999,0.2331009,0.0469999
		h3.9682999c1.6041985,0,2.9096985,1.2609005,2.9096985,2.8115005V59.1567993z"
      />
      <path
        d="M38.6031494,13.2063999H16.253952c-0.5615005,0-1.0159006,0.4542999-1.0159006,1.0158005
		c0,0.5615997,0.4544001,1.0158997,1.0159006,1.0158997h22.3491974c0.5615005,0,1.0158997-0.4542999,1.0158997-1.0158997
		C39.6190491,13.6606998,39.16465,13.2063999,38.6031494,13.2063999z"
      />
      <path
        d="M38.6031494,21.3334007H16.253952c-0.5615005,0-1.0159006,0.4542999-1.0159006,1.0157986
		c0,0.5615005,0.4544001,1.0159016,1.0159006,1.0159016h22.3491974c0.5615005,0,1.0158997-0.454401,1.0158997-1.0159016
		C39.6190491,21.7877007,39.16465,21.3334007,38.6031494,21.3334007z"
      />
      <path
        d="M38.6031494,29.4603004H16.253952c-0.5615005,0-1.0159006,0.4543991-1.0159006,1.0158997
		s0.4544001,1.0158997,1.0159006,1.0158997h22.3491974c0.5615005,0,1.0158997-0.4543991,1.0158997-1.0158997
		S39.16465,29.4603004,38.6031494,29.4603004z"
      />
      <path
        d="M28.4444485,37.5872993H16.253952c-0.5615005,0-1.0159006,0.4543991-1.0159006,1.0158997
		s0.4544001,1.0158997,1.0159006,1.0158997h12.1904964c0.5615025,0,1.0158005-0.4543991,1.0158005-1.0158997
		S29.0059509,37.5872993,28.4444485,37.5872993z"
      />
    </g>
  </svg>
);

export default CopyIcon;
Step 8: Creating the Report Form Component
The ReportForm.tsx file is a React component that renders a form for users to input parameters such as Ethereum addresses and date ranges. This form is used to generate specific transaction reports based on user input.
Open the src/components/ReportForm.tsx file with your code editor and modify the file as follows:
// src/components/ReportForm.tsx
import React, { useState } from "react";
import { viem } from "@quicknode/sdk";

interface ReportFormProps {
  onSubmit: (
    address: string,
    startDate: string,
    endDate: string,
    timezone: string
  ) => void;
  isLoading: boolean;
}

const ReportForm: React.FC<ReportFormProps> = ({ onSubmit, isLoading }) => {
  const [address, setAddress] = useState("");
  const [isValidAddress, setIsValidAddress] = useState(false);
  const [startDate, setStartDate] = useState(
    () => new Date().toISOString().split("T")[0]
  ); // default to today's date
  const [endDate, setEndDate] = useState(
    () => new Date().toISOString().split("T")[0]
  ); // default to today's date
  const [timezone, setTimezone] = useState("UTC");

  /* eslint-disable  @typescript-eslint/no-explicit-any */
  const handleAddressChange = (e: any) => {
    const inputAddress = e.target.value;
    setAddress(inputAddress);
    setIsValidAddress(viem.isAddress(inputAddress));
  };

  const handleSubmit = (e: React.FormEvent) => {
    e.preventDefault();
    onSubmit(address, startDate, endDate, timezone);
  };

  /* eslint-disable  @typescript-eslint/no-explicit-any */
  const timezones = (Intl as any).supportedValuesOf("timeZone") as string[];
  if (!timezones.includes("UTC")) {
    timezones.unshift("UTC");
  }

  return (
    <form onSubmit={handleSubmit} className="space-y-4">
      <div>
        <label htmlFor="address" className="block">
          Ethereum Address
        </label>
        <input
          type="text"
          id="address"
          name="address"
          value={address}
          onChange={handleAddressChange}
          className="border p-2 w-full"
          required
        />
        {!isValidAddress && address && (
          <div className="text-red-500">
            This is not a valid Ethereum address.
          </div>
        )}
      </div>
      <div className="flex space-x-3 ">
        <div>
          <label htmlFor="startDate" className="block">
            Start Date
          </label>
          <input
            type="date"
            id="startDate"
            name="startDate"
            value={startDate}
            onChange={(e) => setStartDate(e.target.value)}
            className="border p-2"
            required
          />
        </div>
        <div>
          <label htmlFor="endDate" className="block">
            End Date
          </label>
          <input
            type="date"
            id="endDate"
            name="endDate"
            value={endDate}
            onChange={(e) => setEndDate(e.target.value)}
            className="border p-2"
            required
          />
        </div>
        <div>
          <label htmlFor="timezone" className="block">
            Timezone
          </label>
          <select
            id="timezone"
            name="timezone"
            value={timezone}
            onChange={(e) => setTimezone(e.target.value)}
            className="border p-2"
          >
            {timezones.map((timezones) => (
              <option key={timezones} value={timezones}>
                {timezones}
              </option>
            ))}
          </select>
        </div>
      </div>
      <button
        type="submit"
        disabled={!isValidAddress}
        className={`${
          isValidAddress ? "bg-blue-500" : "bg-gray-500 cursor-not-allowed"
        } text-white px-4 py-2 rounded`}
      >
        {isLoading ? "Loading..." : "Generate"}
      </button>
    </form>
  );
};

export default ReportForm;
Step 9: Creating the Result Table Component
The ResultTable.tsx file is a React component that displays the transaction report data in a tabular format, making it easy for users to read and analyze the information.
Open the src/components/ResultTable.tsx file with your code editor and modify the file as follows:
import React from "react";
import { ExtendedResult } from "../interfaces.ts";
import CopyIcon from "./CopyIcon.tsx";
import { exportAsCSV, copyAsCSV } from "../helpers/convertToCsv.ts";

interface ResultsTableProps {
  data: ExtendedResult;
}

function shortenAddress(address: string) {
  if (address.length < 10) {
    return address;
  }
  return `${address.slice(0, 5)}...${address.slice(-4)}`;
}

function copyToClipboard(text: string) {
  navigator.clipboard.writeText(text).then(
    () => {
      console.log("Copied to clipboard!");
    },
    (err) => {
      console.error("Could not copy text: ", err);
    }
  );
}

const ResultsTable: React.FC<ResultsTableProps> = ({ data }) => {
  return (
    <div className="overflow-x-auto mt-6">
      <div>
        <h3>Address: {data.address}</h3>
        <p>Current Balance: {parseFloat(data.balance) / 1e18} ETH</p>
        <p>Nonce: {data.nonce}</p>
        <p>Total Transactions: {data.txs}</p>
        <p>Non-Token Transactions: {data.nonTokenTxs}</p>
        <p>Internal Transactions: {data.internalTxs}</p>
      </div>
      <div className="my-4 flex space-x-4">
        <button
          onClick={() => exportAsCSV(data.extractedTransaction)}
          className="bg-blue-500 text-white px-4 py-2 rounded"
        >
          Export as CSV
        </button>
        <button
          onClick={() => copyAsCSV(data.extractedTransaction)}
          className="bg-blue-500 text-white px-4 py-2 rounded"
        >
          Copy as CSV
        </button>
      </div>
      <table className="min-w-full table-fixed text-xs">
        <thead className="bg-blue-100">
          <tr>
            <th className="p-2 text-center">Day</th>
            <th className="p-2 text-center">Time</th>
            <th className="p-2 text-center">Block</th>
            <th className="p-2 text-center">Transaction ID</th>
            <th className="p-2 text-center">Transaction Status</th>
            <th className="p-2 text-center">Transaction Type</th>
            <th className="p-2 text-center">Asset</th>
            <th className="p-2 text-center">Sender Address</th>
            <th className="p-2 text-center">Direction</th>
            <th className="p-2 text-center">Receiver Address</th>
            <th className="p-2 text-center">Amount</th>
            <th className="p-2 text-center">Token ID</th>
            <th className="p-2 text-center">Fees</th>
            <th className="p-2 text-center">Method Name/ID</th>
          </tr>
        </thead>
        <tbody>
          {data.extractedTransaction.map((tx, index) => (
            <tr key={index} className="border-t">
              <td className="p-2 text-center">{tx.day}</td>

              <td className="p-2 text-center">
                {new Date(tx.timestamp).toLocaleTimeString("en-US", {
                  timeZone: tx.userTimezone,
                  timeZoneName: "short",
                })}
              </td>
              <td className="p-2 text-center">{tx.blockHeight}</td>

              <td
                className="p-2 flex items-top justify-center space-x-2 cursor-pointer"
                onClick={() => copyToClipboard(tx.txid)}
              >
                <a
                  href={`https://etherscan.io/tx/${tx.txid}`}
                  target="_blank"
                  rel="noopener noreferrer"
                  className="text-blue-600 hover:text-blue-800"
                >
                  {shortenAddress(tx.txid)}
                </a>
                <CopyIcon />
              </td>
              <td className="p-2 text-center">{tx.status}</td>
              <td className="p-2 text-center">{tx.txType}</td>
              <td className="p-2 text-center">
                {(tx.txType === "ERC20" ||
                  tx.txType === "ERC721" ||
                  tx.txType === "ERC1155") &&
                tx.contract ? (
                  <a
                    href={`https://etherscan.io/token/${tx.contract}`}
                    target="_blank"
                    rel="noopener noreferrer"
                    className="text-blue-600 hover:text-blue-800"
                  >
                    {tx.assetType}
                  </a>
                ) : (
                  tx.assetType
                )}
              </td>
              <td
                className="p-2 flex items-center justify-center space-x-2 cursor-pointer"
                onClick={() => copyToClipboard(tx.senderAddress)}
              >
                <span>{shortenAddress(tx.senderAddress)}</span>
                <CopyIcon />
              </td>
              <td className="p-2 text-center">{tx.direction}</td>

              <td
                className="p-2 flex items-center justify-center space-x-2 cursor-pointer"
                onClick={() => copyToClipboard(tx.receiverAddress)}
              >
                <span>{shortenAddress(tx.receiverAddress)}</span>
                <CopyIcon />
              </td>
              <td
                className="p-2 text-center"
                style={{ wordBreak: "break-word" }}
              >
                {tx.value}
              </td>
              <td
                className="p-2 text-center"
                style={{ wordBreak: "break-word" }}
              >
                {tx.tokenId ? tx.tokenId : "N/A"}
              </td>
              <td
                className="p-2 text-center"
                style={{ wordBreak: "break-word" }}
              >
                {tx.fee + " ETH"}
              </td>
              <td className="p-2 text-center">{tx.methodNameOrId}</td>
            </tr>
          ))}
        </tbody>
      </table>
    </div>
  );
};

export default ResultsTable;
Step 10: Assembling the Application
The App.tsx file serves as the main component of your React application. It imports and uses the ReportForm.tsx and ResultTable.tsx components to create a cohesive user interface. It also manages the state and handles user input submission.
Open the src/App.tsx file with your code editor and modify the file as follows:
// src/App.tsx
import React, { useState } from "react";
import "./index.css";
import ReportForm from "./components/ReportForm.tsx";
import ResultTable from "./components/ResultTable.tsx";
import { bb_getAddress } from "./helpers/blockbookMethods.ts";
import { calculateVariables } from "./helpers/calculateVariables.ts";
import { ExtendedResult, CalculateVariablesOptions } from "./interfaces.ts";
import { DateTime } from "luxon";

const App = () => {
  const [reportData, setReportData] = useState<ExtendedResult | null>(null);
  const [loading, setLoading] = useState<boolean>(false);

  const handleFormSubmit = (
    address: string,
    startDate: string,
    endDate: string,
    timezone: string
  ) => {
    setLoading(true); // Start loading

    const configStartDate = DateTime.fromISO(startDate, {
      zone: timezone,
    });

    const configEndDate = DateTime.fromISO(endDate, {
      zone: timezone,
    });

    const options: CalculateVariablesOptions = {
      startDate: configStartDate,
      endDate: configEndDate,
      userTimezone: timezone,
    };

    bb_getAddress(address)
      .then((data) => {
        return calculateVariables(data, options);
      })
      .then((extendedData) => {
        setLoading(false);
        setReportData(extendedData);
      })
      .catch((error) => {
        setLoading(false);
        console.error(error);
      });
  };

  return (
    <div className="min-h-screen flex flex-col bg-blue-50">
      <header className="bg-blue-200 text-xl text-center p-4">
        Ethereum Transaction Report Generator
      </header>
      <main className="flex-grow container mx-auto p-4">
        <ReportForm onSubmit={handleFormSubmit} isLoading={loading} />
        {reportData && <ResultTable data={reportData} />}
      </main>
      <footer className="bg-blue-200 text-center p-4">
        Created with ❤️ and{" "}
        <a href="https://www.quicknode.com" className="text-blue-500">
          Quicknode
        </a>
      </footer>
    </div>
  );
};

export default App;
Step 11: Running the App
Finally, start your development server to see your application in action. Run the following command in your terminal:
npm run dev
Open your browser and go to http://localhost:5173 to see your application running.
Interacting with the App
To use the Ethereum transaction report generator, follow these steps:
- Input Ethereum Address:
- Enter the Ethereum address for which you want to generate a transaction report in the provided input field. If the address entered is not an Ethereum address, the app will show a warning and not activate the button.
- Specify Date Interval (Optional):
- Optionally, set a start date and an end date to filter transactions within a specific time range, and select the appropriate timezone from the dropdown menu to ensure the dates and times are filtered correctly.
- Generate Report:
- Click the "Generate" button to fetch and process the transaction data based on the input criteria.
- View Results:
- The transaction data will be displayed in a table format below the form. This table includes details such as the date, time, block number, transaction ID, transaction status, type, asset, sender and receiver addresses, amount, token ID, fees, and method name/ID.
- Export or Copy Data:
- Export as CSV: Click the "Export as CSV" button to download the transaction data as a CSV file.
- Copy as CSV: Click the "Copy as CSV" button to copy the transaction data to your clipboard in CSV format for easy pasting into other applications.
By following these steps, you can efficiently generate, view, and export detailed transaction reports for any Ethereum address.
Conclusion
Using Quicknode's EVM Blockbook JSON-RPC add-on, our Ethereum transaction report generator simplifies the process of creating detailed transaction reports for Ethereum addresses. This guide covers the fundamental steps to set up and use the tool, but there's a lot more you can do. Whether it's for audits, regulatory compliance, or market analysis, this application makes extracting and analyzing blockchain data straightforward and efficient.
To learn more about how Quicknode can assist you in pulling detailed blockchain data for various use cases, please feel free to reach out to us; we would love to talk to you!
Subscribe to our newsletter for more articles and guides on Web3 and blockchain. If you have any questions or need further assistance, feel free to join our Discord server or provide feedback using the form below. Stay up to date with the latest by following us on Twitter (@Quicknode) and our Telegram announcement channel.
We ❤️ Feedback!
Let us know if you have any feedback or requests for new topics. We'd love to hear from you.