10 min read
Overview
Solana uses a process called Binary Object Representation Serializer for Hashing (commonly referred to as Borsh) to serialize account data on chain. Borsh serialization is a way to convert data into a compact binary format that can be efficiently stored and transmitted on the Solana blockchain. It helps to save space on the blockchain and makes data transfer faster.
If you have ever made a getAccountInfo call using solanaWeb3.js, you have likely noticed that the returned data is not human-readable. That is because it has been serialized using Borsh. This guide will walk you through the steps necessary to make this data readable to humans.
This guide walks you through account deserialization with Solana Web3.js 1.x.
If you prefer building with Solana Web3.js v2.0, check out our sample code on GitHub or our Guide: How to Deserialize Account Data with Solana Web3.js 2.0.
What You Will Do
This guide will walk you through some basics of account structs and how to use struct schemas to deserialize Solana account data.
What You Will Need
To follow along with this guide, you will need the following:
- Basic knowledge of Solana Fundamentals
- Basic knowledge of the JavaScript/TypeScript programming languages
- Nodejs installed (version 16.15 or higher)
- npm or yarn installed
- TypeScript experience and ts-node installed
Why Borsh?
Before we jump in, let's take a moment to understand the purpose of Borsh and why it is used for serialization of data. Generally, Borsh helps save space on the blockchain and makes data transfer faster. It does so by:
- Borsch serialization uses a compact binary format that takes up less space than traditional text-based formats like JSON or XML.
- Borsch uses a specific layout for structs, a pre-defined scheme for data organization. This allows for the efficient packing of data and reduces the size of the data stored on the blockchain.
- Borsch also uses a type system to represent data, which allows for more precise encoding, reducing the size of the data.
Because Borsch serialization uses fewer bytes to represent the same data, less data needs to be transferred during each transaction, making the data transfer faster.
Let's jump in!
Set Up Your Project
Create a new project directory in your terminal with the following:
mkdir deserialize-solana
cd deserialize-solana
Create a file for your app, app.ts:
echo > app.ts
Initialize your project with the "yes" flag to use default values for your new package:
yarn init --yes
#or
npm init --yes
Install Solana Web3 Dependency
We will need to add the Solana Web3 and Buffer Layout libraries for this exercise. It is fine if you have not previously used the buffer-layout libraries. These will provide important elements for defining our structs (*Note: there are alternative tools for deserializing Borsch data--additional reference links are included at the end of this guide.) In your terminal, enter:
yarn add @solana/web3.js@1 @solana/buffer-layout @solana/buffer-layout-utils
#or
npm install @solana/web3.js@1 @solana/buffer-layout @solana/buffer-layout-utils
We will need a few components from these libraries. Import them in app.ts at line 1 by adding:
import { Connection, PublicKey } from "@solana/web3.js";
import { publicKey, u64, bool } from '@solana/buffer-layout-utils';
import { u32, u8, struct } from '@solana/buffer-layout';
You can now access Logs for your RPC endpoints, helping you troubleshoot issues more effectively. If you encounter an issue with your RPC calls, simply check the logs in your QuickNode dashboard to identify and resolve problems quickly. Learn more about log history limits on our pricing page.
Connect to a Solana Cluster with Your QuickNode Endpoint
To build on Solana in this guide, you'll need a Mainnet API endpoint to connect with the network. You're welcome to use public nodes or deploy and manage your own infrastructure; however, if you'd like 8x faster response times, you can leave the heavy lifting to us.
You can now pay for a QuickNode plan using USDC on Solana. As the first multi-chain provider to accept Solana payments, we're streamlining the process for developers — whether you're creating a new account or managing an existing one. Learn more about paying with Solana here.
See why over 50% of projects on Solana choose QuickNode and sign up for a free account here. Next, copy the HTTP Provider link:
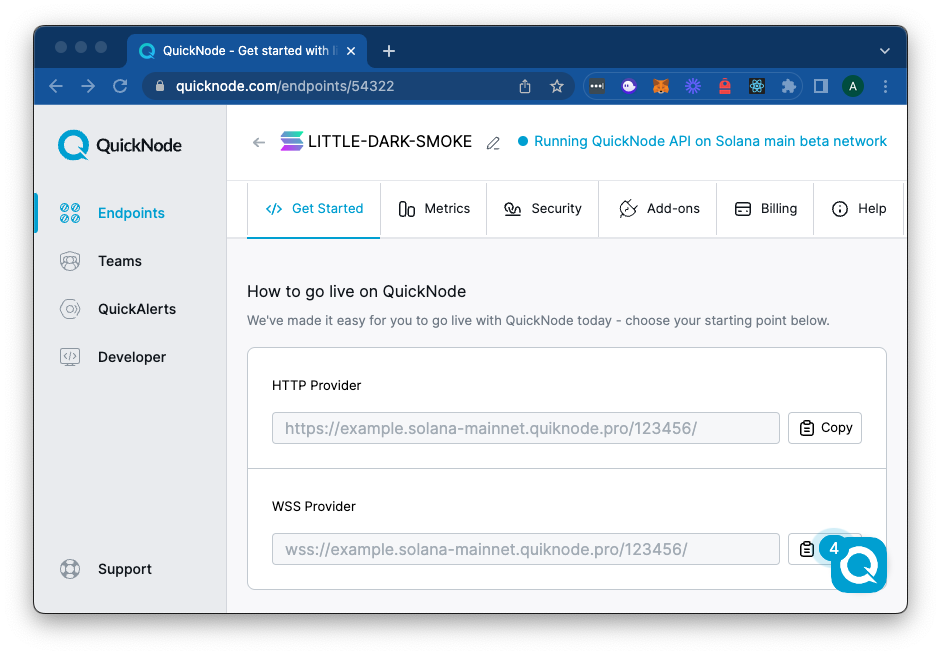
Inside app.ts under your import statements, declare your RPC and establish your Connection to Solana:
const QUICKNODE_RPC = 'https://example.solana-mainnet.quiknode.pro/0123456/'; //replace with your HTTP Provider from https://www.quicknode.com/endpoints
const SOLANA_CONNECTION = new Connection(QUICKNODE_RPC);
Finally, let's define an account that we will deserialize:
const MINT_ADDRESS = new PublicKey('7xKXtg2CW87d97TXJSDpbD5jBkheTqA83TZRuJosgAsU');
Though you can deserialize any account data, each type of account has different data schemas. To follow this guide, you should use a valid SPL Token Mint address (e.g., '7xKXtg2CW87d97TXJSDpbD5jBkheTqA83TZRuJosgAsU').
Your environment should look like this.
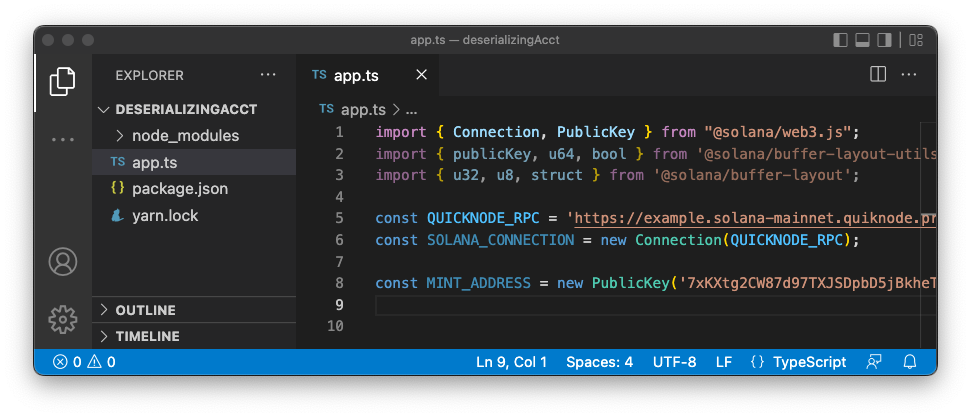
Ready? Let's build!
Step 1 - Fetch Account Info
Inside app.ts, create a new async function, fetchAndParseMint that accepts a Connection and a mint's PublicKey:
export  const fetchAndParseMint = async (mint: PublicKey, solanaConnection: Connection) => {
    try {
        console.log(`Step - 1: Fetching Account Data for ${mint.toBase58()}`);
        let {data} = await solanaConnection.getAccountInfo(mint) || {};
        if (!data) return
        console.log(data) ;
    }
    catch {
        return null;
    }
}

fetchAndParseMint(MINT_ADDRESS, SOLANA_CONNECTION);
In the snippet above, we get our account's data a by destructuring the results of a getAccountInfo call. If results are found, we log them to the console. After declaring our function, we call it to see the results when we pass in MINT_ADDRESS and SOLANA_CONNECTION.
In your terminal, run your app:
ts-node app
You should see some not-very-useful buffered account data like this:
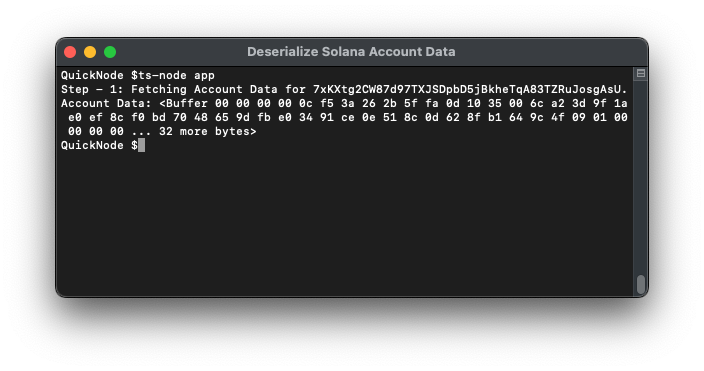
Let's deserialize that data so that we can find something more useful.
Step 2 - Deserialize Account Data
To deserialize our data, we need to know the account schema from our on-chain program struct, and we will need a TypeScript interface corresponding to that struct.
Define TypeScript Interface
Let's start by defining our TypeScript interface for our account data. Below your fetchAndParseMint function, declare a new interface, RawMint:
export interface RawMint {
    mintAuthorityOption: 1 | 0;
    mintAuthority: PublicKey;
    supply: bigint;
    decimals: number;
    isInitialized: boolean;
    freezeAuthorityOption: 1 | 0;
    freezeAuthority: PublicKey;
}
We are defining for our app how we expect our deserialized data to be structured. The structure we use here must match the on-chain program. For core Solana programs, like the SPL Token program, the program structs are open source and well documented. We were able to get this one from the SPL Program Library GitHub. Sometimes these interfaces are not so accessible, and you may need to go to the original program source code. You should notice that the Mint struct in the program is very similar to the TypeScript interface, but it is missing two fields (mintAuthorityOption and freezeAuthorityOption). These are established because those authorities are optional fields (denoted by COption<Pubkey> in the source code and are generated to allow us to easily query whether or not a value has been passed into that field.
For account data that you do not have access to a GitHub repository, you will need to check a public registry or explorer (often published as an Interface Description Language, IDL) for the struct or contact the developer directly. We have included some resources for finding IDLs at the end of this guide.
Note: you may notice the use of a non-native type, bigint, here. bigint stands for Big Integer, a length integer library for JavaScript to support large numbers. Though this type should work in your environment, if you have an older version of JavaScript, you may need to add Big Integer as a dependency in your project.
Define Buffer layout
Next, we must define our buffer layout, allowing us to find where each element of our data exists in the data struct.
export const MintLayout = struct<RawMint>([
    u32('mintAuthorityOption'),
    publicKey('mintAuthority'),
    u64('supply'),
    u8('decimals'),
    bool('isInitialized'),
    u32('freezeAuthorityOption'),
    publicKey('freezeAuthority'),
]);
We use the struct function, a generic function that takes in an array of fields, to return a Structure object with type RawMint (which we defined in the previous section). By using struct<RawMint>, the fields that are passed to the function are expected to match the properties defined in the RawMint interface, and the function will return a Structure<RawMint> object. This allows for more robust type checking and better documentation of the expected structure of the mint object.
The Structure class has several methods, like decode and encode, which can be used to serialize and deserialize data.
Each field passed to the struct function defines a specific aspect of the RawMint object's structure. These fields, defined in @solana/buffer-layout-utils and @solana/buffer-layout, are typically functions that take a single argument, which is a string that specifies the name of the property in the RawMint object that the field corresponds to.
For example, u32('mintAuthorityOption') is used to define a field for the mintAuthorityOption property in the RawMint object, and it tells the struct function that this property should be interpreted as a 32-bit unsigned integer. Similarly, publicKey('mintAuthority') is used to define a field for the mintAuthority property in the RawMint object, and it tells the struct function that this property should be interpreted as a PublicKey. In short, these fields define how each property of the RawMint object should be interpreted and read or written when encoding or decoding the RawMint object.
Decode the Account Data
Jump back to your fetchAndParseMint function and update your try statement by passing our data into .decode on our newly defined MintLayout:
    try {
        console.log(`Step - 1: Fetching Account Data for ${mint.toBase58()}`);
        let {data} = await solanaConnection.getAccountInfo(mint) || {};
        if (!data) return;

        console.log(`Step - 2: Deserializing Found Account Data`);
        const deserialized = MintLayout.decode(data);
        console.log(deserialized);
    }
We should expect this to decode our data into a type of RawMint. Go ahead and run your updated code--in your terminal type:
ts-node app
Hopefully, you see something like this:
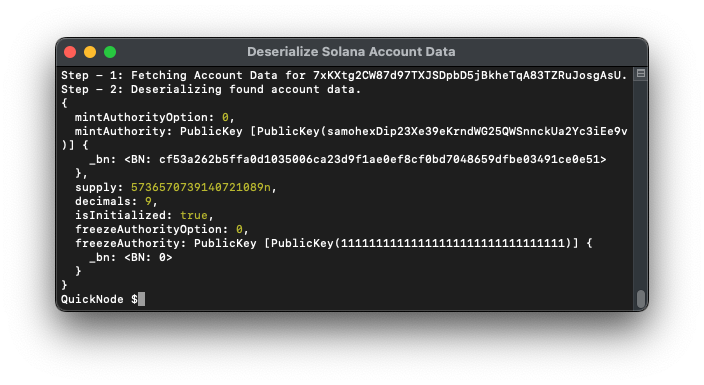
We have a little cleanup to do, but you should see that the new object is in the form of our RawMint class. Nice job!
Clean Results
Let's clean up our console.log a little to improve the readability of our results.
Inside your fetchAndParseMint, replace console.log(deserialized) with a series of logs to destructure our data:
.
        console.log(`Step - 3: Clean and Log Deserialized Data`);
        console.log('   Mint Authority Option:',deserialized.mintAuthorityOption);
        console.log('   Mint Authority:',deserialized.mintAuthority.toString());
        console.log('   Supply:',(Number(deserialized.supply)/10**deserialized.decimals).toLocaleString(undefined, { maximumFractionDigits: 0 })); // Necessary to convert bigint
        console.log('   Decimals:',deserialized.decimals);
        console.log('   Initialized:',deserialized.isInitialized);
        console.log('   Freeze Authority Option:',deserialized.freezeAuthorityOption);
        console.log('   Freeze Authority:',deserialized.freezeAuthority.toString());
There are a couple of things to note here:
- To make our PublicKeys readable, we convert them to strings by using
toString(). - Supply is a bigint, so we need to convert it to a number by passing it into
Number(value:bigint). Because we are using the SPL Token program, we must consider our token's decimals. To do this, we can divide by10^numDecimals. Finally, since our number is large, we usetoLocaleStringto format the number to the local language format (maximumFractionDigits will remove any decimals).
Run your code one last time, and see what you get. In your terminal, type:
ts-node app
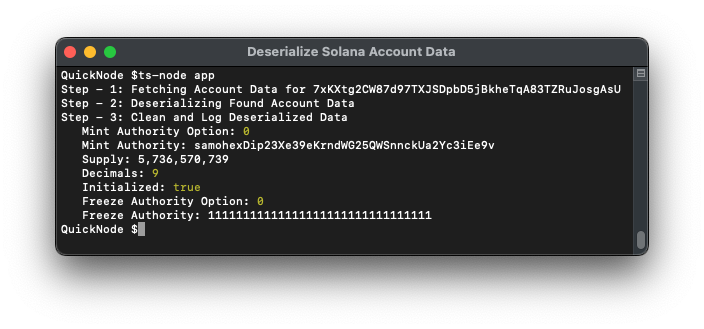
🤯 WHOA! We went from <Buffer 00 00... to a polished set of helpful information in just a few minutes. Great job.
Deserializing on the Fly
Before heading off, we want to introduce you to a helpful tool for deserializing accounts without needing to write any code. The SOL/Borsh Decoder by M2 is a user-friendly UI for doing what we just did. Check it out--they've already preloaded structs for SPL programs!
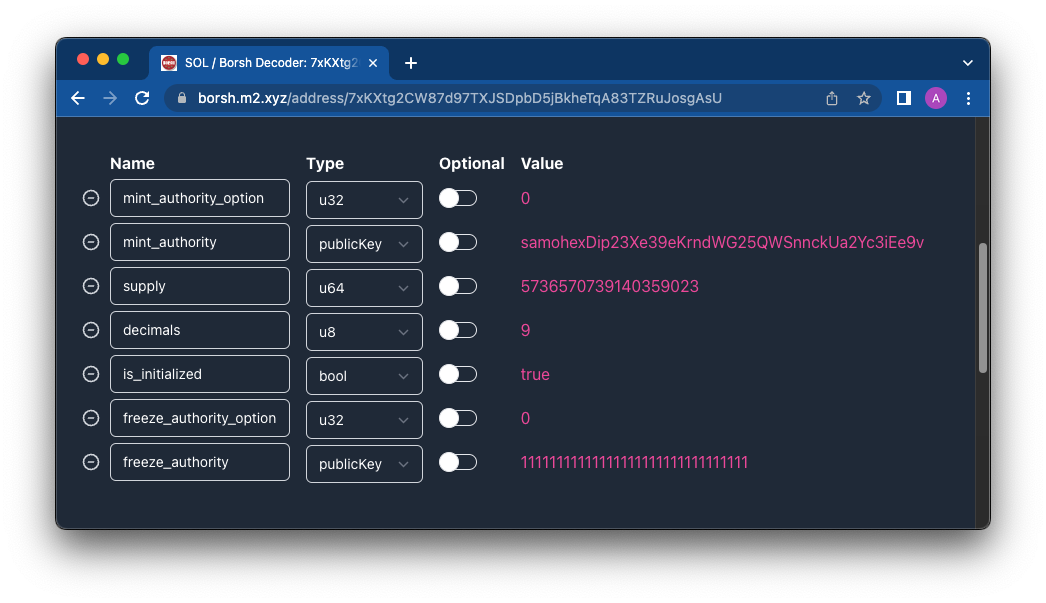
You should see the same results we just got from this exercise. Play around with this tool and a few other accounts--it can be a handy tool for figuring out an account's struct or getting a quick answer for a struct you already know!
We have created an account on devnet for you to test this out:
- Account address is 5SZTpnqXiAwfMdtyMnXfwjdexcDqcEaLUrnKk5EFgCKU.
- Click "mainnet-beta" at the bottom of the window to toggle to devnet, and then build this account structure (don't forget the discriminator).
pub struct Message {
    // discriminator: u64
    secret_one: String,
    secret_two: String,
    value: u8,
    completed: bool,
}
Your input should look like this:
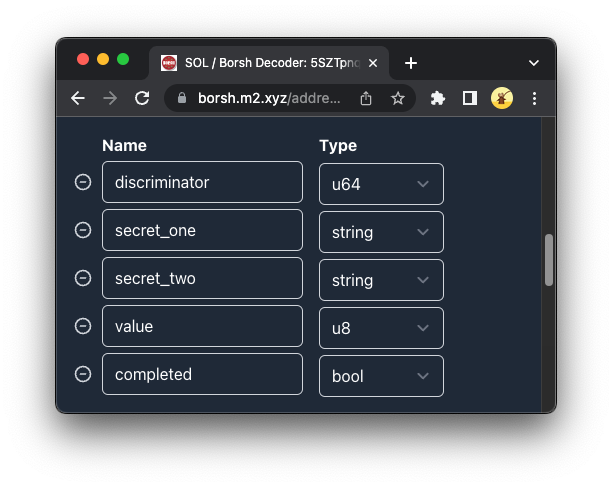
Do you see the message? 🙌
Wrap Up
Deserializing data is a critical component of Solana development. Great job for getting here. What are you deserializing, and how is it helping you on your next build? Share what you are working on in our Discord, or give us a follow on Twitter to stay up to date on all the latest information!
We ❤️ Feedback!
If you have any feedback on this guide, let us know. We’d love to hear from you.