17 min read
Overview
Token Exteions (aka Token-2022) are a newly released primitive by the Solana Labs team. This innovative standard introduces added control to your tokenomics. Equip yourself with these new tools for a more dynamic Solana development experience. In this guide, we will explore the latest features associated with the Token-2022 program and learn how to create, mint, and transfer your first token using the new Transfer Fees extension.
What You Will Do
Over the following sections, we will walk through creating a token, minting it, and transferring it to another wallet. We will also collect transfer fees and withdraw them to a designated wallet:
- Mint a token using the Token-2022 Program's Fee Transfer Extension
- Transfer the token and collect transfer fees
- Harvest and withdraw collected fees
What You Will Need
- Basic knowledge of Solana Fundamentals
- Basic knowledge of Web3 Wallets
- Experience with Solana SPL Tokens (How to Mint Fungible Tokens | How to Get All Tokens Held by a Wallet)
- Solana CLI latest version installed
| Dependency | Version |
|---|---|
| node.js | 18.12.1 |
| tsc | 5.0.2 |
| ts-node | 10.9.1 |
| solana-cli | 1.14.16 |
Step 1 - Set Up Your Environment
Let's create a new Node.js project and install the Solana-Web3.js library. In your terminal, enter the following commands in order:
mkdir token-2022 && cd token-2022
npm init -y # or yarn init -y
npm install @solana/web3.js@1 @solana/spl-token # or yarn add @solana/web3.js@1 @solana/spl-token
echo > app.ts
Open the app.ts file in your favorite editor and add the following imports:
// Import necessary functions and constants from the Solana web3.js and SPL Token packages
import {
    sendAndConfirmTransaction,
    Connection,
    Keypair,
    SystemProgram,
    Transaction,
    LAMPORTS_PER_SOL,
    Cluster,
    PublicKey,
    TransactionSignature,
    SignatureStatus,
    TransactionConfirmationStatus
} from '@solana/web3.js';

import {
    ExtensionType,
    createInitializeMintInstruction,
    mintTo,
    createAccount,
    getMintLen,
    getTransferFeeAmount,
    unpackAccount,
    TOKEN_2022_PROGRAM_ID,
    createInitializeTransferFeeConfigInstruction,
    harvestWithheldTokensToMint,
    transferCheckedWithFee,
    withdrawWithheldTokensFromAccounts,
    withdrawWithheldTokensFromMint,
    getOrCreateAssociatedTokenAccount,
    createAssociatedTokenAccountIdempotent
} from '@solana/spl-token';

// Initialize connection to local Solana node
const connection = new Connection('http://127.0.0.1:8899', 'confirmed');

// Generate keys for payer, mint authority, and mint
const payer = Keypair.generate();
const mintAuthority = Keypair.generate();
const mintKeypair = Keypair.generate();
const mint = mintKeypair.publicKey;

// Generate keys for transfer fee config authority and withdrawal authority
const transferFeeConfigAuthority = Keypair.generate();
const withdrawWithheldAuthority = Keypair.generate();

// Define the extensions to be used by the mint
const extensions = [
    ExtensionType.TransferFeeConfig,
];

// Calculate the length of the mint
const mintLen = getMintLen(extensions);

// Set the decimals, fee basis points, and maximum fee
const decimals = 9;
const feeBasisPoints = 100; // 1%
const maxFee = BigInt(9 * Math.pow(10, decimals)); // 9 tokens

// Define the amount to be minted and the amount to be transferred, accounting for decimals
const mintAmount = BigInt(1_000_000 * Math.pow(10, decimals)); // Mint 1,000,000 tokens
const transferAmount = BigInt(1_000 * Math.pow(10, decimals)); // Transfer 1,000 tokens

// Calculate the fee for the transfer
const calcFee = (transferAmount * BigInt(feeBasisPoints)) / BigInt(10_000); // expect 10 fee
const fee = calcFee > maxFee ?  maxFee : calcFee; // expect 9 fee
// Helper function to generate Explorer URL
function generateExplorerTxUrl(txId: string) {
    return `https://explorer.solana.com/tx/${txId}?cluster=custom&customUrl=http%3A%2F%2Flocalhost%3A8899`;
}
You can now access Logs for your RPC endpoints, helping you troubleshoot issues more effectively. If you encounter an issue with your RPC calls, simply check the logs in your QuickNode dashboard to identify and resolve problems quickly. Learn more about log history limits on our pricing page.
We import necessary dependencies from @solana/web3.js and @solana/spl-token. We will use these to create, mint, and transfer Token-2022 tokens. Note here that we are establishing a connection to the local cluster. If you prefer to use devnet or mainnet, simply change the Connection URL to your QuickNode RPC endpoint. In addition to creating our necessary authority accounts and calculating the expected fee amount, we have added a helper function to generate a URL to the transaction on Solana Explorer. This will be useful for viewing the transaction details.
There are a couple of things here that are new to the Token-2022 program:
-
transferFeeConfigAuthorityandwithdrawWithheldAuthorityare new authorities used to control the transfer fee settings and withdrawal of fees collected. We will use these later in the tutorial. -
The
extensionsarray is used to define the extensions that will be used by the mint. The Token-2022 program supports 13 extensions, but we will only use theTransferFeeConfigextension for this example. Theextensionarray calculates how much space is needed for our Token-2022 accounts (mint accounts are no longer all 165 bytes--they vary based on the extensions used). -
We also calculate the expected fee amount (which we will use later in our transfer function). This is because we must include the fee amount in our instruction (expected amount) to check that it matches the calculated amount when the instruction is executed. If it does not match, the transaction will fail. This is to help safeguard users from errantly sending a transaction without fully knowing the fee amount.
Let's define a helper function to confirm transactions. Add the following to your app.ts file:
    async function confirmTransaction(
        connection: Connection,
        signature: TransactionSignature,
        desiredConfirmationStatus: TransactionConfirmationStatus = 'confirmed',
        timeout: number = 30000,
        pollInterval: number = 1000,
        searchTransactionHistory: boolean = false
    ): Promise<SignatureStatus> {
        const start = Date.now();

        while (Date.now() - start < timeout) {
            const { value: statuses } = await connection.getSignatureStatuses([signature], { searchTransactionHistory });

            if (!statuses || statuses.length === 0) {
                throw new Error('Failed to get signature status');
            }

            const status = statuses[0];

            if (status === null) {
                await new Promise(resolve => setTimeout(resolve, pollInterval));
                continue;
            }

            if (status.err) {
                throw new Error(`Transaction failed: ${JSON.stringify(status.err)}`);
            }

            if (status.confirmationStatus && status.confirmationStatus === desiredConfirmationStatus) {
                return status;
            }

            if (status.confirmationStatus === 'finalized') {
                return status;
            }

            await new Promise(resolve => setTimeout(resolve, pollInterval));
        }

        throw new Error(`Transaction confirmation timeout after ${timeout}ms`);
    }
Finally, create an async function called main and add the following code:
async function main() {
    // Step 1 - Airdrop to Payer
    const airdropSignature = await connection.requestAirdrop(payer.publicKey, 2 * LAMPORTS_PER_SOL);
    await confirmTransaction(connection, airdropSignature);

    // Step 2 - Create a New Token

    // Step 3 - Mint tokens to Owner

    // Step 4 - Send Tokens from Owner to a New Account

    // Step 5 - Fetch Fee Accounts

    // Step 6 - Harvest Fees
}
// Execute the main function
main();
We are outlining the steps we will take to create, mint, and transfer our Token-2022 tokens. We have added the first step: airdrop some SOL to our payer account. This is necessary to pay for the transaction fees.
Let's build out the remaining steps.
Step 2 - Create a New Token
Let's start by creating our new token.
    // Step 2 - Create a New Token
    const mintLamports = await connection.getMinimumBalanceForRentExemption(mintLen);
    const mintTransaction = new Transaction().add(
        SystemProgram.createAccount({
            fromPubkey: payer.publicKey,
            newAccountPubkey: mint,
            space: mintLen,
            lamports: mintLamports,
            programId: TOKEN_2022_PROGRAM_ID,
        }),
        createInitializeTransferFeeConfigInstruction(
            mint,
            transferFeeConfigAuthority.publicKey,
            withdrawWithheldAuthority.publicKey,
            feeBasisPoints,
            maxFee,
            TOKEN_2022_PROGRAM_ID
        ),
        createInitializeMintInstruction(mint, decimals, mintAuthority.publicKey, null, TOKEN_2022_PROGRAM_ID)
    );
    const newTokenTx = await sendAndConfirmTransaction(connection, mintTransaction, [payer, mintKeypair], undefined);
    console.log("New Token Created:", generateExplorerTxUrl(newTokenTx));
This step is mostly the same as creating a token using the old SPL token process, with a couple of significant differences:
- First, we must calculate the minimum balance needed to create the new token. This is done by passing our
mintLeninto thegetMinimumBalanceForRentExemptionfunction. This will ensure our token mint account has adequate space for the extensions we use. - We are including a new instruction in our transaction to initialize the transfer fee config. Here we define:
feeBasisPoints- The fee basis points (1 basis point = 0.01%) that will be charged for transfers of this token (a percentage of the transaction amount, capped atmaxFee).maxFee- The maximum fee that will be charged for transfers of this token (an absolute value, not a percentage).transferFeeConfigAuthority- The authority that will be used to control the transfer fee settings.withdrawWithheldAuthority- The authority that will be used to withdraw fees collected.
- Finally, note that our transaction instructions use the
TOKEN_2022_PROGRAM_IDas the program ID. This is the program ID for the Token-2022 program. The transaction will fail if you attempt to execute this instruction with the old SPL token program ID.
Step 3 - Mint Tokens to Owner
Now that we have a token mint, let's mint some tokens! Add the following to your main() function:
    // Step 3 - Mint tokens to Owner
    const owner = Keypair.generate();
    const sourceAccount = await createAssociatedTokenAccountIdempotent(connection, payer, mint, owner.publicKey, {}, TOKEN_2022_PROGRAM_ID);
    const mintSig = await mintTo(connection,payer,mint,sourceAccount,mintAuthority,mintAmount,[],undefined,TOKEN_2022_PROGRAM_ID);
    console.log("Tokens Minted:", generateExplorerTxUrl(mintSig));
In this section, we're creating a new keypair for the token owner and setting up a source account for our mint. The createAssociatedTokenAccountIdempotent function is used to initialize a new associated token account to hold tokens from our newly created mint (seeded with our mint, owner, and the Token-2022 program ID). We will use this sourceAccount to transfer tokens later.
Then, using the mintTo function, we mint tokens to our source account. We log the returned signature and a URL for viewing the transaction on Solana Explorer.
Again, note that we use TOKEN_2022_PROGRAM_ID as the program ID for our ata and mint transactions.
Step 4 - Send Tokens from Owner to a New Account
Now that we have tokens in our source account, let's send them to a new account. Add the following to your main() function:
    // Step 4 - Send Tokens from Owner to a New Account
    const destinationOwner = Keypair.generate();
    const destinationAccount = await createAssociatedTokenAccountIdempotent(connection, payer, mint, destinationOwner.publicKey, {}, TOKEN_2022_PROGRAM_ID);
    const transferSig = await transferCheckedWithFee(
        connection,
        payer,
        sourceAccount,
        mint,
        destinationAccount,
        owner,
        transferAmount,
        decimals,
        fee,
        []
    );
    console.log("Tokens Transfered:", generateExplorerTxUrl(transferSig));
Similar to the previous step, we create a new Wallet, destinationOwner, and a new associated token account, destinationAccount, to define where our funds will go. Then we call a function new to Token-2022, transferCheckedWithFee, to transfer tokens from our sourceAccount to our destinationAccount. This function is similar to the old SPL token transferChecked (which requires a decimals parameter to check that the client is sending the intended number of tokens) function. The difference is that we are now also checking the expected fee amount. This means we must calculate the expected fee amount on the client side and pass it in as a parameter. On the backend, the fee parameter is checked against the feeBasisPoints and maxFee values we set when we initialized the transfer fee config. If the fee is not as expected, the transaction will fail. Here's a breakdown of all the parameters we are passing in:
connection- The connection to the Solana cluster.payer- The payer account.source- The source associated token account.mint- The mint of the token to transfer.destination- The destination associated token account.owner- The owner of the source associated token account.amount- The number of tokens to transfer (if you recall, this is the number of tokens we want to send times 10^decimals).decimals- The number of decimals for the token we are transferring.fee- The expected fee amount for the transfer (if you recall, when we calculated this, we verified that the value was less than or equal tomaxFee, otherwise, we usemaxFee).- we do not use any multisig for this transaction
Note: because this transaction is native to Token-2022 and unavailable on the SPL Token program, TOKEN_2022_PROGRAM_ID is the default value and does not need to be passed.
We still have some work to do, but if you run your program now, you can see that the transaction succeeds, and the tokens are transferred to the new account (less fees).
In a separate terminal, you can start a local validator with the following command:
solana-test-validator
And in your main terminal, run your script:
ts-node app.ts
You should see output similar to the following:
New Token Created: https://explorer.solana.com/tx/TXID_1?cluster=custom&customUrl=http%3A%2F%2Flocalhost%3A8899
Tokens Minted: https://explorer.solana.com/tx/TXID_2?cluster=custom&customUrl=http%3A%2F%2Flocalhost%3A8899
Tokens Transfered: https://explorer.solana.com/tx/TXID_3?cluster=custom&customUrl=http%3A%2F%2Flocalhost%3A8899
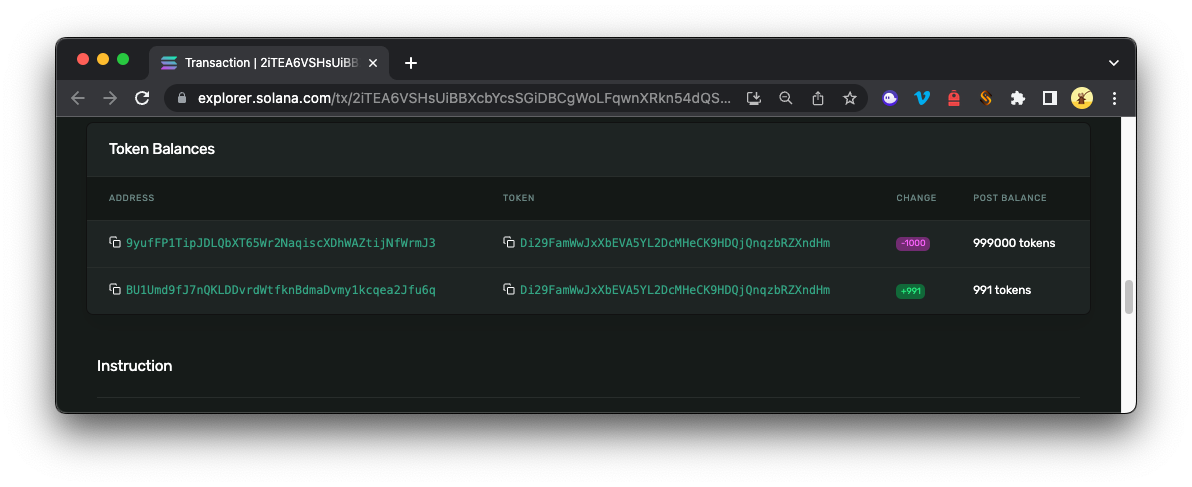
If you open the explorer URL for the "Tokens Transfered,"" you should see that 1,000 tokens were transferred from the source account to the destination account, but only 991 tokens were received. The remaining 9 tokens were retained as fees:
Let's find those tokens!
Step 5 - Fetch Fee Accounts
To withdraw fees collected from transfers, we must find the accounts holding them. This is a 2-step process:
- Fetch all token accounts that are associated with our mint. This looks very similar to fetching all tokens held by a wallet, with the exception that we are using
TOKEN_2022_PROGRAM_IDinstead ofTOKEN_PROGRAM_ID. Add the followinggetProgramAccountsquery to yourmain()function:
    // Step 5 - Fetch Fee Accounts
    const allAccounts = await connection.getProgramAccounts(TOKEN_2022_PROGRAM_ID, {
        commitment: 'confirmed',
        filters: [
            {
                memcmp: {
                    offset: 0,
                    bytes: mint.toString(),
                },
            },
        ],
    });
This request looks for accounts owned by the Token-2022 program and filters them by the mint we are interested in (the mint is in the 0 position of the account data).
- Decode each account to see if there are any fees to withdraw. Add the following code after your
getProgramAccountsquery:
    const accountsToWithdrawFrom: PublicKey[] = [];
    for (const accountInfo of allAccounts) {
        const account = unpackAccount(accountInfo.pubkey, accountInfo.account, TOKEN_2022_PROGRAM_ID);
        const transferFeeAmount = getTransferFeeAmount(account);
        if (transferFeeAmount !== null && transferFeeAmount.withheldAmount > BigInt(0)) {
            accountsToWithdrawFrom.push(accountInfo.pubkey);
        }
    }
Here's what we are doing:
- We create an empty array,
accountsToWithdrawFrom, to hold the accounts that have fees to withdraw. - We loop through each account returned from our
getProgramAccountsquery. - We unpack the account data using the
unpackAccountfunction to deserialize the data into aTokenAccountobject. - We check if the account has any fees to withdraw using the
getTransferFeeAmountfunction. If the account has withdrawal fees, we add it to ouraccountsToWithdrawFromarray.
Great job. Now let's claim those fees!
Step 6 - Harvest Fees
One important thing to understand about fees is that they are pooled at the recipient account, rather than a central fee vault. This is meant to maximize the parallelization of transactions; otherwise, a single fee account would need to be write-locked between parallel transfers, decreasing the protocol's throughput. This also means that a token account can only be closed once all fees have been withdrawn. For this reason, there are 2 ways to withdraw fees: one triggered by the withdrawWithheldAuthority (using the withdrawWithheldTokensFromAccounts method) and the other triggered by the account holder (using the harvestWithheldTokensToMint method).
Let's explore both approaches:
- Withdraw by Authority
- Withdraw by Owner
    // Step 6 Withdraw Fees by Authority
    const feeVault = Keypair.generate();
    const feeVaultAccount = await createAssociatedTokenAccountIdempotent(connection, payer, mint, feeVault.publicKey, {}, TOKEN_2022_PROGRAM_ID);

    const withdrawSig1 = await withdrawWithheldTokensFromAccounts(
        connection,
        payer,
        mint,
        feeVaultAccount,
        withdrawWithheldAuthority,
        [],
        accountsToWithdrawFrom
    );
    console.log("Withdraw from Accounts:", generateExplorerTxUrl(withdrawSig1));
    // Step 6 - Withdraw Fees by Owner
    const feeVault = Keypair.generate();
    const feeVaultAccount = await createAssociatedTokenAccountIdempotent(connection, payer, mint, feeVault.publicKey, {}, TOKEN_2022_PROGRAM_ID);

    const harvestSig = await harvestWithheldTokensToMint(connection, payer, mint, [destinationAccount]);
    console.log("Harvest by Owner:", generateExplorerTxUrl(harvestSig));

    // Tokens that have been harvested to Mint can then be claimed by the authority
    const withdrawSig2 = await withdrawWithheldTokensFromMint(
        connection,
        payer,
        mint,
        feeVaultAccount,
        withdrawWithheldAuthority,
        []
    );
    console.log("Withdraw from Mint:", generateExplorerTxUrl(withdrawSig2));
For both scenarios, we create a new wallet, feeVault (and associated token account, feeVaultAccount), to hold the fees we are withdrawing.
Withdraw Fees by Authority
We use the withdrawWithheldTokensFromAccounts method to withdraw fees from the accounts we found in Step 5. This method requires the authority to sign the transaction, so we pass in the withdrawWithheldAuthority wallet.
Withdraw Fees by Owner
- First, we use the
harvestWithheldTokensToMintmethod to harvest fees from the recipient account to the mint. This method requires the owner to sign the transaction, so we pass in thedestinationAccountwallet. The likely reason to do this in a practical application is if the user (or program) is closing the account and needs to withdraw all fees before closing. - Once the fees are moved to be associated with the mint account, the authority can withdraw them using the
withdrawWithheldTokensFromMintmethod. This method requires the authority to sign the transaction, so we pass in thewithdrawWithheldAuthoritywallet. This is slightly different from the first scenario, where the authority was withdrawing fees from the recipient account--in this case, we were withdrawing from the mint account.
We recommend trying both examples and exploring the Solana Explorer transactions using the links printed to the console.
Run the Code
Finally, in a separate terminal, run the following command to start a local Solana cluster:
solana-test-validator
And in your main terminal, run your script:
ts-node app.ts
You should see output similar to the following:
New Token Created: https://explorer.solana.com/tx/TXID_1?cluster=custom&customUrl=http%3A%2F%2Flocalhost%3A8899
Tokens Minted: https://explorer.solana.com/tx/TXID_2?cluster=custom&customUrl=http%3A%2F%2Flocalhost%3A8899
Tokens Transfered: https://explorer.solana.com/tx/TXID_3?cluster=custom&customUrl=http%3A%2F%2Flocalhost%3A8899
Withdraw from Accounts: https://explorer.solana.com/tx/TXID_4?cluster=custom&customUrl=http%3A%2F%2Flocalhost%3A8899
Again, explore the transactions in Solana Explorer using the links printed to the console--this will help you understand the flow of fees in the Token-2022 program.
Great job!
Wrap Up
You have just created a new token, minted some tokens, transferred tokens, and withdrawn fees from the recipient account. You can now use this code as a starting point for your own projects! If there is one thing to remember as you start on your Token-2022 journey, it's to make sure your program is using the correct program ID.
We would love to hear more about what you are building and how you plan to use Token-2022 for your projects. Drop us a line in Discord, or give us a follow on Twitter to stay up to date on all the latest information!
We ❤️ Feedback!
Let us know if you have any feedback or requests for new topics. We'd love to hear from you.