22 min read
Overview
JM! As demand for Solana block space increases, so does demand to ensure your transactions are included in a block. Additionally, many applications require the ability to atomically and sequentially execute multiple transactions. Jito Labs, a builder of high-performance MEV infrastructure for Solana, operates a Solana validator client that enables a unique feature called Bundles, which makes this possible. In this guide, we will discuss what Jito Bundles are and how to use the Lil' JIT marketplace add-on to bundle transactions and send them to the Jito Validator client.
Let's jump in!
Prefer a video walkthrough? Follow along with Sahil and learn about Jito bundles and how to send one.
What You Will Do
- Install the Lil' JIT marketplace add-on
- Write a script using TypeScript and Solana Kit
- Create a bundle of 5 transactions
- Send the Bundle to the Jito Validator client
- Verify the transactions are included in a block and processed in the correct order
What You Will Need
- A Quicknode account
- Experience with optimizing Solana transactions
- Experience with Solana Kit will be helpful
- Mainnet SOL (0.01 SOL should be enough for this demo)
- Solana CLI, latest
What are Jito Bundles?
Jito Bundles are a feature provided by Jito Labs that enables sequential and atomic execution of multiple transactions on the Solana blockchain. This feature is particularly useful for complex operations, efficient MEV (Miner Extractable Value) capture, and certain DeFi applications. To understand their significance, let's first review some key concepts:
- Individual Solana transactions are atomic: all instructions within a transaction either execute successfully or fail together.
- However, multiple transactions sent separately are not atomic: some may succeed while others fail. This can be problematic for many applications; for example, you may only want a transaction to land only if another transaction that impacts a user's position also succeeds.
- Some complex transactions are not executable on Solana because they include multiple compute-intensive instructions that exceed the run-time's compute budget (currently 1.4M Compute Units per transaction)
- Occasionally, network congestion can cause transactions to fail and not land in a given block (ref: Guide: How to Optimize Solana Transactions).
Jito Bundles address all of these issues by allowing multiple transactions to be bundled together and ensuring that all transactions in the Bundle either succeed or fail as a unit. A Jito Bundle is a group of up to five Solana transactions that are executed sequentially and atomically within the same block by Jito validators, ensuring that either all transactions in the Bundle succeed or none are processed. Bundles are prioritized based on a user-defined tip amount, incentivizing validators to process bundles ahead of other transactions.
Key Characteristics of Jito Bundles
| Characteristic | Description |
|---|---|
| Sequential Execution | Transactions in a bundle are guaranteed to execute in the order they are listed |
| Atomic Execution | All transactions in a bundle execute within the same slot |
| All-or-Nothing Outcome | If any transaction in a bundle fails, none of the transactions are committed to the chain |
| Bundle Size | Maximum of 5 transactions per Bundle (enabling complex operations exceeding the 1.4M Compute Units per transaction limit) |
How Jito Bundles Work
- The user creates and signs transactions
- The user bundles transactions together with a tip instruction to the last transaction
- Users send bundles to Jito's Block Engine
- Block Engine forwards bundles to validators running Jito
- Jito-Solana features a specialized BundleStage for executing bundles
- Bundles are processed only when a Jito-Solana leader is producing blocks
Use Cases for Jito Bundles
- MEV Arbitrage: Execute atomic arbitrage by bundling user transactions with arbitrage transactions
- Liquidations: Bundle oracle update transactions with liquidation transactions
- Batching Complex Operations: Overcome transaction size limits or compute budget constraints by batching operations across multiple transactions
Important Notes on Tipping
Bundles are prioritized based on a user-defined tip amount, which incentivizes validators to process bundles ahead of other transactions. Some key considerations when using tips:
- Tips incentivize validators to process bundles ahead of other transactions
- Tips are simply a SOL transfer instruction to one of several on-chain tip addresses
- The tip instruction must be in the last transaction of your Bundle
- Minimum tip required: 1,000 lamports
- Tip amounts vary based on demand and contested accounts
- Tip accounts should not be included in Address Lookup Tables
- Tip Payment Program:
T1pyyaTNZsKv2WcRAB8oVnk93mLJw2XzjtVYqCsaHqt - Tip Accounts can be accessed via the
getTipAccountsRPC method (we will cover this in a bit) or via the Jito Docs
Block Engine Bundle Selection Process
- Basic Sanity Check: Validates transactions and ensures the Bundle contains five or fewer transactions
- Simulation Check: Verifies all transactions will succeed and compares payment to other bundle submissions
- Auction Check: Groups bundles based on state locks, simulates them, and selects top N highest-paying bundles
Limitations
- Jito Bundles are only processed when a Jito-Solana leader is producing blocks (the Anza validator client does not process them). At the time of this writing (updated April 2025), the Jito validator client represents about 95% of the stake in the Solana blockchain (source: Jito Labs).
- Maximum of 5 transactions per Bundle
By leveraging Jito Bundles, developers can ensure complex, multi-transaction operations execute atomically and sequentially, enabling new possibilities for DeFi applications, trading strategies, and other advanced use cases on Solana.
For more detailed information, refer to Jito's official documentation.
Let's test it out!
Create a New Project
To get started, open a code editor of your choice and create a new project folder:
mkdir lil-jit-demo && cd lil-jit-demo
Then, initialize a new project using the following command:
npm init -y
Next, install the following dependencies:
npm install --save @solana/kit @solana-program/memo @solana-program/system
Note: You may need to install the
@solana-program/systemand@solana-program/memopackages using the--legacy-peer-depsflag.
Make sure you have Node types installed:
npm i --save-dev @types/node
And initialize a new TypeScript configuration file that supports JSON modules:
tsc --init --resolveJsonModule
And create a new file called index.ts in the root directory of your project:
echo > index.ts
You will need a paper wallet with ~0.01 SOL to test out this demo (and cover the cost of a bundle tip). If you don't have one, you can create one using the following command:
solana-keygen new -o secret.json -s --no-bip39-passphrase
You can get the new wallet's address by running the following command:
solana address -k secret.json
Make sure to send that wallet ~0.01 SOL before proceeding. You can verify your mainnet balance by running the following command:
solana balance -um -k secret.json
Great. Let's write our script!
Write the Script
Before we get to coding, let's just outline the steps we want our script to perform:
- Setup our script by importing our Solana keypair from the
secret.jsonfile and establishing a connection to our Lil' Jit-enabled Solana endpoint - Get a Jito Tip account to use for sending our tip to
- Fetch the recent blockhash
- Create a set of transactions to bundle. For this example, we will create 5 Memo transactions that each include a unique, sequential message (e.g., "lil jit demo transaction # ${index}")
- Simulate our Bundle to ensure it will succeed
- Send our Bundle
- Verify it is included in a block
Let's build it!
Import Dependencies
First, open up your index.ts file and add the following imports:
import {
    Rpc,
    createDefaultRpcTransport,
    createRpc,
    createJsonRpcApi,
    Address,
    mainnet,
    Base58EncodedBytes,
    createSolanaRpc,
    createKeyPairSignerFromBytes,
    createTransactionMessage,
    setTransactionMessageFeePayerSigner,
    pipe,
    setTransactionMessageLifetimeUsingBlockhash,
    appendTransactionMessageInstruction,
    TransactionPartialSigner,
    signTransactionMessageWithSigners,
    getBase64EncodedWireTransaction,
    Base64EncodedWireTransaction
} from "@solana/kit";
import { getAddMemoInstruction } from "@solana-program/memo";
import { getTransferSolInstruction } from "@solana-program/system";
import secret from "./secret.json";
We will use several interfaces and functionality from the @solana/kit library. We will also use the @solana-program/memo and @solana-program/system libraries to create our transactions.
Define Constants
Let's define a few constants that we'll use throughout our script. Add the following constants below your imports:
const MINIMUM_JITO_TIP = 1_000; // lamports
const NUMBER_TRANSACTIONS = 5;
const SIMULATE_ONLY = true;
const ENDPOINT = 'https://example.solana-mainnet.quiknode.pro/123456/'; // 👈 replace with your endpoint
const POLL_INTERVAL_MS = 3000;
const POLL_TIMEOUT_MS = 30000;
const DEFAULT_WAIT_BEFORE_POLL_MS = 5000;
Make sure you replace the ENDPOINT constant with your own Lil' JIT-enabled endpoint. If you do not already have an endpoint, you can create one at Quicknode.com. If you already have an endpoint and need to add the Lil' JIT Marketplace Add-on, you do so by going to your endpoint page and click Add-on and follow the steps to add the add-on.
Define Lil JIT Type
To best use the Solana Kit library, we will define a custom type for our Lil' JIT endpoint. Below your constants, add the following type definition:
type JitoBundleSimulationResponse = {
    context: {
        apiVersion: string;
        slot: number;
    };
    value: {
        summary: 'succeeded' | {
            failed: {
                error: {
                    TransactionFailure: [number[], string];
                };
                tx_signature: string;
            };
        };
        transactionResults: Array<{
            err: null | unknown;
            logs: string[];
            postExecutionAccounts: null | unknown;
            preExecutionAccounts: null | unknown;
            returnData: null | unknown;
            unitsConsumed: number;
        }>;
    };
};

type LilJitAddon = {
    getRegions(): string[];
    getTipAccounts(): Address[];
    getBundleStatuses(bundleIds: string[]): {
        context: { slot: number };
        value: {
            bundleId: string;
            transactions: Base58EncodedBytes[];
            slot: number;
            confirmationStatus: string;
            err: any;
        }[]
    };
    getInflightBundleStatuses(bundleIds: string[]): {
        context: { slot: number };
        value: {
            bundle_id: string;
            status: "Invalid" | "Pending" | "Landed" | "Failed";
            landed_slot: number | null;
        }[];
    };
    sendTransaction(transactions: Base64EncodedWireTransaction[]): string;
    simulateBundle(transactions: [Base64EncodedWireTransaction[]]): JitoBundleSimulationResponse;
    sendBundle(transactions: Base64EncodedWireTransaction[]): string;
}
Here we are defining the LilJitAddon type, which specifies the methods, params, and return types for interacting with the Lil' JIT Marketplace Add-on. We will use this type to interact with our endpoint. Due to its size, we have also broken out the JitoBundleSimulationResponse type into its own definition.
Create Helper Functions
Let's create a few helper functions to make our script more readable.
Create a Jito Bundles RPC Client
First, let's create a createJitoBundlesRpc function that creates a new RPC client for interacting with our Lil' JIT endpoint. Add the following function below your imports:
function createJitoBundlesRpc({ endpoint }: { endpoint: string }): Rpc<LilJitAddon> {
    const api = createJsonRpcApi<LilJitAddon>({
        responseTransformer: (response: any) => response.result,
    });
    const transport = createDefaultRpcTransport({
        url: mainnet(endpoint),
    });
    return createRpc({ api, transport });
}
We simply use the createRpc function from the @solana/kit library to create a new RPC client for our endpoint. We are also using the createJsonRpcApi and createDefaultRpcTransport functions to create the necessary API and transport objects for our RPC client. A couple of notes:
- make sure you are specifying
LilJitAddonas the type for yourapiobject - note that we are using a
responseTransformerto only return theresultproperty of the response
Create a Simulation Checker
Next, let's create a validateSimulation function that checks the simulation results to ensure the Bundle was successful. Add the following function below your imports:
function isFailedSummary(summary: JitoBundleSimulationResponse['value']['summary']): summary is { failed: any } {
    return typeof summary === 'object' && summary !== null && 'failed' in summary;
}

function validateSimulation(simulation: JitoBundleSimulationResponse) {
    if (simulation.value.summary !== 'succeeded' && isFailedSummary(simulation.value.summary)) {
        throw new Error(`Simulation Failed: ${simulation.value.summary.failed.error.TransactionFailure[1]}`);
    }
}
Here, we are adding two functions to help us check the response of a received simulation. The isFailedSummary function checks if the simulation summary is an object with a failed property. The validateSimulation function checks if the simulation summary has succeeded and throws an error if it does not.
Create a Transaction Generator
We are going to need to create five distinct transactions for the purposes of our demo. Let's make a createTransaction function that generates a new transaction for each of the five transactions. We'll want to be able to specify an index that we can pass into a memo message to ensure each transaction is unique, and we'll want to allow the option to include a tip instruction in our transaction (this will be the last transaction in the Bundle). Add the following function below your imports:
async function createTransaction(
    index: number,
    latestBlockhash: Parameters<
        typeof setTransactionMessageLifetimeUsingBlockhash
    >[0],
    payerSigner: TransactionPartialSigner,
    includeTip?: Address
) {
    const transactionMessage = pipe(
        createTransactionMessage({ version: 0 }),
        (tx) => setTransactionMessageFeePayerSigner(payerSigner, tx),
        (tx) => setTransactionMessageLifetimeUsingBlockhash(latestBlockhash, tx),
        (tx) =>
            appendTransactionMessageInstruction(
                getAddMemoInstruction({
                    memo: `lil jit demo transaction # ${index}`,
                }),
                tx
            ),
        (tx) =>
            includeTip
                ? appendTransactionMessageInstruction(
                    getTransferSolInstruction({
                        source: payerSigner,
                        destination: includeTip,
                        amount: MINIMUM_JITO_TIP,
                    }),
                    tx
                )
                : tx
    );
    return await signTransactionMessageWithSigners(transactionMessage);
}
Here we are using @solana/kit pipe function to create a new transaction message:
- we set the fee payer using
setTransactionMessageFeePayerSigner, - we set the lifetime of the transaction using the
setTransactionMessageLifetimeUsingBlockhashfunction - we are also using the
appendTransactionMessageInstructionfunction to add a memo instruction to the transaction (each memo will have a unique message based on theindexparameter--we will use this to verify the transaction sequence executed correctly) - we are also using the
appendTransactionMessageInstructionfunction to add a tip instruction to the transaction ifincludeTipis passed in as a parameter
Get a Tip Account
The Lil' JIT add-on includes a method for retrieving a list of tip accounts. We will use this method to get all the tip accounts and then select one from the list randomly to include in our transaction. Add the following function below your imports:
async function getTipAccount(rpc: Rpc<LilJitAddon>): Promise<Address> {
    try {
        const tipAccounts = await rpc.getTipAccounts().send() as Address[];
        const randomTipIndex = Math.floor(Math.random() * tipAccounts.length);
        const jitoTipAddress = tipAccounts[randomTipIndex];
        if (!jitoTipAddress) {
            throw new Error("No JITO tip accounts found");
        }
        return jitoTipAddress;
    } catch {
        throw new Error("Failed to get Tip Account");
    }
}
Here, we simply use the getTipAccounts method to retrieve a list of tip accounts. We then select a random tip account from the list and return it.
Poll for Bundle Status
We will use the getInflightBundleStatuses method to poll for the status of our Bundle until it has landed, failed, or timed out. Add the following function below your imports:
async function pollBundleStatus(
    rpc: Rpc<LilJitAddon>,
    bundleId: string,
    timeoutMs = 30000,
    pollIntervalMs = 3000,
    waitBeforePollMs = DEFAULT_WAIT_BEFORE_POLL_MS
) {
    await new Promise(resolve => setTimeout(resolve, waitBeforePollMs));

    const startTime = Date.now();
    let lastStatus = '';
    while (Date.now() - startTime < timeoutMs) {
        try {
            const bundleStatus = await rpc.getInflightBundleStatuses([bundleId]).send();
            const status = bundleStatus.value[0]?.status ?? 'Unknown';

            if (status !== lastStatus) {
                lastStatus = status;
            }

            if (status === 'Landed') {
                return true;
            }

            if (status === 'Failed') {
                console.log(`Bundle ${status.toLowerCase()}. Exiting...`);
                throw new Error(`Bundle failed with status: ${status}`);
            }

            await new Promise(resolve => setTimeout(resolve, pollIntervalMs));
        } catch {
            console.error('❌ - Error polling bundle status.');
        }
    }
    throw new Error("Polling timeout reached without confirmation");
}
There's not much going on here; we are simply defining a polling frequency and timeout period and calling getInflightBundleStatuses to check the status of our Bundle. If the Bundle has landed, we return true, breaking the loop. If the Bundle fails or the polling times out, we log an error and throw an error.
Note that we are adding a brief delay before polling to ensure the Bundle has time to be processed--otherwise you may get a polling error.
Additionally, the getInflightBundleStatuses method will only find bundles processed within the last five minutes. If you use this on a bundle that was processed more than five minutes ago, you will get a 500 error.
Create a Main Function
Let's start by framing out our main function based on the abovementioned steps. Add the following function below the rest of your code:
async function main() {
    // Step 1 - Setup


    // Step 2 - Get a Jitotip account


    // Step 3 - Get Recent Blockhash


    // Step 4 - Create Transactions


    // Step 5 - Simulate Bundle


    // Step 6 - Send Bundle


    // Step 7 - Verify Bundle Landed

}

main().catch((error) => {
    console.error(`❌ - Error: ${error}`);
    process.exit(1);
});
Great. Now let's fill in the steps.
Step 1 - Setup
First, let's import our keypair and define both our Solana RPC and our Lil' JIT RPC. Add the following to your main function:
    // Step 1 - Setup
    const signer = await createKeyPairSignerFromBytes(new Uint8Array(secret));
    console.log(`Initializing Jito Bundles demo. Sending ${NUMBER_TRANSACTIONS} transactions from ${signer.address}.`);

    const solanaRpc = createSolanaRpc(ENDPOINT);
    const lilJitRpc = createJitoBundlesRpc({ endpoint: ENDPOINT });
    console.log(`✅ - Established connection to Quicknode.`);
Now we can use both our native Solana RPC methods (using solanaRpc) and our Jito Bundles RPC methods (using lilJitRpc) to interact with the Jito validator client.
Step 2 - Get a Jitotip account
Since we have already defined our getTipAccount function, all we need to do is call it and store its response to a variable, jitoTipAddress. Add the following to your main function:
    // Step 2 - Get a Jitotip account
    const jitoTipAddress = await getTipAccount(lilJitRpc);
    console.log(`✅ - Using the following Jito Tip account: ${jitoTipAddress}`);
Step 3 - Get Recent Blockhash
Just like any transaction on Solana, we must pass a recent blockhash to ensure our transaction is processed timely. If you send a bundle with transactions that have stale blockhashes, the transactions/bundle will fail.
Add the following to your main function:
    // Step 3 - Get Recent Blockhash
    const { value: latestBlockhash } = await solanaRpc
        .getLatestBlockhash({ commitment: "confirmed" })
        .send();
    console.log(`✅ - Latest blockhash: ${latestBlockhash.blockhash}`);
Step 4 - Create Transactions
Now, we will create five memo transactions, each with a unique, sequential message. Add the following to your main function:
    // Step 4 - Create Transactions
    const signedTransactions = await Promise.all(
        Array.from({ length: NUMBER_TRANSACTIONS }, (_, i) => {
            const isLastTransaction = i === NUMBER_TRANSACTIONS - 1;
            return createTransaction(
                i + 1,
                latestBlockhash,
                signer,
                isLastTransaction ? jitoTipAddress : undefined
            );
        })
    );

    const base64EncodedTransactions = signedTransactions.map((transaction) => {
        const base64EncodedTransaction = getBase64EncodedWireTransaction(transaction);
        return base64EncodedTransaction;
    }) as Base64EncodedWireTransaction[];

    console.log(`✅ - Transactions assembled and encoded.`);
Let's walk through what we've done here:
- We use the
createTransactionfunction to create 5 Memo transactions. - For the last transaction in the array, we include the
jitoTipAddressas the tip account so the tip instruction is included in the transaction. - We then encode the transactions using base64 encoding.
Step 5 - Simulate Bundle
Next, we will use the Lil' JIT simulateBundle method to test our Bundle. We can use the validateSimulation function we wrote earlier to ensure the simulation succeeds. Finally, we create a conditional that will end the script if our configuration is set to Simulation Only mode. Add the following to your main function:
    // Step 5 - Simulate Bundle
    const simulation = await lilJitRpc
        .simulateBundle([base64EncodedTransactions])
        .send();

    validateSimulation(simulation);
    console.log(`✅ - Simulation Succeeded.`);

    if (SIMULATE_ONLY) {
        console.log("🏁 - Simulation Only Mode - Exiting script.");
        return;
    }
Step 6 - Send Bundle
Now, we will use the sendBundle method to send our Bundle to the Jito validator client. Add the following to your main function:
    // Step 6 - Send Bundle
    let bundleId: string;
    try {
        bundleId = await lilJitRpc
            .sendBundle(base64EncodedTransactions)
            .send();
        console.log(`✅ - Bundle sent: ${bundleId}`);
    } catch (error) {
        console.error("❌ - Error sending bundle:", error);
        throw error;
    }
Step 7 - Verify Bundle Landed
Finally, let's call our pollBundleStatus function to verify the Bundle landed. Add the following to your main function:
    // Step 7 - Verify Bundle Landed
    await pollBundleStatus(lilJitRpc, bundleId, POLL_TIMEOUT_MS, POLL_INTERVAL_MS);
    console.log(`✅ - Bundle landed: ${bundleId}`);
    console.log(`     https://explorer.jito.wtf/bundle/${bundleId}`);
    console.log(`     (Note: This URL may take a few moments to become available.)`);
Great job. We should now have a working script that sends 5 Memo transactions to the Jito validator client and verifies that they landed. Let's run it!
Run Your Code
Before you run your code, check your SIMULATE_ONLY and MINIMUM_JITO_TIP variables. If you set SIMULATE_ONLY to true, the script will only simulate the Bundle and exit. Otherwise, it will send the Bundle to the validator client--if the transaction lands on mainnet, your transactions will be included in a block, meaning your tip will be paid. This is irreversible.
When you are ready, in your terminal, run the following command:
ts-node index.ts
If you set SIMULATE_ONLY to false, you should see something similar to the following output:
Initializing Jito Bundles demo. Sending 5 transactions from FUA7zS5PXVtW2VCmFGtfv5q6AdusbpVGy8HTjVjBAAzR.
✅ - Using the following Jito Tip account: HFqU5x63VTqvQss8hp11i4wVV8bD44PvwucfZ2bU7gRe
✅ - Latest blockhash: CghMwVqLLdKrdgdCKDbTtRgdRhj9BfCBZxL8n87QNB9C
✅ - Transactions assembled and encoded.
✅ - Simulation Succeeded.
✅ - Bundle sent: c4fb0940406d3fead71e29b9f87d2273ab6a743f3da1bf4aeeb73db3521685b0
✅ - Bundle landed: c4fb0940406d3fead71e29b9f87d2273ab6a743f3da1bf4aeeb73db3521685b0
     https://explorer.jito.wtf/bundle/c4fb0940406d3fead71e29b9f87d2273ab6a743f3da1bf4aeeb73db3521685b0
     (Note: This URL may take a few moments to become available.)
LFJitoooo! Great job! You've landed your first Bundle on Solana. As you should note in our terminal output, the Jito bundle explorer might take a minute to update with your Bundle, so wait a minute or so and then click your link. You should see something like this:
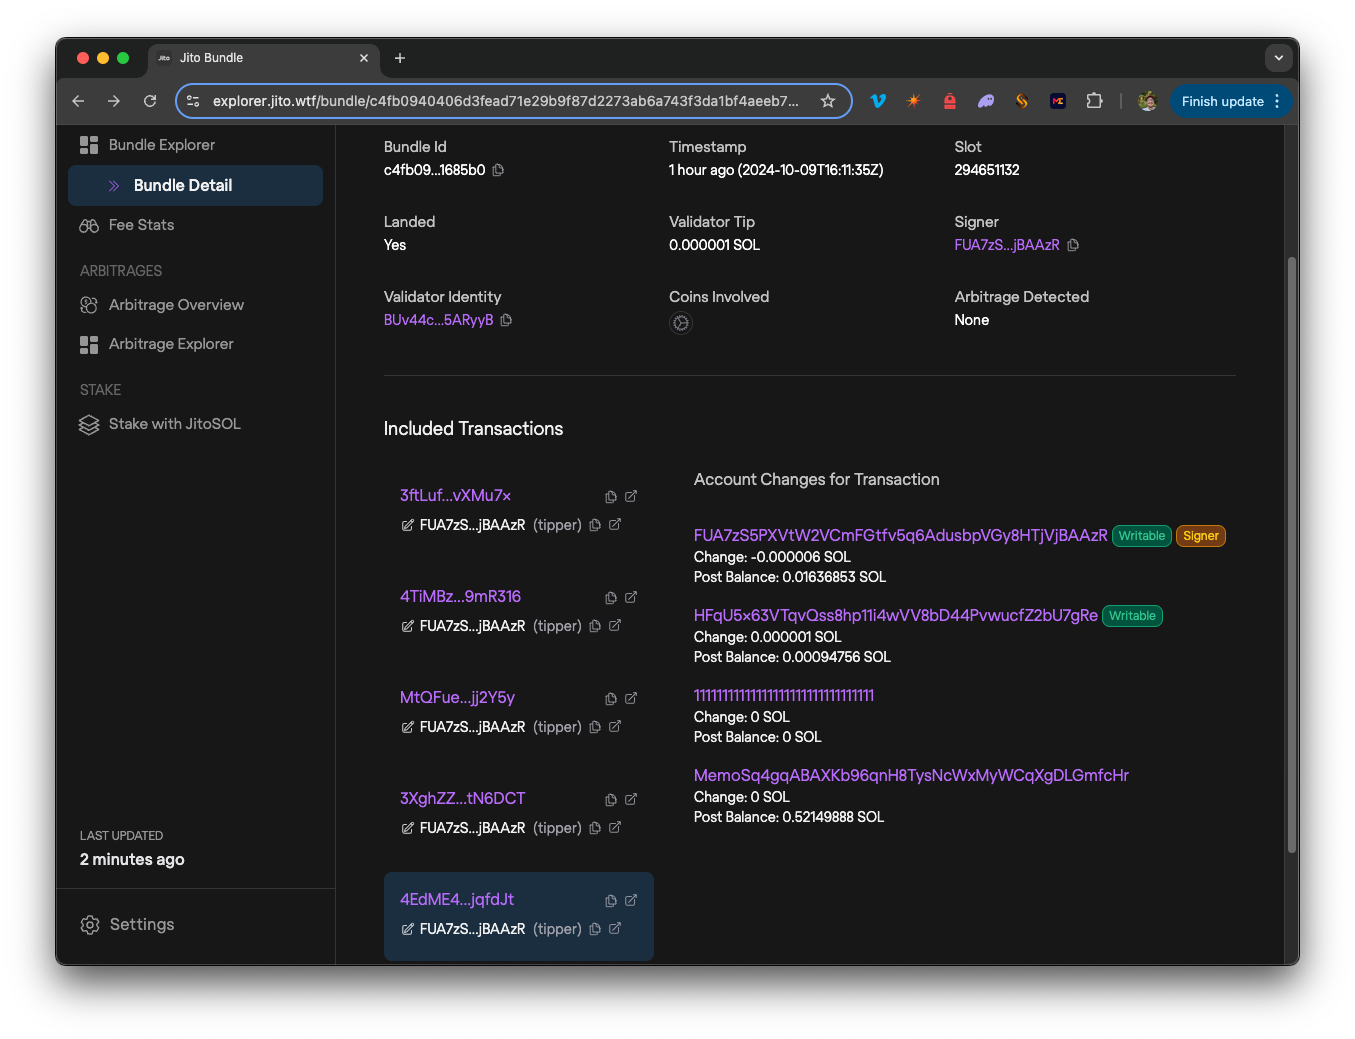
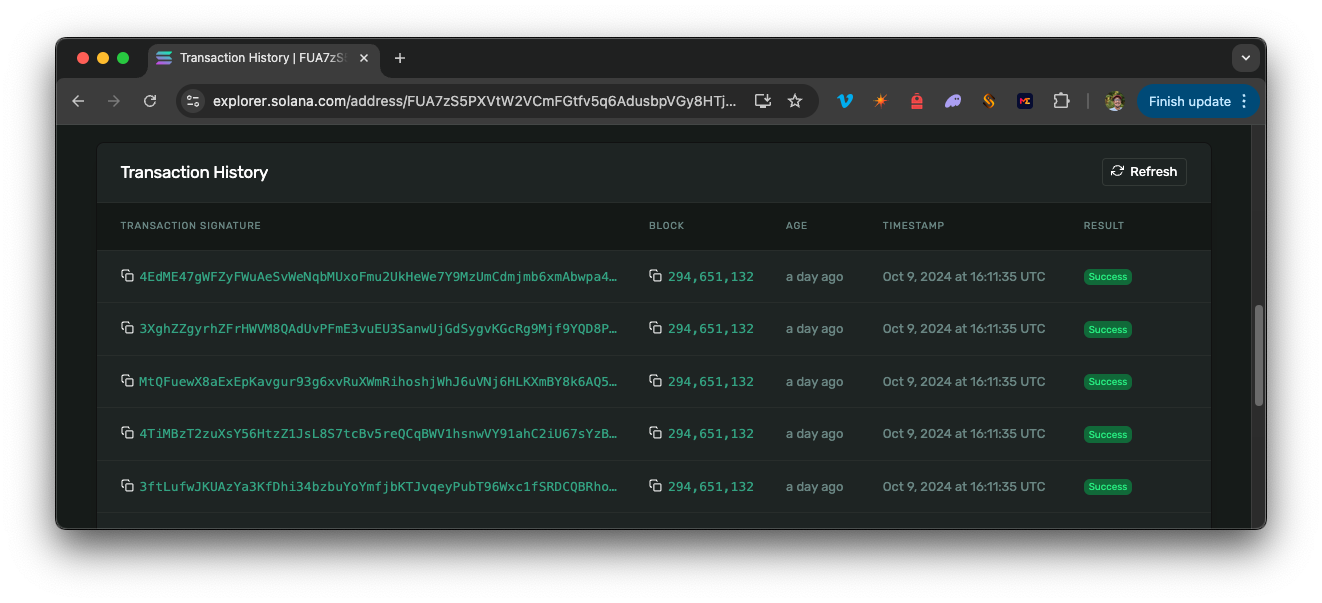
The Bundle should show all five transactions in order. The fifth transaction should include the tip instruction with a SOL balance transfer. You can see this in the example above. You can also open each transaction individually by clicking the ⎘ icon in the top right of a transaction (or browse your wallet address in the Solana Explorer). You should see all five transactions with the same timestamp and block:
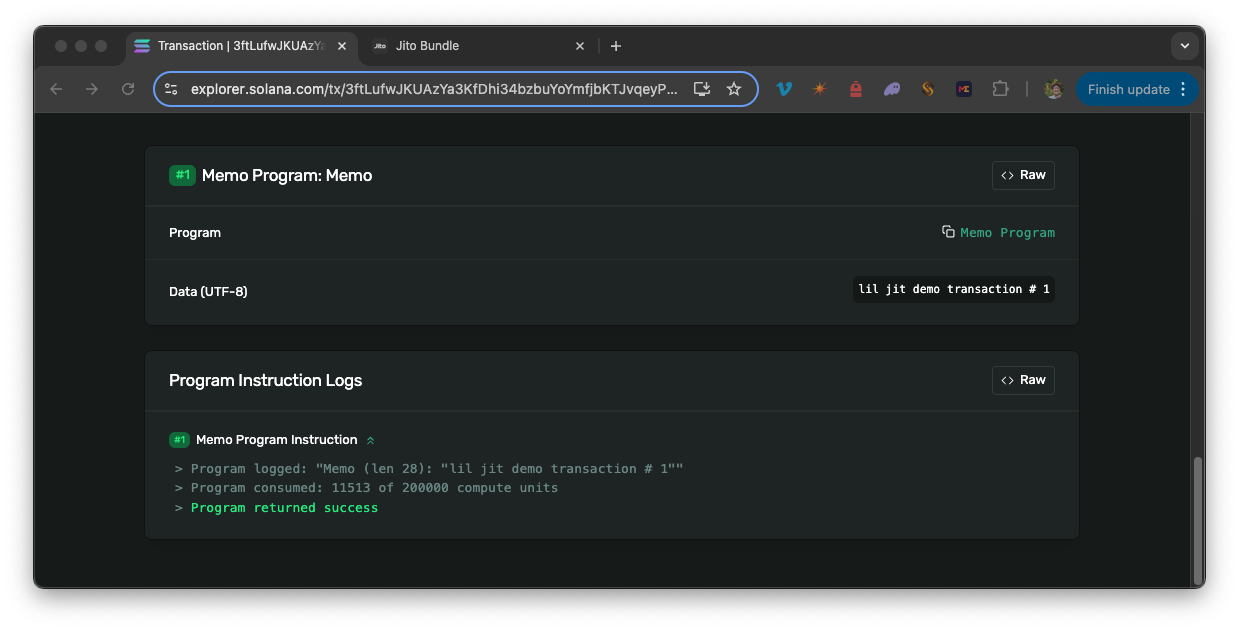
You should be able to navigate to the 1st of the five transactions and see "lil jit demo transaction # 1" in the transaction details:
And you should be able to navigate to the 5th transaction and see "lil jit demo transaction # 5" in the transaction details with our tip transfer as well:
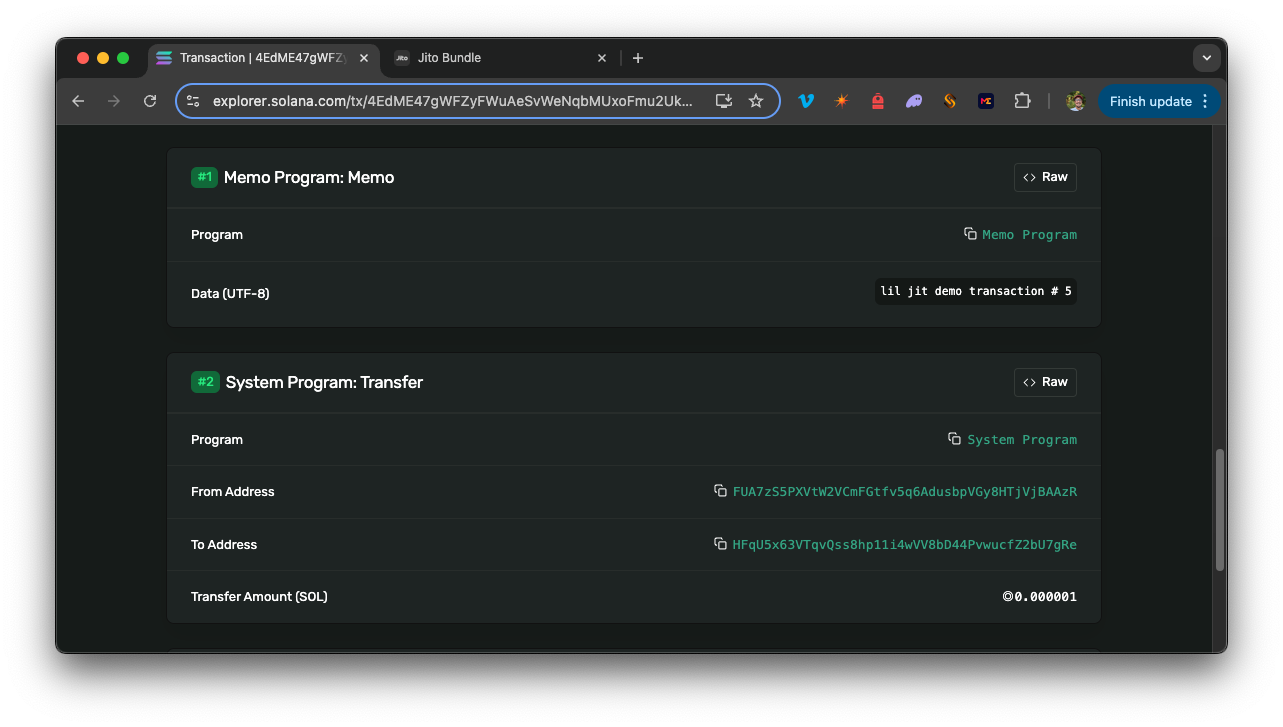
This shows:
- All transactions are included in the same block
- All transactions are executed in the same order that they were sent
- All transactions are successful
- The final transaction includes a tip transfer to the tip account
Pretty cool, right? Nice job! 🎉
Frequently Asked Questions
What are Jito Bundles?
Jito Bundles are groups of up to five Solana transactions that execute sequentially and atomically within the same block, meaning all transactions succeed together or none are processed. They are designed to guarantee transaction order and protect against partial execution failures.
Why would I use Jito Bundles instead of regular transactions?
Jito Bundles are ideal when you need guaranteed sequential execution, when operations exceed the 1.4M Compute Unit limit per transaction, or when you need atomic execution across multiple transactions for MEV protection or complex DeFi operations.
What is a Jito tip and why is it required?
A Jito tip is a small SOL payment (minimum 1,000 lamports) included as a transfer instruction in the last transaction of your bundle. Tips incentivize validators to prioritize your bundle over other transactions, with higher tips receiving priority in the Block Engine auction.
How do I send a Jito Bundle using Quicknode?
You need a Quicknode Solana endpoint with the Lil' JIT marketplace add-on enabled, then create up to five signed transactions, encode them in base64, simulate the bundle, and submit it using the sendBundle RPC method.
How can I verify my bundle was included in a block?
After sending, use the getInflightBundleStatuses method with your bundle ID to poll for status, or check the Jito explorer at https://explorer.jito.wtf/bundle/[bundleId] to see all transactions with matching timestamps and block numbers.
Do Jito Bundles work on all Solana validators?
No, Jito Bundles only process when a Jito-Solana validator is producing blocks. At the time of this writing, the Jito validator client represents approximately 95% of stake on Solana.
That's a Bundle!
Jito Bundles are a powerful tool to level up your Solana development experience. By utilizing the Lil' JIT marketplace add-on, you can bundle transactions and ensure they are executed in the same block and in the specified order. This is a great way to optimize your transactions and maximize the performance of your applications.
We look forward to seeing what you build with the Lil' JIT add-on. Let us know what you are up to or if you have any questions! You can reach out to us on Discord or Twitter.
We ❤️ Feedback!
Let us know if you have any feedback or requests for new topics. We'd love to hear from you.