13 min read
Overview
Anchor is a framework that speeds up the development of secure programs on the Solana Blockchain. When working with Solana and Anchor, you will likely encounter situations where you need to send SOL or SPL tokens between accounts (e.g., handling a user's payment to your treasury or having a user send their NFT to an escrow account). This guide will walk you through the process of transferring SOL and SPL tokens using Anchor. We'll cover the necessary code for both the program and tests to ensure a seamless transfer of tokens between accounts.
What You Will Do
In this guide, you will:
- Create a Solana program using Anchor and Solana Playground
- Create a program instruction to send SOL between two users
- Create a program instruction to send SPL tokens between two users
- Write tests to verify the token transfers
What You Will Need
- Basic experience with building in Anchor (Guide: Getting Started with Anchor)
- Experience with Solana Transfers (Guide: How to Send SOL using JavaScript) and SPL Token Transfers (Guide: How to Transfer SPL Tokens)
- Basic knowledge of the JavaScript/TypeScript and Rust programming languages
- A modern web browser (e.g., Google Chrome)
Dependencies Used in this Guide
| Dependency | Version |
|---|---|
| anchor-lang | 0.26.0 |
| anchor-spl | 0.26.0 |
| solana-program | 1.14.12 |
| spl-token | 3.5.0 |
Initiate Your Project
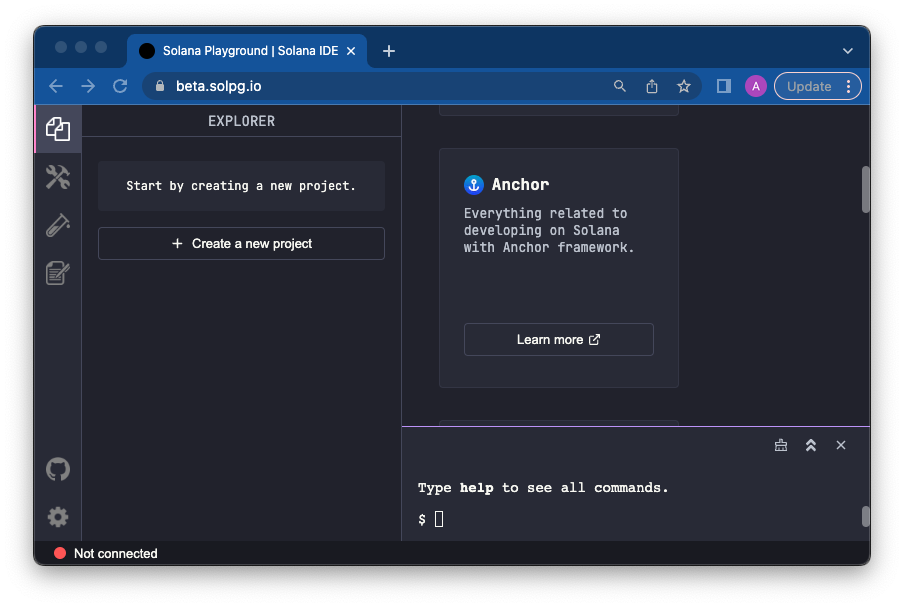
Create a new project in Solana Playground by going to https://beta.solpg.io/. Solana Playground is a browser-based Solana code editor that will allow us to quickly get up and running with this project. You're welcome to follow along in your own code editor, but this guide will be tailored to Solana Playground's required steps. First, click "Create a new project":
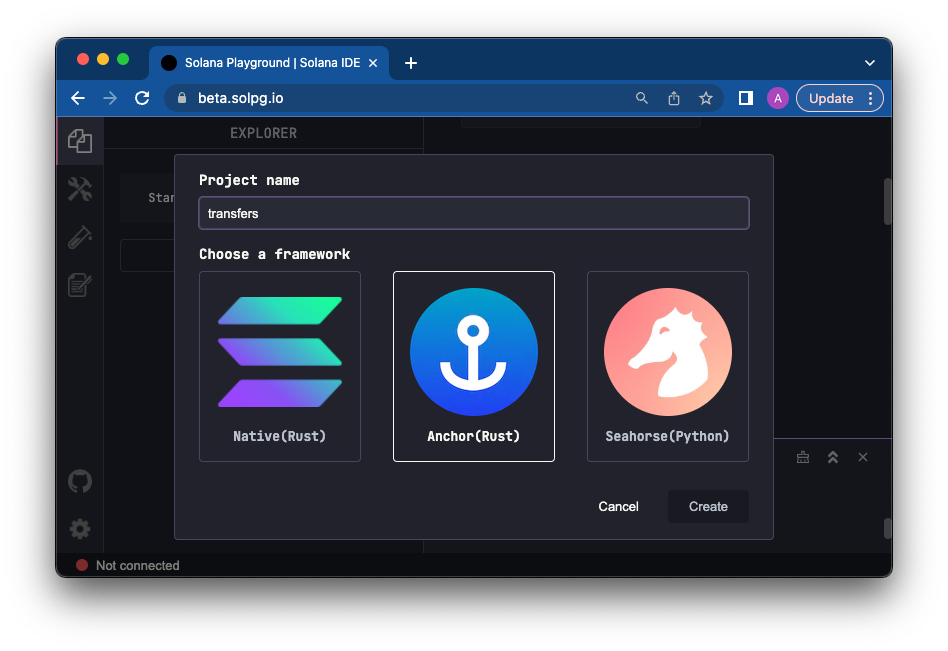
Enter a project name, "transfers," and select "Anchor (Rust)":
Create and Connect a Wallet
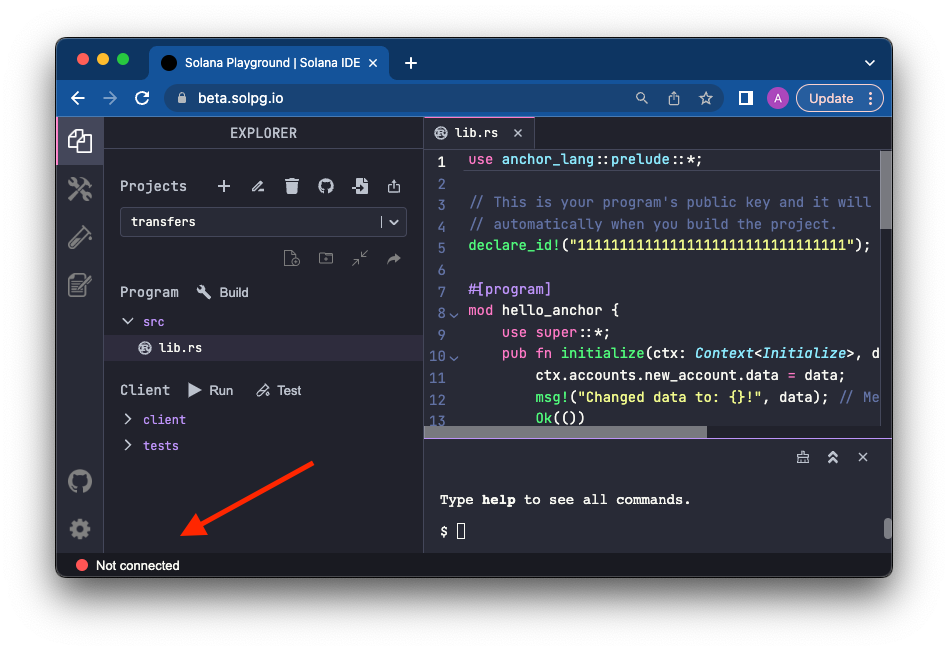
Since this project is just for demonstration purposes, we can use a "throw-away" wallet. Solana Playground makes it easy to create one. You should see a red dot "Not connected" in the bottom left corner of the browser window. Click it:
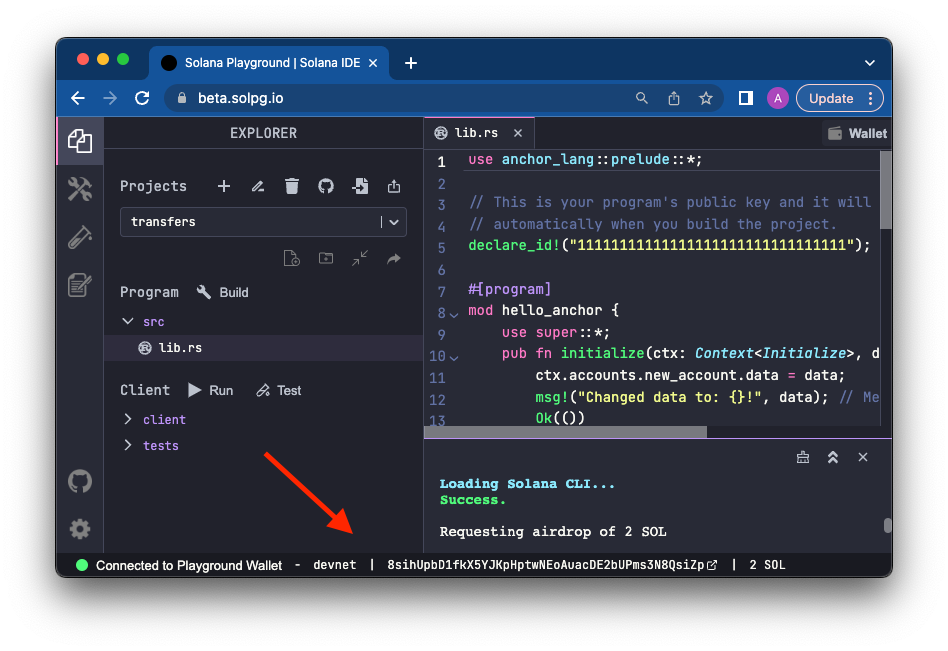
Solana Playground will generate a wallet for you (or you can import your own). Feel free to save it for later use, and click continue when you're ready. A new wallet will be initiated and connected to Solana devnet. Solana Playground airdrops some SOL to your new wallet automatically, but we will request a little extra to ensure we have enough for deploying our program. In the browser terminal, you can use Solana CLI commands. Enter solana airdrop 2 to drop 2 SOL into your wallet. Your wallet should now be connected to devnet with a balance of 6 SOL:
You are ready to go! Let's build!
Create the Transfer Program
Let's start by opening lib.rs and deleting the starter code. Once you have a blank slate, we can start building our program. First, we will need to import some dependencies. Add the following to the top of the file:
use anchor_lang::prelude::*;
use anchor_spl::token::{self, Token, TokenAccount, Transfer as SplTransfer};
use solana_program::system_instruction;
declare_id!("11111111111111111111111111111111");
These imports will allow us to use the Anchor framework, the SPL token program, and the system program. Solana Playground will automatically update declare_id! when we deploy our program.
Create a Transfer Lamports (SOL) Function
To create a function for transferring SOL (or lamports), we must define a struct for our transfer context. Add the following to your program:
#[derive(Accounts)]
pub struct TransferLamports<'info> {
    #[account(mut)]
    pub from: Signer<'info>,
    #[account(mut)]
    pub to: AccountInfo<'info>,
    pub system_program: Program<'info, System>,
}
The struct defines a from account that will sign the transaction and send SOL, a to account that will receive the SOL, and the system program to handle the transfer. The #[account(mut)] attribute indicates that the program will modify the account.
Next, we'll create the function that will handle the transfer. Add the following to your program:
#[program]
pub mod solana_lamport_transfer {
    use super::*;
    pub fn transfer_lamports(ctx: Context<TransferLamports>, amount: u64) -> Result<()> {
        let from_account = &ctx.accounts.from;
        let to_account = &ctx.accounts.to;

        // Create the transfer instruction
        let transfer_instruction = system_instruction::transfer(from_account.key, to_account.key, amount);

        // Invoke the transfer instruction
        anchor_lang::solana_program::program::invoke_signed(
            &transfer_instruction,
            &[
                from_account.to_account_info(),
                to_account.clone(),
                ctx.accounts.system_program.to_account_info(),
            ],
            &[],
        )?;

        Ok(())
    }
}
Here is a brief explanation of the different parts of this snippet:
-
The
#[program]attribute marks the module as an Anchor program. It generates the required boilerplate to define the program's entry point and automatically handles the account validation and deserialization. -
Inside the
solana_lamport_transfermodule, we import necessary items from the parent module withuse super::*;. -
The
transfer_lamportsfunction takes a Context and anamountas its arguments. The Context contains the required account information for the transaction, and theamountis the number of lamports to transfer. -
We create references to the
from_accountandto_accountfrom the context, which will be used for the transfer. -
The
system_instruction::transferfunction creates a transfer instruction that takes thefrom_account's public key,to_account's public key, and theamountto be transferred as arguments. -
The
anchor_lang::solana_program::program::invoke_signedfunction invokes the transfer instruction and uses the transaction's signer (from_account). It takes the transfer instruction, an array of account information for the from_account, to_account, and the system_program, and an empty array for the signers. -
The transfer_lamports function returns an
Ok(())to indicate a successful execution.
You should be able to make sure everything is working by clicking the Build button or typing anchor build into the terminal. If you have any errors, check your code against the code in this guide and follow the error responses' recommendations. If you need help, feel free to contact us on Discord.
Create a Transfer SPL Tokens Function
Before we deploy our program, let's add a 2nd function that will transfer SPL tokens. First, let's create a new context for the function. Add the following to your program under your TransferLamports struct:
#[derive(Accounts)]
pub struct TransferSpl<'info> {
    pub from: Signer<'info>,
    #[account(mut)]
    pub from_ata: Account<'info, TokenAccount>,
    #[account(mut)]
    pub to_ata: Account<'info, TokenAccount>,
    pub token_program: Program<'info, Token>,
}
This struct will require the from wallet (our signer), the from wallet's associated token account (ATA), the to wallet's ATA, and the token program. You don't need the destination wallet's primary account because it will be unchanged (only its ATA will be modified). Let's create our function. Inside the solana_lamport_transfer module, under the transfer_lamports instruction, add the following:
    pub fn transfer_spl_tokens(ctx: Context<TransferSpl>, amount: u64) -> Result<()> {
        let destination = &ctx.accounts.to_ata;
        let source = &ctx.accounts.from_ata;
        let token_program = &ctx.accounts.token_program;
        let authority = &ctx.accounts.from;

        // Transfer tokens from taker to initializer
        let cpi_accounts = SplTransfer {
            from: source.to_account_info().clone(),
            to: destination.to_account_info().clone(),
            authority: authority.to_account_info().clone(),
        };
        let cpi_program = token_program.to_account_info();

        token::transfer(
            CpiContext::new(cpi_program, cpi_accounts),
            amount)?;
        Ok(())
    }
Let's break that function down:
-
The
transfer_spl_tokensfunction takes a Context and anamountas its arguments. The TransferSpl context contains the required account information for the transaction we defined in the previous step. -
We create references to the
destination,source,token_program, andauthorityfrom the context. These variables represent the destination ATA, source ATA, token program, and the signer's wallet, respectively. -
The SplTransfer struct is created with account information for the
source,destination, andauthority. This struct will provide account information when making a cross-program invocation (CPI) to the SPL Token program. -
The
token::transferfunction is called with a new CpiContext created using thecpi_programandcpi_accounts, as well as theamountto be transferred. This function performs the actual token transfer between the specified ATAs. -
We return an
Ok(())to indicate a successful execution.
Go ahead and build your program again to ensure everything works by clicking "Build" or entering anchor build.
If the program builds successfully, you can deploy it to the Solana devnet.
Deploy the Program
Click the Tools Icon 🛠 on the left side of the page, and then click "Deploy":
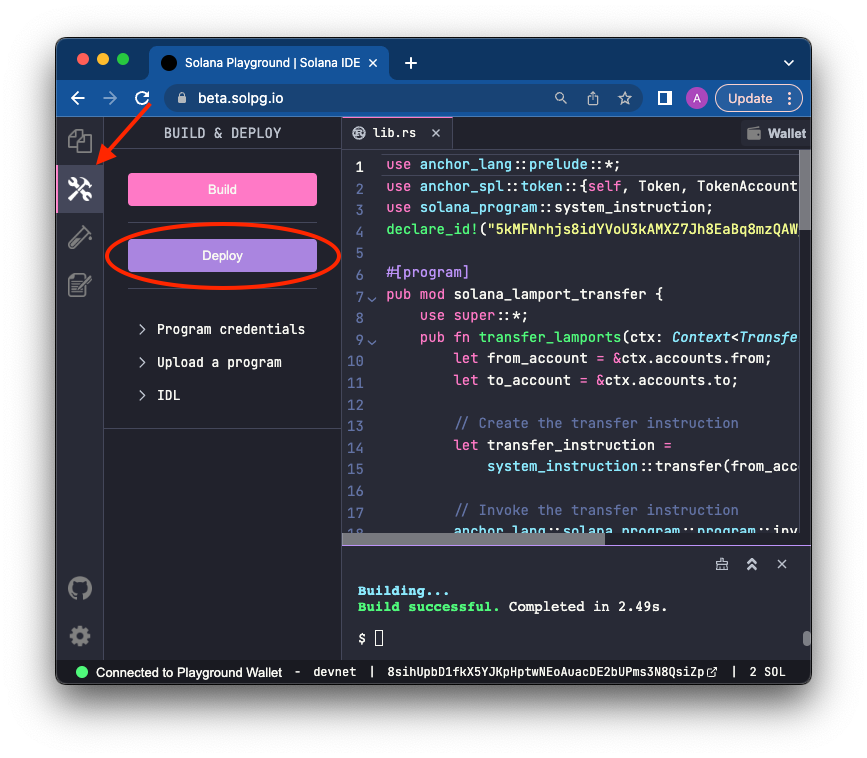
This will likely take a minute or two, but on completion, you should see something like this in your browser terminal:

Great job! Let's test it out.
Test the Program
Return to your main file window where you edited your lib.rs file by clicking the 📑 icon on the top left side of the page. Open anchor.test.ts and replace the contents with the following:
import {
  createMint,
  createAssociatedTokenAccount,
  mintTo,
  TOKEN_PROGRAM_ID,
} from "@solana/spl-token";
describe("Test transfers", () => {

});
You can now access Logs for your RPC endpoints, helping you troubleshoot issues more effectively. If you encounter an issue with your RPC calls, simply check the logs in your QuickNode dashboard to identify and resolve problems quickly. Learn more about log history limits on our pricing page.
This code will import the necessary functions from the SPL Token program to create a mint, create an associated token account, and mint tokens to the associated token account. This will also create a test suite for our program.
Test Transfer Lamports
Inside of your test suite, add the following code:
  it("transferLamports", async () => {
    // Generate keypair for the new account
    const newAccountKp = new web3.Keypair();
    // Send transaction
    const data = new BN(1000000);
    const tx = await pg.program.methods
      .transferLamports(data)
      .accounts({
        from: pg.wallet.publicKey,
        to: newAccountKp.publicKey,
      })
      .signers([pg.wallet.keypair])
      .transaction();
    const txHash = await web3.sendAndConfirmTransaction(pg.program.provider.connection, tx, [pg.wallet.keypair]);
    console.log(`https://explorer.solana.com/tx/${txHash}?cluster=devnet`);
    const newAccountBalance = await pg.program.provider.connection.getBalance(
      newAccountKp.publicKey
    );
    assert.strictEqual(
      newAccountBalance,
      data.toNumber(),
      "The new account should have the transferred lamports"
    );
  });
Here's what's happening in this transferLamports test:
- We generate a new keypair for the destination account.
- We define the amount to transfer as
data, which is set to 1,000,000 lamports (.001 SOL) (note: Anchor expects us to pass this value as a Big Number type). - We execute the
transferLamportsfunction of the Solana program by callingpg.program.methods.transferLamports(data). The accounts used for this transaction are specified with the accounts method, where thefromaccount is the test wallet's public key, and thetoaccount is the newly generated account's public key. Anchor knows that we will need the system program, so we do not need to pass it here. - The transaction is signed using the test wallet's keypair with the
signersmethod. - The transaction is created with the
transaction()method. - The test waits for the transaction to be finalized using await
sendAndConfirmTransaction(). This is important in making sure when we check the balance of the new account, it has been updated with the transferred amount. - The balance of the new account is fetched using
getBalance(), and it's stored in thenewAccountBalancevariable. - An assertion is made using
assert.strictEqualto confirm that the balance of the new account matches the transferred amount. The test will only succeed if the balance matches the expected amount.
Test Transfer SPL Tokens
After your transferLamports test but inside the same test suite, add a test for your SPL token transfer:
  it("transferSplTokens", async () => {
    // Generate keypairs for the new accounts
    const fromKp = pg.wallet.keypair;
    const toKp = new web3.Keypair();

    // Create a new mint and initialize it
    const mint = await createMint(
      pg.program.provider.connection,
      pg.wallet.keypair,
      fromKp.publicKey,
      null,
      0
    );

    // Create associated token accounts for the new accounts
    const fromAta = await createAssociatedTokenAccount(
      pg.program.provider.connection,
      pg.wallet.keypair,
      mint,
      fromKp.publicKey
    );
    const toAta = await createAssociatedTokenAccount(
      pg.program.provider.connection,
      pg.wallet.keypair,
      mint,
      toKp.publicKey
    );
    // Mint tokens to the 'from' associated token account
    const mintAmount = 1000;
    await mintTo(
      pg.program.provider.connection,
      pg.wallet.keypair,
      mint,
      fromAta,
      pg.wallet.keypair.publicKey,
      mintAmount
    );

    // Send transaction
    const transferAmount = new BN(500);
    const tx = await pg.program.methods
      .transferSplTokens(transferAmount)
      .accounts({
        from: fromKp.publicKey,
        fromAta: fromAta,
        toAta: toAta,
        tokenProgram: TOKEN_PROGRAM_ID,
      })
      .signers([pg.wallet.keypair, fromKp])
      .transaction();
    const txHash = await web3.sendAndConfirmTransaction(pg.program.provider.connection, tx, [pg.wallet.keypair, fromKp]);
    console.log(`https://explorer.solana.com/tx/${txHash}?cluster=devnet`);
    const toTokenAccount = await pg.connection.getTokenAccountBalance(toAta);
    assert.strictEqual(
      toTokenAccount.value.uiAmount,
      transferAmount.toNumber(),
      "The 'to' token account should have the transferred tokens"
    );
  });
Here's what's happening in this transferSplTokens test:
- We generate a new keypair for the destination account.
- We create a new mint and initialize it.
- We create associated token accounts for the source and destination wallets associated with the new token mint.
- We mint 1,000 tokens to the source's (from wallet) associated token account.
- We execute the
transferSplTokensinstruction we created in our program. The accounts used for this transaction are specified with the accounts method, where thefromaccount is the test wallet's public key, thefromAtaaccount is the source associated token account, thetoAtaaccount is the destination associated token account, and thetokenProgramis the SPL Token program ID. - The transaction is created with the
transaction()method. - The test waits for the transaction to be finalized using await
sendAndConfirmTransaction(). This is important in making sure when we check the balance of the new account, it has been updated with the transferred amount. - The balance of the new token account is fetched using
getTokenAccountBalance(), and it's stored in thetoTokenAccountvariable. - An assertion is made using
assert.strictEqualto confirm that the balance of the new account matches the transferred amount. The test will only succeed if the balance matches the expected amount.
Great job--let's test it out! Press the 🧪 Test button on the left side of the screen to run your tests. You should see both tests pass like this:
Running tests...
  anchor.test.ts:
  Test
    https://explorer.solana.com/tx/5DNZm9oCtzMFSqUte6bt9tW5iW95AS77hSz8uqjZjD41rkJpCDLHRti6X7iRDrCfHRRGpMeAAePrVcKW4Qg3C9GB?cluster=devnet
    ✔ transferLamports (13409ms)
    https://explorer.solana.com/tx/3KCDqrbUonDBQSZfN8jFYZH8vo4fWgLfa3nCSWfCmeNgva3yVCeiy7QfiH9Az8U8LQpS1VKMELCH2wPDL4BcgKD6?cluster=devnet
    ✔ transferSplTokens (15975ms)
  2 passing (29s)
That's it! Great job.
Wrap up
You have now implemented a native SOL transfer and an SPL token transfer using your own Solana program. This is an excellent start to building your own NFT project, game, or DeFi application on Solana. Keep building!
If you're stuck, have questions, or just want to talk about what you're building, drop us a line on Discord or Twitter!
We ❤️ Feedback!
If you have any feedback on this guide, let us know. We'd love to hear from you.