19 min read
Overview
Solana Explorer provides access to a wealth of great information on the Solana blockchain: transaction history and details, token balances, NFT metadata, and much more. In our opinion, browsing Solana Explorer is one of the best ways to understand Solana, but building a Solana Explorer takes your knowledge to the next level! In this 3 part series, we are covering the steps needed to build a simple clone of Solana Explorer!
In our first guide, we fetched Transaction history and displayed it in a Table for your users. In this guide, we're going to create a variable Transaction detail page that can be accessed by clicking any of the transactions generated in the Transaction History table.
What You Will Do
In this guide, you will use the Solana Explorer Example we built in our previous How to Build a Solana Explorer Clone (Part 1: Transaction History) guide. You'll use that framework to build a component that will allow users to open a new page with a dynamic URL that shows the detail of any specific transaction in a users' transaction history.

What You Will Need
-
Nodejs (version 16.15 or higher) installed
-
Typescript experience and ts-node installed
-
Basic knowledge of HTML/CSS
-
Experience with Solana Transactions (Guide: How to Get Transaction Logs on Solana)
-
Experience with Solana Scaffold (Guide: How to Connect Users to Your dApp with the Solana Wallet Adapter and Scaffold)
To follow along with this guide, you will need to have completed our guide on How to Build a Solana Explorer Clone (Part 1: Transaction History). Why? We will be building on top of the code that is there.
The final code from the How to Build a Solana Explorer Clone (Part 1: Transaction History) guide can be found in this QuickNode Github repo. That guide will serve as a starting point to this one. Make sure that you have followed the instructions in that guide and completed all the steps.
Quick Start: If you didn't have a chance to complete the 1st guide, here's a simple way to jump right in. In your terminal create a project directory and clone the sample:
mkdir solana-explorer-demo
cd solana-explorer-demo
git clone https://github.com/quiknode-labs/technical-content.git .
cd solana/explorer-clone-part-2/starter
yarn install
echo > .env
Then update your .env with your QuickNode RPC:
REACT_APP_SOLANA_RPC_HOST=https://example.solana-devnet.quiknode.pro/000000/
REACT_APP_NETWORK=devnet
And enter yarn dev into your terminal.
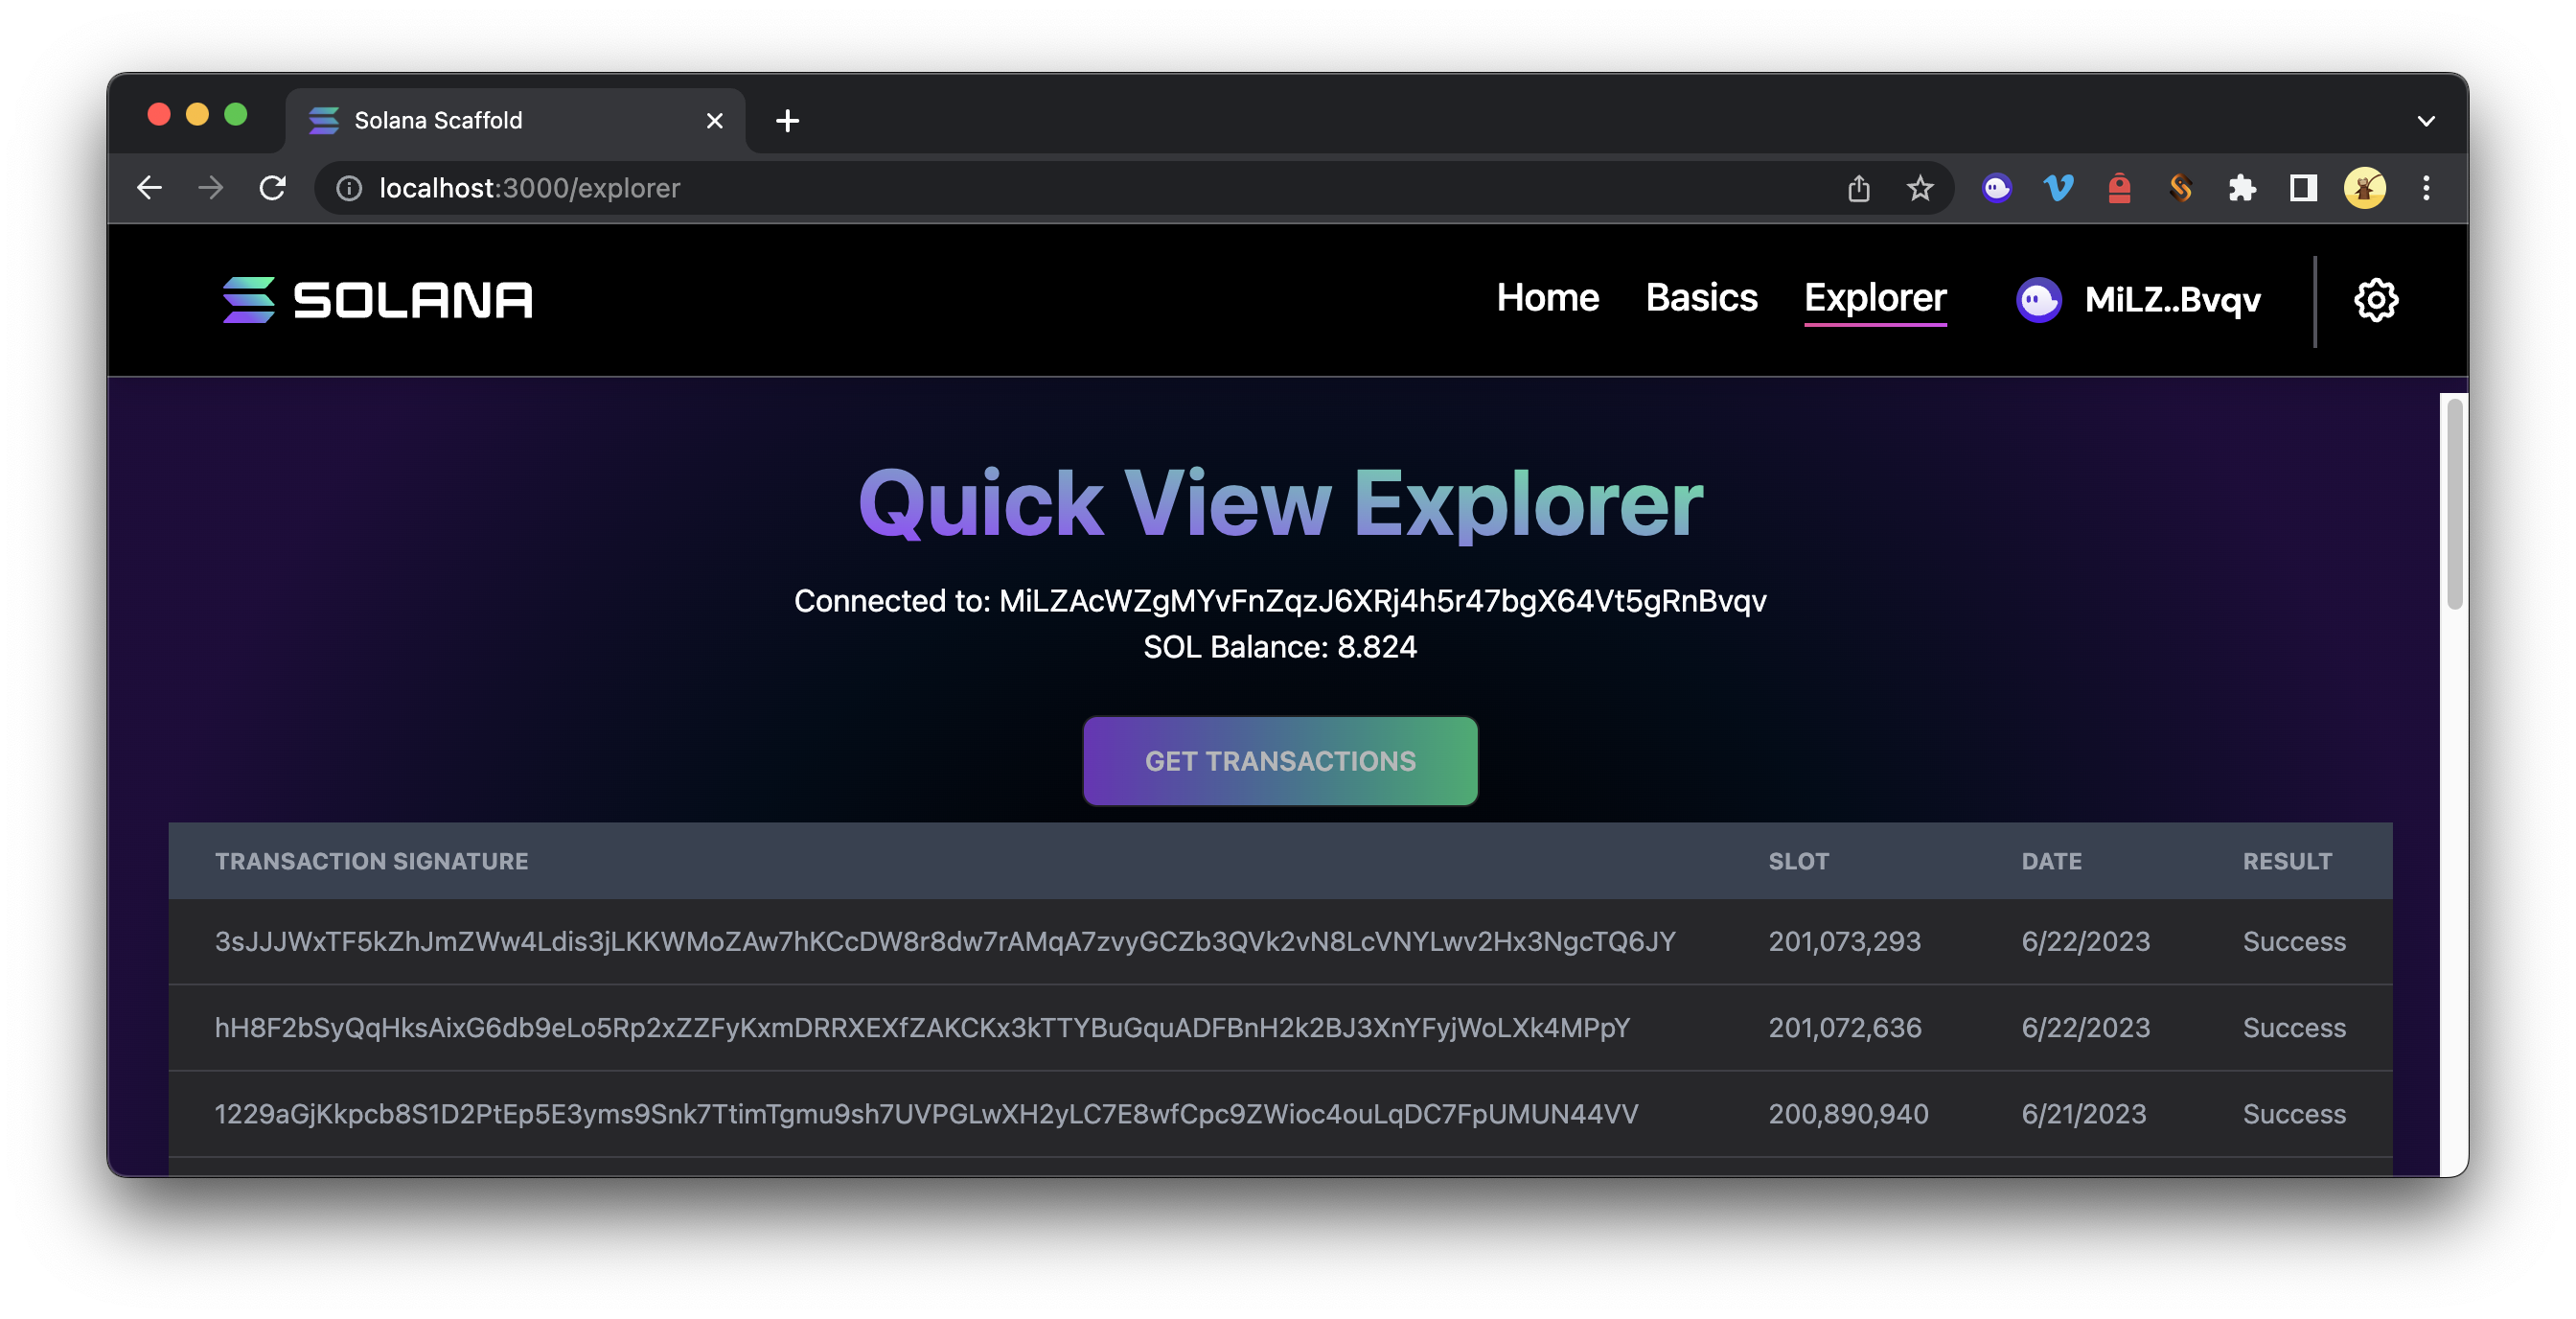
You should have the final code from this Github repo in a local code editor, and your https://localhost:3000/explorer should render the following view:

Alright! Let's get started.
Create a Transaction Detail Component
Let's build on our transactions tool to allow a user to click on a transaction to get more details about that transaction. The great news is that we've already got the tools to do this.
From your project directory, duplicate your Component Template and name it TransactionDetail.tsx:
cp ./src/components/template.tsx ./src/components/TransactionDetail.tsx
TransactionDetail.tsx should now exist in your components folder. Open it in a code editor.
Update Dependencies
Start by renaming your Function Component to TransactionDetail. Replace
export const Template: FC = () => {
You can now access Logs for your RPC endpoints, helping you troubleshoot issues more effectively. If you encounter an issue with your RPC calls, simply check the logs in your QuickNode dashboard to identify and resolve problems quickly. Learn more about log history limits on our pricing page.
with
export const TransactionDetail: FC = () => {
For this component, we need the following imports. Replace the existing imports of your template with these:
import { useRouter } from 'next/router'
import { useConnection } from '@solana/wallet-adapter-react';
import { LAMPORTS_PER_SOL, ParsedTransactionWithMeta} from '@solana/web3.js';
import { FC, useEffect, useState } from 'react';
This is mostly pretty similar to TransactionLog but includes useRouter, which will allow us to extract information from our URL so we can have dynamic domain searching (e.g., ./tx/TRANSACTION_ID will enable us to use TRANSACTION_ID as a variable in our app).
Since the assembly of this component is similar to our previous one, we're going to share the full code up front and walk through a few important pieces:
import { useRouter } from 'next/router'
import { useConnection } from '@solana/wallet-adapter-react';
import { LAMPORTS_PER_SOL, ParsedTransactionWithMeta} from '@solana/web3.js';
import { FC, useEffect, useState } from 'react';

export const TransactionDetail: FC = () => {
    const router = useRouter();
    const { txid } = router.query;
    const { connection } = useConnection();
    const [transactionDetail, setTransactionDetail] = useState<ParsedTransactionWithMeta>(null);
    const [transactionCard, setTransactionCard] = useState<JSX.Element>(null);
    let search = Array.isArray(txid) ? txid[0] : txid;

    useEffect(()=>{
        if(!router.isReady) return;
        if(search) {getTransaction(search);}
    },[router.isReady]);

    useEffect(() => {
        if (transactionDetail) {
            buildView();
        }
      }, [transactionDetail, connection]);

    async function getTransaction(txid: string) {
        //Get parsed details for the transaction
        let transactionDetails = await connection.getParsedTransaction(txid, {maxSupportedTransactionVersion:0});
        //Update State
        setTransactionDetail(transactionDetails);
    }

    function buildView() {
        if(transactionDetail) {
            let overviewTable = buildOverviewTable();
            let accountsTable = buildAccountsTable();
            let tokensTable = buildTokensTable();
            let programsTable = buildProgramsTable();
            let view = (<>
                <p className="text-left text-lg font-bold">Overview:</p>
                {overviewTable}
                <br/>
                <p className="text-left text-lg font-bold">Account Input(s): </p>
                {accountsTable}
                <br/>
                <p className="text-left text-lg font-bold">SPL Token Changes(s): </p>
                {tokensTable}
                <br/>
                <p className="text-left text-lg font-bold">Programs(s): </p>
                {programsTable}
            </>)
            setTransactionCard(view)
        }
        else {
            setTransactionCard(null);
        }
    }

    function buildOverviewTable() {
        if(transactionDetail) {
            let date = new Date(transactionDetail.blockTime*1000).toLocaleDateString();
            let table =
            (<table className="w-full text-sm text-left text-gray-500 dark:text-gray-400">
                <tbody>

                <tr  className="bg-white border-b bg-zinc-800 dark:border-zinc-700">
                    <td className="px-6 py-3">Signature</td>
                    <td className="px-6 py-3">{transactionDetail.transaction.signatures[0]}</td>
                </tr>
                <tr  className="bg-white border-b bg-zinc-800 dark:border-zinc-700">
                    <td className="px-6 py-3">Timestamp</td>
                    <td className="px-6 py-3">{date}</td>
                </tr>
                <tr  className="bg-white border-b bg-zinc-800 dark:border-zinc-700">
                    <td className="px-6 py-3">Status</td>
                    <td className="px-6 py-3">{transactionDetail.meta.err ? 'Failed' : 'Success'}</td>
                </tr>
                </tbody>
            </table>
            );
            return(table)
        }
        else {
            return(null);
        }
    }

    function buildAccountsTable() {
        if(transactionDetail) {
            let {preBalances, postBalances} = transactionDetail.meta;
            let header =
                <thead className="text-xs text-gray-700 uppercase bg-zinc-50 dark:bg-gray-700 dark:text-gray-400"><tr>
                    <td className="px-6 py-3">#</td>
                    <td className="px-6 py-3">Address</td>
                    <td className="px-6 py-3 text-center">Change</td>
                    <td className="px-6 py-3 text-center">Post Balance</td>
                </tr></thead>;
            let rows = (transactionDetail.transaction.message.accountKeys.map((account,i)=>{
                let solChange = (postBalances[i] - preBalances[i]) / LAMPORTS_PER_SOL;
                return (
                    <tr key={i+1} className="bg-white border-b bg-zinc-800 dark:border-zinc-700">
                        <td className="px-6 py-3">{i+1}</td>
                        <td className="px-6 py-3">{account.pubkey.toString()}</td>
                        <td className="px-6 py-3 text-center">{solChange === 0 ? '-' : '◎ ' + solChange.toFixed(6)}</td>
                        <td className="px-6 py-3 text-center">◎ {(postBalances[i] / LAMPORTS_PER_SOL).toFixed(3)}</td>
                    </tr>)
                }
            ));
            let table = (
            <table className="w-full text-sm text-left text-gray-500 dark:text-gray-400">
                {header}
                <tbody>{rows}</tbody>
            </table>);
            return(table)
        }
        else {
            return(null)
        }
    }

    function buildTokensTable() {
        if(transactionDetail) {
            let {preTokenBalances, postTokenBalances} = transactionDetail.meta;
            let header =
                <thead className="text-xs text-gray-700 uppercase bg-zinc-50 dark:bg-gray-700 dark:text-gray-400"><tr>
                    <td className="px-6 py-3">#</td>
                    <td className="px-6 py-3">Owner</td>
                    <td className="px-6 py-3">Mint</td>
                    <td className="px-6 py-3 text-center">Change</td>
                    <td className="px-6 py-3 text-center">Post Balance</td>
                </tr></thead>;
            let rows = (preTokenBalances.map((account,i)=>{
                let tokenChange = (postTokenBalances[i].uiTokenAmount.uiAmount - account.uiTokenAmount.uiAmount);
                return (
                    <tr key={i+1} className="bg-white border-b bg-zinc-800 dark:border-zinc-700">
                        <td className="px-6 py-3">{i+1}</td>
                        <td className="px-6 py-3">{account.owner}</td>
                        <td className="px-6 py-3">{account.mint}</td>
                        <td className="px-6 py-3 text-center">{tokenChange === 0 ? '-' : tokenChange.toFixed(2)}</td>
                        <td className="px-6 py-3 text-center">{postTokenBalances[i].uiTokenAmount.uiAmount ? (postTokenBalances[i].uiTokenAmount.uiAmount).toFixed(2): '-'}</td>
                    </tr>)
                }
            ));
            let table = (
            <table className="w-full text-sm text-left text-gray-500 dark:text-gray-400">
                {header}
                <tbody>{rows}</tbody>
            </table>);
            return(table)
        }
        else {
            return(null)
        }
    }

    function buildProgramsTable() {
        if(transactionDetail) {
            const transactionInstructions = transactionDetail.transaction.message.instructions;
            let header =
                <thead className="text-xs text-gray-700 uppercase bg-zinc-50 dark:bg-gray-700 dark:text-gray-400"><tr>
                    <td className="px-6 py-3">#</td>
                    <td className="px-6 py-3">Program</td>
                </tr></thead>;

            let rows = (transactionInstructions.map((instruction,i)=>{
                return (
                    <tr key={i+1} className="bg-white border-b bg-zinc-800 dark:border-zinc-700">
                        <td className="px-6 py-3">{i+1}</td>
                        <td className="px-6 py-3">{instruction.programId.toString() }</td>
                    </tr>)
                }
            ));
            let table = (
            <table className="w-full text-sm text-left text-gray-500 dark:text-gray-400">
                {header}
                <tbody>{rows}</tbody>
            </table>);
            return(table)
        }
        else {
            return(null)
        }
    }

    return(<div>
    {/* Render Results Here */}
        <div>{transactionCard}</div>
    </div>)
}
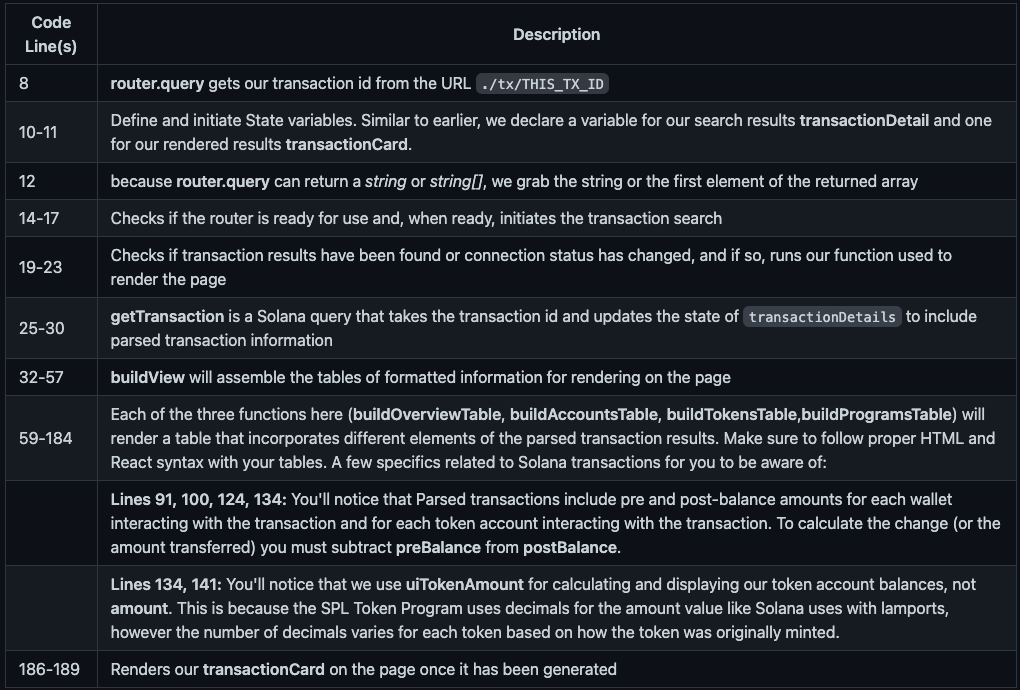
Here's what's happening in this Function Component:

Create a Transaction View and Page
Nice work! Just like the last guide, before we can see the final product, we need to tell our app where to display it. We need to do a couple of things to make our component visible in Nextjs:
-
Create a Transaction View
-
Create a Dynamic Transaction Page
Create a Transaction View
From your project directory, create a new file, tx.tsx, inside your ./src/views/explorer/ folder:
echo > ./src/views/explorer/tx.tsx
Open tx.tsx and paste this code:
import { FC } from "react";
import { TransactionDetail } from "components/TransactionDetail";

export const TransactionView: FC = ( ) => {
  return (
    <div className="md:hero mx-auto p-4">
      <div className="md:hero-content flex flex-col">
        <h1 className="text-center text-5xl font-bold text-transparent bg-clip-text bg-gradient-to-tr from-[#9945FF] to-[#14F195]">
          Quick View Explorer
        </h1>
        <div className="text-center">
        </div>
        <div className="text-center">
            <TransactionDetail />
        </div>
      </div>
    </div>
  );
};
This view is quite simple, since we compiled a pretty comprehensive TransactionDetail component in our previous step. We include a Header for our page and then call TransactionDetail.
Create Transaction Page that publishes our view:
From your project directory, create a new page directory, /tx/. Then create a new file, [txid].tsx, in that directory. The brackets will allow us to use to allow for dynamic url parameters by passing different transaction IDs to our /tx/ directory:
mkdir ./src/pages/tx
echo > ./src/pages/tx/\[txid\].tsx
Paste this code into [txid].tsx:
import Head from "next/head";
import { TransactionView } from 'views/explorer/tx';

const Tx = () => {

  return (
    <div>
    <Head>
      <title>Solana Scaffold</title>
      <meta
        name="description"
        content="Basic Functionality"
      />
    </Head>
    <TransactionView />
  </div>
  )
}

export default Tx
This is the actual page that will render, /tx/YOUR_TRANSACTION_ID.
Yes!!! You should be good to go, but if you want a little extra sauce to get that Solana Explorer feel, let's add a couple of useful links to our website.
Link It Up
Navigate back to your TransactionLog component, ./src/components/TransactionsLog.tsx and find the code where you render the transaction signature, transaction.transaction.signature[0] (Line 51 for us):
    <td className="px-6 py-3">
         {/* some transactions return more than 1 signature -- we only want the 1st one */}
         {transaction.transaction.signatures[0]}
    </td>
Let's wrap an HTML <a> tag around it and pass in the location to the href attribute:
    <td className="px-6 py-3">
        <a href={'../tx/'+transaction.transaction.signatures[0]}>
            {transaction.transaction.signatures[0]}
        </a>
    </td>
This will convert each transaction ID into a URL that directs to our new TransactionDetail page!
Finally, let's add some links to our Explorer page in the header and sidebar to improve navigability.
Open up ./src/components/ContentContainer.tsx and add a link to your Explorer on line 30:
          <li>
            <NavElement
                label="Explorer"
                href="/explorer"
            />
          </li>
Similarly, open up ./src/components/AppBar.tsx and add a link to your Explorer on line 60:
          <NavElement
            label="Explorer"
            href="/explorer"
            navigationStarts={() => setIsNavOpen(false)}
          />
Awesome job! Here's a quick recap of our recent changes:

Alright, let's see it in action! Head back to your terminal and enter:
yarn dev
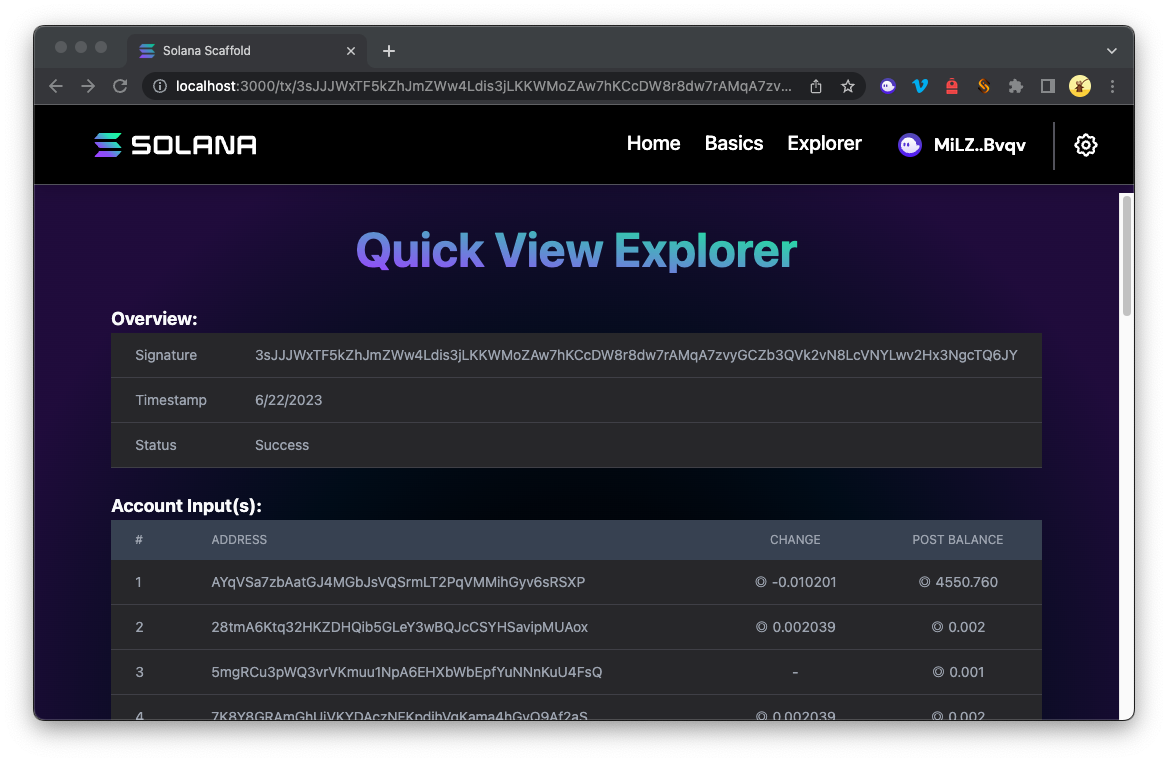
Open http://localhost:3000/ and head on to one of your handy new Explorer links to navigate to http://localhost:3000/explorer. Now, click on any one of your transaction IDs. You should be redirected to http://localhost:3000/tx/YOUR_TRANSACTION_ID and see something like this!

High Five! 🙌
Conclusion
Congrats! You've added transaction details to your Solana Explorer clone using dynamic routes. Now you can feel free to customize the look and feel or pull in different data from your parsed transaction results. You can use these same concepts to render all sorts of on-chain queries. Spend some time tinkering with this and you'll be surprised at what you can do with a few simple tweaks. Add anything interesting to your transactions view? Join us on Discord or reach out to us via Twitter to share what you come up with.
We ❤️ Feedback!
If you have any feedback or questions on this guide, let us know. We’d love to hear from you!