26 min read
If using Yellowstone gRPC on Node.js for very large quantities of data, it is possible to overwhelm a single CPU. If you're building systems that need to process all transactions from busy programs or track multiple programs simultaneously, consider the following high performance alternatives:
-
Using multiple threads. Node.js has two modules:
cluster(multi-process, one thread per process) andworker(single process, multiple threads). Either will solve the problem of node overloading a single core, butclusteris simpler as each process is memory isolated. Divide the YellowStone subscriptions between multiple instances ofclusterorworkerto distribute the load. -
Using Yellowstone gRPC on Rust (see also YellowStone on Rust guide)
-
Using Yellowstone gRPC on Go (see also YellowStone on Go guide).
Overview
In this guide, we will learn how to create a Solana trading bot that copies trades of a specified wallet on the Pump.fun DEX using Quicknode's Metis add-on for the Pump.fun API and Yellowstone Geyser gRPC. This guide is designed for developers with a solid understanding of JavaScript, Solana, and basic DeFi concepts.
A visual learner? Follow along with this video to learn how to create a Solana copy trading bot using Pump.fun.
What You Will Do
- Get an overview of Pump.fun and Yellowstone
- Create a JavaScript trading bot that monitors wallets' trades on Pump.fun and copies their buy transactions based on a predefined strategy
- Simulate target wallet transactions and test the bot's functionality
If you prefer using TypeScript or the new Solana Kit library, check out our guide on Monitoring Programs with Yellowstone and how to Build with the Pump.fun API using Solana Kit.
What You Will Need
- Intermediate knowledge of Solana development and DeFi concepts
- Experience with JavaScript and Node.js
- A Solana file system wallet with a SOL balance (run
solana-keygen -hfor support creating a new wallet) - A Quicknode Account with Yellowstone Geyser gRPC add-on enabled
Connect to a Solana Cluster with Your Quicknode Endpoint
To build on Solana, you'll need an API endpoint to connect with the network. You're welcome to use public nodes or deploy and manage your own infrastructure; however, if you'd like 8x faster response times, you can leave the heavy lifting to us.
See why over 50% of projects on Solana choose Quicknode and start your free trial here. We're going to use a Solana Mainnet endpoint.
Copy the HTTP Provider link: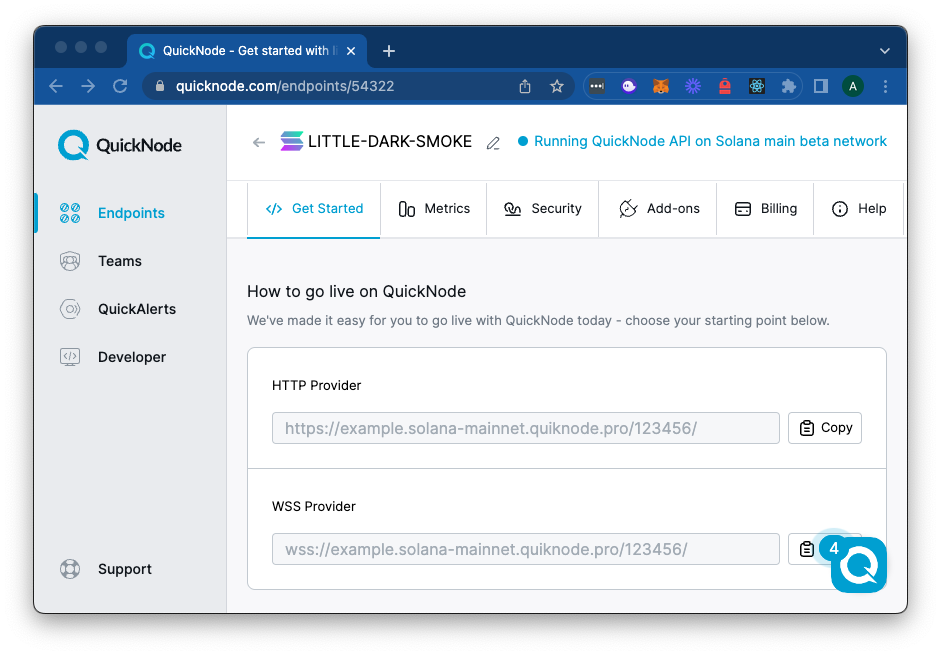
What is Metis?
Metis is a powerful tool for developers to access liquidity on Solana. By integrating Jupiter's V6 Swap API, Jupiter's Limit Order API, Pump.fun trading, Trading websockets, and more, you have access to the tools you need to build robust trading tools that access many DeFi protocols across Solana. Metis is available as an add-on on the Quicknode Marketplace, here or a public endpoint is available at JupiterAPI.com.
Using the Pump.fun API
In this guide, we will primarily focus on the /pump-fun/swap endpoint (docs), which allows us to fetch a serialized transaction for executing a swap on Pump.fun. This endpoint requires the following parameters:
wallet: The public key of the wallet executing the tradetype: The type of trade ("BUY" or "SELL")mint: The mint address of the token being tradedinAmount: The amount of the input token (in raw units)priorityFeeLevel(optional): The priority fee level for the trade ("low", "medium", "high", or "auto")slippageBps(optional): The maximum slippage (in basis points) allowed for the trade
The response from this endpoint contains a base64-encoded Solana transaction that can be signed and sent to the network to execute the trade.
What is Yellowstone?
Yellowstone is a Marketplace Add-on provides a gRPC-based API that enables developers to create custom subscriptions and receive real-time updates as events occur on the Solana network. This makes it an excellent tool for building applications that require real-time monitoring of blockchain activity, such as trading bots, analytics platforms, and decentralized applications (dApps).
To use Yellowstone, we need to create a subscription request that specifies the accounts, transactions, and other events we want to monitor. Yellowstone will then stream real-time updates for the specified events.
For more information on Yellowstone, check out:
Setting Up the Project
This guide is for educational purposes only and should not be considered financial advice. Trading bots can be risky and may result in financial loss. Always do your own research and consider consulting with a financial advisor before using trading bots or engaging in trading activities. Make sure any code you run is secure and thoroughly tested before using it with real funds.
Before we start building the trading bot, let's set up our project and install the necessary dependencies.
-
Create a new directory for your project and navigate to it in your terminal.
-
Initialize a new Node.js project by running the following command:
npm init -y -
Install the required dependencies by running the following command:
npm install @solana/web3.js@1 bs58 dotenv @triton-one/yellowstone-grpc@solana/web3.js: The legacy version of Solana Web3.js library for interacting with the Solana blockchainbs58: A library for working with Base58 encoding/decodingdotenv: A library for loading environment variables from a.envfile@triton-one/yellowstone-grpc: The Yellowstone gRPC client library
-
Create a new file called
bot.jsin your project directory. -
Create a
.envfile in your project directory and add the following environment variables:SOLANA_RPC=<your_solana_rpc_endpoint> # https://example.quiknode.pro/replace-me-123/
SECRET_KEY=<your_wallet_secret_key> # [0, 0, ..., 0]
METIS_ENDPOINT=<your_metis_endpoint> # https://jupiter-swap-api.quiknode.pro/REPLACE_ME
YELLOWSTONE_ENDPOINT=<your_yellowstone_endpoint> # https://example.solana-mainnet.quiknode.pro:10000
YELLOWSTONE_TOKEN=<your_yellowstone_token> # abc...xyzReplace the placeholders with your actual values:
SOLANA_RPC: Your Quicknode Solana Mainnet RPC endpoint (you can find this in your Quicknode dashboard)SECRET_KEY: Your Solana wallet's secret key (in JSON array format, e.g.,[0, 0, ..., 0]). Make sure this wallet is funded with SOL for the bot to execute trades.METIS_ENDPOINT: Your Quicknode Metis endpoint for the Pump.fun API (e.g.,https://jupiter-swap-api.quiknode.pro/...). If you do not have the Metis add-on, you can use the public endpoint:https://public.jupiterapi.com(note: the public endpoint may incur transaction fees--check jupiterapi.com for details).YELLOWSTONE_ENDPOINT: Your Yellowstone endpoint (Note: this should be a gRPC endpoint, ending in:10000- more information is available here)YELLOWSTONE_TOKEN: Your Yellowstone API token (locate your token here)
Building the Trading Bot
Now that we have our project set up, let's start building the trading bot. 🤖
At a high level, here's what we will be doing:
- Create a class for the trading bot that initializes the necessary configuration and dependencies.
- Create a monitoring function that listens for target wallet buy transactions on Pump.fun using Yellowstone.
- Implement a method that responds to target transactions by fetching a copy swap transaction using the Pump.fun API and executing the trade on Solana.
- Log successful trades to a file for tracking and analysis.
Configuring the Bot
Open the bot.js file and add the following code:
require("dotenv").config();
const fs = require("fs");
const fetch = require("node-fetch");
const bs58 = require("bs58").default;
const {
  Connection,
  Keypair,
  VersionedTransaction,
  LAMPORTS_PER_SOL,
  PublicKey,
} = require("@solana/web3.js");
const Client = require("@triton-one/yellowstone-grpc").default;
const { CommitmentLevel } = require("@triton-one/yellowstone-grpc");

class CopyTradeBot {
  config = {
    WATCH_LIST: [
      "WALLET_TO_TRACK_1",
      "WALLET_TO_TRACK_2",
      "WALLET_TO_TRACK_3",
      //...
    ],
    PUMP_FUN: {
      PROGRAM_ID: "6EF8rrecthR5Dkzon8Nwu78hRvfCKubJ14M5uBEwF6P",
      FEE_ACCOUNT: "CebN5WGQ4jvEPvsVU4EoHEpgzq1VV7AbicfhtW4xC9iM",
      BUY_DISCRIMINATOR: Buffer.from([102, 6, 61, 18, 1, 218, 235, 234]),
      SELL_DISCRIMINATOR: Buffer.from([51, 230, 133, 164, 1, 127, 131, 173]),
      TOKEN_DECIMALS: 6,
      TARGET_ACCOUNTS: {
        BUY: [
          { name: "mint", index: 2 },
          { name: "user", index: 6 },
        ],
        SELL: [
          { name: "mint", index: 2 },
          { name: "user", index: 6 },
        ],
      },
    },
    MIN_TX_AMOUNT: LAMPORTS_PER_SOL / 1000,
    BUY_AMOUNT: LAMPORTS_PER_SOL / 1000,
    LOG_FILE: "pump_fun_swaps.json",
    COMMITMENT: CommitmentLevel.CONFIRMED,
    TEST_MODE: true
  };

  constructor() {
    this.validateEnv();

    this.connection = new Connection(process.env.SOLANA_RPC);
    this.wallet = Keypair.fromSecretKey(
      Uint8Array.from(JSON.parse(process.env.SECRET_KEY))
    );

    console.log("🤖 Bot wallet:", this.wallet.publicKey.toBase58());
    console.log("Watching addresses:");
    this.config.WATCH_LIST.forEach((address) => console.log("   -", address));
  }

  // ... (other methods will be added here)
}
This code sets up the initial configuration for our trading bot. Here's what each part of the configuration does:
WATCH_LIST: An array of wallet addresses that the bot will monitor for trades on Pump.fun. For this example, go ahead and use a wallet address from your own browser wallet (e.g., Phantom, SolFlare, Backpack, etc.). We will use that wallet to execute a trade on Pump.fun later in this guide.PUMP_FUN: An object containing configuration details for the Pump.fun program, including the program ID, fee account, discriminators for buy and sell instructions, token decimals, and indices for target accounts (mint and user) in the instructions. These are known constants derived from Pump.fun's program IDL and instructions. For more information on Program IDLs, check out our Solana Program IDL guide.MIN_TX_AMOUNT: The minimum SOL amount required for the bot to consider a trade (if target wallet spends less than this amount, we will just ignore the transction).BUY_AMOUNT: The amount of SOL the bot will use to execute buy transactions. For this demo, we will just set a static buy amount--if we see a transaction we want to copy, we will spend a fixed amount of SOL on a copy trade. After completing the guide, feel free to experiment with different strategies for your own use cases.LOG_FILE: The file path where the bot will log successful trades.COMMITMENT: The commitment level for Yellowstone subscriptions.TEST_MODE: A flag to enable/disable test mode. When set totrue, the bot will simulate trades without actually executing them on the Solana network. This is useful for testing the bot's functionality without risking real funds.
The constructor method validates the required environment variables, creates a Solana connection, and initializes the bot's wallet using the provided secret key.
Let's add our methods!
Environment Variables Validation
We've already added a validateEnv() method in the constructor above, which ensures that our required environment variables are set. This method is triggered right when the CopyTradeBot class is instantiated. If any required variables are missing, the bot will throw an error and exit.
Add the following method to your CopyTradeBot class to validate the required environment variables:
  validateEnv = () => {
    const requiredEnvs = [
      "SOLANA_RPC",
      "SECRET_KEY",
      "METIS_ENDPOINT",
      "YELLOWSTONE_ENDPOINT",
      "YELLOWSTONE_TOKEN",
    ];
    requiredEnvs.forEach((env) => {
      if (!process.env[env]) {
        throw new Error(`Missing required environment variable: ${env}`);
      }
    });
  };
This will just check that all the required environment variables are set before proceeding.
Fetching the Swap Transaction
Let's create a fetchSwapTransaction() method that will be responsible for communicating with the Pump.fun API (via your Metis endpoint) to get a serialized transaction that performs a swap. You provide details such as the wallet address, type of swap (e.g., "BUY"), token mint, and the amount to swap.
  fetchSwapTransaction = async ({
    wallet,
    type,
    mint,
    inAmount,
    priorityFeeLevel = "high",
    slippageBps = "100",
  }) => {
    const body = JSON.stringify({
      wallet,
      type,
      mint,
      inAmount,
      priorityFeeLevel,
      slippageBps,
    });
    const res = await fetch(`${process.env.METIS_ENDPOINT}/pump-fun/swap`, {
      method: "POST",
      headers: { "Content-Type": "application/json" },
      body,
    });
    if (!res.ok) {
      throw new Error(`Swap instructions fetch error: ${await res.text()}`);
    }
    return res.json();
  };
Here are the two main components of this method:
body: Contains the parameters needed by the Pump.fun API to generate a swap transaction.fetch: Sends a POST request to the Pump.fun /swap endpoint with the provided parameters. On success, you'll get a JSON response that includes a base64-encoded transaction.
For more information on this method, check out our Pump.fun API documentation here.
Signing the Transaction
Once the Pump.fun API returns a base64-encoded transaction, you need to sign it locally using your bot's Keypair. Let's add a signTransaction() method that handles this to our CopyTradeBot class:
  signTransaction = async (swapTransaction) => {
    const transaction = VersionedTransaction.deserialize(
      Buffer.from(swapTransaction, "base64")
    );
    const latestBlockHash = await this.connection.getLatestBlockhash();
    transaction.message.recentBlockhash = latestBlockHash.blockhash;
    transaction.sign([this.wallet]);
    const txBuffer = Buffer.from(transaction.serialize());
    const txBase64 = txBuffer.toString("base64");
    return txBase64;
  };
Because the transaction is already serialized, we need to deserialize it into a VersionedTransaction object, sign it with our bot's wallet, and then serialize it back into raw bytes for broadcasting:
- Deserialization: Converts the base64-encoded transaction into a
VersionedTransactionobject. - Get Latest Blockhash: Fetches the latest blockhash from the Solana network and applying it to the transaction.
- Sign: Adds your bot's wallet signature to the transaction.
- Serialize: Returns the fully signed transaction in a base64-encoded string, ready to be broadcast.
Sending & Confirming the Transaction
The next step is to broadcast the signed transaction to the Solana network. Add the following sendAndConfirmTransaction() method to your bot class:
  sendAndConfirmTransaction = async (signedTxBase64) => {
    try {
      const txid = await this.connection.sendEncodedTransaction(signedTxBase64, {
        skipPreflight: false,
        encoding: 'base64'
      });
      const timeout = 30 * 1000;
      const pollInterval = 3 * 1000;
      const start = Date.now();

      while (Date.now() - start < timeout) {
        const response = await this.connection.getSignatureStatuses([txid]);
        if (!response) {
          await new Promise(resolve => setTimeout(resolve, pollInterval));
          continue;
        }

        const statuses = response.value;

        if (!statuses || statuses.length === 0) {
          await new Promise(resolve => setTimeout(resolve, pollInterval));
          continue;
        }

        const status = statuses[0];

        if (status === null) {
          await new Promise(resolve => setTimeout(resolve, pollInterval));
          continue;
        }

        if (status.err) {
          throw new Error(`Transaction failed: ${JSON.stringify(status.err)}`);
        }

        if (status.confirmationStatus && (status.confirmationStatus === 'confirmed' || status.confirmationStatus === 'finalized')) {
          return txid;
        }

        await new Promise(resolve => setTimeout(resolve, pollInterval));
      }
      throw new Error(`Transaction confirmation timeout after ${timeout}ms`);

    } catch (error) {
      throw {error, base64: Buffer.from(rawTransaction).toString("base64")};
    }
  };
This method sends the signed transaction to the Solana network and waits for it to be confirmed. It uses the following steps:
sendEncodedTransaction(): Sends the signed transaction encoded as a base64-string to the cluster and returns a transaction signature (txid) - note that since we serialized the transaction in the previous step, we can use thesendEncodedTransaction()method. The API that creates the transaction already simulates the transaction to calculate compute units, so we can skip the preflight checks.- Finally, we create a simple polling function using
getSignatureStatuses()to check the transaction status until it is confirmed or times out. For more information on best practices, check our docs here.
Logging Swaps
For record-keeping and debugging, the logSwap() method writes a JSON record of each swap to a log file:
  logSwap = (swapLog) => {
    const logs = fs.existsSync(this.config.LOG_FILE)
      ? JSON.parse(fs.readFileSync(this.config.LOG_FILE, "utf-8"))
      : [];
    logs.push(swapLog);
    fs.writeFileSync(this.config.LOG_FILE, JSON.stringify(logs, null, 2));
  };
Here's what we are doing:
- Existing logs: If the file
pump_fun_swaps.jsonexists, it reads and parses it into an array. - Append new log: The
swapLogobject is added to the array. - Write back: Writes the updated array to disk.
Handling Whale Buys
Whenever we detect a buy transaction above a certain threshold (MIN_TX_AMOUNT) from a “whale” in our WATCH_LIST, we need to execute some logic. Let's create a method, handleWhaleBuy(), that will execute a copy trade once we know a "whale" has made a buy meeting our criteria. Add the following method to your CopyTradeBot class:
  handleWhaleBuy = async (whalePubkey, tokenMint, lamportsSpent, copiedTxid) => {
    if (lamportsSpent < this.config.MIN_TX_AMOUNT) return;
    try {
      const inAmount = this.config.BUY_AMOUNT;
      const response = await this.fetchSwapTransaction({
        wallet: this.wallet.publicKey.toBase58(),
        type: "BUY",
        mint: tokenMint,
        inAmount,
        slippageBps: "300",
      });

      if (!response.tx) {
        throw new Error(`Unexpected response format: ${JSON.stringify(response)}`);
      }
      const { tx } = response;
      const signedTransaction = await this.signTransaction(tx);
      let txid = 'Simulated-TxID';
      if (!this.config.TEST_MODE) {
        txid = await this.sendAndConfirmTransaction(signedTransaction);
      }

      console.log("🎯 - COPY - TxID:", txid);

      this.logSwap({
        event: "COPY_BUY",
        txid,
        copiedTxid,
        tokenMint,
        lamportsSpent,
        whalePubkey,
        timestamp: new Date().toISOString(),
      });
    } catch (err) {
      this.logSwap({
        event: "COPY_BUY_ERROR",
        error:
          typeof err === "string"
            ? err
            : err && typeof err.message === "string"
              ? err.message
              : JSON.stringify(err, null, 2) || "Unknown error",
        copiedTxid,
        timestamp: new Date().toISOString(),
      });
    }
  };
Let's take a look at the key components of this method:
lamportsSpent: The total SOL the target wallet spent in the original transaction. This must exceed MIN_TX_AMOUNT for us to bother copying. You, of course, can implement your own logic here.inAmount: How much SOL our bot will spend to copy the trade. This is set toBUY_AMOUNTfrom our config.fetchSwapTransaction(): We request a Pump.fun transaction for our own buy trade.signTransaction(): Sign it with our wallet.sendAndConfirmTransaction(): Broadcast the signed transaction to the Solana network and wait for confirmation. (skipped ifTEST_MODEis enabled)logSwap(): Record the copy trade attempt in our log file.
Building the Yellowstone Subscription
Now that we have our bot execution methods in place, we need to set up a subscription to Yellowstone to monitor the target wallets for buy transactions on Pump.fun. Yellowstone will allow us to listen for transactions that meet our specific criteria, then we can parse the transaction instruction data to ensure we respond appropriately.
Create the Subscribe Request
We need to tell Yellowstone which addresses or programs we care about monitoring. Let's add a few methods to our CopyTradeBot class:
  createSubscribeRequest = () => {
    const { WATCH_LIST, PUMP_FUN, COMMITMENT } = this.config;
    return {
      accounts: {},
      slots: {},
      transactions: {
        pumpFun: {
          accountInclude: WATCH_LIST,
          accountExclude: [],
          accountRequired: [PUMP_FUN.FEE_ACCOUNT, PUMP_FUN.PROGRAM_ID],
        },
      },
      transactionsStatus: {},
      entry: {},
      blocks: {},
      blocksMeta: {},
      commitment: COMMITMENT,
      accountsDataSlice: [],
      ping: undefined,
    };
  };

  sendSubscribeRequest = (stream, request) => {
    return new Promise((resolve, reject) => {
      stream.write(request, (err) => {
        if (err) reject(err);
        else resolve();
      });
    });
  };

  handleStreamEvents = (stream) => {
    return new Promise((resolve, reject) => {
      stream.on("data", this.handleData);
      stream.on("error", (error) => {
        console.error("Stream error:", error);
        reject(error);
        stream.end();
      });
      stream.on("end", () => {
        console.log("Stream ended");
        resolve();
      });
      stream.on("close", () => {
        console.log("Stream closed");
        resolve();
      });
    });
  };
Here we are defining three functions:
createSubscribeRequest(): Builds the subscription request object with accounts/filters we care about.accountsRequiredwill ensure that we only see transactions that involve Pump.fun's fee account and program ID--the fee account helps us identify Pump.fun trades as opposed to other types of transactions on the program. TheaccountIncludefilter ensures we only see transactions from ourWATCH_LISTwallets (think of these as an "OR" join--so as long as a transaction includes any of these accounts, it will be shown).sendSubscribeRequest(): Sends the subscription to the network.handleStreamEvents(): Outlines how we will handle incoming data, errors, and stream closure. Importantly, here, we callthis.handleDatawhen we receive new data. In other words, when Yellowstone returns a transaction that matches our filter criteria (defined increateSubscribeRequest()), we will process it using thehandleData()method.
Processing Incoming Transactions
The handleData() method is where we parse out the Pump.fun transaction details. This is extremely important for our use case because it is where we will determine what type of transaction occurred (e.g., buy or sell) and how big the trade is. Add the following method to your bot class, and we'll walk through it in detail below:
handleData = (data) => {
if (
!this.isSubscribeUpdateTransaction(data) ||
!data.filters.includes("pumpFun")
) {
return;
}
const transaction = data.transaction?.transaction;
const message = transaction?.transaction?.message;
const innerInstructions = transaction?.meta?.innerInstructions;
const flattenedInnerInstructions =
innerInstructions?.flatMap((ix) => ix.instructions || []) || [];
const allInstructions = [
...message.instructions,
...flattenedInnerInstructions,
];
if (!transaction || !message || transaction?.meta?.err) return;
const formattedSignature = this.convertSignature(transaction.signature);
const matching = allInstructions.find(this.matchesInstructionDiscriminator);
if (!matching) {
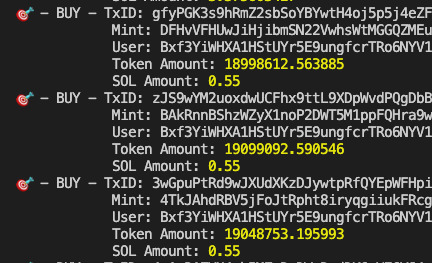
console.log(`❓ - Unknown - TxID: ${formattedSignature.base58}`);
return;
}
const { amount, solAmount } = this.getInstructionData(matching.data);
if (solAmount < this.config.MIN_TX_AMOUNT) return;
const txType = this.getTransactionType(matching.data);
const icon = txType === "SELL" ? "📉" : txType === "BUY" ? "🎯" : "❓";
console.log(`${icon} - ${txType} - TxID: ${formattedSignature.base58}`);
const accountKeys = message.accountKeys;
const accountsToInclude = this.config.PUMP_FUN.TARGET_ACCOUNTS[txType];
const includedAccounts = accountsToInclude.reduce((acc, { name, index }) => {
const accountIndex = matching.accounts[index];
const publicKey = accountKeys[accountIndex];
acc[name] = new PublicKey(publicKey).toBase58();
return acc;
}, {});
if (includedAccounts.mint) {
console.log(" Mint:", includedAccounts.mint);
}
if (includedAccounts.user) {
console.log(" User:", includedAccounts.user);
}
console.log(
" Token Amount:",
amount / Math.pow(10, this.config.PUMP_FUN.TOKEN_DECIMALS)
);
console.log(" SOL Amount:", solAmount / LAMPORTS_PER_SOL);
if (txType === "BUY") {
(async () => {
try {
await this.handleWhaleBuy(
includedAccounts.user,
includedAccounts.mint,
solAmount,
formattedSignature.base58
);
} catch (error) {
console.error("Error in handleWhaleBuy:", error);
}
})();
}
};
Here's what we are doing
- First, we make sure the incoming data is a transaction update from Yellowstone and that it involves the Pump.fun program. If for some reason it doesn't, we ignore it.
- Next, we extract the transaction data and instructions from the incoming data. We flatten all the instructions into a single array for easier processing of inner and outer instructions.
- We check if the transaction is a buy or sell on Pump.fun - we will define this method shortly.
- We then extract the amount and SOL spent from the transaction data.
- If the transaction includes a Pump.fun BUY: We call
handleWhaleBuy()with the relevant transaction data.
You'll notice we used a few helper methods here that we haven't defined yet. Let's add those now. Add these remaining helper methods to your bot class.
  isSubscribeUpdateTransaction = (data) => {
    return (
      "transaction" in data &&
      typeof data.transaction === "object" &&
      data.transaction !== null &&
      "slot" in data.transaction &&
      "transaction" in data.transaction
    );
  };

  convertSignature = (signature) => {
    return { base58: bs58.encode(Buffer.from(signature)) };
  };

  parseU64 = (data, offset) => {
    const slice = data.slice(offset, offset + 8);
    const dataView = new DataView(
      slice.buffer,
      slice.byteOffset,
      slice.byteLength
    );
    return Number(dataView.getBigUint64(0, true));
  };

  getInstructionData = (instructionData) => {
    const amount = this.parseU64(instructionData, 8);
    const solAmount = this.parseU64(instructionData, 16);
    return { amount, solAmount };
  };

  getTransactionType = (instructionData) => {
    if (!instructionData) return "Unknown";
    if (
      this.config.PUMP_FUN.SELL_DISCRIMINATOR.equals(
        instructionData.slice(0, 8)
      )
    ) {
      return "SELL";
    } else if (
      this.config.PUMP_FUN.BUY_DISCRIMINATOR.equals(
        instructionData.slice(0, 8)
      )
    ) {
      return "BUY";
    }
    return "Unknown";
  };

  matchesInstructionDiscriminator = (ix) => {
    if (!ix?.data) return false;
    return (
      this.config.PUMP_FUN.SELL_DISCRIMINATOR.equals(ix.data.slice(0, 8)) ||
      this.config.PUMP_FUN.BUY_DISCRIMINATOR.equals(ix.data.slice(0, 8))
    );
  };
Let's explain each of these:
isSubscribeUpdateTransaction(): Checks if the incoming data is a proper transaction object from Yellowstone.convertSignature(): Converts the transaction signature to a base58-encoded string for easier logging.parseU64(): Parses a 64-bit unsigned integer from the instruction data at a given offset. This allows us to get instruction data like Token Amount and SOL Amount.getInstructionData(): Extracts the amount and SOL amount from the instruction data based on known offsets from the program's IDL.getTransactionType(): Determines if the transaction is a buy or sell based on the instruction data's discriminator and the discriminators we included in our config(known values from the program's IDL).matchesInstructionDiscriminator(): Checks if an instruction matches the buy or sell discriminator.
Initialize Our Bot
Finally, let's create a method to initiate our Yellowstone instance and another to start our bot. Add the following methods to your CopyTradeBot class:
  monitorWhales = async () => {
    console.log("Monitoring whales...");
    const client = new Client(
      process.env.YELLOWSTONE_ENDPOINT,
      process.env.YELLOWSTONE_TOKEN,
      {}
    );
    const stream = await client.subscribe();
    const request = this.createSubscribeRequest();

    try {
      await this.sendSubscribeRequest(stream, request);
      console.log(
        "Geyser connection established - watching whale Pump.fun activity."
      );
      await this.handleStreamEvents(stream);
    } catch (error) {
      console.error("Error in subscription process:", error);
      stream.end();
    }
  };

  start = async () => {
    console.log("🤖 Pump.fun Copy Trading Bot Starting...");
    this.monitorWhales();
  };
Here's what these methods do:
monitorWhales(): Establishes a Yellowstone client using the endpoint and token you configured in your.env. It then creates our subscription to the Pump.fun transactions we care about and listens for incoming data. Ultimately the streaming data is passed intohandleStreamEventsfor processing.start(): Initiates the bot by callingmonitorWhales(). This is the entry point for our bot.
Let's just add a final line to our bot.js file that will start our bot when the script is run. Add this main function outside of the CopyTradeBot class:
async function main() {
  const bot = new CopyTradeBot();
  await bot.start();
}

main().catch(console.error);
That's it! If you had any issues, you can see the complete code for this project at our GitHub Example Repository, here. Let's test it out!
Testing the Bot
At this point, your bot.js file contains the entire logic for watching a target wallet or wallets (WATCH_LIST) and copying their Pump.fun buys if the SOL amounts exceed your MIN_TX_AMOUNT. For demonstration/testing purposes, make sure your WATCH_LIST is just a single address of a wallet that you control. We will use this to copy our own trades in the next step.
This example is on mainnet and will execute real trades if you set TEST_MODE to false . Be cautious with real funds and consider testing on a local network or using small amounts of SOL. Transactions on-chain are irreversible and can result in loss of funds if not executed correctly.
- Fund Your Bot Wallet: Make sure your bot wallet (the one in your .env file) has enough SOL to cover any swap fees and trades.
- Run the Bot:
node bot.js
- Trigger a Trade: Using the same wallet from your
WATCH_LIST, head over to Pump.fun and perform a buy transaction. - Check Bot Output:
- Your console should print messages like 🎯 - BUY - TxID: ...
- If the trade is detected, you should see a COPY_BUY log entry in the file pump_fun_swaps.json.
- If you ran the bot with
TEST_MODEset tofalse, you can look up yourtxidon Solana Explorer to see the transaction details.
Great job!
Keep Building!
Congratulations! You have built a simple yet powerful Solana copy-trading bot using the Pump.fun API for swaps and Yellowstone gRPC for real-time transaction streaming. This setup demonstrates how to subscribe to on-chain events and react programmatically by fetching and sending your own swap transactions via the Pump.fun API.
Feel free to customize this bot for more advanced strategies:
- Variable Buy Amounts: Instead of a fixed BUY_AMOUNT, you might track the ratio of the whale's buy size to your total available SOL.
- Stop Loss / Sell Signals: Implement logic to detect large sell-offs or set thresholds for automatically selling the tokens.
- Multi-Program Monitoring: Extend your Yellowstone subscription to watch other DeFi protocols on Solana. Consider utilizing the Metis API for other DEXes or AMMs and/or setting up limit orders.
Thanks for following along and happy building! If you have any questions or want to explore more Solana and DeFi tutorials, check out our Guides and Documentation. Good luck and trade safely!
Let us know what you are up to or if you have any questions! You can reach out to us on Discord or Twitter.
We ❤️ Feedback!
Let us know if you have any feedback or requests for new topics. We'd love to hear from you.