16 min read
Amman is no longer actively maintained by Metaplex. This guide is for historic educational purposes only.
For a modern alternative, check out the How to Test Solana Programs with LiteSVM guide for testing Solana programs.
Overview
Amman is a Solana Local Test Validator wrapper that simplifies the developer experience. Amman is built and maintained by Metaplex, a prominent NFT standard on Solana. Amman can reduce the time it takes to test Solana programs. Let's get started!
What You Will Do
- Learn about what Amman is and its features
- Write a simple script to test some of Amman's features
- Create an Amman Configuration File
- Test your script and browse your transaction in the Amman Explorer
What You Will Need
- Solana CLI installed
- Experience with Solana's local validator (Guide: How to Set Up a Local Validator)
- JavaScript experience and Node.js installed
- Experience Creating a Fungible Token on Solana (Guide: How to Create a Fungible SPL token with the New Metaplex Token Standard)
What is Amman?
Amman is short for "A modern mandatory toolbelt to help test solana SDK libraries and apps on a locally running validator."
Notable Features:
- Amman Explorer - A web-based explorer that connects with your local Solana validator, tracks recent transactions, provides custom labels for accounts, and deserializes account data.
- Mock storage server - Amman can be used to mock the storage server for your Solana programs, which can be handy for testing NFT-related programs.
- Program and Account Loading - Amman can be used to load programs and accounts from a local filesystem or specified Solana cluster.
- Sharable Configuration - Amman can be configured to share the same validator and storage server across multiple projects, which can save time and effort.
How to Use Amman?
Let's create a simple script to test Amman's features. The script will:
- Create a fungible token, utilizing Amman's mock storage server to simulate uploading token metadata
- Mint tokens to a wallet
- Transfer tokens from the sender to the receiver
- Label the accounts using the Amman client
Note: this will be modeled off of our Fungible Tokens Guide using Umi.
Create a New Project
First, let's set up our project:
mkdir amman-test
cd amman-test
npm init -y
npm install @metaplex-foundation/amman @solana/web3.js@1 @metaplex-foundation/umi @metaplex-foundation/umi-bundle-defaults @metaplex-foundation/mpl-token-metadata @metaplex-foundation/mpl-toolbox @metaplex-foundation/umi-web3js-adapters
We will use npx rather than a global install for testing, but you can also globally install Amman if you prefer. Add the following script to your package.json:
"scripts": {
  "amman:start": "npx amman start"
}
Great! We're ready to start writing our script.
Create Script
Create a new app.ts file in your project root.
echo > app.ts
Open the file in your code editor, and let's get started!
Import Dependencies
First, let's import the necessary dependencies:
import { Amman, LOCALHOST, AMMAN_EXPLORER } from "@metaplex-foundation/amman-client";
import { Connection } from "@solana/web3.js";
import { percentAmount, generateSigner, signerIdentity, TransactionBuilderSendAndConfirmOptions, transactionBuilder, createSignerFromKeypair, Umi, Keypair, Signer, KeypairSigner } from '@metaplex-foundation/umi';
import { TokenStandard, createAndMint, mplTokenMetadata, CreateV1InstructionDataArgs } from '@metaplex-foundation/mpl-token-metadata';
import { createUmi } from '@metaplex-foundation/umi-bundle-defaults';
import { base58 } from "@metaplex-foundation/umi/serializers";
import { fromWeb3JsKeypair, toWeb3JsPublicKey } from "@metaplex-foundation/umi-web3js-adapters";
import { findAssociatedTokenPda, transferTokens as transferTokensUmi, createAssociatedToken } from '@metaplex-foundation/mpl-toolbox';
Types and Interfaces
Let's define some types and interfaces to help us manage our metadata. Add the following below your imports:
type TokenMetadata = Pick<CreateV1InstructionDataArgs, 'name' | 'symbol' | 'uri'>;
type MetaplexFile = Readonly<{
    buffer: Buffer;
    fileName: string;
    displayName: string;
    uniqueName: string;
    contentType: string | null;
    extension: string | null;
    tags: [];
}>;
type OffchainMetadata = {
    name: string;
    symbol: string;
    image: string;
    description: string;
    creator: {
        name: string;
        site: string;
    }
}
We are defining a TokenMetadata type that will be used to create our token. It is a subset of the CreateV1InstructionDataArgs type from the Umi library. We will also define a MetaplexFile type that will represent a file uploaded to Amman's mock storage. Finally, we define an OffchainMetadata type that will store metadata for our token.
Constants
Below, let's define a few constants to use throughout our script. Add the following below your imports:
const AIRDROP_AMOUNT = 100; // 100 SOL
const TOKEN_DECIMALS = 5;
const INITIAL_MINT_AMOUNT = 1_000_000 * Math.pow(10, TOKEN_DECIMALS); // 1 million tokens
const TRANSFER_AMOUNT = 100 * Math.pow(10, TOKEN_DECIMALS); // 100 tokens

const STORAGE_ID = "mock-storage";

const DEFAULT_OPTIONS: TransactionBuilderSendAndConfirmOptions = {
    send: { skipPreflight: true },
    confirm: { commitment: 'processed' },
};

const OFF_CHAIN_METADATA: OffchainMetadata = {
    "name": "Fake Bonk",
    "symbol": "xBONK",
    "image": "https://arweave.net/hQiPZOsRZXGXBJd_82PhVdlM_hACsT_q6wqwf5cSY7I",
    "description": "The FAKE Bonk Inu token",
    "creator": {
        "name": "Quicknode Guides",
        "site": "https://www.quicknode.com/guides/"
 }
}
Here's a quick breakdown of the constants:
AIRDROP_AMOUNT: The amount of SOL to airdrop to the authority/sender account.TOKEN_DECIMALS: The number of decimals for the token (we are going to create a fake BONK token with 5 decimals).INITIAL_MINT_AMOUNT: The initial amount of tokens to mint.TRANSFER_AMOUNT: The amount of tokens to transfer.STORAGE_ID: The ID of the storage to use for Amman's mock storage (this will need to match our Amman configuration--we will cover that later in the guide).DEFAULT_OPTIONS: The default options to use for transactions--we will use skipPreflight and processed commitment for our transactions to speed up our testing.OFF_CHAIN_METADATA: Sample off-chain metadata for our token that we will upload to Amman's mock storage.
Setup Functions
Now, let's define some functions to help us set up our project. Add the following below your imports:
async function setupUmi(): Promise<Umi> {
    const connection = new Connection(LOCALHOST);
    const umi = createUmi(connection);
    umi.use(mplTokenMetadata());
    return umi;
}

async function setupAuthority(umi: Umi, amman: Amman, connection: Connection): Promise<[Umi, Keypair]> {
    const [_authorityPublicKey, authorityKeypair] = await amman.genLabeledKeypair("Authority");
    const authority = fromWeb3JsKeypair(authorityKeypair);
    const authoritySigner = createSignerFromKeypair(umi, authority);
    umi.use(signerIdentity(authoritySigner));
    await airdropSol(umi, authority, amman, connection);
    return [umi, authority];
}

async function airdropSol(umi: Umi, authority: Keypair, amman: Amman, connection: Connection): Promise<void> {
    try {
        await amman.airdrop(connection, toWeb3JsPublicKey(authority.publicKey), AIRDROP_AMOUNT);
        console.log(`✅ - Airdropped ${AIRDROP_AMOUNT} SOL to ${authority.publicKey}`);
 } catch (err) {
        console.error("❌ - Error airdropping SOL:", err);
 }
}
Here, we are defining three helper functions for setting up our project:
setupUmi: This function initializes the Umi library and returns a new instance of it. Note that the Amman library has a handyLOCALHOSTconstant that we can use to connect to the local validator. Since we are using token metadata, we must also use themplTokenMetadatafunction to enable the token metadata program.setupAuthority: This function sets up the authority account, returns a new instance of Umi with the authority signer, and returns the authority's keypair. Note our use of thegenLabeledKeypairfunction from the Amman client. This function will create a new Solana keypair and add a label to it that will be accessible in the Amman Explorer.airdropSol: This function airdrops SOL to the authority account.
Mock Storage Function
Let's create a function utilizing Amman's mock storage to upload our token metadata. Add the following below your airdropSol function:
async function uploadTokenMetadata(amman: Amman, tokenMetadata: OffchainMetadata): Promise<string> {
    const storage = amman.createMockStorageDriver(STORAGE_ID, 1);

    const file: MetaplexFile = {
        buffer: Buffer.from(JSON.stringify(tokenMetadata)),
        fileName: "xBONK.json",
        displayName: "xBONK.json",
        uniqueName: "xBONK.json",
        contentType: "application/json",
        extension: "json",
        tags: [],
    }

    try {
        const uploadResponse = await storage.upload(file);
        console.log(`✅ - Successfully uploaded metadata`);
        return uploadResponse;
    } catch (err) {
        console.error("❌ - Error uploading metadata:", err);
        throw err;
    }
}
The file will use the Amman instance to create a new mock storage driver with the STORAGE_ID and an arbitrary cost of 1. We then create a MetaplexFile object (which is expected by the upload function) with the token metadata and upload it to the storage. Finally, we log a success message and return the upload response.
Mint Token Function
Next, define a function to mint our token. Add the following below your uploadTokenMetadata function:
async function mintTokens(umi: Umi, mint: Signer, authority: Keypair, metadata: TokenMetadata): Promise<void> {
    try {
        const response = await createAndMint(umi, {
            mint,
            authority: umi.identity,
            name: metadata.name,
            symbol: metadata.symbol,
            uri: metadata.uri,
            sellerFeeBasisPoints: percentAmount(0),
            decimals: TOKEN_DECIMALS,
            amount: INITIAL_MINT_AMOUNT,
            tokenOwner: authority.publicKey,
            tokenStandard: TokenStandard.Fungible,
        }).useLegacyVersion().sendAndConfirm(umi, DEFAULT_OPTIONS);
        console.log(`✅ - Successfully minted ${INITIAL_MINT_AMOUNT / Math.pow(10, TOKEN_DECIMALS)} tokens (${mint.publicKey})`);
        const [signature] = base58.deserialize(response.signature);
        console.log(`     ${AMMAN_EXPLORER}/#/tx/${signature}`);
    } catch (err) {
        console.error("❌ - Error minting tokens:", err);
    }
}
This will simply use the createAndMint function from the Umi library to create a new token with the specified metadata. We then log a success message and a link to the transaction in the Amman Explorer (note the AMMAN_EXPLORER URL constant from the amman-client library).
Transfer Token Function
Next, let's define a function to transfer our token. Add the following below your mintTokens function:
async function transferTokens(umi: Umi, mint: Signer, authority: Keypair, receiver: KeypairSigner): Promise<void> {
    const [senderAta] = findAssociatedTokenPda(umi, { mint: mint.publicKey, owner: authority.publicKey });
    const [receiverAta] = findAssociatedTokenPda(umi, { mint: mint.publicKey, owner: receiver.publicKey });

    const createAtaInstruction = createAssociatedToken(umi, {
        payer: umi.identity,
        owner: receiver.publicKey,
        mint: mint.publicKey,
        ata: receiverAta,
    });

    const transferInstruction = transferTokensUmi(umi, {
        source: senderAta,
        destination: receiverAta,
        amount: TRANSFER_AMOUNT,
    });

    const transferTransaction = transactionBuilder()
        .add(createAtaInstruction)
        .add(transferInstruction);

    try {
        const response = await transferTransaction.useLegacyVersion().sendAndConfirm(umi, DEFAULT_OPTIONS);
        if (response.result.value.err) {
            throw new Error(JSON.stringify(response.result.value.err));
        }
        console.log(`✅ - Successfully transferred ${TRANSFER_AMOUNT / Math.pow(10, TOKEN_DECIMALS)} tokens`);
        const [signature] = base58.deserialize(response.signature);
        console.log(`     ${AMMAN_EXPLORER}/#/tx/${signature}`);
    } catch (err) {
        console.error("❌ - Error sending tokens:", err);
    }
}
Here, we need to do two things:
- Create the Associated Token Account (ATA) for the receiver. We use the
createAssociatedTokenfunction from the Umi library. - Transfer the tokens using the
transferTokensfunction from the Umi library (which we cast astransferTokensUmito avoid a type error). We then log a success message and a link to the transaction in the Amman Explorer.
Main Function
Great! Now that we have defined our functions let's define our main function, which will pull our pieces together. Add the following below your transferTokens function:
async function main() {
    const amman = Amman.instance();
    const connection = new Connection(LOCALHOST, 'processed');
    let umi = await setupUmi();

    const [updatedUmi, authority] = await setupAuthority(umi, amman, connection);
    umi = updatedUmi;

    const mint = generateSigner(umi);
    const receiver = generateSigner(umi);

    const [senderAta] = findAssociatedTokenPda(umi, { mint: mint.publicKey, owner: authority.publicKey });
    const [receiverAta] = findAssociatedTokenPda(umi, { mint: mint.publicKey, owner: receiver.publicKey });

    amman.addr.addLabel("xBONK", toWeb3JsPublicKey(mint.publicKey));
    amman.addr.addLabel("Receiver Wallet", toWeb3JsPublicKey(receiver.publicKey));
    amman.addr.addLabel("Sender xBONK Account", toWeb3JsPublicKey(senderAta));
    amman.addr.addLabel("Receiver xBONK Account", toWeb3JsPublicKey(receiverAta));

    const uri = await uploadTokenMetadata(amman, OFF_CHAIN_METADATA);

    const metadata: TokenMetadata = {
        name: "FakeBONK",
        symbol: "xBONK",
        uri
    };

    await mintTokens(umi, mint, authority, metadata);
    await transferTokens(umi, mint, authority, receiver);
}

main().then(() => console.log('Done.'));
Let's break this down:
- We first create a new
Ammaninstance and aConnectioninstance to our local validator. - We then call our
setupUmifunction to set up ourUmiinstance. - We then call our
setupAuthorityfunction to set up our authority account and airdrop some SOL to it. We update ourUmiinstance with the authority signer. - We create a
mintandreceiversigner using thegenerateSignerfunction from the Umi library. With those, we can find the ATA for both the Authority and Receiver accounts. - We add labels to our accounts using the
amman.addr.addLabelfunction. This will function similarly to thegenLabeledKeypairfunction from the Amman library but will add a label to an existing account. Typically, we would probably have used the same approach for defining the keypairs here, but we are using this approach just to show different ways of using the Amman library. - We then call our
uploadTokenMetadatafunction to upload our token metadata to Amman's mock storage, and we use its response to create our token metadata object. - We create a new token by calling the
mintTokensfunction. - We then call our
transferTokensfunction to transfer our token to the receiver account.
Configure Amman
Before we can run our script, we need to configure Amman. Amman has a number of configuration options--we will cover some, but check out the Amman documentation or the Amman Source Code for more information.
Create a new .ammanrc.js file in your project root with the following content:
const { LOCALHOST } = require("@metaplex-foundation/amman");
const path = require('path');

function localDeployPath(programName) {
    return path.join(__dirname, `programs`, `${programName}.so`);
}

module.exports = {
    validator: {
        killRunningValidators: true,
        accountsCluster: "https://example.solana-mainnet.quiknode.pro/123456/", // 👈 Replace with your own Quicknode endpoint
        programs: [
            {
                label: 'Metaplex Metadata',
                programId: "metaqbxxUerdq28cj1RbAWkYQm3ybzjb6a8bt518x1s",
                deployPath: localDeployPath('metadata')
            }
        ],
        jsonRpcUrl: LOCALHOST,
        websocketUrl: "",
        commitment: "confirmed",
        resetLedger: true,
        verifyFees: false,
        detached: process.env.CI != null,
    },
    relay: {
        enabled: process.env.CI == null,
        killRunningRelay: true,
    },
    storage: {
        enabled: process.env.CI == null,
        storageId: "mock-storage",
        clearOnStart: true,
    },
};
The validator configuration is where we specify how we want our solana-test-validator to start up and run:
killRunningValidators: This will kill any running validators before starting a new one.accountsCluster: This is the URL of the Quicknode endpoint we use to fetch accounts data from and start up our validator. For example, if we want a program or token to mimic a mainnet deployment, we can use the mainnet endpoint. If you do not have a Quicknode endpoint, you can get a free one here. Alternatively, you can use a public endpoint from Solana.com.programs: This is an array of programs we want to be loaded to our validator. In this case, we are deploying the Metaplex Metadata program. You'll notice that we are using thelocalDeployPathfunction to specify the path where the program is located. We will need to create this directory anddumpthe program into it--we will do that next.jsonRpcUrlandwebsocketUrl: These are the URLs of our local validator. We will use these to connect to our local validator and interact with it.commitment: This is the commitment level we want to use for our validator. We will use this to ensure our validator is in sync with the network.resetLedger: This will reset the ledger before starting the validator. We will use this to start from the genesis block each time we start the validator.verifyFees: If true, the validator is not considered fully started up until it charges transaction fees.detached: This will run the validator in the background, allowingammanto exit while it continues to run.
The relay configuration specifies how our data is shared between the validator and Amman Explorer. We will use the default configuration for this example. For more information on the relay configuration, check out the Amman Source Code.
Finally, the storage configuration specifies how we want to store our mock storage. We will create a storage identifier called mock-storage to match the STORAGE_ID constant in our script. We will also set the clearOnStart flag to true, which will clear the storage before starting the validator.
Clone Necessary Programs
As mentioned above, we must clone the Metaplex Metadata program from Mainnet. To do this, we can use the dump command in Solana CLI. The dump command will export the program account's executable byte code to a file, which we can then deploy to our localnet. We will need the program ID. For Metaplex Token Metadata, the program ID is metaqbxxUerdq28cj1RbAWkYQm3ybzjb6a8bt518x1s.
In your terminal, create a new directory called programs and enter the following command to dump the program to a file:
mkdir programs
Then, enter the following command to dump the program to a file:
solana program dump -u m metaqbxxUerdq28cj1RbAWkYQm3ybzjb6a8bt518x1s programs/metadata.so
This should create a metadata.so file in the programs directory, which matches what we specified in our configuration file. We should be good to go!
Run Your Script
Start the Amman validator by running:
npm run amman:start
Open a new terminal and navigate to your project directory. If you would like, ou can browse the Amman CLI tools by running:
npx amman help
Now, run your script:
ts-node app.ts
You should see output similar to this:
✅ - Airdropped 100 SOL to 5L8siRBhjiAE4GJKZmZSSkfCYBSRZXMv44SVuoD888Yt
✅ - Successfully uploaded metadata
✅ - Successfully minted 1000000 tokens (7nE1GmnMmDKiycFZxTUdf2Eis9KoYZWN6xNapYzcVCu2)
     https://amman-explorer.metaplex.com/#/tx/2AQhGq2BxmGFfvVEJ6uKkMYKGmAswWWZ9vg4YHw2iqr1Nd9wGChL9rLJWZTqKRBxZepTMPQutJ6Lqj2ZbRuNKkX
✅ - Successfully transferred 100 tokens
     https://amman-explorer.metaplex.com/#/tx/3X6CAX6YUWZQ4X8AyHK2EuFHZHZ3iS8GrJnCwNvQKsyF8UjWZ6ysRgXCH7Y2q7q3zJNkiNKn1CwS6xEQ5R1YuZfv
Done.
You will also notice that the terminal window with your local validator running will show real-time logs of your transactions. You can also view your transactions and accounts on the Amman Explorer by following the links in the terminal. Go ahead and click the link for the transfer transaction to see the transaction on the explorer.
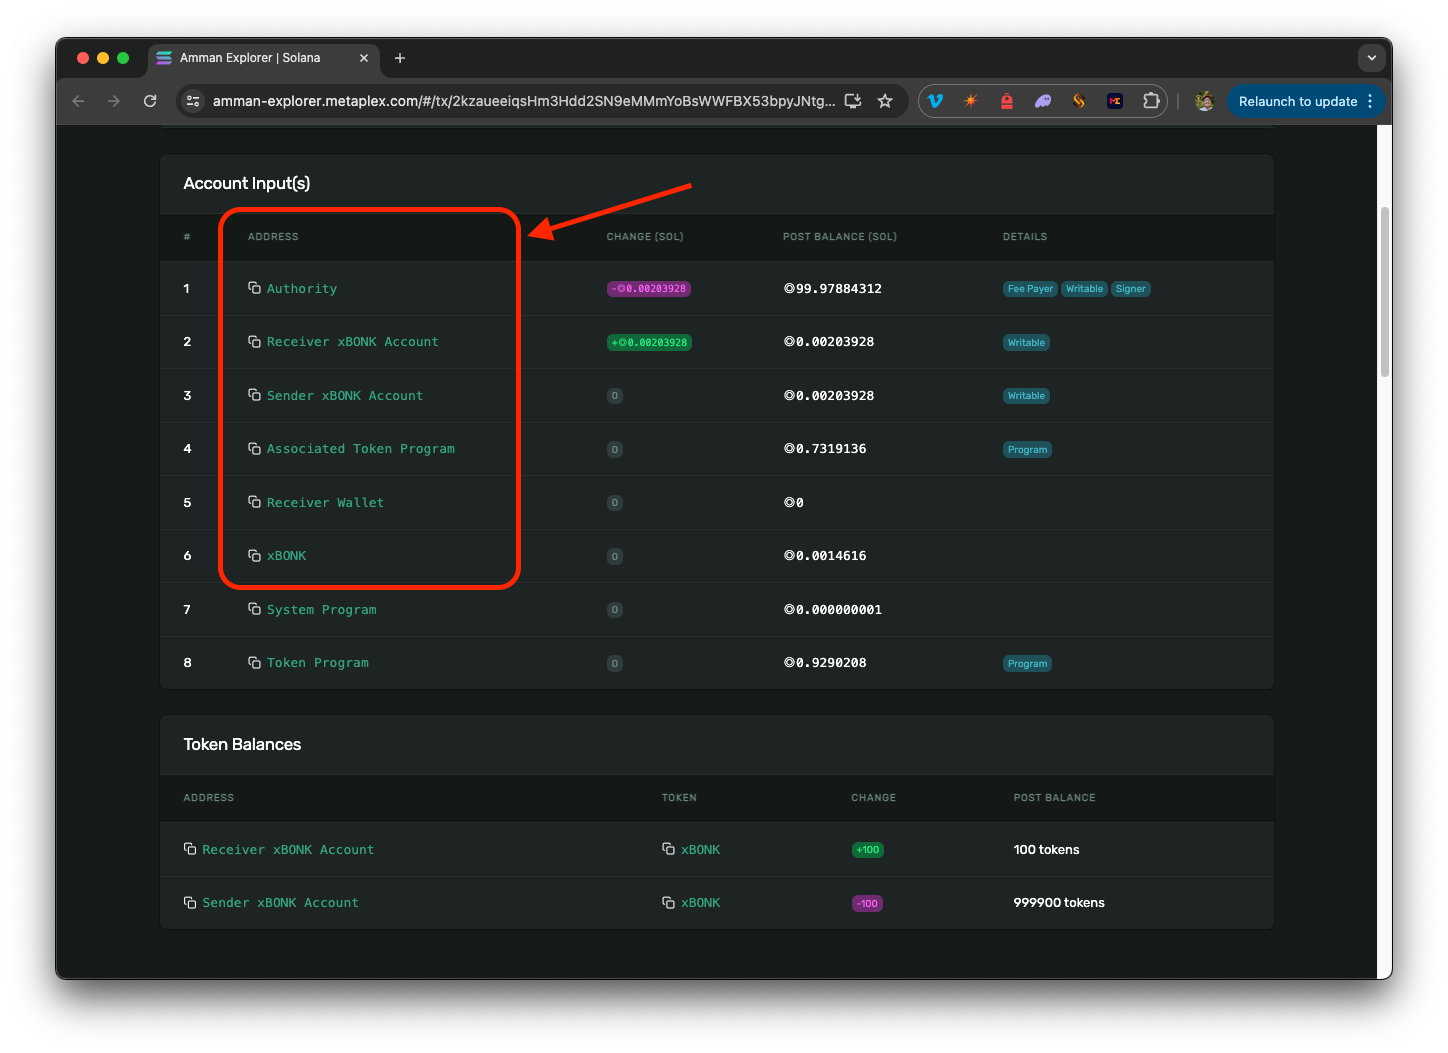
You should notice a few new things:
- The input "Account Input(s)" section is now a list of labeled accounts (as opposed to the raw public keys we are used to seeing on Solana Explorer). These should match the account labels we defined in our script:
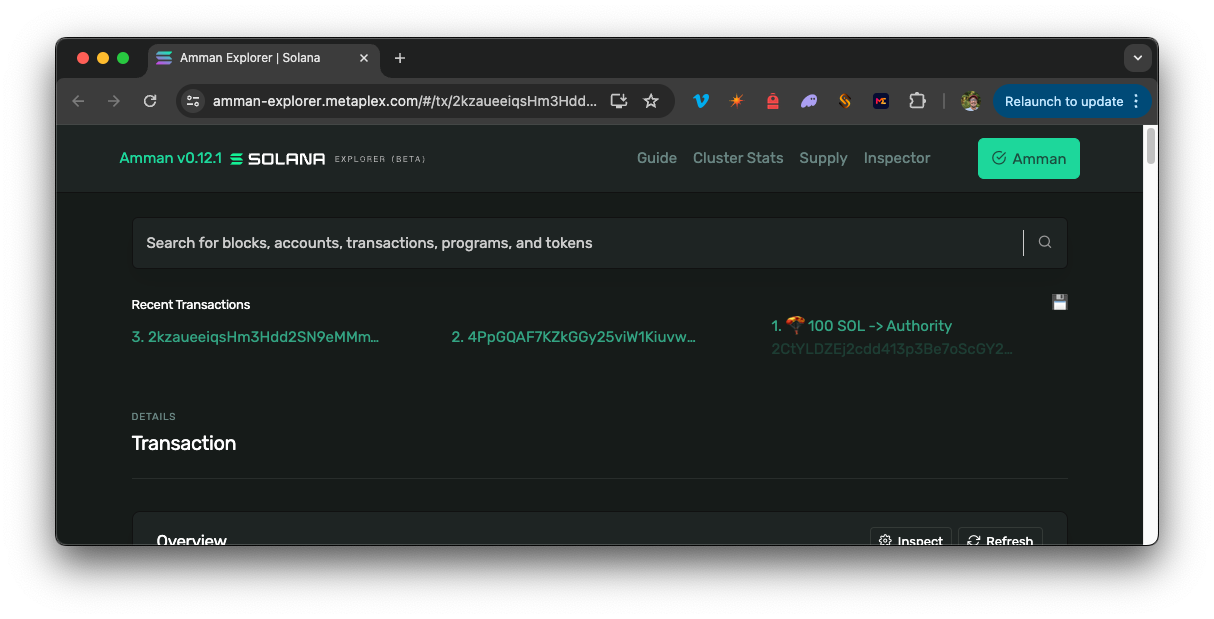
- At the top of the screen, you should see a "Load History" button. Clicking this will load the transaction history for the accounts we are using in our script. You should see the transactions we just ran:
- Snapshots are available to view and store the state of your accounts. This is useful for debugging and testing. You can view the snapshots by clicking the 💾 icon in the top right corner of the screen. You can store these and load them later to return to a previous state. 🤯
Pretty cool, right?
Wrap Up
Amman is a powerful set of tools for Solana developers, making local development and testing much more efficient. As you continue to develop on Solana, consider integrating Amman into your workflow to streamline your development process. Check out these additional resources to learn more:
Resources
- Metaplex Developers - Amman
- Amman GitHub
- Amman Explorer
- Amman Explorer GitHub
- Amman Pre-made Configs
Let's Connect!
Are you already using Amman? We'd love to hear how. Send us your experience, questions, or feedback via Twitter or Discord.
We ❤️ Feedback!
Let us know if you have any feedback or requests for new topics. We'd love to hear from you.