Setting Up Streams with Snowflake
In the following section, we'll show you how to set up a Stream and have the data delivered to Snowflake by using Amazon S3, Snowflake's Snowpipe, and GZIP compression.
This document will cover the following topics:
- Set up AWS S3 and Snowflake accounts, with the necessary permissions
- Create a Stream on Quicknode to stream data to S3
- Configure Snowflake to automatically ingest data from S3
- Set up Snowpipe to automatically load data from S3 into Snowflake
- Use GZIP compression to reduce the size of the data being streamed
Prerequisites
- AWS, Google Cloud Platform (GCP), or any other S3-compatible storage account
- Snowflake account
Step 1: Set Up S3 and Test GZIP Upload
Step 1.1: Create an S3 Bucket
- Log in to AWS Console
- Click Create bucket
- Bucket name: Choose something unique like
qn-streams-data-test - Region: Pick one close to you (e.g.,
us-east-1) - Leave the rest default
- Click Create bucket
Step 1.2: Create IAM User for Quicknode Streams
Create an IAM user with programmatic access to upload data to your S3 bucket. This user will be used by Quicknode Streams to upload data to your S3 bucket.
- Go to IAM Console
- Click Users → Add users
- Name:
qn-streams-s3-writer - Enable Programmatic access
- Click Next: Permissions
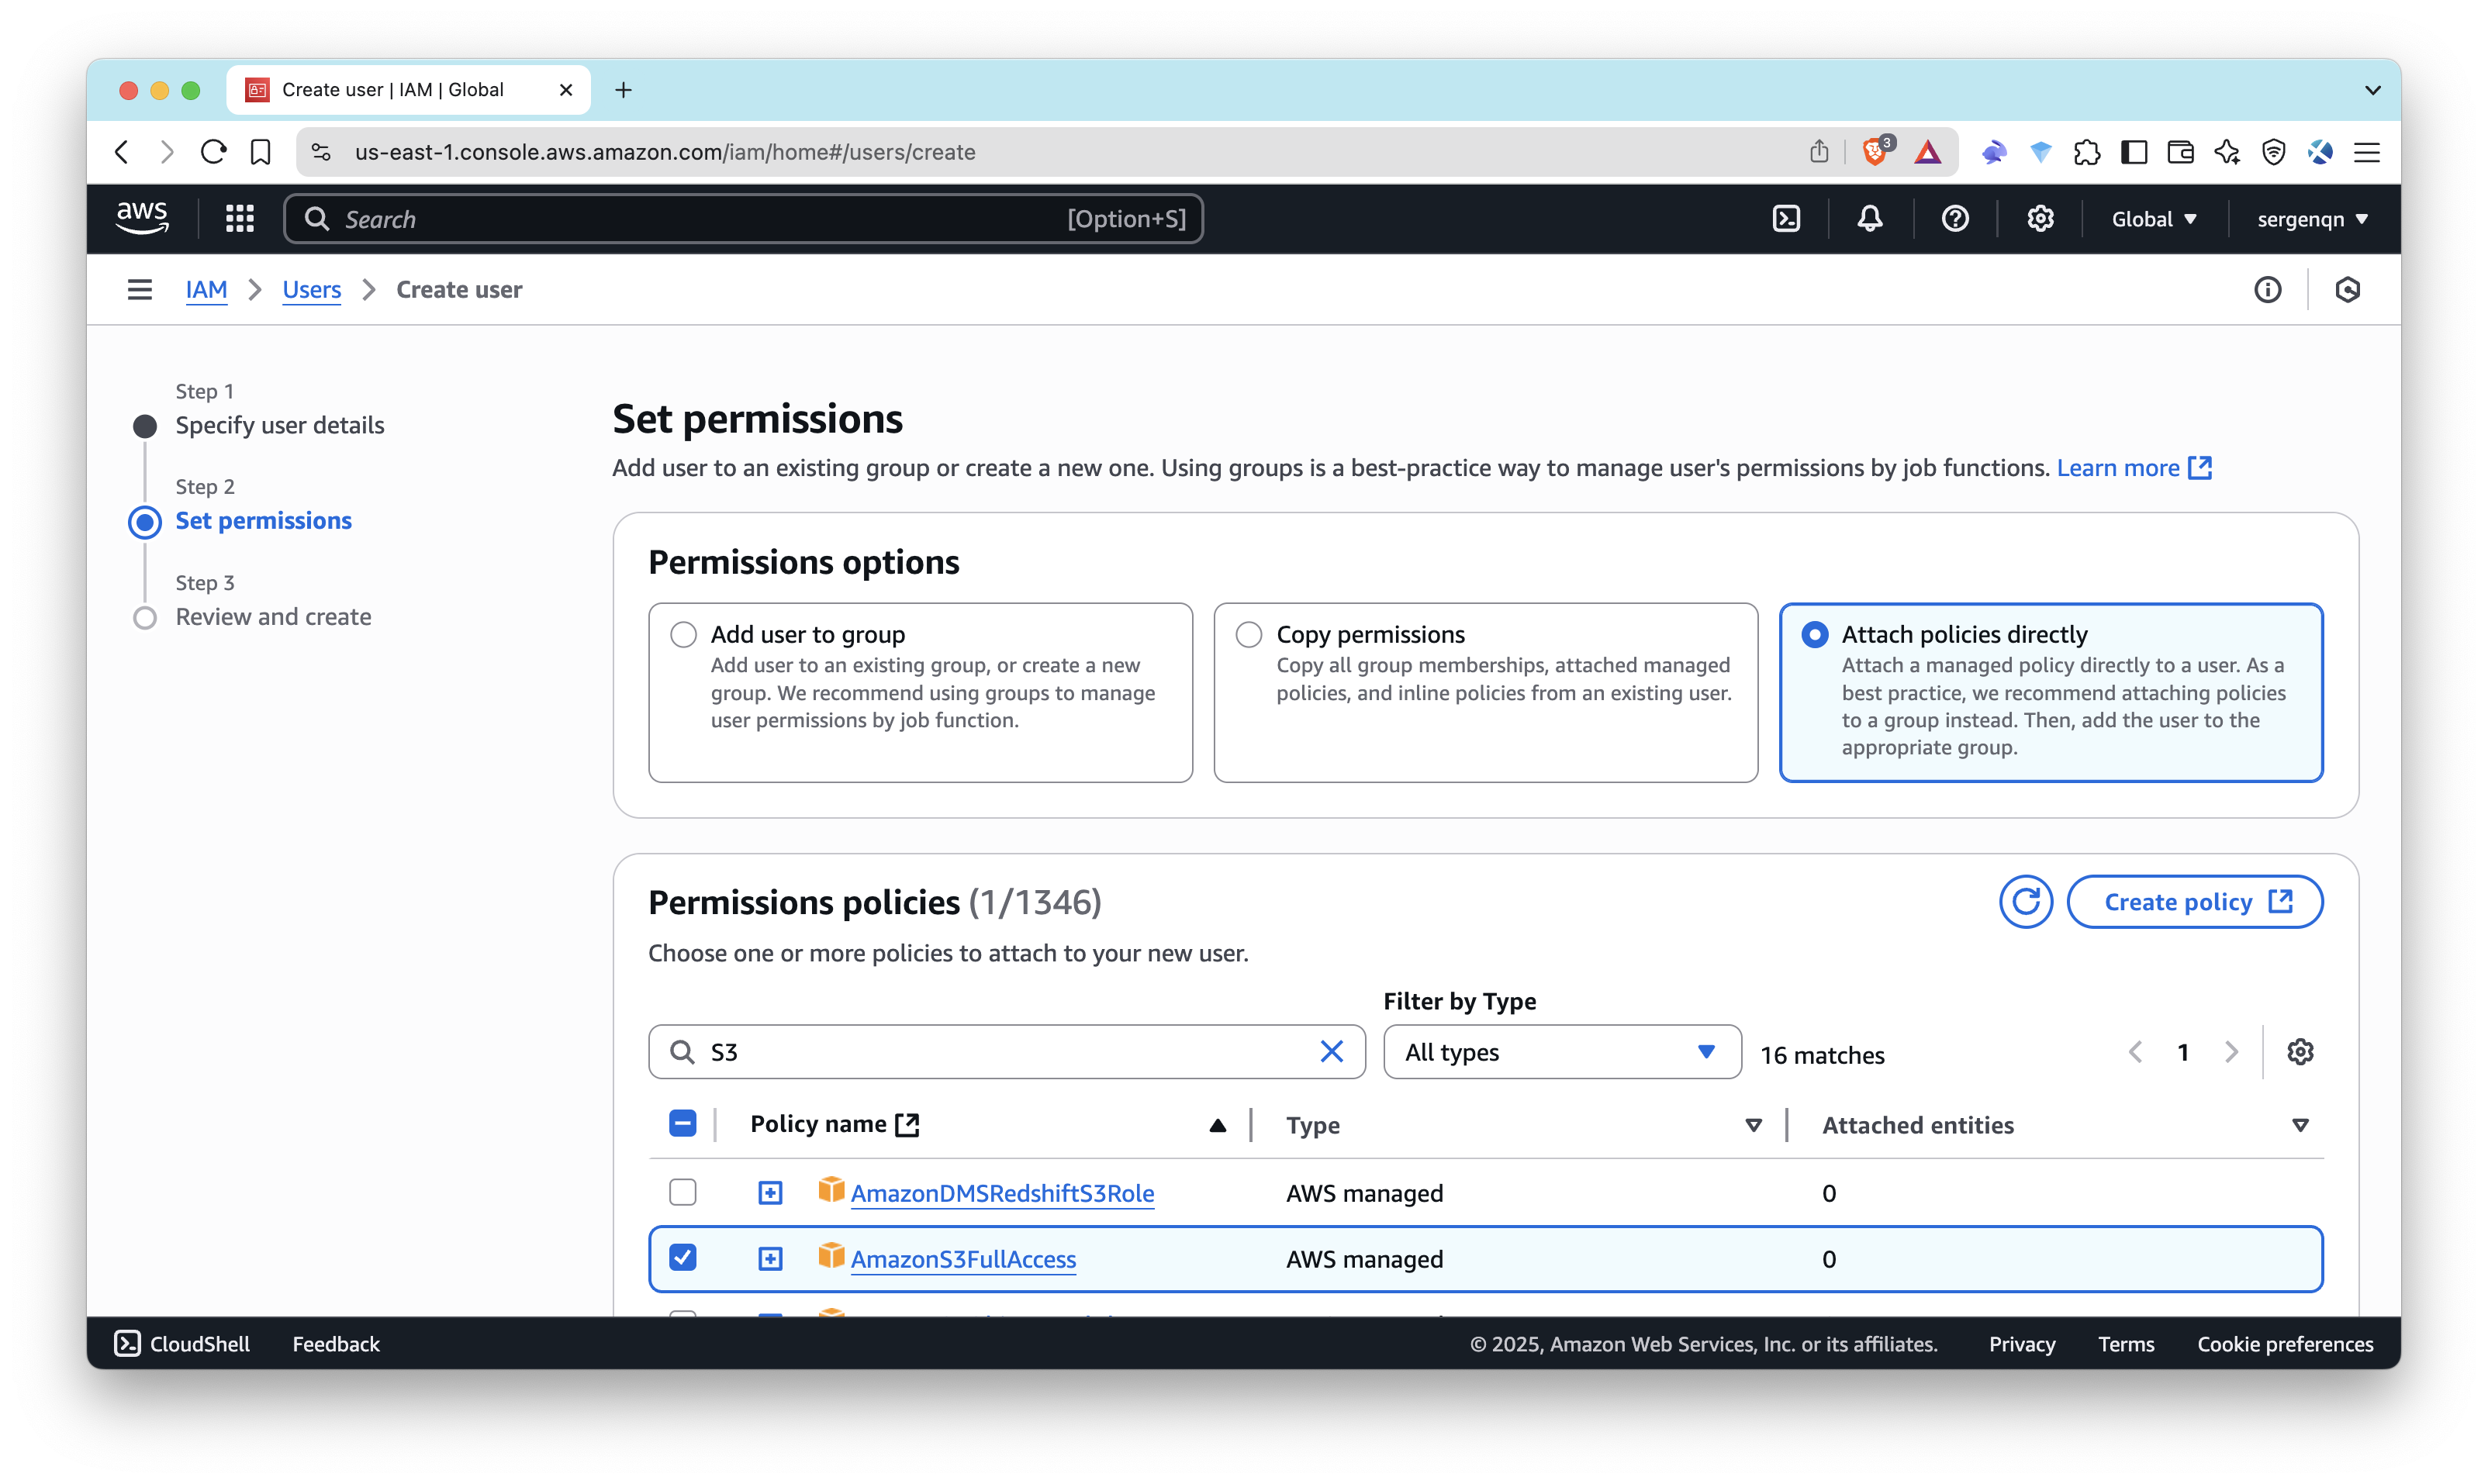
- Select Attach policies directly and choose:
AmazonS3FullAccess(or create a more restricted policy later)
- Click through to create the user
- Select the user you just created, and click Security credentials
- Find Access keys section to create Access Key ID and Secret Access Key
- Select use case as Application running outside AWS, follow instructions
Note down the Access Key ID and Secret Access Key – you’ll use them later in Streams configuration.
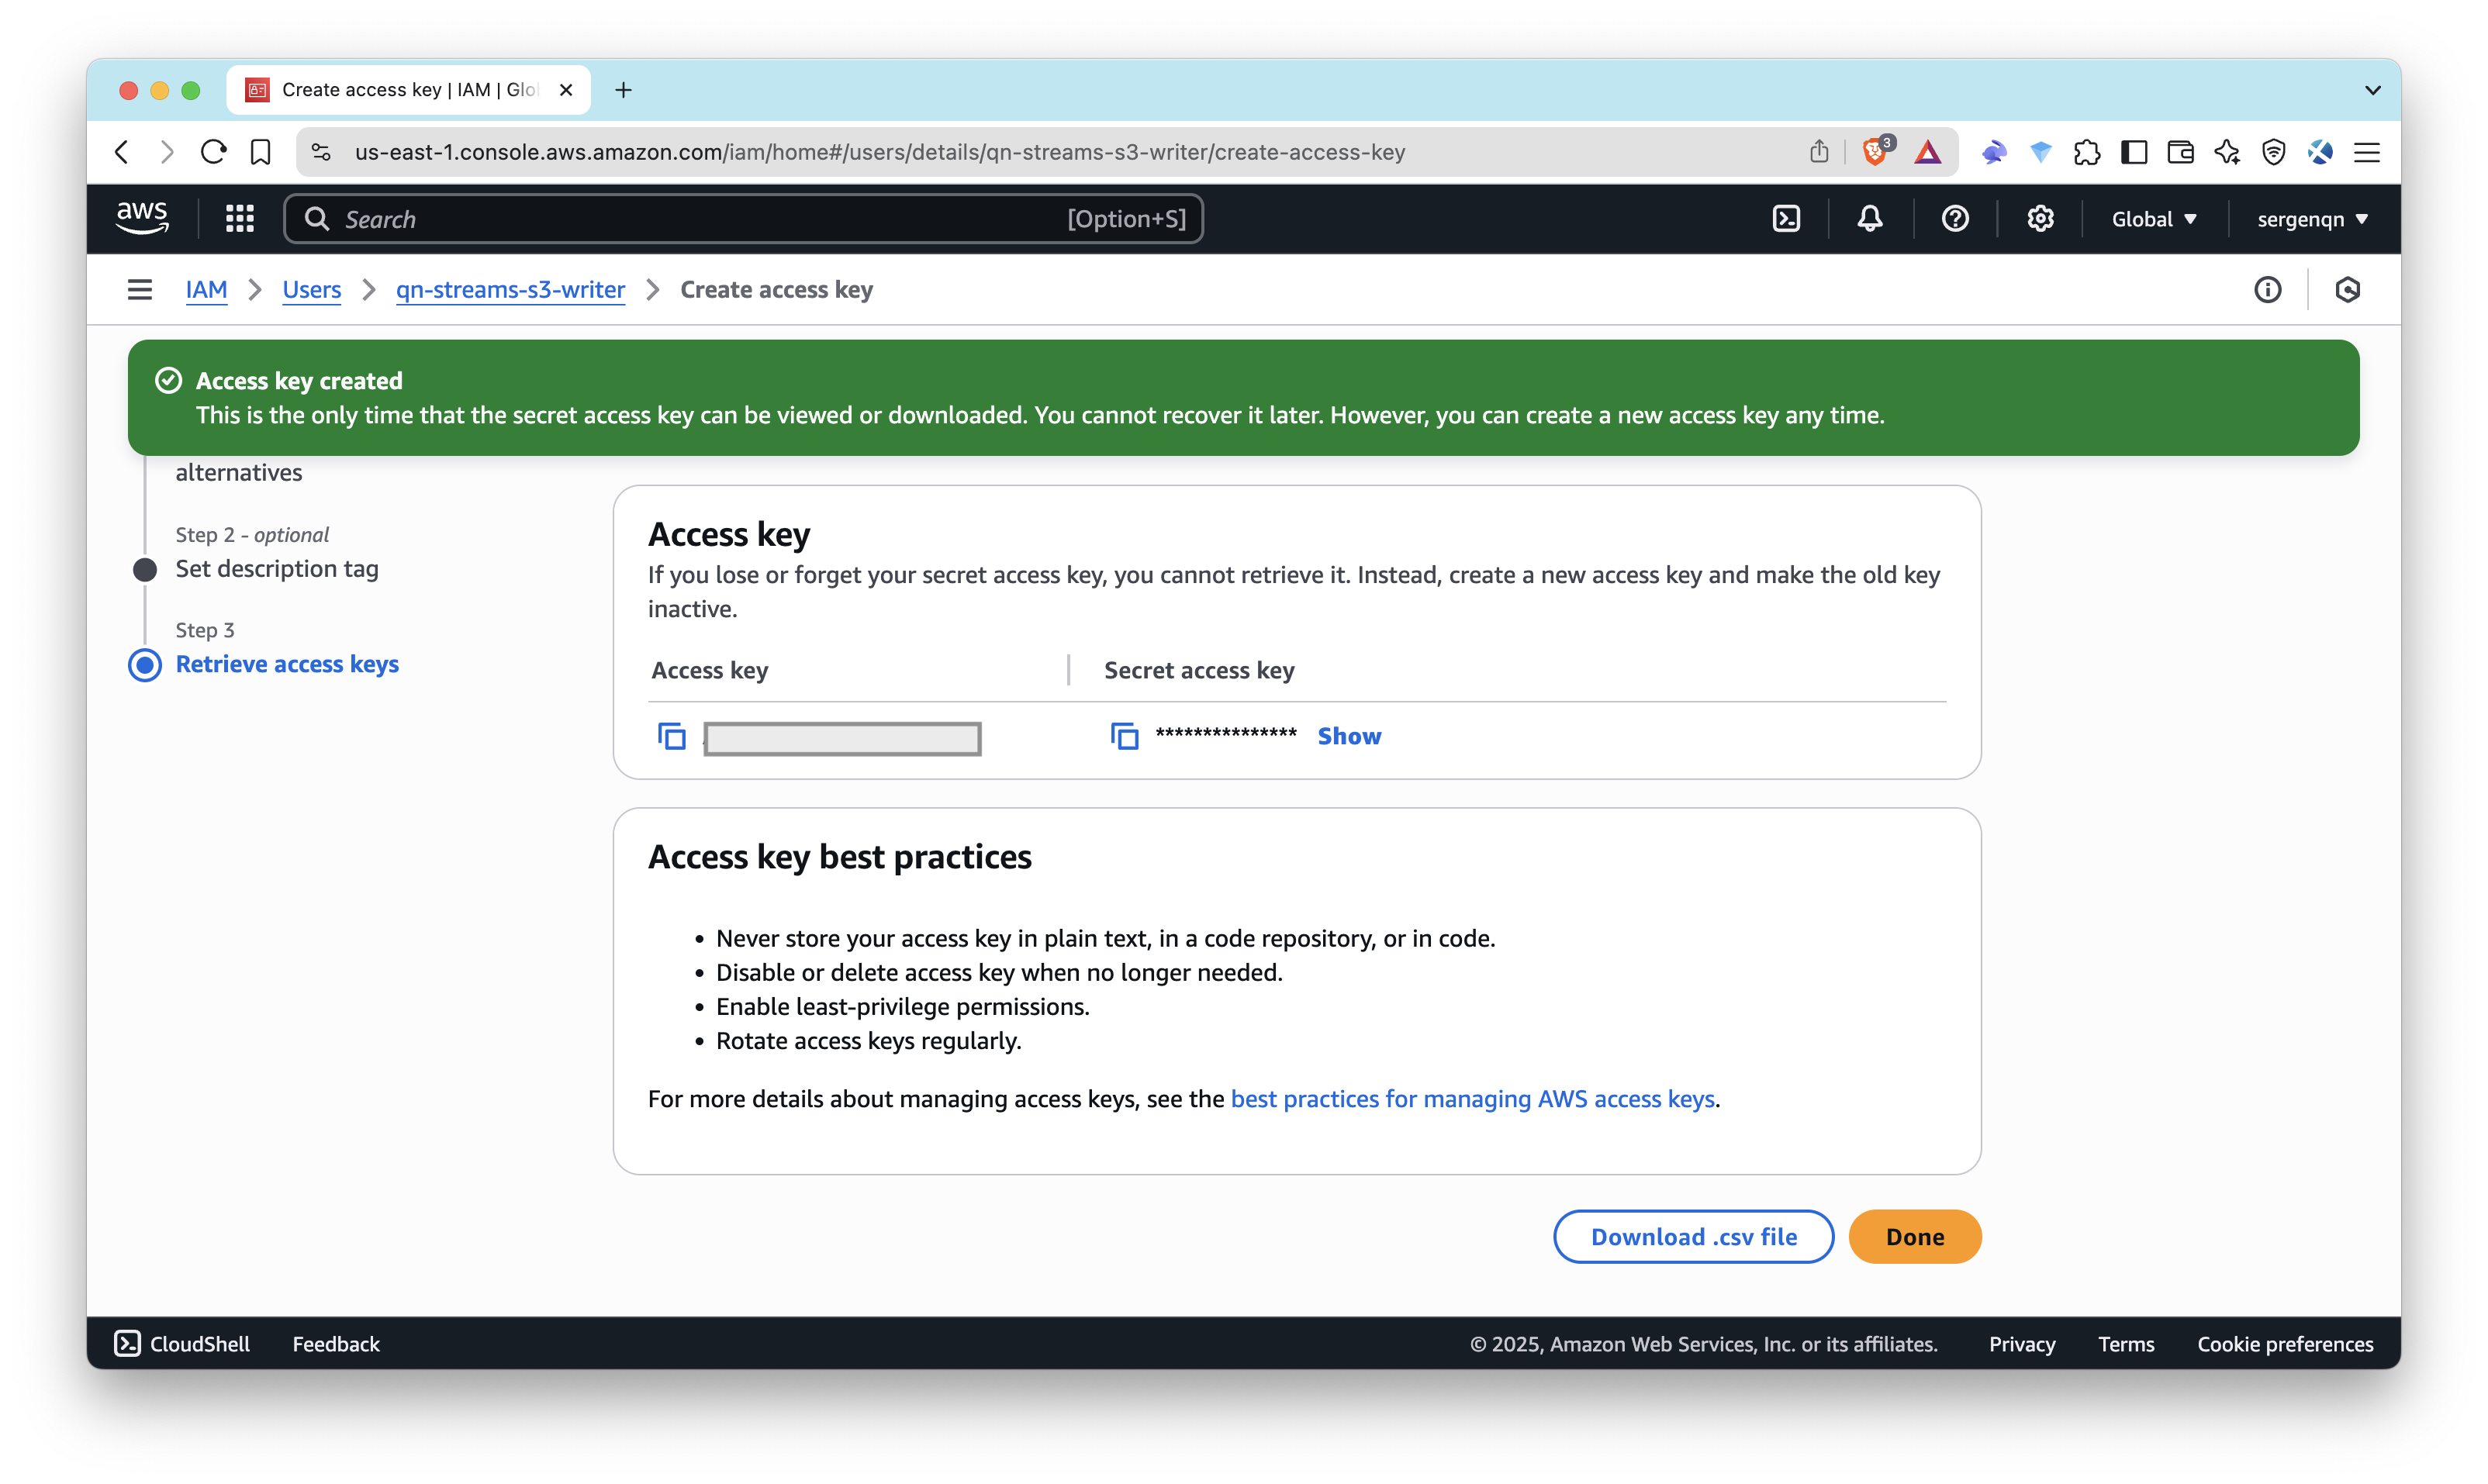
- Never store your access key in plain text, in a code repository, or in code
- Disable or delete access key when no longer needed
- Enable least-privilege permissions
- Rotate access keys regularly
See AWS - Access Keys Best Practices for more information.
Step 2: Set Up Streams and Test Connection
Step 2.1: Create a Stream with S3 Destination
- Go to your Quicknode Dashboard and click Streams tab.
- Click Create Stream.
- Choose your network (e.g., Ethereum Mainnet) and stream range
- Choose a dataset (e.g., Block, Transaction, etc.)
- Modify the stream payload by applying filters (optional)
- Choose S3-compatible Storage as the destination.
- Enter:
- Endpoint: For Amazon S3, leave the field as it is, for GCP use https://storage.googleapis.com, and other endpoint URLs depending on the service you’re streaming files to.
- File compression: Select
GZIP. - Access Key ID and Secret Access Key: Use the IAM credentials that you noted down earlier.
- Bucket name: Use the bucket name that you created earlier. (e.g.,
qn-streams-data-test) - Prefix: The prefix, if any. You can use prefixes to organize objects in your bucket, similarly to folders in a regular file system. (e.g.,
ethereum/) - File type: Select JSON as the file type.
- Click Test Connection and then Send Payload to check connection and send a sample data.
For more details, check out the Setting Up Streams with S3-Compatible Storage documentation.
Step 2.2: Verify the File in S3
The AWS S3 Console is the easiest and most visual option for now:
- Open the S3 bucket in the S3 Console
- Sort by Last Modified or use the search bar if you specified a prefix/path.
- You should see files named something like
ethereum-mainnet_block_000022437491-000022437491.json.gz
You can also use the AWS CLI to check the file in your S3 bucket:
aws s3 ls s3://qn-streams-data-test/ethereum/
aws s3 cp s3://qn-streams-data-test/ethereum/<your-file-name> .
gunzip <your-file-name> && cat <your-file-name>
Once you've confirmed events are being written and compressed correctly, we’re ready for the ingestion step.
At this point, we only have the data in S3. The next step is to set up Snowflake to automatically ingest this data. Thus, we just sent a test payload but haven't created the Stream yet.
Before moving forward, keep your S3 URI (e.g., s3://qn-streams-data-test/ethereum/) handy, as you’ll need it for the Snowflake setup.
Step 3: Set Up Snowflake and Snowpipe
We’ll now set up Snowflake to automatically ingest these .json.gz files from S3.
Step 3.1: Sign Up for Snowflake and Set Up a Worksheet
Sign Up (or Log In)
- Go to Snowflake and log in
- Choose a cloud provider and region (same as your S3 bucket — e.g., AWS
us-east-1) - Pick a tier (e.g.,
Standard)
Open Worksheets
- On the left menu: click Worksheets
- Click + Worksheet to open a SQL editor window
- This is where you’ll paste and run SQL commands in the following steps
Step 3.2: Create Your Database, Schema, and Table
In Snowflake, you’ll create a database and schema to store your data. You can name them whatever you like, but for this example, we’ll use quicknode_data and streams. We’ll store entire GZIP’d JSON objects in one VARIANT column.
Run the following SQL commands to create a database, schema, and table:
CREATE OR REPLACE DATABASE quicknode_data;
CREATE OR REPLACE SCHEMA quicknode_data.streams;

USE SCHEMA quicknode_data.streams;
CREATE OR REPLACE TABLE raw_streams_data (
    json_data VARIANT
);
That’s your base setup.
Step 4: Connect Snowflake to S3 (Storage Integration)
To let Snowflake read files from your S3 bucket, you’ll use a secure feature called storage integration. This allows Snowflake to access your S3 bucket without needing to store AWS credentials in Snowflake.
First, you’ll create an IAM policy and role in AWS, then create a storage integration in Snowflake.
Step 4.1: IAM Policy for Snowflake to Access S3
Create an IAM policy that allows Snowflake to access your S3 bucket.
- Go to the IAM Console
- Click Policies in the left navigation pane.
- Click Create policy.
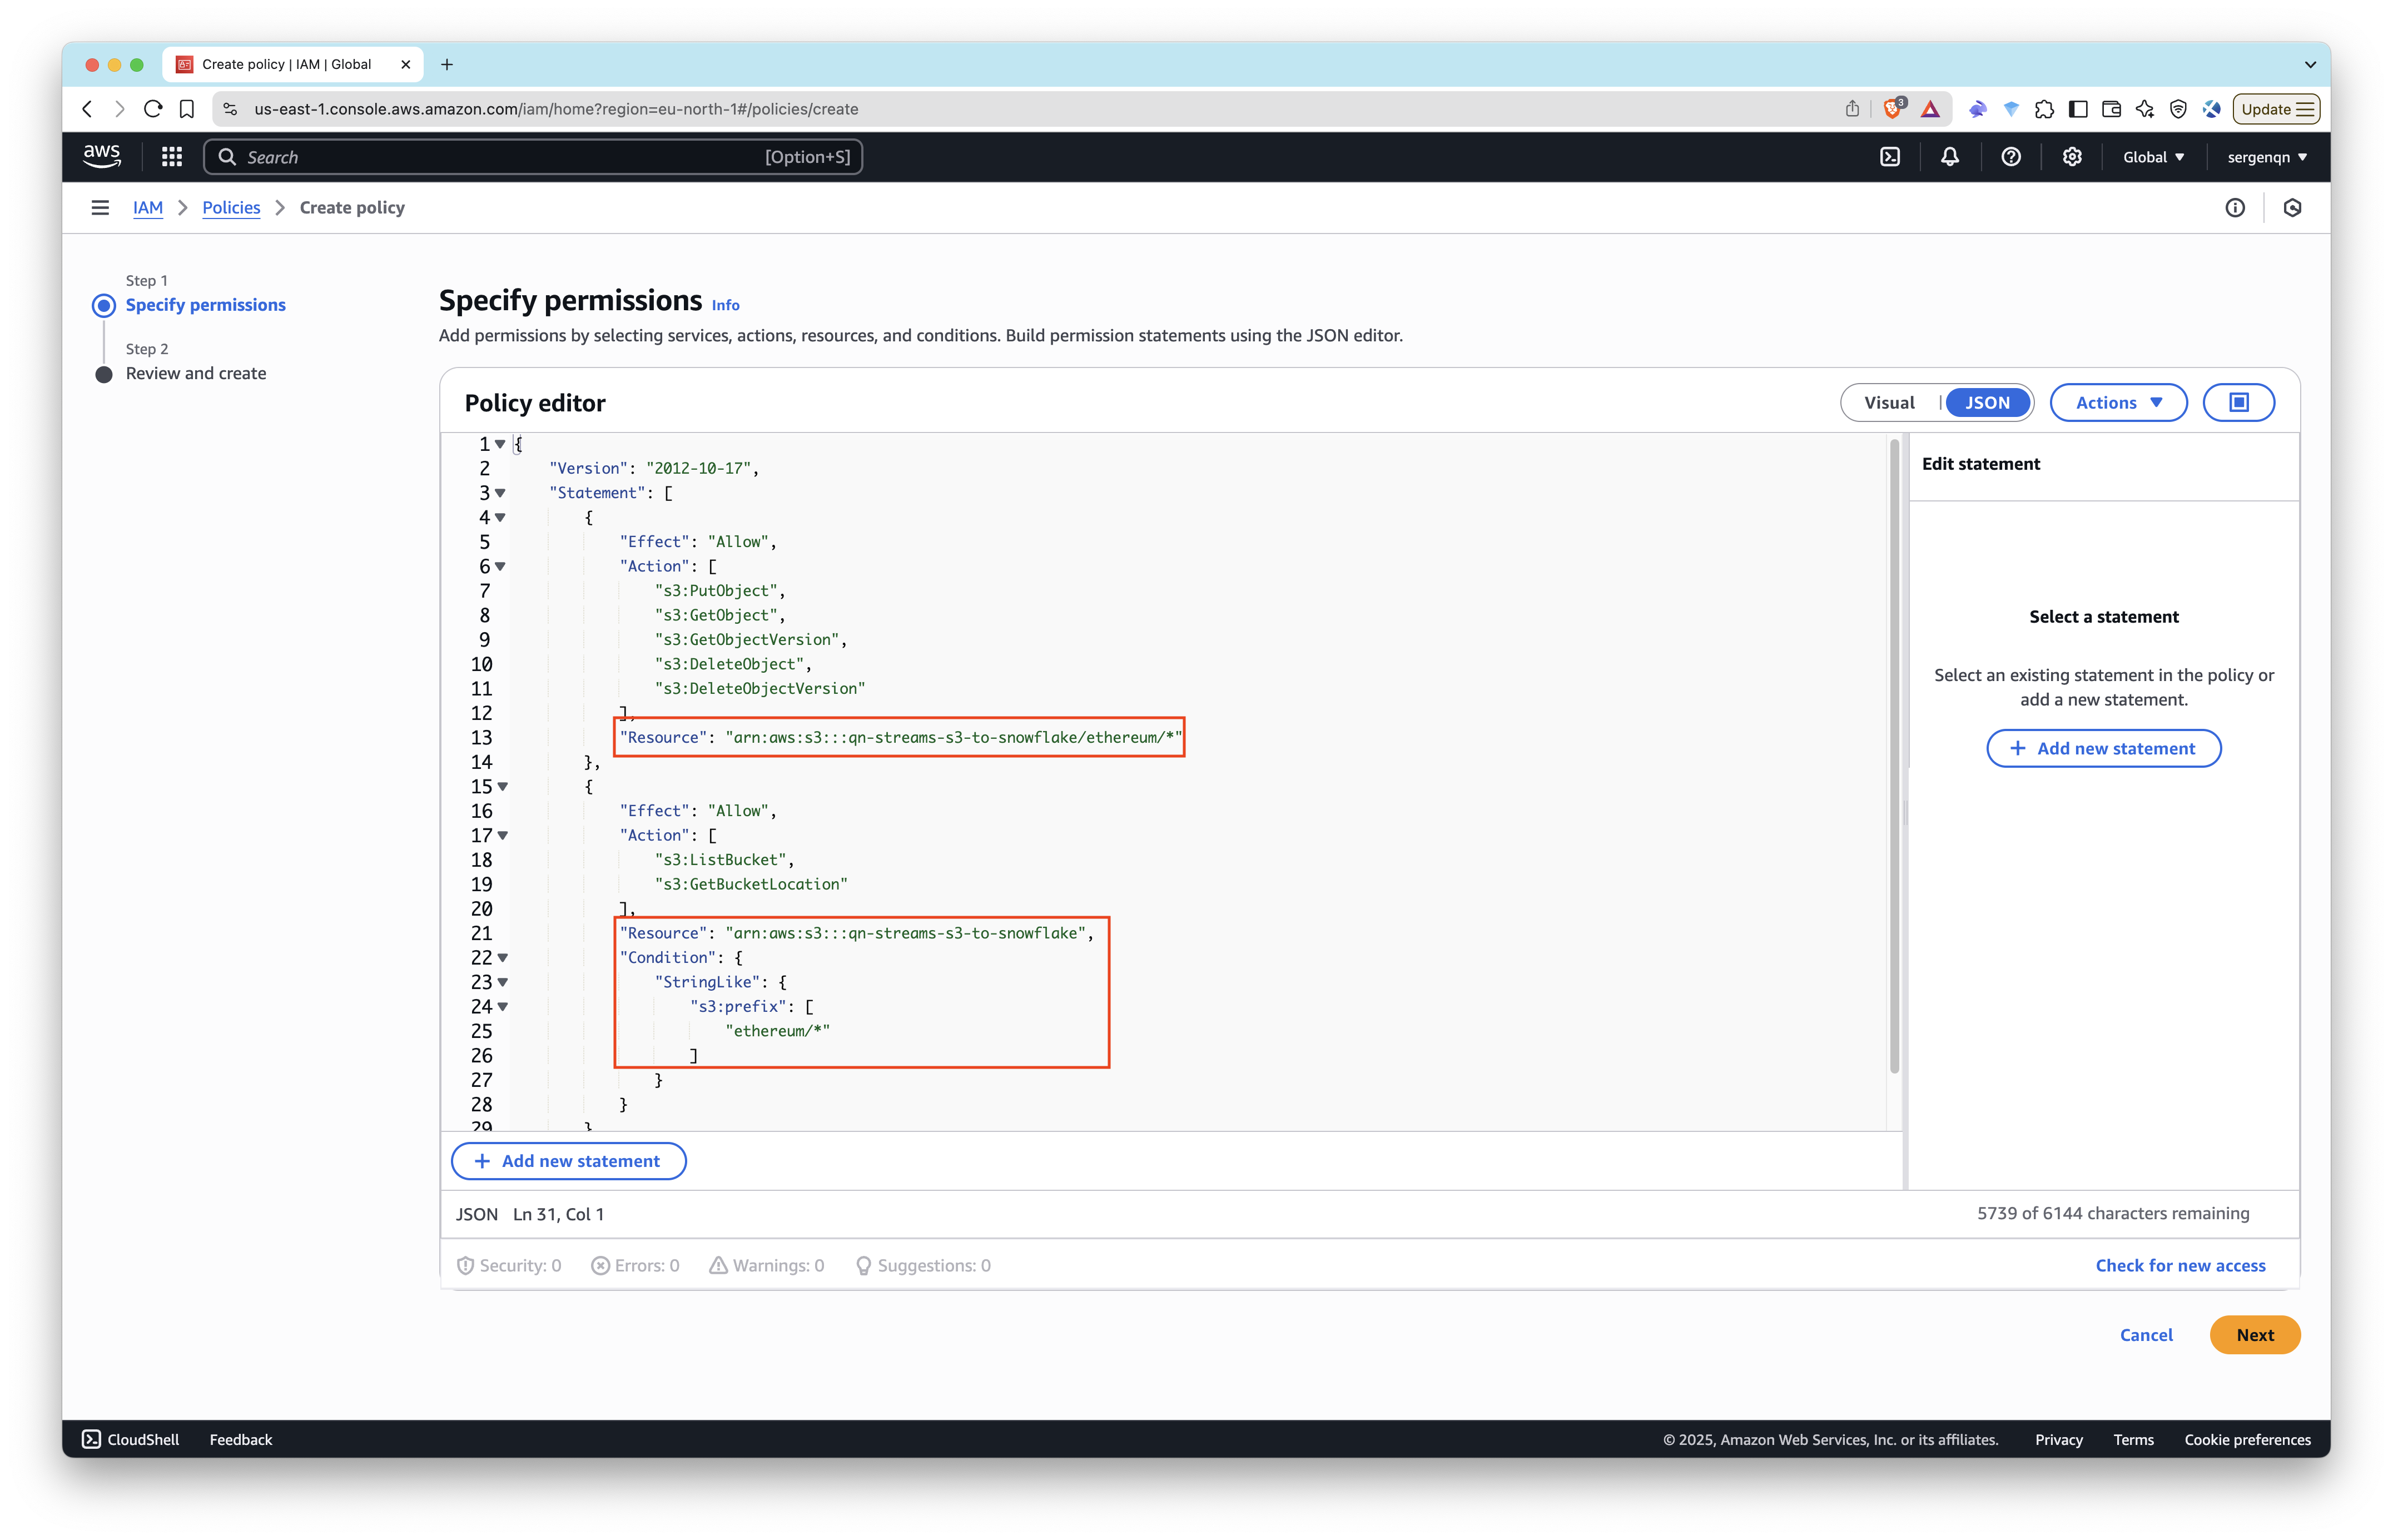
- Select the JSON tab to define the policy.
- Copy and paste the following JSON policy document. Replace
<bucket>and<prefix>with your S3 bucket name (e.g.,qn-streams-data-test) and prefix if applicable (e.g.,ethereum/).
{
    "Version": "2012-10-17",
    "Statement": [
        {
            "Effect": "Allow",
            "Action": [
              "s3:PutObject",
              "s3:GetObject",
              "s3:GetObjectVersion",
              "s3:DeleteObject",
              "s3:DeleteObjectVersion"
            ],
            "Resource": "arn:aws:s3:::<bucket>/<prefix>/*"
        },
        {
            "Effect": "Allow",
            "Action": [
                "s3:ListBucket",
                "s3:GetBucketLocation"
            ],
            "Resource": "arn:aws:s3:::<bucket>",
            "Condition": {
                "StringLike": {
                    "s3:prefix": [
                        "<prefix>/*"
                    ]
                }
            }
        }
    ]
}
- Give the policy a name (e.g.,
snowflake_access) and create the policy.
Step 4.2: Create an IAM Role for Snowflake
Create an IAM role that allows Snowflake to access your S3 bucket.
- Go to the IAM Console
- Click Roles in the left navigation pane.
- Click Create role.
- Choose AWS account as the trusted entity.
- Select Another AWS account and enter your own AWS account ID temporarily. We'll update it later with the Snowflake account ID.
- Select the Require external ID checkbox and enter a placeholder value (e.g.,
0000). In the next step, you'll specify the external ID for your storage integration. - Click Next and attach the policy you created earlier (e.g.,
snowflake_access). - Give your role a name (e.g.,
snowflake-role) and create the role.
Then, click on the role you just created and copy the Role ARN. You’ll need it for the next step. (e.g., arn:aws:iam::1234567890:role/snowflake-role)
Step 4.3: Create a Storage Integration
Create a storage integration that allows Snowflake to access your S3 bucket, using the IAM role you just created.
CREATE STORAGE INTEGRATION s3_int
  TYPE = EXTERNAL_STAGE
  STORAGE_PROVIDER = 'S3'
  ENABLED = TRUE
  STORAGE_AWS_ROLE_ARN = '<YOUR_ROLE_ARN>'
  STORAGE_ALLOWED_LOCATIONS = ('s3://<bucket>/<prefix>/')
Replace <YOUR_ROLE_ARN> with the role ARN you copied earlier, and <bucket> and <prefix> with your S3 bucket name and prefix (e.g., qn-streams-data-test and ethereum/).
Need more help? Check out the Snowflake documentation on creating a storage integration.
Step 4.4: Get the Snowflake Account ID
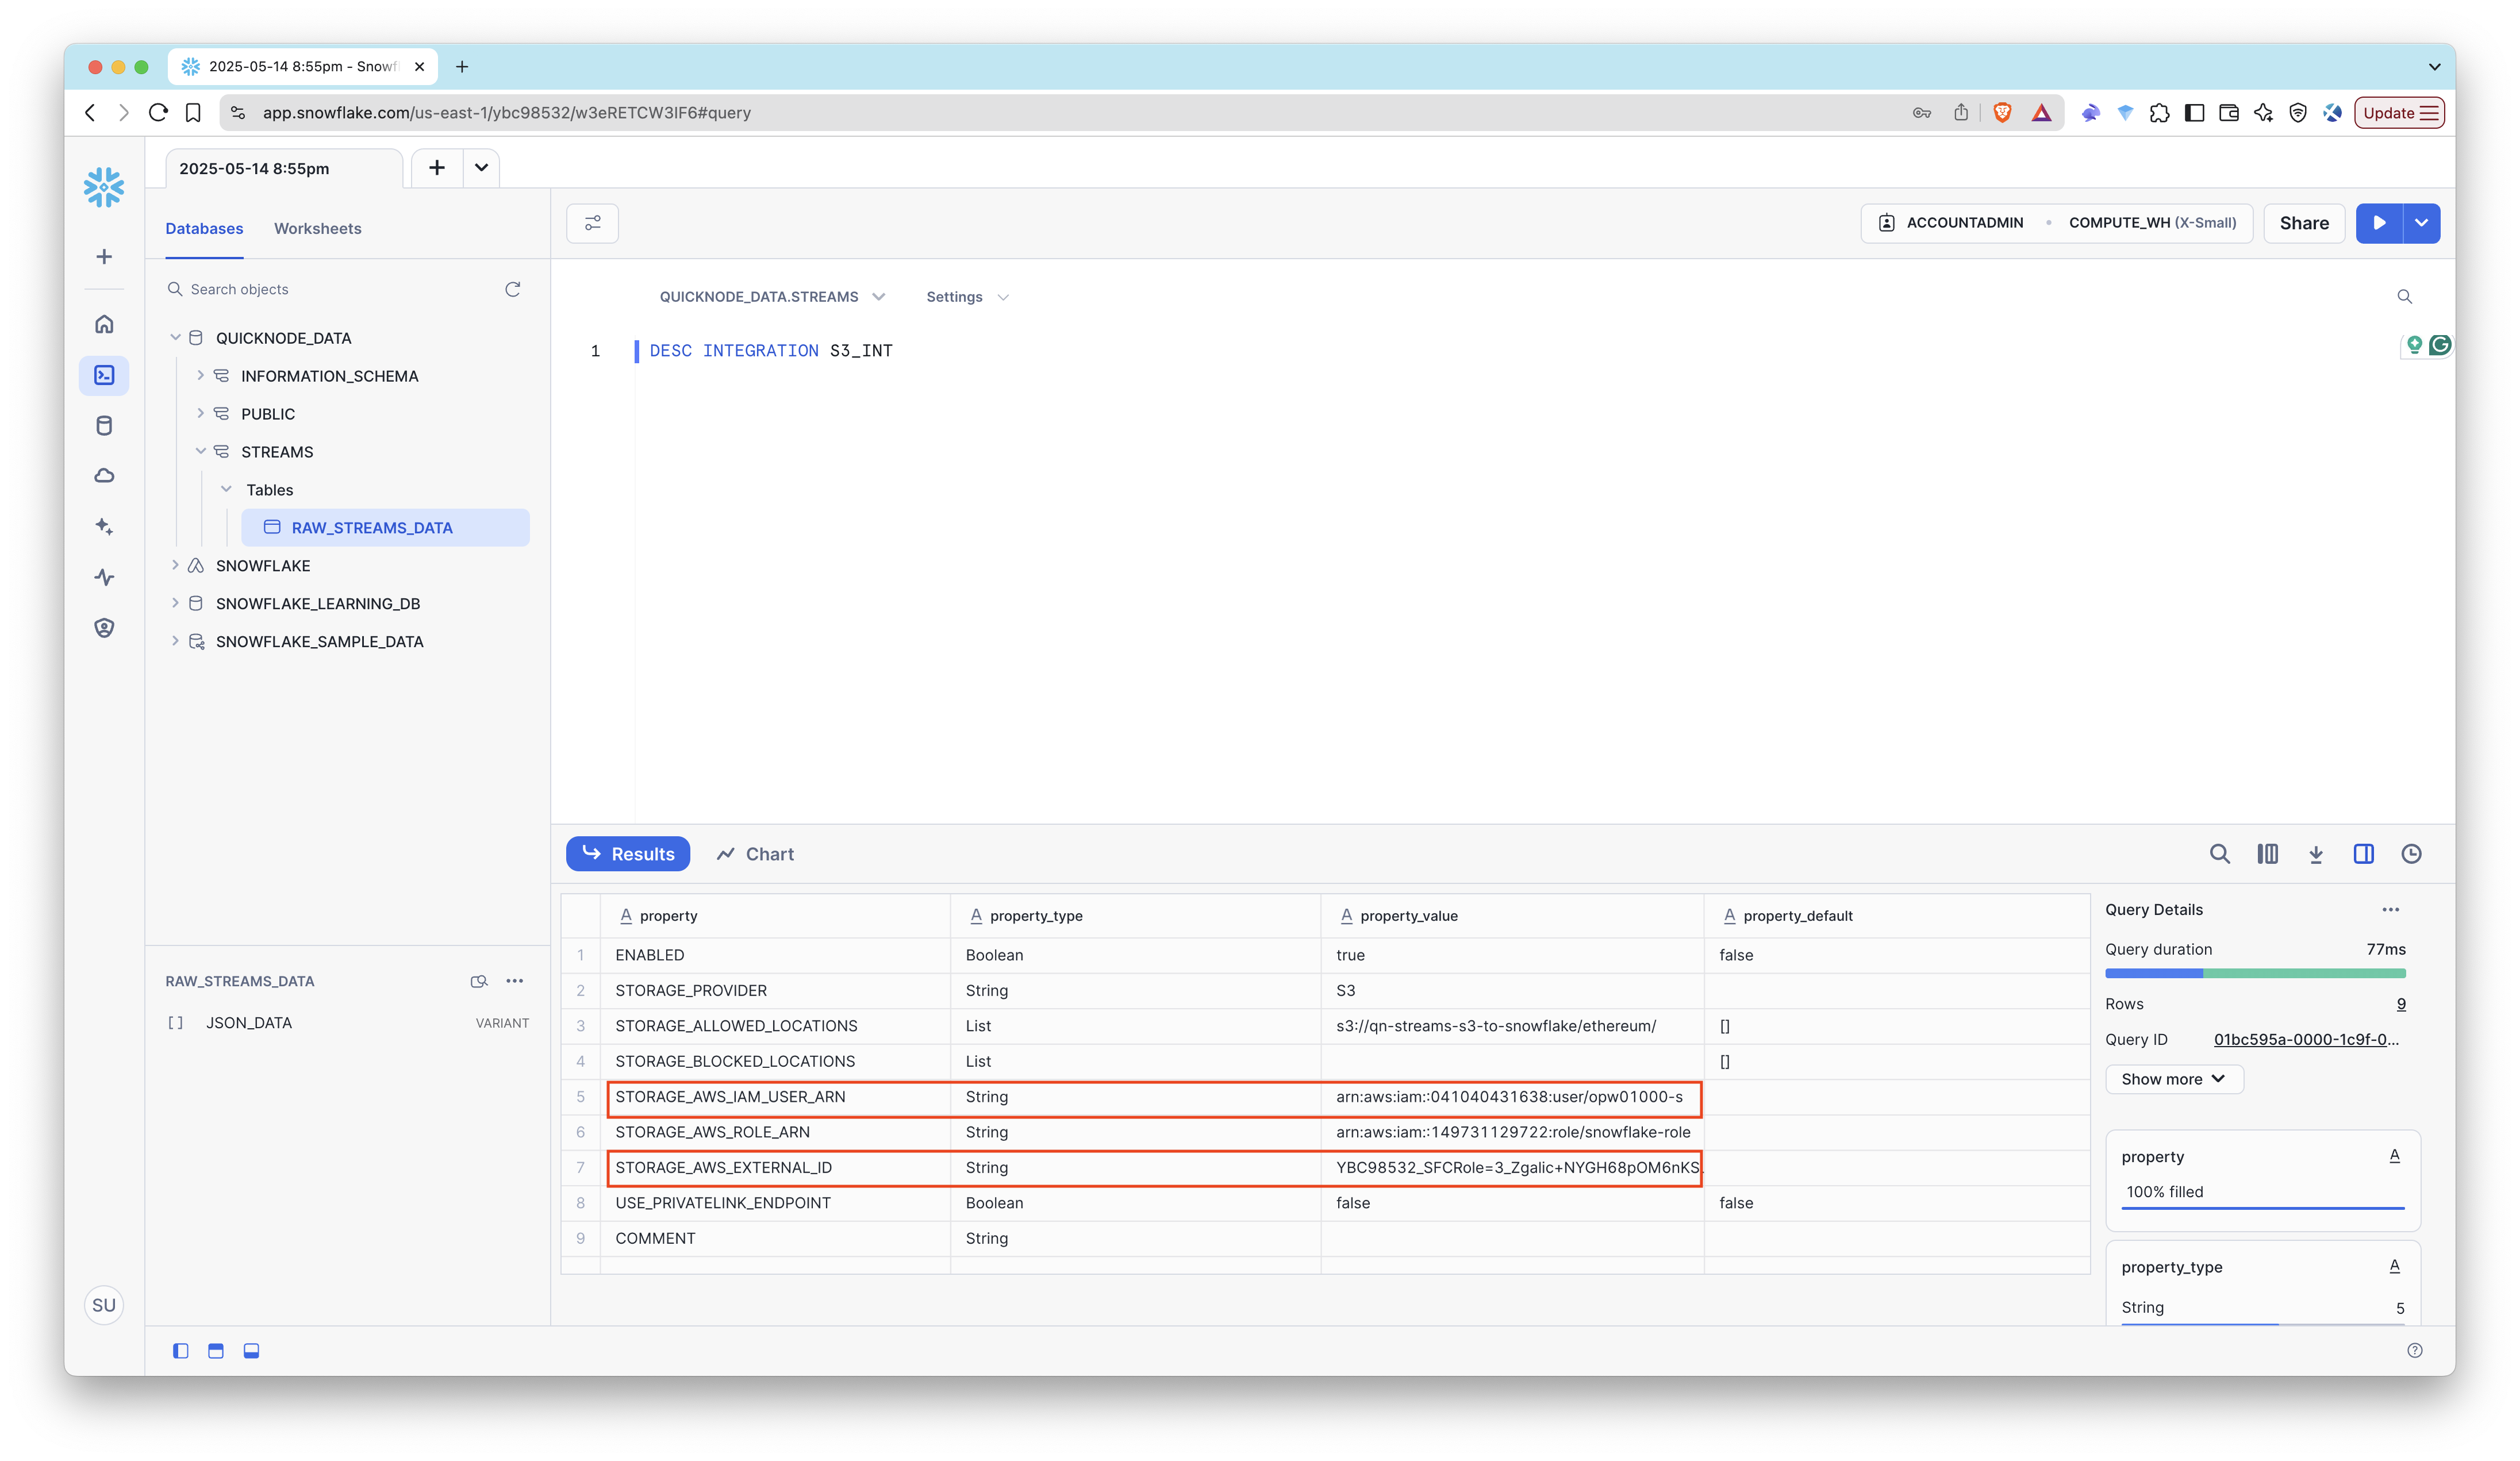
Run the following SQL command on the Snowflake to get the ARN for the IAM user that was created automatically by Snowflake:
DESC INTEGRATION s3_int;
Save the following values:
- Storage IAM User ARN: This is the IAM user ARN that Snowflake created for you. It will look something like this:
arn:aws:iam::1234567890:user/abc1-b-self1234 - External ID: This is the External ID that Snowflake uses to establish the connection with your S3 bucket.
Step 4.5: Update the IAM Role
- Go back to the IAM Console
- Click on the role you created earlier (e.g.,
snowflake-role). - Click on the Trust relationships tab.
- Click Edit trust policy.
- Replace
<STORAGE_AWS_IAM_USER_ARN>and<STORAGE_AWS_EXTERNAL_ID>values with the values you copied earlier.
{
    "Version": "2012-10-17",
    "Statement": [
        {
            "Effect": "Allow",
            "Principal": {
                "AWS": "<STORAGE_AWS_IAM_USER_ARN>"
            },
            "Action": "sts:AssumeRole",
            "Condition": {
                "StringEquals": {
                    "sts:ExternalId": "<STORAGE_AWS_EXTERNAL_ID>"
                }
            }
        }
    ]
}
Step 5: Create File Format and Stage in Snowflake
We have the S3 bucket and Snowflake storage integration set up. Now, we’ll create a file format for GZIP-compressed JSON, an external stage to connect the S3 bucket to Snowflake, and a Snowpipe to automatically load data from S3 into Snowflake.
Step 5.1: Create a File Format for GZIP-Compressed JSON
Run the following SQL command to create a file format for GZIP-compressed JSON files:
CREATE OR REPLACE FILE FORMAT gzip_json_format
  TYPE = 'JSON'
  COMPRESSION = 'GZIP';
Step 5.2: Create an External Stage
This connects the bucket to Snowflake:
CREATE OR REPLACE STAGE my_s3_stage
  URL = 's3://<bucket>/<prefix>/'
  STORAGE_INTEGRATION = s3_int
  FILE_FORMAT = gzip_json_format;
Replace <bucket> and <prefix> with your S3 bucket name and prefix (e.g., qn-streams-data-test and ethereum/).
You can list the files in the stage to verify that it’s working:
LIST @my_s3_stage;
It should list the .json.gz file uploaded by Streams during the test earlier.
We successfully created the stage. Now, let’s create the pipe, which will automatically load data from S3 into Snowflake.
Step 6: Create the Snowpipe
Step 6.1: Create the Snowpipe
First, we'll create a Snowpipe with auto ingest disabled. This will allow us to manually load data from S3 to Snowflake. Then, we will enable auto ingest after setting up the required permissions.
Run the following SQL command to create a Snowpipe:
CREATE OR REPLACE PIPE qn_streams_pipe
  AUTO_INGEST = FALSE
  AS
  COPY INTO raw_streams_data (json_data)
  FROM (SELECT $1 FROM @my_s3_stage);
Step 6.2: Manually Load Data from S3 to Snowflake
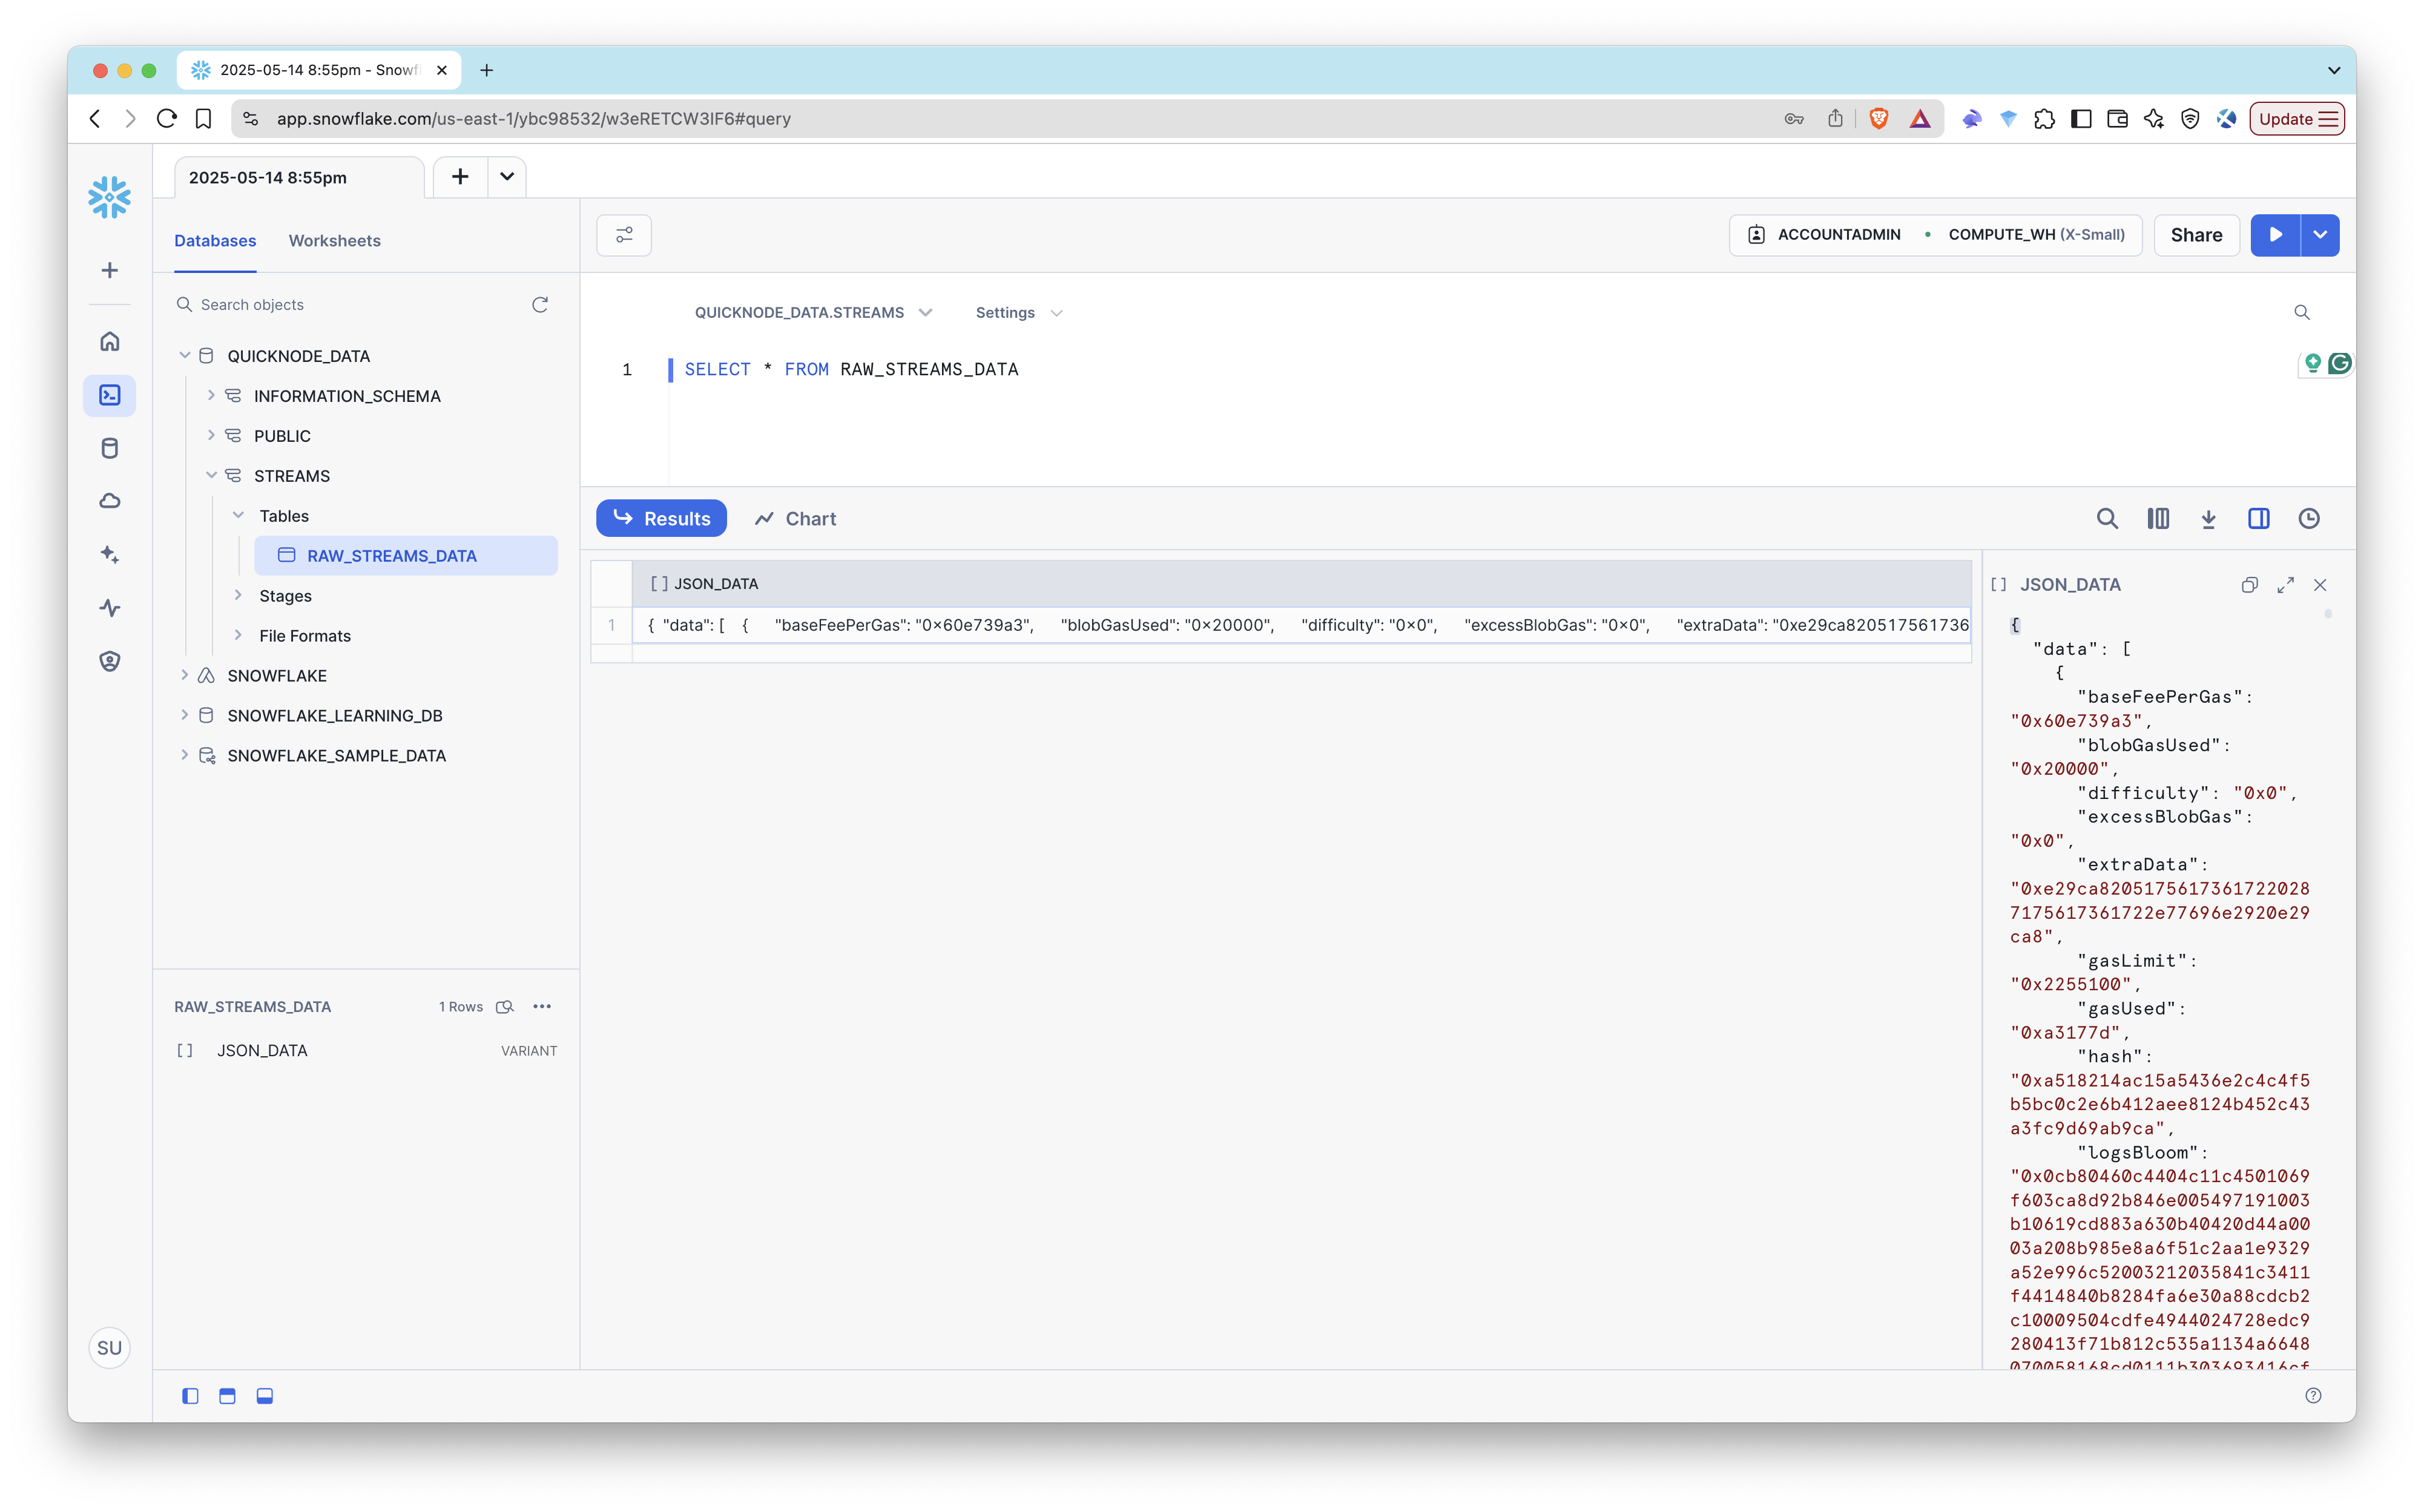
Run the following SQL command to manually load data from S3 to Snowflake:
COPY INTO raw_streams_data (json_data)
FROM (SELECT $1 FROM @my_s3_stage);
This reads .json.gz files from S3, decompresses them, and loads JSON into your table.
Step 7: Enable Auto Ingest
Now that we have the Snowflake pipe set up, we can enable auto ingest. This will automatically load data from S3 to Snowflake whenever a new file is uploaded.
Step 7.1: Create Amazon SNS Topic
Amazon SNS (Simple Notification Service) is used to notify Snowflake when new files are uploaded to S3. We’ll create an SNS topic and subscribe the SQS queue to it.
- Go to Amazon SNS Console
- Click Topics → Create topic
- Type: Standard
- Name:
qn-snowpipe-topic
- Click Create topic
Step 7.2: Create Amazon SQS Queue
Amazon SQS (Simple Queue Service) is used to queue messages from SNS. We’ll create an SQS queue and subscribe it to the SNS topic.
- Go to Amazon SQS Console
- Click Create queue
- Type: Standard
- Name:
qn-snowpipe-queue
- Keep defaults, click Create Queue
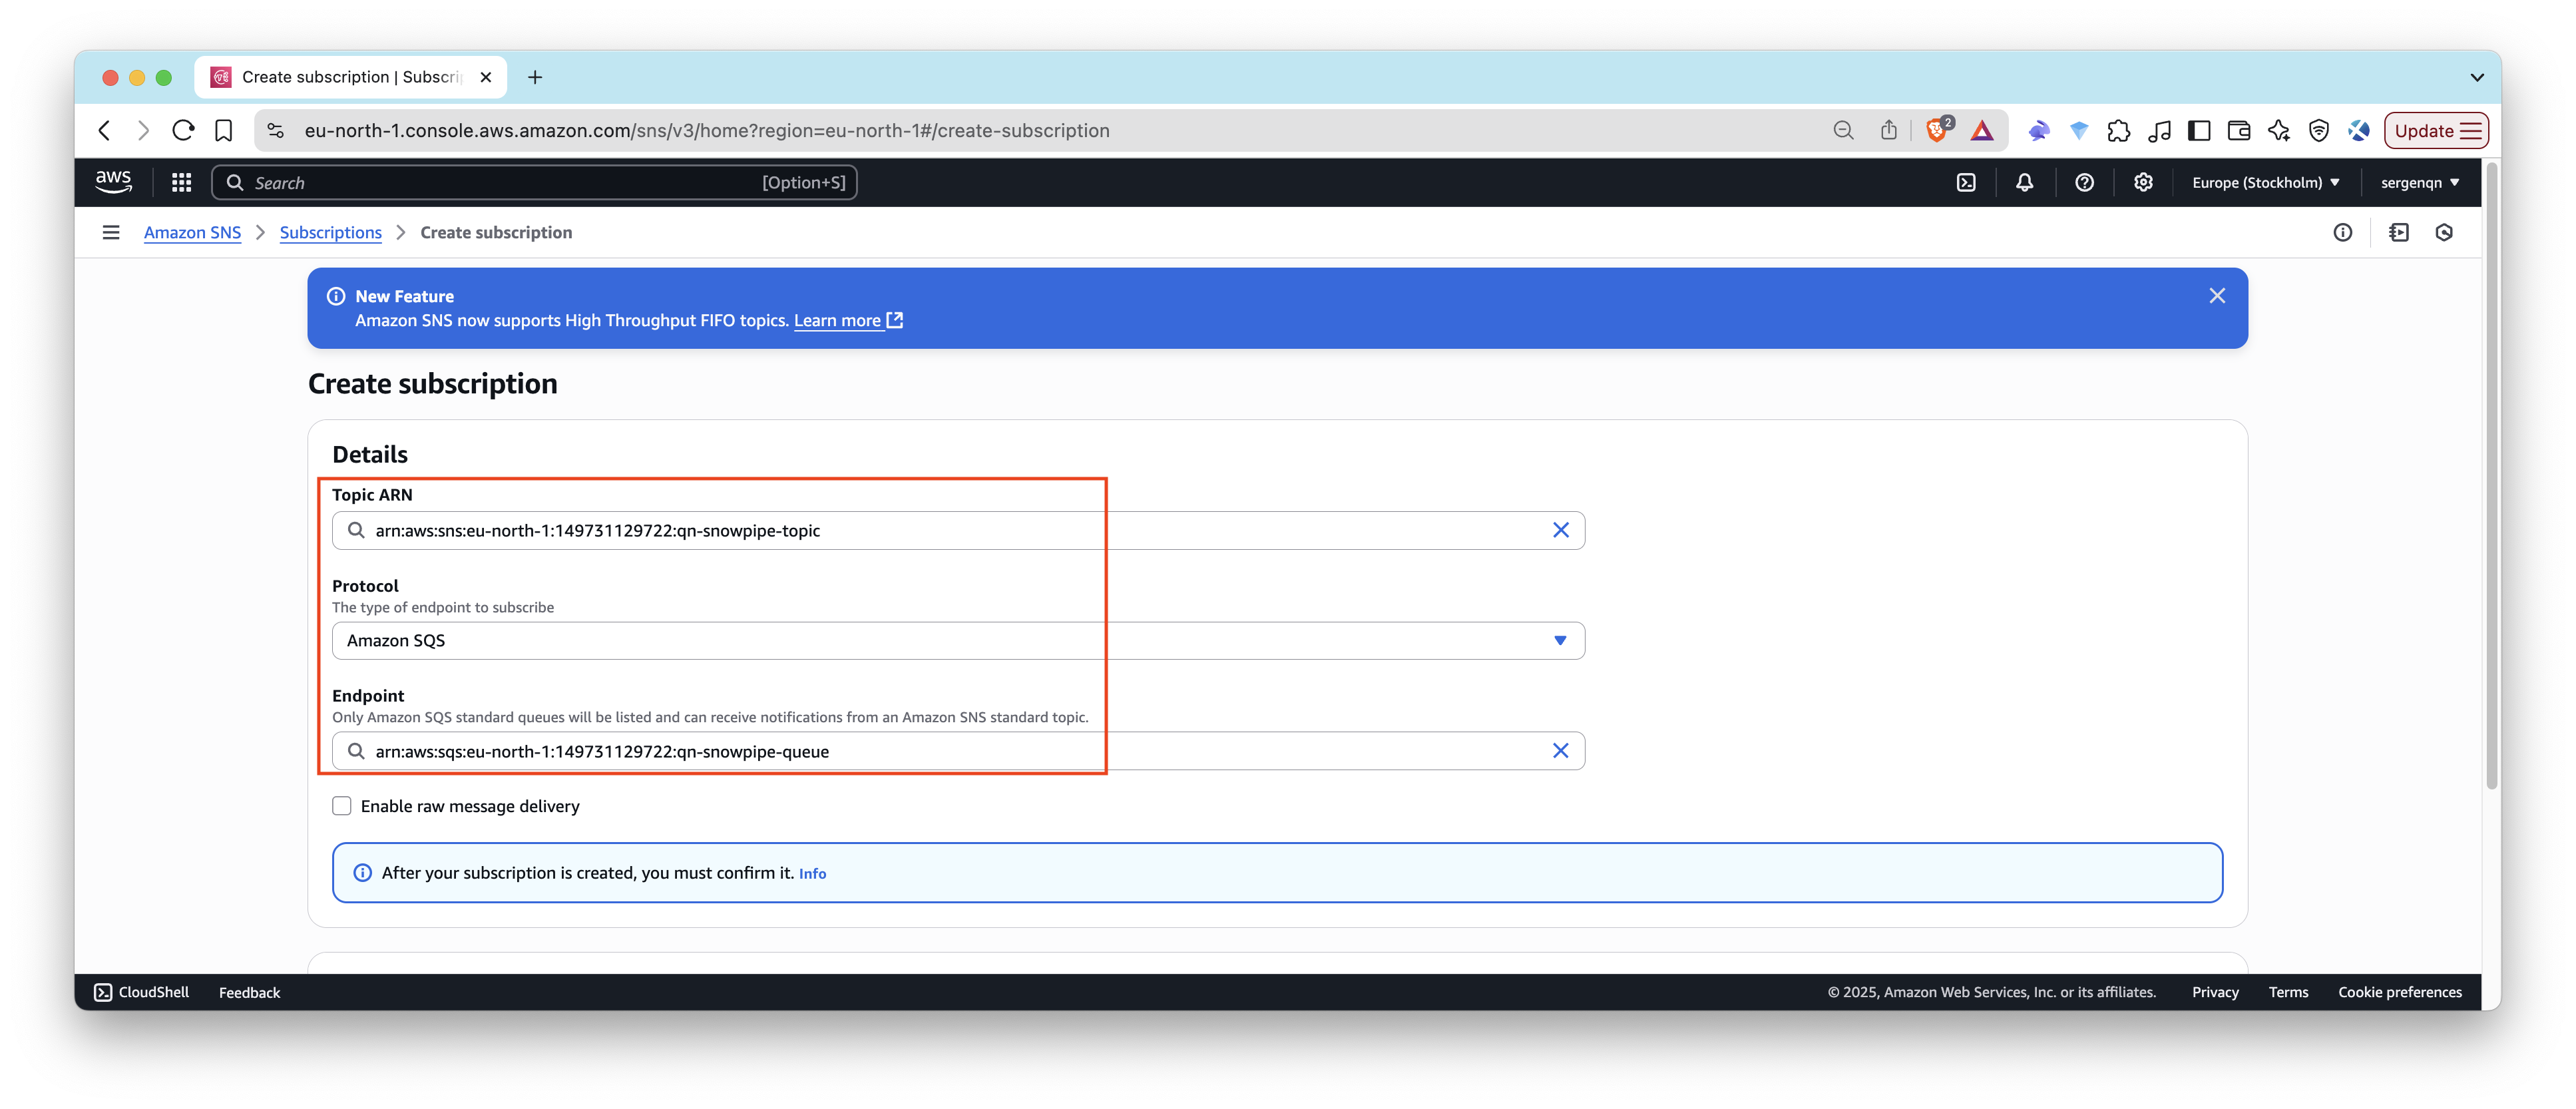
Step 7.3: Subscribe SQS to SNS
- Go back to your SNS topic
- Click Create subscription
- Protocol: Amazon SQS
- Endpoint: select your
qn-snowpipe-queuefrom dropdown
- Click Create subscription
Step 7.4: Add S3 Event Notification
Now, we’ll set up S3 to send notifications to the SNS topic whenever a new file is uploaded.
- Go to your S3 bucket:
qn-streams-data-test - Click Properties → scroll to Event Notifications
- Click Create event notification
- Name:
snowpipe-events - Event type: PUT
- Prefix: (optional) e.g.,
ethereum/,streams/if you use a path - Suffix:
.json.gz - Destination: SNS Topic
- Choose
qn-snowpipe-topic
- Name:
- Save
Step 7.5: Get Event Access Policy
Now, we need to give the Snowflake account access to the SQS queue. We’ll do this by updating the event access policy.
- Log in to your AWS Console.
- Go to the SNS topic you created earlier:
qn-snowpipe-topic - Note the Topic ARN (e.g.,
arn:aws:sns:us-east-1:1234567890:qn-snowpipe-topic) - Query the getting SNS IAM policy using the following SQL command in your Snowflake worksheet:
select system$get_aws_sns_iam_policy('<sns_topic_arn>');
Replace <sns_topic_arn> with the ARN you copied earlier.
The function will return a JSON object that represents the IAM policy that grants a Snowflake SQS queue permission to subscribe to the topic.
Step 7.6: Update the Topic Policy
- Return to the SNS topic:
qn-snowpipe-topic - Click Edit → Access policy
- Merge the IAM policy you got from the previous step with the existing policy. It should look something like this:
Highlighted section is the new policy that allows Snowflake to subscribe to the SNS topic.
{
  "Version": "2008-10-17",
  "Id": "__default_policy_ID",
  "Statement": [
    {
      "Sid": "__default_statement_ID",
      "Effect": "Allow",
      "Principal": {
        "AWS": "*"
      },
      "Action": [
        "SNS:GetTopicAttributes",
        "SNS:SetTopicAttributes",
        "SNS:AddPermission",
        "SNS:RemovePermission",
        "SNS:DeleteTopic",
        "SNS:Subscribe",
        "SNS:ListSubscriptionsByTopic",
        "SNS:Publish"
      ],
      "Resource": "<sns_topic_arn>",
      "Condition": {
        "StringEquals": {
          "AWS:SourceOwner": "<aws_account_id>"
        }
      }
    },
+   {
+     "Sid": "1",
+     "Effect": "Allow",
+     "Principal": {
+       "AWS": "<snowflake_aws_iam_user_arn>"
+     },
+     "Action": ["sns:Subscribe"],
+     "Resource": ["<sns_topic_arn>"]
+   }
  ]
}
- Now, add an additional policy to allow S3 to send notifications to the SNS topic. This is done by adding the following policy to the Access policy:
{
  "Version": "2008-10-17",
  "Id": "__default_policy_ID",
  "Statement": [
    {
      "Sid": "__default_statement_ID",
      "Effect": "Allow",
      "Principal": {
        "AWS": "*"
      },
      "Action": [
        "SNS:GetTopicAttributes",
        "SNS:SetTopicAttributes",
        "SNS:AddPermission",
        "SNS:RemovePermission",
        "SNS:DeleteTopic",
        "SNS:Subscribe",
        "SNS:ListSubscriptionsByTopic",
        "SNS:Publish"
      ],
      "Resource": "<sns_topic_arn>",
      "Condition": {
        "StringEquals": {
          "AWS:SourceOwner": "<aws_account_id>"
        }
      }
    },
    {
      "Sid": "1",
      "Effect": "Allow",
      "Principal": {
        "AWS": "<snowflake_aws_iam_user_arn>"
      },
      "Action": ["sns:Subscribe"],
      "Resource": ["<sns_topic_arn>"]
    },
+   {
+     "Sid": "s3-event-notifier",
+     "Effect": "Allow",
+     "Principal": {
+       "Service": "s3.amazonaws.com"
+     },
+     "Action": "SNS:Publish",
+     "Resource": "<sns_topic_arn>",
+     "Condition": {
+       "ArnLike": {
+         "aws:SourceArn": "arn:aws:s3:::<bucket>"
+       }
+     }
+   }
  ]
}
Update the <bucket> and <sns_topic_arn> with the appropriate values (e.g., qn-streams-data-test and arn:aws:sns:us-east-1:1234567890:qn-snowpipe-topic).
5. Click Save changes.
Step 8: Tell Snowflake About the SQS Queue
Now you’ll update your Snowpipe to point to the SQS queue ARN and SNS topic ARN (Snowflake polls SQS behind the scenes).
8.1: Grant Permissions to Snowflake
In IAM Console → SQS > Access Policy, add:
{
  "Effect": "Allow",
  "Principal": {
    "Service": "sqs.amazonaws.com"
  },
  "Action": [
    "sqs:SendMessage",
    "sqs:ReceiveMessage",
    "sqs:DeleteMessage",
    "sqs:GetQueueAttributes"
  ],
  "Resource": "<sqs_queue_arn>",
  "Condition": {
    "ArnEquals": {
      "aws:SourceArn": "<sns_topic_arn>"
    }
  }
}
Replace <sqs_queue_arn> and <sns_topic_arn> with the appropriate values (e.g., arn:aws:sqs:us-east-1:1234567890:qn-snowpipe-queue and arn:aws:sns:us-east-1:1234567890:qn-snowpipe-topic).
8.2: Recreate the Snowpipe with Auto Ingest
In Snowflake, drop and re-create the pipe:
DROP PIPE IF EXISTS qn_streams_pipe;

CREATE OR REPLACE PIPE qn_streams_pipe
  AUTO_INGEST = TRUE
  AWS_SNS_TOPIC='<sns_topic_arn>'
  AS
  COPY INTO raw_streams_data (json_data)
  FROM (SELECT $1 FROM @my_s3_stage);
Step 9: Start the Stream
Now, it's time to test the all the components together.
- Go back to your Quicknode Dashboard and click on the Streams tab.
- Create the Stream that you tested earlier.
- Check the usage of the stream and make sure it is running.
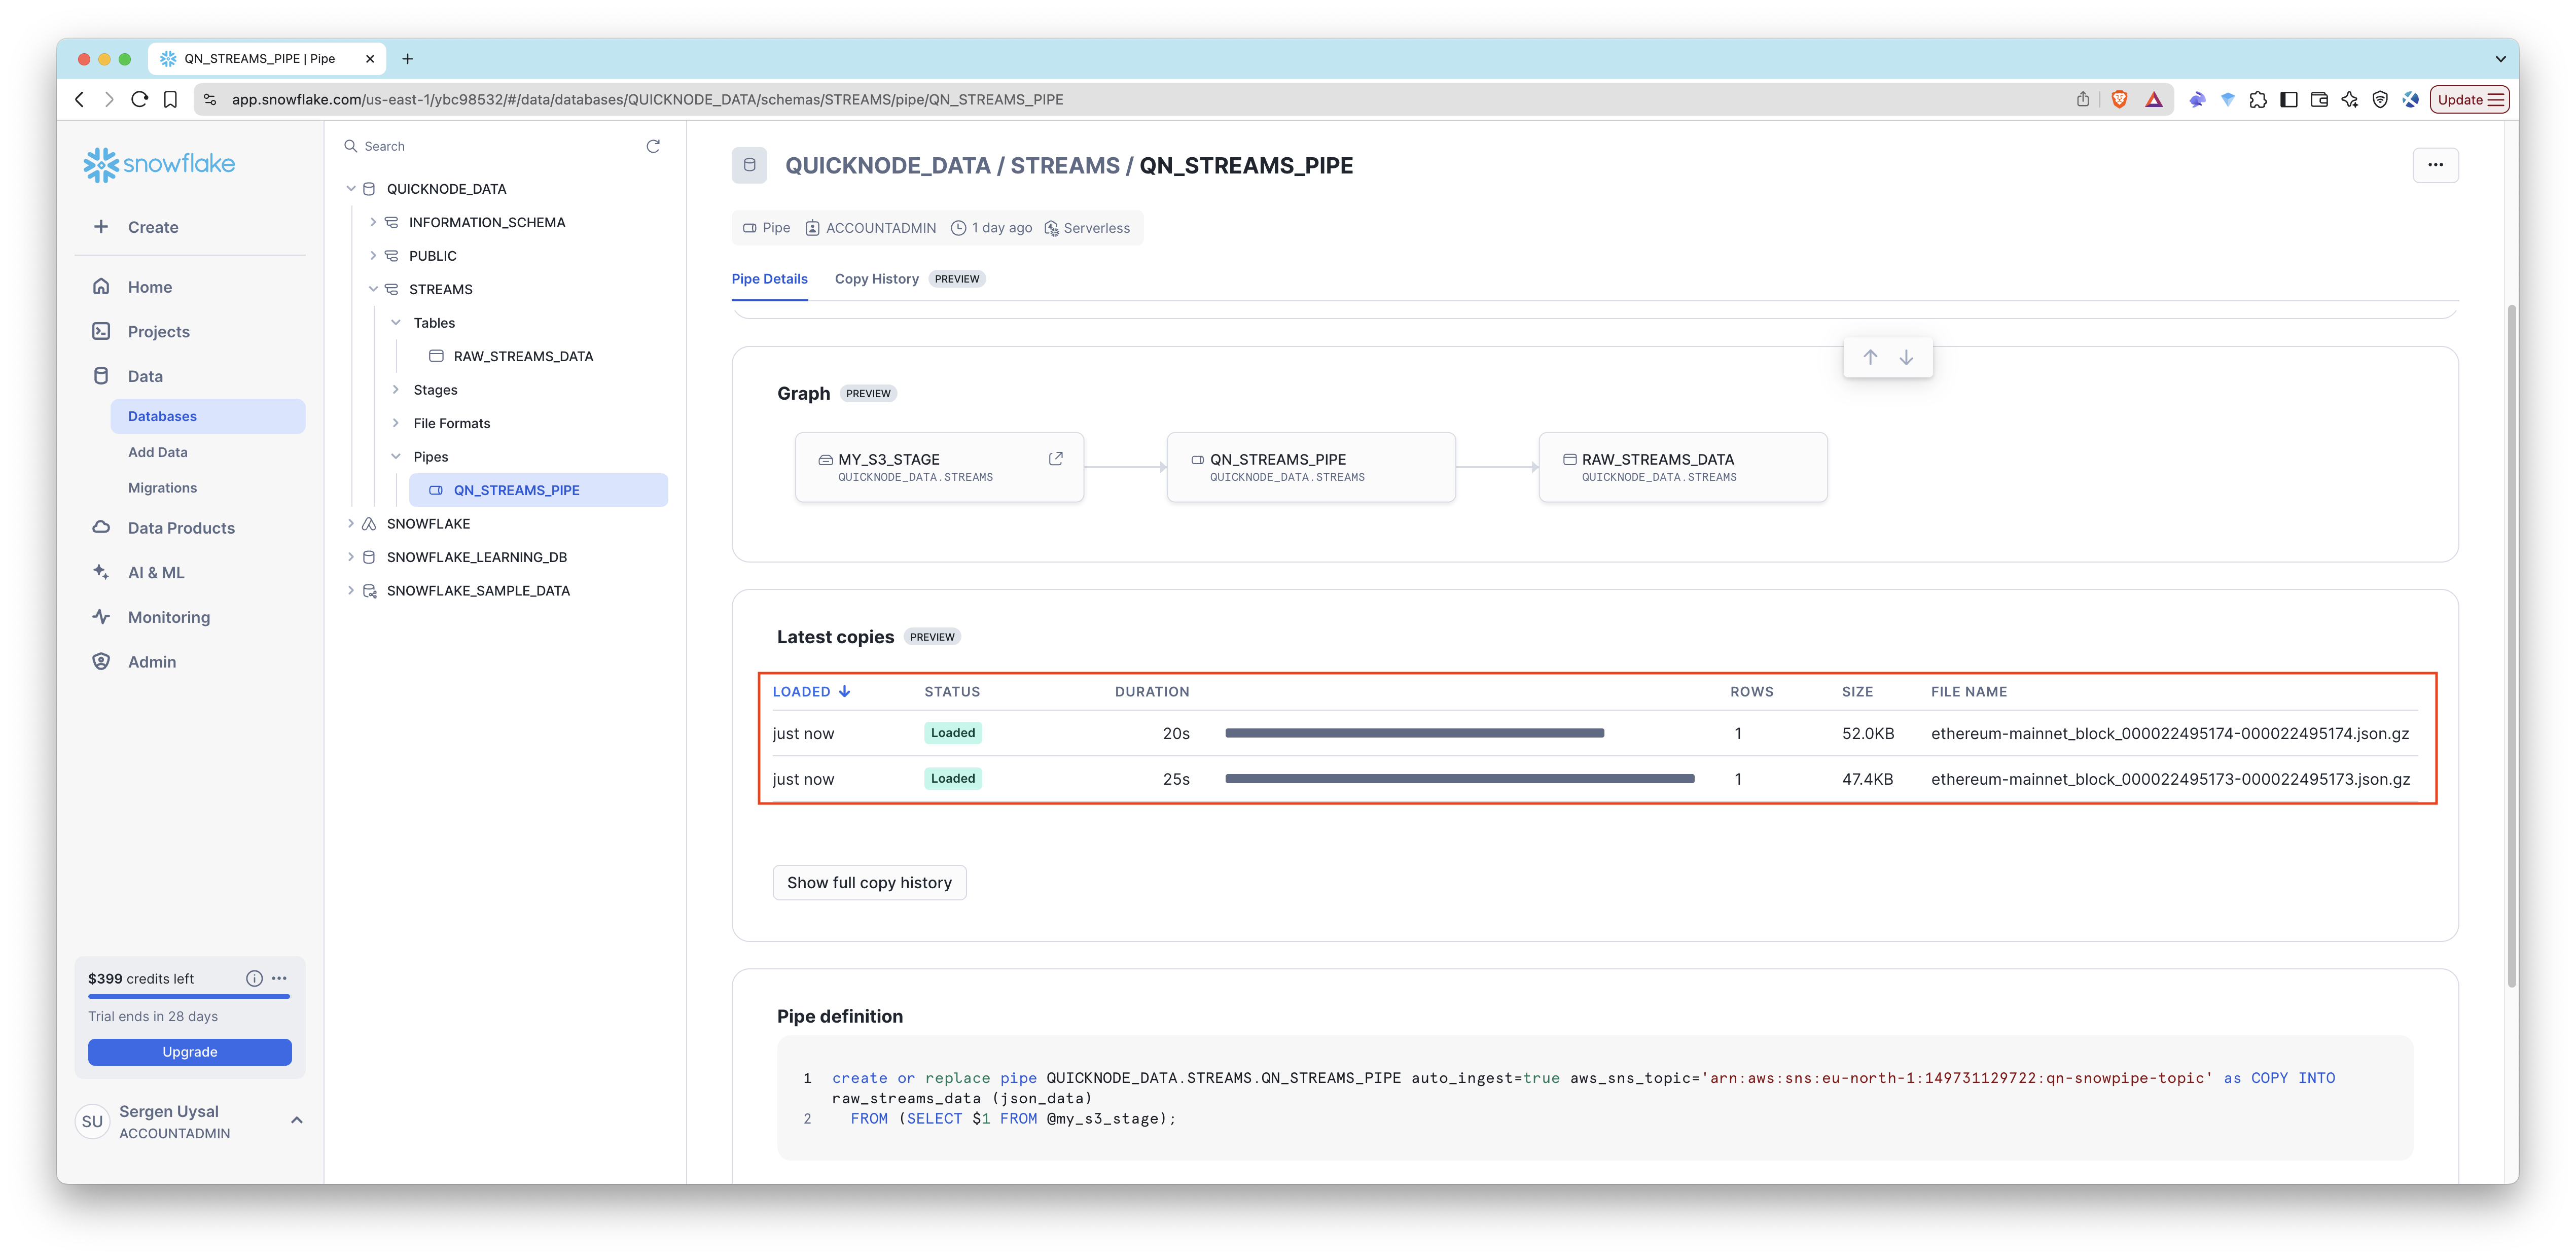
Then, check the Snowflake table and pipe to see if the data is being ingested correctly.
SELECT * FROM raw_streams_data;
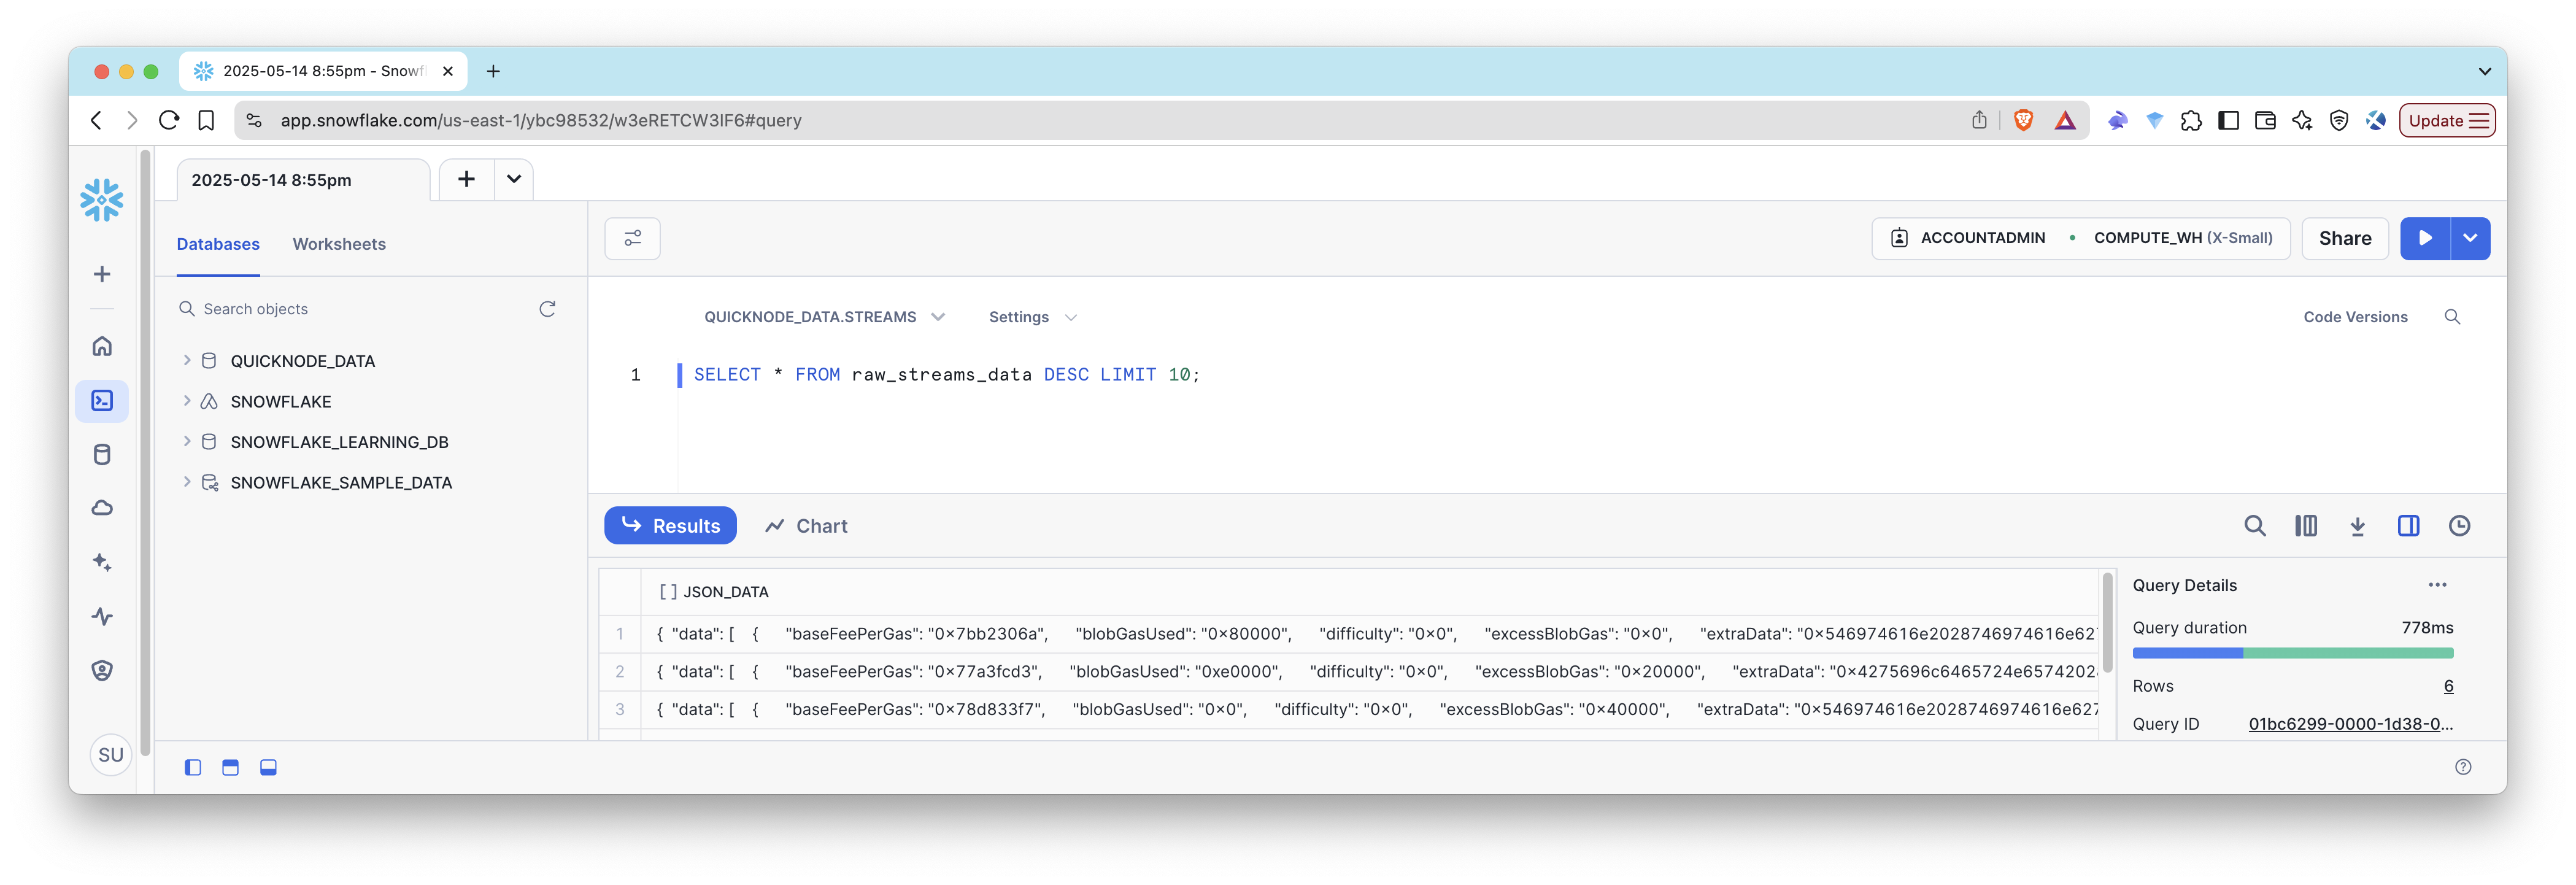
You should see the data being ingested into Snowflake.
Conclusion
Congratulations! You’ve successfully set up a Stream and Snowflake pipe to ingest data from S3 to Snowflake.