21 min read
Overview
Eclipse is a new blockchain that claims to be "Ethereum's fastest Layer 2", which is achieved by running the Solana Virtual Machine (SVM) as a rollup on Ethereum. Eclipse recently launched mainnet to builders and with its launch has come a lot of excitement for the community. One exciting release has been the deployment of the Nifty Asset Standard program on Eclipse, which is a lightweight tooling and efficient standards for managing digital assets on Solana.
In this guide, we will learn how to create an NFT using the Nifty Asset Standard on Eclipse.
Prerequisites
Before we dive in, make sure you have the following installed:
- Node.js (version 16.15 or higher)
- Typescript experience and ts-node installed (TypeScript version 4.0 or higher recommended)
- Solana CLI latest version
- MetaMask (or similar EVM-compatible wallet)
Though not required, we recommend familiarizing yourself with the following:
Dependencies Used in this Guide
| Dependency | Version |
|---|---|
| @metaplex-foundation/umi | ^0.9.2 |
| @metaplex-foundation/umi-bundle-defaults | ^0.9.2 |
| @nifty-oss/asset | ^0.6.1 |
| solana cli | 1.18.8 |
What You Will Do
This guide will walk you bridging Ethereum to Eclipse and minting an NFT on Eclipse using the Nifty Asset Standard. Specifically, we will cover the following functionalities:
- Bridging: Transfer ETH from Ethereum to Eclipse.
- Uploading: Upload an image and metadata to IPFS using Quicknode's IPFS Gateway.
- Minting: Create a new digital asset with the Nifty Asset Standard.
- Verify: Verify the NFT's on-chain data
Let's get started!
Nifty Asset Basics
This project will utilize the Nifty Asset Standard on Eclipse. Nifty Asset is a new approach to NFTs on Solana that improves efficiency and flexibility. Unlike traditional NFT standards built on the SPL Token program, Nifty Asset uses a single account to represent an asset, optimizing storage and compute usage. It offers features like traits, metadata, royalty enforcement, and asset locking through extensions. The asset account structure includes base metadata and extension data, with the owner defined within the asset account for more efficient management. For more detailed information on Nifty Asset, including its features and implementation, please refer to our Nifty Asset Guide.
The Nifty Asset standard is still in development and has yet to be audited. Use caution when deploying to mainnet and ensure you have thoroughly tested your application on devnet or testnet before deploying to mainnet. Check their GitHub for the latest updates and documentation.
Get ETH Tokens on Eclipse
To get started, you will need some ETH tokens on Eclipse. To bridge to Eclipse, you will need some ETH on Ethereum Mainnet or Sepolia Testnet (for use on Eclipse Testnet). If you already have ETH, you can skip to bridging; if you do not, you will need to get some Sepolia Test ETH.
Working on Testnet? Get Sepolia ETH Tokens
If you are not ready for mainnet, you can get Sepolia ETH tokens that can be bridged to Eclipse Testnet.
Head over to Quicknode's Multi-chain Faucet and select the Sepolia ETH network. Enter your wallet address and click "Send me ETH":

Make sure you have selected "Sepolia" from the Metamask "Test Networks" dropdown (or add your own network using your Quicknode endpoint - you can create one free here). You should see the Sepolia ETH tokens in your wallet after a few seconds:

Nice job! You now have Sepolia ETH tokens in your wallet. Next, let's bridge these tokens to Eclipse.
Bridge ETH to Eclipse
The Eclipse Foundation has created a bridge contract and script to transfer Mainnet or Sepolia ETH tokens to Eclipse's Mainnet and Testnets, respectively. Let's make a destination Solana wallet and fund it with some ETH.
Create a Destination Solana Wallet
If you do not already have a Solana paper wallet for use with Solana CLI, you must create one. We can use the Solana CLI to interact with the Eclipse network because it is an instance of the SVM! Note: There are a few quirks at the moment (mostly around UI); for example, using solana balance will return the correct balance, but it will say X SOL instead of X ETH (even though the underlying token being represented is actually ETH).
You can create a new wallet by running the following command in your terminal:
solana-keygen new --outfile /path-to-wallet/my-wallet.json
Then, update your Solana CLI configuration to use the new wallet and the appropriate Eclipse cluster. Enter the following commands into your terminal based on your desired network:
- Eclipse Mainnet
- Eclipse Testnet
solana config set --url https://mainnetbeta-rpc.eclipse.xyz
solana config set --url https://testnet.dev2.eclipsenetwork.xyz/
and
solana config set --keypair /path-to-wallet/my-wallet.json
Get your address by running the following command:
solana address
Hang onto this--we will need it later!
Clone the Eclipse Bridge Script
Clone the Eclipse Bridge repository. Open a terminal window in the directory where you want to clone the repository and run:
git clone https://github.com/Eclipse-Laboratories-Inc/eclipse-deposit
And navigate to the eclipse-deposit directory:
cd eclipse-deposit
Install dependencies:
yarn install
Get Your Ethereum Private Key
In your Ethereum wallet, copy your private key. In MetaMask, you can find this by going to:
"Account Details" -> "View Account" -> "Show Private Key" -> "Copy Private Key"
This should be a 64-character hexadecimal string. Save this to a file called private-key.txt. Hang onto this--we will need it to run our script.
Run the Bridge Script
You should be able to follow the instructions in the README in the cloned repo or on Eclipse's documentation here. You will need to run the following (without the brackets) in your terminal:
- Eclipse Mainnet
- Eclipse Testnet
node bin/cli.js -k [path_to_private_key] -d [solana_destination_address] -a [amount_in_ether] --mainnet
node bin/cli.js -k [path_to_private_key] -d [solana_destination_address] -a [amount_in_ether] --sepolia
Here are the parameters:
- The
[path_to_private_key]is the path to the 64-character string you just copied from MetaMask, e.g.,private-key.txt. - The
[solana_destination_address]is the one you generated using the Solana CLI, saved inmy-wallet.json. - The
[amount_in_ether]is the amount of ETH you want to transfer to Eclipse, e.g.,0.01. - The
--mainnetflag is for transferring to Eclipse Mainnet, and the--sepoliaflag is for transferring to Eclipse Testnet.
You should see something like this:
Transaction successful: 0xb763990f73f1801197d...
You can view the transaction on Etherscan here (or Sepolia Etherscan). After a few moments, you should be able to see your ETH balance in the Solana wallet you created. Since you have already configured Solana CLI to the Eclipse testnet, you just need to run the following command to check your balance:
solana balance
You will see something like 0.001 SOL depending on the amount you deposited. Just make a mental note that SOL is representing ETH in this case. You can verify this by checking your wallet in the Eclipse Block Explorer here. Make sure your explorer is set to the correct cluster (see top right corner of the Explorer window). If you are on the wrong cluster, you will not see your balance. Paste your wallet address, and you should see your account balance.
Great job! You have successfully bridged your ETH tokens to Eclipse Mainnet. Now, let's mint an NFT on Eclipse!
Setting Up the Project
Initialize a New Node.js Project
First, create a new directory for your project and initialize a Node.js project.
mkdir eclipse-nft
And then change into the new directory:
cd eclipse-nft
Then, initialize a new Node.js project:
npm init -y
Install Dependencies
Next, install the necessary dependencies:
npm install @metaplex-foundation/umi @metaplex-foundation/umi-bundle-defaults @nifty-oss/asset
If you are using a version of Node.js older than 18, you may need to install the @types/node package as a development dependency:
npm install @types/node --save-dev
Create the Project Files
Create a new file named index.ts in your project directory.
echo > index.ts
Import Dependencies
First, import the required modules and set up the UMI instance and signers. Add the following code to the index.ts file:
import { createUmi } from '@metaplex-foundation/umi-bundle-defaults';
import {
    TransactionBuilderSendAndConfirmOptions,
    createGenericFile,
    createGenericFileFromJson,
    createSignerFromKeypair,
    generateSigner,
    keypairIdentity,
} from '@metaplex-foundation/umi';
import {
    metadata,
    mint,
    niftyAsset,
    fetchAsset,
    Metadata,
    royalties,
    creators,
    Royalties,
    Creators,
} from '@nifty-oss/asset';
import { readFile } from "fs/promises";
import { uploadToIpfs } from './upload';
import fs from 'fs';
The createUmi function initializes the Umi client with the default options. Umi is a Solana client library that provides a high-level API for interacting with the Solana blockchain. The Nifty Asset library includes functions for minting and managing digital assets--we will discuss these functions in detail later.
Set Up Constants
We will also set up some constants once the client is ready. We will need the following:
- Cluster: Eclipse Mainnet or Testnet
- Options: Options for sending and confirming transactions
- NFT Details: Details of the NFT you want to mint
- IPFS API: The IPFS API endpoint
Add the following code to the index.ts file:
const CLUSTERS = {
    'mainnet': 'https://mainnetbeta-rpc.eclipse.xyz',
    'testnet': 'https://testnet.dev2.eclipsenetwork.xyz',
    'devnet': 'https://staging-rpc.dev2.eclipsenetwork.xyz',
    'localnet': 'http://127.0.0.1:8899',
};

const OPTIONS: TransactionBuilderSendAndConfirmOptions = {
    confirm: { commitment: 'processed' }
};

const NFT_DETAILS = {
    name: "Quicknode Pixel",
    symbol: "QP",
    royalties: 500, // Basis Points (5%)
    description: 'Pixel infrastructure for everyone!',
    imgType: 'image/png',
    attributes: [
        { trait_type: 'Speed', value: 'Quick' },
    ]
};

const IPFS_API = 'REPLACE_WITH_YOUR_KEY'; // 👈 Replace this with your IPFS API endpoint
Feel free to update the NFT_DETAILS fields to suit your desired NFT. We will be using each field to define the NFT's metadata below.
Before we move on, make sure to replace the REPLACE_WITH_YOUR_KEY placeholder with your IPFS API key. You can get an API key from the Quicknode Dashboard. If you do not already have a Quicknode account, you can create one for free here. To learn more about IPFS on Quicknode, check out our IPFS guide.
Setup Umi Client
Next, initialize the Umi client and create signers for creator, owner, and asset, accounts. We will also set the default options for sending and confirming transactions.
Add the following code to the index.ts file:
const umi = createUmi(CLUSTERS.mainnet, OPTIONS.confirm).use(niftyAsset()); // 👈 Replace this with your cluster

const wallet = './my-wallet.json'; // 👈 Replace this with your wallet path
const secretKey = JSON.parse(fs.readFileSync(wallet, 'utf-8'));
const keypair = umi.eddsa.createKeypairFromSecretKey(new Uint8Array(secretKey));
umi.use(keypairIdentity(keypair));

const creator = createSignerFromKeypair(umi, keypair);
const owner = creator; // Mint to the creator
const asset = generateSigner(umi);
Ensure you update your CLUSTERS selection in the createUmi function to match your cluster (e.g., CLUSTERS.mainnet or CLUSTERS.testnet).
Make sure that you replace the wallet placeholder with the path to your wallet file. If you aren't sure where your wallet file is, you can find it in the Solana CLI configuration by running the following command in your terminal:
solana config get
You should see something like this:
Keypair Path: ./my-wallet.json
Upload Image and Metadata to IPFS
Now that we have our wallet and environment confirgured, we can write some helper functions to upload our image and metadata to IPFS.
Add the following code to the index.ts file:
async function uploadImage(path: string, contentType = 'image/png'): Promise<string> {
    try {
        const image = await readFile(path);
        const fileName = path.split('/').pop() ?? 'unknown.png';
        const genericImage = createGenericFile(image, fileName, { contentType });
        const cid = await uploadToIpfs(genericImage, IPFS_API);
        console.log(`1. ✅ - Uploaded image to IPFS`);
        return cid;
    } catch (error) {
        console.error('1. ❌ - Error uploading image:', error);
        throw error;
    }
}

async function uploadMetadata(imageUri: string): Promise<string> {
    try {
        const metadata = {
            name: NFT_DETAILS.name,
            description: NFT_DETAILS.description,
            image: imageUri,
            attributes: NFT_DETAILS.attributes,
            properties: {
                files: [
                    {
                        type: NFT_DETAILS.imgType,
                        uri: imageUri,
                    },
                ]
            }
        };

        const file = createGenericFileFromJson(metadata, 'metadata.json');
        const cid = await uploadToIpfs(file, IPFS_API);
        console.log(`2. ✅ - Uploaded metadata to IPFS`);
        return cid;
    } catch (error) {
        console.error('2. ❌ - Error uploading metadata:', error);
        throw error;
    }
}
Let's break down the code.
- The first function,
uploadImage, takes in a path to an image and an optional content type. It reads the image from the file system, creates a generic file object (necessary for the Umi uploader config), and uploads it to IPFS. It returns the CID of the uploaded image. - The second function,
uploadMetadata, takes in the URI of the uploaded image and uploads the metadata to IPFS. It returns the CID of the uploaded metadata. Both functions use theuploadToIpfsfunction to upload the files to IPFS. If you recall from our imports, this function is being imported from a file calledupload.ts. Let's go ahead and create this file now.
In your terminal, run the following command to create the file:
echo > upload.ts
Then, copy the following code into the file:
import {
    GenericFile,
    request,
    HttpInterface,
    HttpRequest,
    HttpResponse,
} from '@metaplex-foundation/umi';

interface QuickNodeUploadResponse {
    requestid: string;
    status: string;
    created: string;
    pin: {
        cid: string;
        name: string;
        origins: string[];
        meta: Record<string, unknown>;
    };
    info: {
        size: string;
    };
    delegates: string[];
}

const createQuickNodeFetch = (): HttpInterface => ({
    send: async <ResponseData, RequestData = unknown>(
        request: HttpRequest<RequestData>
    ): Promise<HttpResponse<ResponseData>> => {
        let headers = new Headers(
            Object.entries(request.headers).map(([name, value]) => [name, value] as [string, string])
        );

        if (!headers.has('x-api-key')) {
            throw new Error('Missing x-api-key header');
        }

        const isJsonRequest = headers.get('content-type')?.includes('application/json') ?? false;
        const body = isJsonRequest && request.data ? JSON.stringify(request.data) : request.data as string | undefined;

        try {
            const response = await fetch(request.url, {
                method: request.method,
                headers,
                body,
                redirect: 'follow',
                signal: request.signal as AbortSignal,
            });

            const bodyText = await response.text();
            const isJsonResponse = response.headers.get('content-type')?.includes('application/json');
            const data = isJsonResponse ? JSON.parse(bodyText) : bodyText;

            return {
                data,
                body: bodyText,
                ok: response.ok,
                status: response.status,
                statusText: response.statusText,
                headers: Object.fromEntries(response.headers.entries()),
            };
        } catch (error) {
            console.error('Fetch request failed:', error);
            throw error;
        }
    },
});

const getUrl = (cid: string, gatewayUrl = 'https://qn-shared.quicknode-ipfs.com/ipfs/'): string => {
    if (!cid) throw new Error('Invalid CID: CID cannot be empty.');
    const baseUrl = gatewayUrl.endsWith('/') ? gatewayUrl : `${gatewayUrl}/`;
    return `${baseUrl}${encodeURIComponent(cid)}`;
};

export const uploadToIpfs = async <T>(
    file: GenericFile,
    apiKey: string
): Promise<string> => {
    const http = createQuickNodeFetch();
    const endpoint = 'https://api.quicknode.com/ipfs/rest/v1/s3/put-object';
    const formData = new FormData();

    const fileBlob = new Blob([file.buffer], { type: 'application/json' });

    formData.append('Body', fileBlob);
    formData.append("Key", file.fileName);
    formData.append("ContentType", file.contentType || '');

    const qnRequest = request()
        .withEndpoint('POST', endpoint)
        .withHeader("x-api-key", apiKey)
        .withData(formData);

    try {
        const response = await http.send<QuickNodeUploadResponse, FormData>(qnRequest);
        if (!response.ok) throw new Error(`${response.status} - Failed to send request: ${response.statusText}`);
        return getUrl(response.data.pin.cid, /* OPTIONAL_GATEWAY_URL  */); // 👈 Add your gateway URL here
    } catch (error) {
        console.error('Failed to send request:', error);
        throw error;
    }
};
This may look like a lot of code, but it's actually just a simple HTTP Request to the Quicknode IPFS API. We are using the request function from the Umi SDK to create a request object. We are then using the HttpInterface to send the request to the IPFS API. If the request is successful, we return the URL of the uploaded file. If there is an error, we log the error and throw it. If you would like to learn more about Quicknode's IPFS API, check out our documentation, or if you would like to learn more about handling HTTP requests with the Umi SDK, check out the Metaplex documentation.
If you would like, you can pass in your own gateway URL to the getUrl function. If you do so, make sure to update the OPTIONAL_GATEWAY_URL in the uploadToIpfs function.
Great job! Let's return to our index.ts file and complete the rest of the code. Note, any errors related to the importing of the uploadToIpfs function should now be resolved.
Mint an NFT
Now that we have functions for uploading our NFT's image and metadata, we can write our function for minting an NFT. Add the following function to index.ts to mint a new digital asset:
async function mintAsset(metadataUri: string): Promise<void> {
    try {
        await mint(umi, {
            asset,
            owner: owner.publicKey,
            authority: creator.publicKey,
            payer: umi.identity,
            mutable: false,
            standard: 0,
            name: NFT_DETAILS.name,
            extensions: [
                metadata({
                    uri: metadataUri,
                    symbol: NFT_DETAILS.symbol,
                    description: NFT_DETAILS.description,
                }),
                royalties(NFT_DETAILS.royalties),
                creators([{ address: creator.publicKey, share: 100 }]),
            ]
        }).sendAndConfirm(umi, OPTIONS);
        const nftAddress = asset.publicKey.toString();
        console.log(`3. ✅ - Minted a new Asset: ${nftAddress}`);
    } catch (error) {
        console.error('3. ❌ - Error minting a new NFT.', error);
    }
}
Our function will accept the URI of the uploaded metadata and mint a new NFT and then use the Nifty mint function to mint the NFT.
- We are using
metadataextension to define the URI of the uploaded metadata - We are using
royaltiesextension to define the royalties for the NFT - We are using
creatorsextension to define the creators of the NFT
Feel free to explore some of the other Nifty extensions and modify the code to suit your specific needs.
Verify OnChain Data
Once we mint our NFT, let's verify that the data on-chain matches what we expect. Let's create a new function, verifyOnChainData to do this. This step is not necessary or required, but we are including it to expose you to the data availability via the Nifty SDK. Add the following function to index.ts to verify the on-chain data:
async function verifyOnChainData(metadataUri: string): Promise<void> {
    try {
        const assetData = await fetchAsset(umi, asset.publicKey, OPTIONS.confirm);

        const onChainCreators = assetData.extensions.find(ext => ext.type === 3) as Creators;
        const onChainMetadata = assetData.extensions.find(ext => ext.type === 5) as Metadata;
        const onChainRoyalties = assetData.extensions.find(ext => ext.type === 7) as Royalties;

        const checks = [
            // Asset Checks
            { condition: assetData.owner.toString() === owner.publicKey.toString(), message: 'Owner matches' },
            { condition: assetData.publicKey.toString() === asset.publicKey.toString(), message: 'Public key matches' },
            { condition: assetData.name === NFT_DETAILS.name, message: 'Asset name matches' },

            // Creator Extension Checks
            { condition: !!onChainCreators, message: 'Creators extension not found' },
            { condition: onChainCreators.values.length === 1, message: 'Creators length matches' },
            { condition: onChainCreators.values[0].address.toString() === creator.publicKey.toString(), message: 'Creator address matches' },
            { condition: onChainCreators.values[0].share === 100, message: 'Creator share matches' },
            { condition: onChainCreators.values[0].verified === true, message: 'Creator not verified' },

            // Metadata Extension Checks
            { condition: !!onChainMetadata, message: 'Metadata extension not found' },
            { condition: onChainMetadata.symbol === NFT_DETAILS.symbol, message: 'Symbol matches' },
            { condition: onChainMetadata.description === NFT_DETAILS.description, message: 'Description matches' },
            { condition: onChainMetadata.uri === metadataUri, message: 'Metadata URI matches' },

            // Royalties Extension Checks
            { condition: !!onChainRoyalties, message: 'Royalties extension not found' },
            { condition: onChainRoyalties.basisPoints.toString() === NFT_DETAILS.royalties.toString(), message: 'Royalties basis points match' },
        ];

        checks.forEach(({ condition, message }) => {
            if (!condition) throw new Error(`Verification failed: ${message}`);
        });

        console.log(`4. ✅ - Verified Asset Data`);
    } catch (error) {
        console.error('4. ❌ - Error verifying Asset Data:', error);
    }
}
There's a lot going on here, so let's break it down.
- First, we are fetching the data for the asset using the
fetchAssetfunction from the Nifty SDK - Next, we are using finding our expected extensions data from the
assetDatafrom the response. We are using the enum position inExtensionTypefrom the Nifty SDK to find the correct extension data (source: here). - Then, we create an array of objects that will be used to check if the data matches what we expect. Each object will contain a
condition(boolean) and amessage(string) to be logged if the condition is not met. Ourchecksarray contains various comparisons of ourNFT_DETAILSandassetDataobjects. - Finally, we iterate over the
checksarray and log an error if any conditions are unmet.
Main Function
Create a main() function that ties all the individual functions together to execute the entire process sequentially. Add the following to the end of the index.ts file:
async function main() {
    const imageCid = await uploadImage('./pixel.png'); // 👈 Replace this with the path to your image
    const metadataCid = await uploadMetadata(imageCid);
    await mintAsset(metadataCid);
    await verifyOnChainData(metadataCid);
}

main();
Make sure to add a ./pixel.png file to the root of your project directory or update the path to your image in the uploadImage function.
Running the Code
To run the code, execute the following command in your terminal:
ts-node index.ts
If everything is set up correctly, you should see console logs indicating the successful execution of each step or detailed error messages if something goes wrong.
ts-node index.ts
1. ✅ - Uploaded image to IPFS
2. ✅ - Uploaded metadata to IPFS
3. ✅ - Minted a new Asset: F66dGYgKhRKzqkGAJEnJSHEL5qjLHG9vZSw6jMYcaDTM
4. ✅ - Verified Asset Data
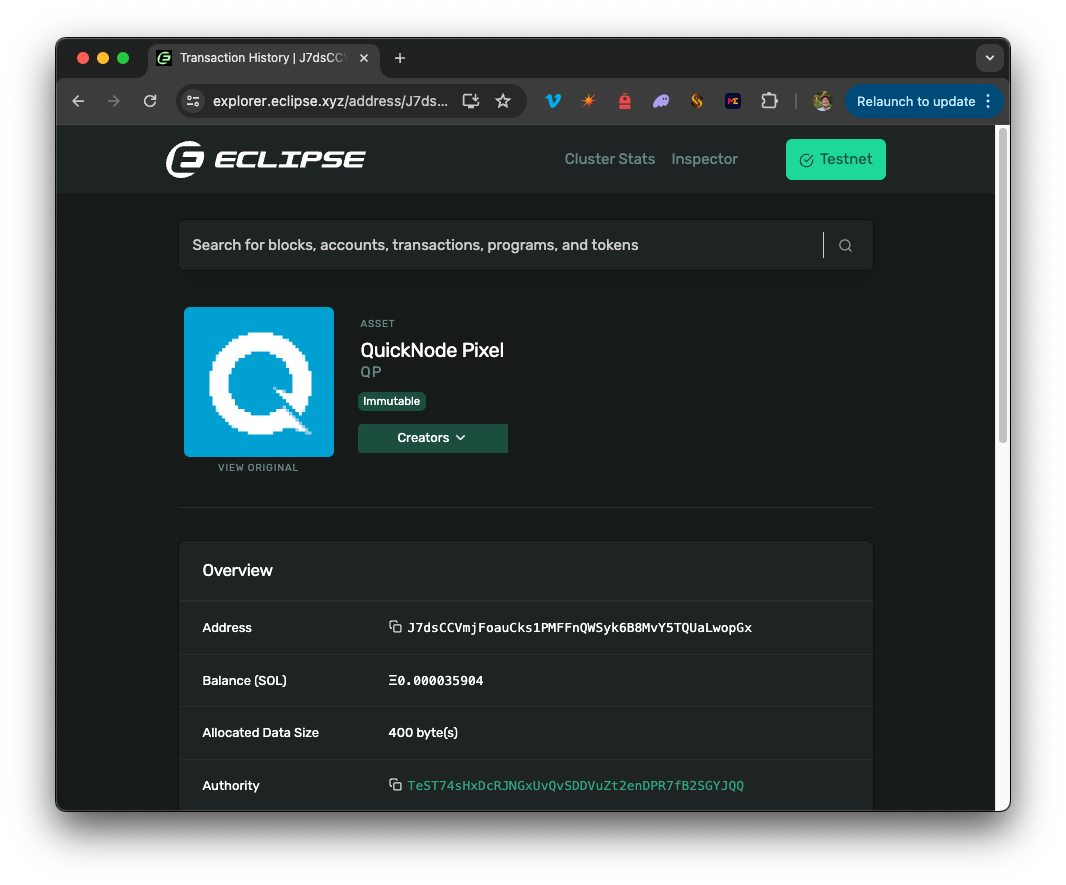
Let's go!!! Pretty nifty, huh? Let's look up our NFT on the Eclipse Explorer:
Just search the account address from your console output, and you should see your NFT:
And the NFT metadata:
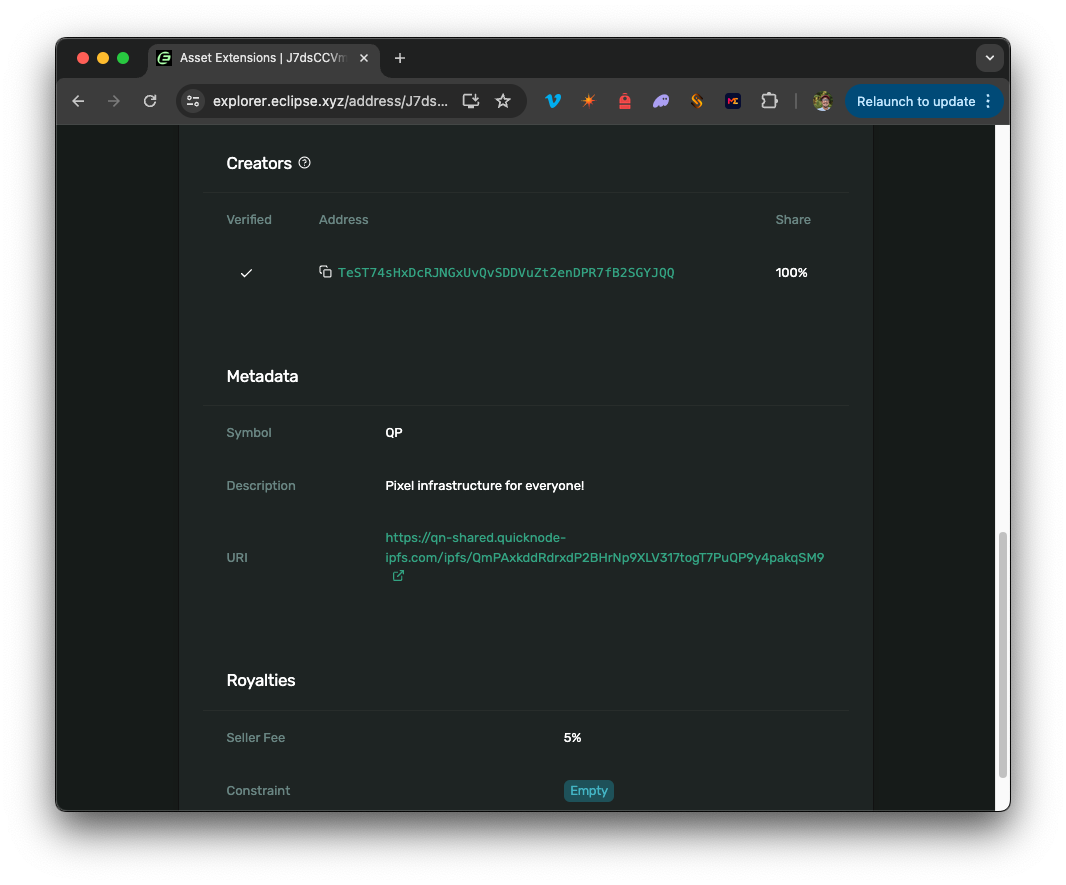
Nice job! You now have an NFT on Eclipse!
Keep Building!
In this guide, we covered the basics of minting NFTs on Eclipse. You now have the tools to build a client-side application that can do all sorts of things with digital assets on Eclipse. So what are you waiting for?
If you have a question or idea you want to share, drop us a line on Discord or Twitter!
We ❤️ Feedback!
Let us know if you have any feedback or requests for new topics. We'd love to hear from you.