11 min read
Overview
Codama is a set of libraries that provides tools for generating clients for Solana programs. It is a powerful tool that can be used to generate JavaScript, Umi (JavaScript), and Rust clients for existing Solana programs. Codama recently added support for generating clients from Anchor IDLs, so we can now use Codama to create clients for Anchor programs. This can save time when building and testing new programs with Anchor. This guide will show you how to use Codama to generate clients for your Anchor programs.
What You Will Do
- Create a simple Anchor Program
- Write a script that will generate a client for the program using Codama
- Test the client
What You Need
This guide assumes you have a basic understanding of Solana Programming and Anchor:
Before you begin, make sure you have the following installed:
This guide works with Solana CLI version 1.18.16 or later Anchor version 0.30.0 or later.
Let's get started!
What is Codama?
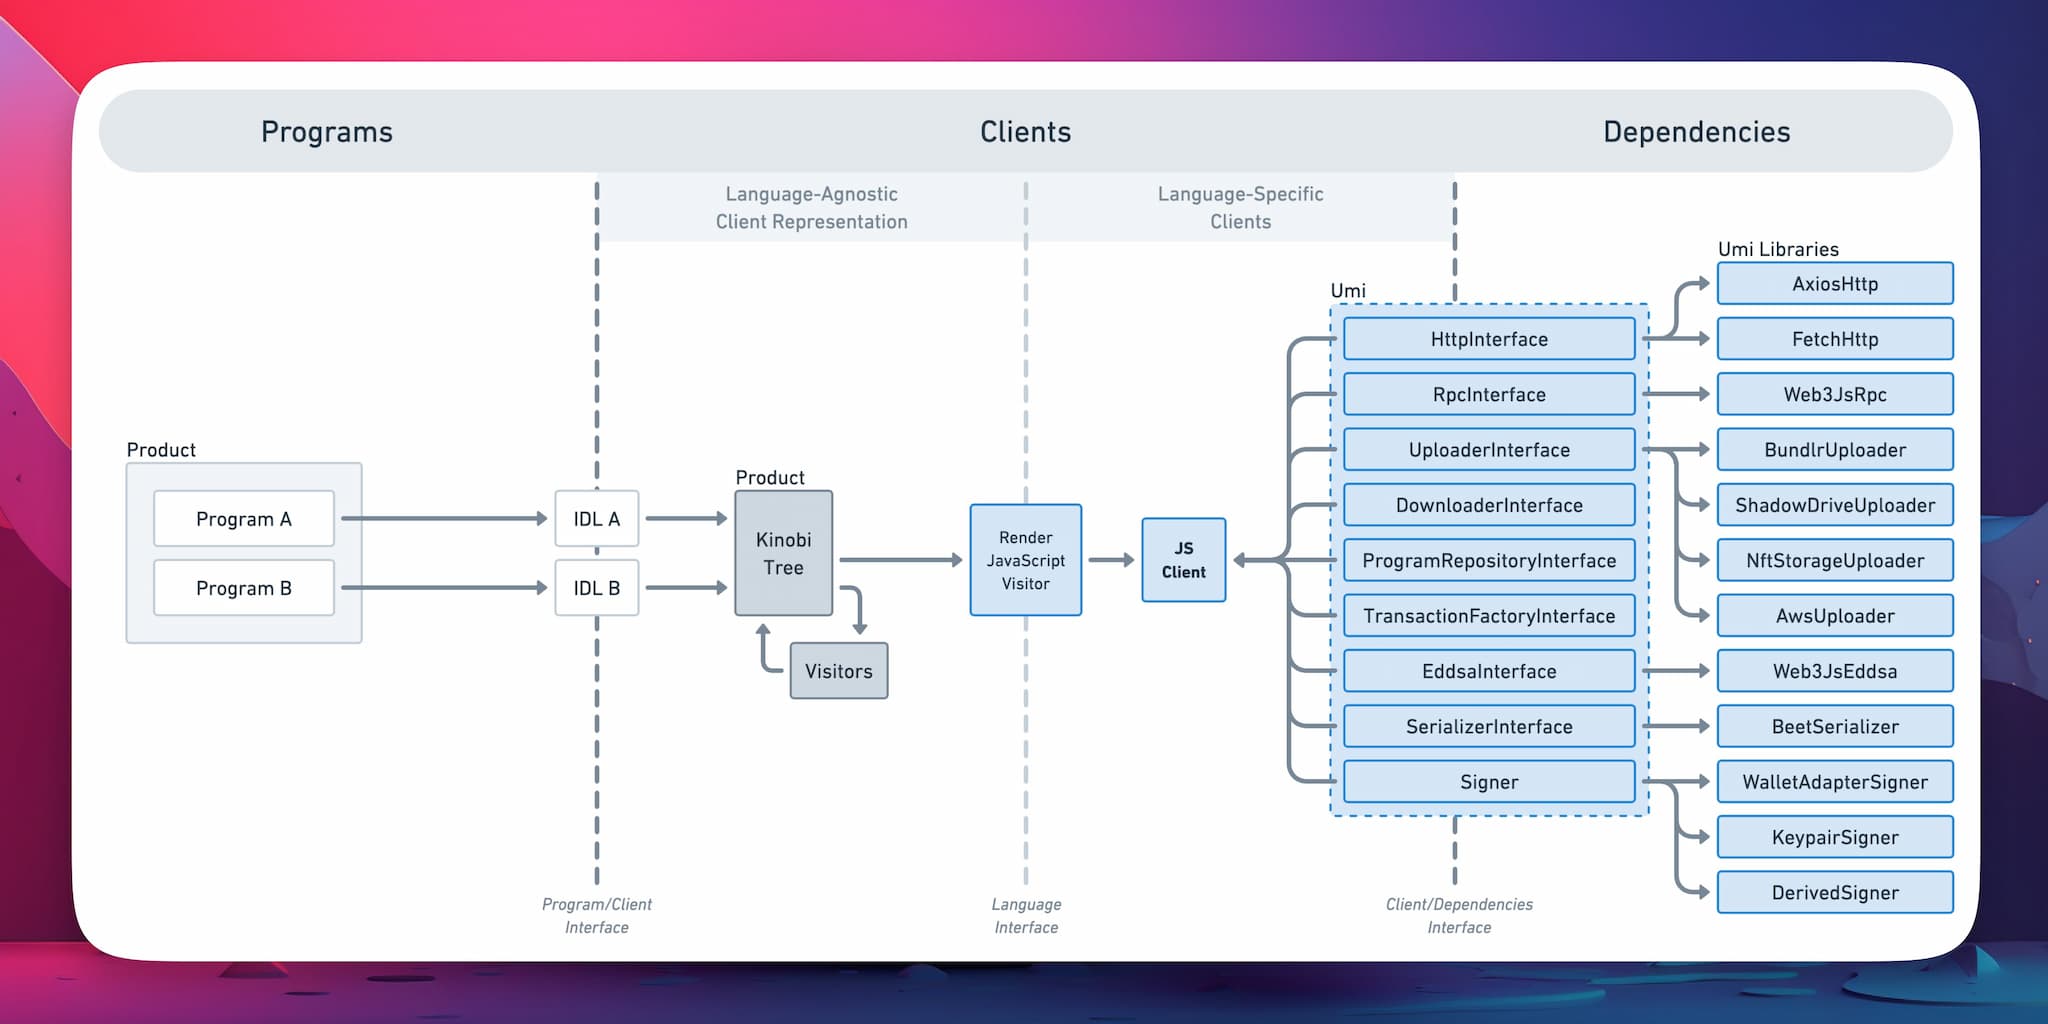
Codama is a library spun off from the Kinobi Project by the Metaplex Foundation designed to generate clients for Solana programs. Codama works by passing one or more programs' IDLs to generate a tree of nodes that can be updated by Visitors. These visitors can update instructions or accounts as needed. Language-agnostic rendering Visitors can then generate clients in various languages so that you can manage client stack/dependencies.
How Codama Works
- Program Definition: You define your Solana programs and corresponding IDLs.
- Abstraction: Codama creates a language-agnostic tree of nodes (or client representation) that visitors can update.
- Client Generation: Codama's Visitors process the tree and generate language-specific clients.
 source: Metaplex Developers
Key Components
- Programs: Solana programs with associated IDLs.
- IDLs: Describe the interface and functionality of Solana programs.
- Codama Tree: Organizes IDLs and facilitates client generation.
- Visitors: Modules that customize the client generation process for specific languages.
- Dependencies: Includes necessary libraries and utilities like HTTP interfaces, RPC interfaces, and cryptographic tools.
Recently, Codama added support for generating clients from Anchor IDLs. This means you can now use Codama to generate clients for Anchor programs. Let's see how to do that.
Codama support for Anchor is still very new and under active development. Code may change, and new features may be added. Please let us know if you encounter any issues on Discord.
Create an Anchor Program
First, let's create a simple Anchor program. We will create a program that has two instructions:
initialize: Initializes a data account with a u64 value.set_data: Sets the value of the data account.
Initialize the Project
Create a new project directory and run the following commands to create a new Anchor program:
anchor init codama-test
Change into the project directory:
cd codama-test
Install Dependencies
After the project is initialized, you can run npm install to ensure the dependencies are installed. We will then install a few additional dependencies. In your terminal, run the following commands:
npm install @codama/nodes-from-anchor @codama/renderers @codama/visitors-core @metaplex-foundation/umi @metaplex-foundation/umi-bundle-defaults
This will install a few Codama packages, including the nodes-from-anchor package, which will help us generate the Codama tree from the Anchor IDL.
Update TSConfig
Add resolveJsonModule to your tsconfg.json to ensure we can load the IDL JSON object to generate the client and "DOM" to your lib array so we can run our script in Node.js. Update the tsconfig.json file in your project directory to look like this:
{
    "compilerOptions": {
      "types": ["mocha", "chai"],
      "typeRoots": ["./node_modules/@types"],
      "lib": ["ES2020", "DOM"],
      "module": "commonjs",
      "target": "es6",
      "esModuleInterop": true,
      "resolveJsonModule": true,
 }
}
Write the Anchor Program
Let's write our Anchor program. Open your programs/codama-test/src/lib.rs file and replace the contents with the following code, being careful not to overwrite your declare_id! macro:
use anchor_lang::prelude::*;

declare_id!("YOUR_PROGRAM_ID_HERE"); // Replace with your program ID

#[program]
pub mod codama_test {
    use super::*;

    pub fn initialize(ctx: Context<Initialize>) -> Result<()> {
        ctx.accounts.pda.set_inner(ExampleStruct {
            data: 0,
            authority: *ctx.accounts.payer.key,
 });
        Ok(())
 }

    pub fn set_data(ctx: Context<SetData>, data: u32) -> Result<()> {
        ctx.accounts.pda.data = data;
        Ok(())
 }
}

#[derive(Accounts)]
pub struct Initialize<'info> {
 #[account(mut)]
    payer: Signer<'info>,

 #[account(
 init,
 payer = payer,
 space = 45,
 seeds = [b"example".as_ref(), payer.key().as_ref()],
        bump
 )]
    pda: Account<'info, ExampleStruct>,

    system_program: Program<'info, System>,
}


#[derive(Accounts)]
pub struct SetData<'info> {
 #[account(mut)]
    authority: Signer<'info>,

 #[account(
        mut,
 has_one = authority,
 seeds = [b"example".as_ref(), authority.key().as_ref()],
        bump
 )]
    pda: Account<'info, ExampleStruct>,
}

#[account]
pub struct ExampleStruct {
    pub data: u32,
    pub authority: Pubkey,
}
This is a basic Anchor program that will allow a user to initialize an ExampleStruct (a PDA that holds u32 data and an authority PublicKey) and set the data value. The PDAs are seeded with the payer's key and the string "example". Feel free to use a different program, or modify this one as needed--it is just for demonstration purposes.
Build and Test the Program
Now that we have our program, we can build and test it. Run the following commands in your terminal:
anchor build
This might take a few minutes but should run without any errors. While it is running, let's write a simple test script. Open your anchor-generated test file, tests/codama-test.ts, and replace the contents with the following code:
import * as anchor from "@coral-xyz/anchor";
import { Program } from "@coral-xyz/anchor";
import { CodamaTest } from "../target/types/codama_test";

describe("codama-test", () => {
  anchor.setProvider(anchor.AnchorProvider.env());
  const program = anchor.workspace.CodamaTest as Program<CodamaTest>;
  const [pda] = anchor.web3.PublicKey.findProgramAddressSync(
 [
      Buffer.from("example"),
      program.provider.publicKey.toBuffer()
 ],
    program.programId
 )
  it("Is initialized!", async () => {
    const tx = await program.methods
 .initialize()
 .accountsStrict({
        payer: program.provider.publicKey,
        pda,
        systemProgram: anchor.web3.SystemProgram.programId
 })
 .rpc();
 });
  it("Can set data!", async () => {
    const tx = await program.methods
 .setData(10)
 .accountsStrict({
        authority: program.provider.publicKey,
        pda
 })
 .rpc({skipPreflight: true});
 });
});
This script will test the two instructions in our program. The first test will initialize the data account, and the second test will set the data value to 10. Go ahead and run the test script:
anchor test
You should see something like this:
  codama-test
    ✔ Is initialized! (450ms)
    ✔ Can set data! (463ms)


  2 passing (916ms)

✨  Done in 2.80s.
Great job.
Generate a Client with Codama
Since your test has run successfully, Anchor should have auto-generated an IDL for you in target/idl/codama_test.json. Locate this file--we will use it in the next section (Note: if you used a different name for your Anchor project, this file path may vary slightly.). We can now use Codama to generate a client for this program.
From your root directory create a new folder, clients, and create two new files:
generate-client.tsfor the client generation scriptexample.tsfor trying the generated client
Generate the Client
Open generate-client.ts, and add the following code to the file:
import { AnchorIdl, rootNodeFromAnchorWithoutDefaultVisitor } from "@codama/nodes-from-anchor";
import { renderJavaScriptUmiVisitor, renderJavaScriptVisitor, renderRustVisitor } from "@codama/renderers";
import { visit } from "@codama/visitors-core";
import anchorIdl from "../target/idl/codama_test.json"; // Note: if you initiated your project with a different name, you may need to change this path

async function generateClients() {
    const node = rootNodeFromAnchorWithoutDefaultVisitor(anchorIdl as AnchorIdl);

    const clients = [
        { type: "JS", dir: "clients/generated/js/src", renderVisitor: renderJavaScriptVisitor },
        { type: "Umi", dir: "clients/generated/umi/src", renderVisitor: renderJavaScriptUmiVisitor },
        { type: "Rust", dir: "clients/generated/rust/src", renderVisitor: renderRustVisitor }
    ];

    for (const client of clients) {
        try {
            await visit(
                node,
                await client.renderVisitor(client.dir)
            ); console.log(`✅ Successfully generated ${client.type} client for directory: ${client.dir}!`);
        } catch (e) {
            console.error(`Error in ${client.renderVisitor.name}:`, e);
            throw e;
        }
    }
}

generateClients();
Let's break down what this script does:
- Imports the necessary Codama packages.
- Imports the IDL file generated by Anchor and creates a Codama tree from it (using the
rootNodeFromAnchorWithoutDefaultVisitorfunction). - Defines the clients to generate (JavaScript, Umi, and Rust) - feel free to comment out any you don't need and adjust the directories as needed.
- Iterates over the clients and generates the clients using the appropriate render visitor using the
visitfunction.
Run the Script
Now that we have our script, we can run it to generate the clients. Run the following command in your terminal:
ts-node clients/generate-client.ts
You should see output similar to this:
ts-node clients/generate-client.ts
✅ Successfully generated JS client for directory: clients/generated/js/src!
✅ Successfully generated Umi client for directory: clients/generated/umi/src!
✅ Successfully generated Rust client for directory: clients/generated/rust/src!
You should now have clients generated for your program in the clients directory. Great job!
You can now use these clients to interact with your program.
Test the Client
Open the example.ts file you created earlier and add the following code:
import { createUmi } from '@metaplex-foundation/umi-bundle-defaults';
import { TransactionBuilderSendAndConfirmOptions, generateSigner, keypairIdentity, sol } from '@metaplex-foundation/umi';
import { publicKey as publicKeySerializer, string } from '@metaplex-foundation/umi/serializers';
import { getCodamaTestProgramId } from './generated/umi/src/programs/codamaTest';
import { initialize, setData } from './generated/umi/src/instructions';

const umi = createUmi('http://127.0.0.1:8899', { commitment: 'processed' });
const creator = generateSigner(umi);
umi.use(keypairIdentity(creator));

const options: TransactionBuilderSendAndConfirmOptions = {
    confirm: { commitment: 'processed' }
};

const pda = umi.eddsa.findPda(getCodamaTestProgramId(umi), [
    string({ size: 'variable' }).serialize('example'),
    publicKeySerializer().serialize(creator.publicKey),
]);

async function logPda() {
    console.log(`PDA: ${pda.toString()}`);
}

async function airdropFunds() {
    try {
        await umi.rpc.airdrop(creator.publicKey, sol(100), options.confirm);
        console.log(`1. ✅ - Airdropped 100 SOL to the ${creator.publicKey.toString()}`);
    } catch (error) {
        console.error('1. ❌ - Error airdropping SOL to the wallet.', error);
    }
}

async function initializeAccount() {
    try {
        await initialize(umi, { pda, payer: creator }).sendAndConfirm(umi, options);
        console.log('2. ✅ - Initialized the account.');
    } catch (error) {
        console.error('2. ❌ - Error initializing the account.', error);
    }
}

async function setDataAccount(num: number, value: number) {
    try {
        await setData(umi, { authority: creator, pda, data: value }).sendAndConfirm(umi, options);
        console.log(`${num}. ✅ - Set data to ${value}.`);
    } catch (error) {
        console.error(num, '. ❌ - Error setting data.', error);
    }
}

async function main() {
    await logPda();
    await airdropFunds();
    await initializeAccount();
    await setDataAccount(3, 10);
    await setDataAccount(4, 20);
    await setDataAccount(5, 30);
    await setDataAccount(6, 40);
}

main().then(() => {
    console.log('🚀 - Done!');
}).catch((error) => {
    console.error('❌ - Error:', error);
});
This script will:
- Import necessary Umi packages and helpers
- Import the generated client functions
- Create a Umi instance
- Fetch the PDA for our signer based on our program's seeds
- Define functions to log the PDA, airdrop funds, initialize the account, and set the data
- Note that Codama generated our
initializeandsetDatafunctions. They take the Umi instance and the necessary arguments and return a function that can be used to send and confirm the transaction. Easy, right?
- Note that Codama generated our
- Finally, run the functions in order in our
mainfunction. We have included a fewsetDatacalls to demonstrate the functionality.
Run the Script
Now that we have our script, we can run it to interact with our program. Run the following command in your terminal:
ts-node clients/example.ts
I bet you got an error, didn't you? That's because our local validator is not running. Let's rerun our test with the --detach flag to keep it running in the background:
anchor test --detach
Now, in a separate terminal, run the example.ts script again:
ts-node clients/example.ts
Better luck this time? You should see output similar to this:
PDA: 5GawRMyhgw8uDxanKeZd89AMeteuHmuAhyb2NSN7YEgJ,255
1. ✅ - Airdropped 100 SOL to the 5L8siRBhjiAE4GJKZmZSSkfCYBSRZXMv44SVuoD888Yt
2. ✅ - Initialized the account.
3. ✅ - Set data to 10.
4. ✅ - Set data to 20.
5. ✅ - Set data to 30.
6. ✅ - Set data to 40.
🚀 - Done!
Congratulations! You have successfully generated a client for your Anchor program using Codama and interacted with it using Umi. You can now use this client to interact with your program in your applications.
Wrapping Up
Great job getting to this point. Here's a quick recap of what you have accomplished:
- Program Creation: You created a simple Anchor program with essential instructions.
- Testing: You wrote and executed tests to ensure your program works correctly.
- Client Generation: You used Codama to generate JavaScript, Umi, and Rust clients from your Anchor IDL.
- Client Interaction: You wrote a script to interact with your program using the generated clients and confirmed its functionality.
By leveraging Codama, you have streamlined the client generation process, making your development workflow more efficient. If you are building a complex program, building many programs for your customers, or just want to save time, Codama can be a valuable tool in your toolkit.
As Codama evolves, stay updated with its latest features and improvements. Don't hesitate to contribute to the project by reporting issues or submitting PRs.
If you are stuck or have questions, post them in our Discord. You can also stay up to date by following us on Twitter (@Quicknode) or our Telegram announcement channel.
We ❤️ Feedback!
Let us know if you have any feedback or requests for new topics. We'd love to hear from you.