12 min read
Overview
Metaplex recently launched a Candy Machine tool for their new Metaplex Core standard. Candy Machine is a tool that allows creators to sell/distribute bulk NFTs fairly and transparently, and Metaplex Core is a low-cost/flexible standard for minting NFTs on Solana.
This guide will teach you how to create a Core Candy Machine and mint NFTs using the Umi JavaScript library.
Let's jump in!
What You Will Do
Write a script to:
- Upload NFT images and metadata to IPFS
- Create a Core NFT Collection
- Deploy a Core Candy Machine
- Mint NFTs using the Candy Machine
- Delete the Candy Machine and recover rent
What You Will Need
This guide assumes basic knowledge of the Metaplex Core standard and Candy Machine. If you are new to these concepts, check out the following guides before getting started:
- Guide: What is Metaplex Core and How to Mint Your First Core NFT
- Guide: What is Metaplex Core and How to Mint Your First Core NFT
You will need the following tools and dependencies to complete this guide:
- Nodejs (version 16.15 or higher) installed
- Typescript experience and ts-node installed
- Solana CLI installed
Dependencies Used in this Guide
| Dependency | Version |
|---|---|
| @metaplex-foundation/umi | ^0.9.1 |
| @metaplex-foundation/umi-bundle-defaults | ^0.9.1 |
| @metaplex-foundation/mpl-core-candy-machine | ^0.2.0 |
| solana cli | 1.18.1 |
Let's get started!
What is Core Candy Machine?
Core Candy Machine ("CCM") is a new tool that brings the power of Metaplex's Candy Machine and Candy Guards to the Metaplex Core standard. It enables creators to distribute NFTs to their audience fairly and transparently using Candy Guards to specify the rules for minting. Candy Machines are temporary accounts that are deployed to the Solana blockchain that enable users to mint NFTs.
Set Up Your Project
Create a new project directory. In your terminal, enter:
mkdir core-cm-example
cd core-cm-example
Initiate a new project with npm:
npm init -y
Create a new Typescript file in your project directory:
echo > app.ts
Download Necessary Programs
We will be running our tests today on a local validator. Because the Candy Machine and Candy Guard programs are not included in your local validator, we will need to download them from the network to initiate them when we start our local validator.
solana program dump -um CoREENxT6tW1HoK8ypY1SxRMZTcVPm7R94rH4PZNhX7d core.so
solana program dump -um CMACYFENjoBMHzapRXyo1JZkVS6EtaDDzkjMrmQLvr4J candy_machine_core.so
solana program dump -um CMAGAKJ67e9hRZgfC5SFTbZH8MgEmtqazKXjmkaJjWTJ candy_guard.so
These commands will write the program executable data to files in your project directory. We will use these later when we are ready to run our script.
Install Dependencies
Next, install the necessary dependencies for your project:
npm install @metaplex-foundation/umi @metaplex-foundation/umi-bundle-defaults @metaplex-foundation/mpl-core-candy-machine
Add the following imports to your app.ts file:
import { createUmi } from '@metaplex-foundation/umi-bundle-defaults'
import {
	mplCandyMachine as mplCoreCandyMachine,
	create,
	addConfigLines,
	fetchCandyMachine,
	deleteCandyMachine,
	mintV1,
} from '@metaplex-foundation/mpl-core-candy-machine'
import {
	Umi,
	PublicKey,
	generateSigner,
	transactionBuilder,
	keypairIdentity,
	some,
	sol,
	dateTime,
	TransactionBuilderSendAndConfirmOptions,
} from '@metaplex-foundation/umi'
import { createCollectionV1 } from '@metaplex-foundation/mpl-core'
import { setComputeUnitLimit } from '@metaplex-foundation/mpl-toolbox'
You can now access Logs for your RPC endpoints, helping you troubleshoot issues more effectively. If you encounter an issue with your RPC calls, simply check the logs in your QuickNode dashboard to identify and resolve problems quickly. Learn more about log history limits on our pricing page.
We will use these imports to create and deploy our Core Candy Machine--we will discuss these functions in more detail as we go.
Define Key Variables
Before we start building, let's define our umi instance using our local Solana cluster and the keypairs we will use to sign transactions.
const umi = createUmi('http://127.0.0.1:8899').use(mplCoreCandyMachine())

const keypair = generateSigner(umi)
const collectionMint = generateSigner(umi)
const treasury = generateSigner(umi)
const candyMachine = generateSigner(umi)

umi.use(keypairIdentity(keypair))

const options: TransactionBuilderSendAndConfirmOptions = {
	send: { skipPreflight: true },
	confirm: { commitment: 'processed' },
}

async function main() {
	console.log(`Testing Candy Machine Core...`)
	console.log(`Important account information:`)
	console.table({
		keypair: keypair.publicKey.toString(),
		collectionMint: collectionMint.publicKey.toString(),
		treasury: treasury.publicKey.toString(),
		candyMachine: candyMachine.publicKey.toString(),
	})

	// 1. Airdrop 100 SOL to the keypair

	// 2. Create a collection

	// 3. Create a Candy Machine

	// 4. Add items to the Candy Machine

	// 5. Verify the Candy Machine configuration

	// 6. Mint NFTs

	// 7. Verify the Candy Machine configuration

	// 8. Delete the Candy Machine
}
main().catch(console.error)
Here's a summary of what we added:
- We utilized
createUmito create an instance of the Umi library and pass in the URL of our local Solana cluster. We also used themplCoreCandyMachinefunction to add the Candy Machine program to our Umi instance. - We used
generateSignerto create keypairs for ourkeypair(our payer/primary signer),collectionMint,treasury, andcandyMachine. - We set the
keypairas the primary signer for our Umi instance. - We defined an
optionsobject that we will use to send and confirm transactions. For our test environment, we are skipping the preflight check and setting the commitment level toprocessed--this will ensure that our transactions are processed quickly. You will likely want to change this for a production environment. - In addition to our constants, we have defined a
mainfunction to run our script. We will fill in the steps of themainfunction as we go.
Create Helper Function
We will create one helper function that we can use to fetch our collection and verify that the on-chain data matches our expectations. Under main, add the following:
interface ExpectedCandyMachineState {
	itemsLoaded: number
	itemsRedeemed: number
	authority: PublicKey
	collection: PublicKey
}

async function checkCandyMachine(
	umi: Umi,
	candyMachine: PublicKey,
	expectedCandyMachineState: ExpectedCandyMachineState,
	step?: number
) {
	try {
		const loadedCandyMachine = await fetchCandyMachine(
			umi,
			candyMachine,
			options.confirm
		)
		const { itemsLoaded, itemsRedeemed, authority, collection } =
			expectedCandyMachineState
		if (Number(loadedCandyMachine.itemsRedeemed) !== itemsRedeemed) {
			throw new Error(
				'Incorrect number of items available in the Candy Machine.'
			)
		}
		if (loadedCandyMachine.itemsLoaded !== itemsLoaded) {
			throw new Error('Incorrect number of items loaded in the Candy Machine.')
		}
		if (loadedCandyMachine.authority.toString() !== authority.toString()) {
			throw new Error('Incorrect authority in the Candy Machine.')
		}
		if (
			loadedCandyMachine.collectionMint.toString() !== collection.toString()
		) {
			throw new Error('Incorrect collection in the Candy Machine.')
		}
		step &&
			console.log(`${step}. ✅ - Candy Machine has the correct configuration.`)
	} catch (error) {
		if (error instanceof Error) {
			step &&
				console.log(
					`${step}. ❌ - Candy Machine incorrect configuration: ${error.message}`
				)
		} else {
			step && console.log(`${step}. ❌ - Error fetching the Candy Machine.`)
		}
	}
}
Here, we are creating a TypeScript interface that defines the expected state of our Candy Machine. Our helper function, checkCandyMachine, will accept an umi instance, the candyMachine public key, and the expected state of the Candy Machine. The function uses the fetchCandyMachine function to get the current state of the Candy Machine and compares it to the expected state. If the state does not match, the function will throw an error.
Step 1 - Airdrop SOL
Since we will be working on a local host, we will need to airdrop SOL every time we run our script to our keypair. Add the following code to your main function:
// 1. Airdrop 100 SOL to the keypair
try {
	await umi.rpc.airdrop(keypair.publicKey, sol(100), options.confirm)
	console.log(
		`1. ✅ - Airdropped 100 SOL to the ${keypair.publicKey.toString()}`
	)
} catch (error) {
	console.log('1. ❌ - Error airdropping SOL to the wallet.')
}
We use the umi.rpc.airdrop function to send 100 SOL to our keypair.
Step 2 - Create a Collection
Next, we will create a collection for our NFTs to be minted into. Add the following code to your main function:
// 2. Create a collection
try {
	await createCollectionV1(umi, {
		collection: collectionMint,
		name: 'My Collection',
		uri: 'https://example.com/my-collection.json',
	}).sendAndConfirm(umi, options)
	console.log(
		`2. ✅ - Created collection: ${collectionMint.publicKey.toString()}`
	)
} catch (error) {
	console.log('2. ❌ - Error creating collection.')
}
We are using the createCollectionV1 function to create a new collection. We are passing in the collectionMint keypair, the name of the collection, and the URI where the collection metadata will be stored. Make sure to update the URI with your own metadata, and ensure that it complies with the Metaplex Non-Fungible Token Metadata standard.
Step 3 - Create a Candy Machine
Now that we have a collection, we can use the create function from the mpl-core-candy-machine package to create a new Candy Machine. Add the following code to your main function:
// 3. Create a Candy Machine
try {
	const createIx = await create(umi, {
		candyMachine,
		collection: collectionMint.publicKey,
		collectionUpdateAuthority: umi.identity,
		itemsAvailable: 3,
		authority: umi.identity.publicKey,
		isMutable: false,
		configLineSettings: some({
			prefixName: 'Quick NFT #',
			nameLength: 11,
			prefixUri: 'https://example.com/metadata/',
			uriLength: 29,
			isSequential: false,
		}),
		guards: {
			botTax: some({ lamports: sol(0.001), lastInstruction: true }),
			solPayment: some({ lamports: sol(1.5), destination: treasury.publicKey }),
			startDate: some({ date: dateTime('2023-04-04T16:00:00Z') }),
			// All other guards are disabled...
		},
	})
	await createIx.sendAndConfirm(umi, options)
	console.log(
		`3. ✅ - Created Candy Machine: ${candyMachine.publicKey.toString()}`
	)
} catch (error) {
	console.log('3. ❌ - Error creating Candy Machine.')
}
The create function takes our umi instance and an object with the following properties:
candyMachine: The public key of the Candy Machine accountcollection: The public key of the collection we created in step 2collectionUpdateAuthority: The public key of the collection update authorityitemsAvailable: The number of NFTs that will be available in the Candy Machineauthority: The public key of the authority that will control the Candy MachineisMutable: A boolean that determines if the NFTs from the Candy Machine are mutable or notconfigLineSettings: An object that defines the configuration of the NFTs that will be minted. This can help reduce the size of the NFT metadata by using prefixes and lengths for the name and URI. For example, if we setprefixNameto 'Quick NFT #' andnameLengthto 11, the name of the NFT will be 'Quick NFT #1', 'Quick NFT #2', etc., rather than having to store that same prefix in the Candy Machine for each NFT.guards: An object that defines the rules for minting NFTs from the Candy Machine. In this example, we set a bot tax of 0.001 SOL, a payment of 1.5 SOL to the treasury, and a start date of April 4, 2023. You can add additional guards as needed.
For more information on config settings and candy guards, check out our guide on Candy Machine v. 3 or the Metaplex Core Candy Machine documentation.
Step 4 - Add Items to the Candy Machine
Now that our candy machine is initiated, we will need to add items to it. Since we used the configLineSettings object to define the configuration of the NFTs that will be minted, we can use the addConfigLines function to add items to the Candy Machine with our abbreviated names and URIs (e.g., 1 instead of Quick NFT #1 and 1.json instead of https://example.com/metadata/1.json). Add the following code to your main function:
// 4. Add items to the Candy Machine
try {
	await addConfigLines(umi, {
		candyMachine: candyMachine.publicKey,
		index: 0,
		configLines: [
			{ name: '1', uri: '1.json' },
			{ name: '2', uri: '2.json' },
			{ name: '3', uri: '3.json' },
		],
	}).sendAndConfirm(umi, options)
	console.log(
		`4. ✅ - Added items to the Candy Machine: ${candyMachine.publicKey.toString()}`
	)
} catch (error) {
	console.log('4. ❌ - Error adding items to the Candy Machine.')
}
The addConfigLines function takes our umi instance and an object with the following properties:
candyMachine: The public key of the Candy Machine accountindex: The index of the first item to add (if you are running this script multiple times, you may need to adjust this index to avoid overwriting existing items)configLines: An array of objects defining each item's name and URI to add to the Candy Machine.
Step 5 - Verify the Candy Machine Configuration
Before we mint our NFTs, let's use our helper function, checkCandyMachine, to verify that the Candy Machine configuration matches our expectations. Add the following code to your main function:
// 5. Verify the Candy Machine configuration
await checkCandyMachine(
	umi,
	candyMachine.publicKey,
	{
		itemsLoaded: 3,
		authority: umi.identity.publicKey,
		collection: collectionMint.publicKey,
		itemsRedeemed: 0,
	},
	5
)
We expect at this point that our Candy Machine should have three items loaded and none redeemed. If the configuration does not match, the checkCandyMachine function will throw an error.
Step 6 - Mint NFTs
Let's mint all of our NFTs from the Candy Machine. We can write a simple loop that calls the mintV1 function for each item. Add the following code to your main function:
// 6. Mint NFTs
try {
	const numMints = 3
	let minted = 0
	for (let i = 0; i < numMints; i++) {
		await transactionBuilder()
			.add(setComputeUnitLimit(umi, { units: 800_000 }))
			.add(
				mintV1(umi, {
					candyMachine: candyMachine.publicKey,
					asset: generateSigner(umi),
					collection: collectionMint.publicKey,
					mintArgs: {
						solPayment: some({ destination: treasury.publicKey }),
					},
				})
			)
			.sendAndConfirm(umi, options)
		minted++
	}
	console.log(`6. ✅ - Minted ${minted} NFTs.`)
} catch (error) {
	console.log('6. ❌ - Error minting NFTs.')
}
The mintV1 function requires that we generate an address for the new NFT (we are using the generateSigner function for this), the collection public key, and the mint arguments. In this example, we only need to pass in the solPayment guard to send 1.5 SOL to the treasury for each minted NFT (as not all guards require arguments). Check the Metaplex Core Candy Machine Documentation for more information on each argument you plan to use.
Step 7 - Verify the Candy Machine Configuration
Now that we have minted our NFTs, we should expect that our Candy Machine configuration has changed. Let's use our checkCandyMachine function to verify that the configuration matches our expectations. Add the following code to your main function:
// 7. Verify the Candy Machine configuration
await checkCandyMachine(
	umi,
	candyMachine.publicKey,
	{
		itemsLoaded: 3,
		authority: umi.identity.publicKey,
		collection: collectionMint.publicKey,
		itemsRedeemed: 3,
	},
	7
)
We expect our Candy Machine to still have three items loaded, but now all of them should be redeemed. If the configuration does not match, the checkCandyMachine function will throw an error.
Step 8 - Delete the Candy Machine
Finally, since our mint is complete, we will delete the Candy Machine and recover the rent. Add the following code to your main function:
// 8. Delete the Candy Machine
try {
	await deleteCandyMachine(umi, {
		candyMachine: candyMachine.publicKey,
	}).sendAndConfirm(umi, options)
	console.log(
		`8. ✅ - Deleted the Candy Machine: ${candyMachine.publicKey.toString()}`
	)
} catch (error) {
	console.log('8. ❌ - Error deleting the Candy Machine.')
}
The deleteCandyMachine function takes our umi instance and an object with the public key of the Candy Machine account. This function will delete the Candy Machine and recover the rent that was used to create it. After this step, the Candy Machine account will no longer exist on the chain, and the Candy Machine will be unusable. If we were to run the checkCandyMachine function after deleting the Candy Machine, it would throw an error.
Great work. Your script is now complete! Let's start our local validator and run the script.
Run Your Script
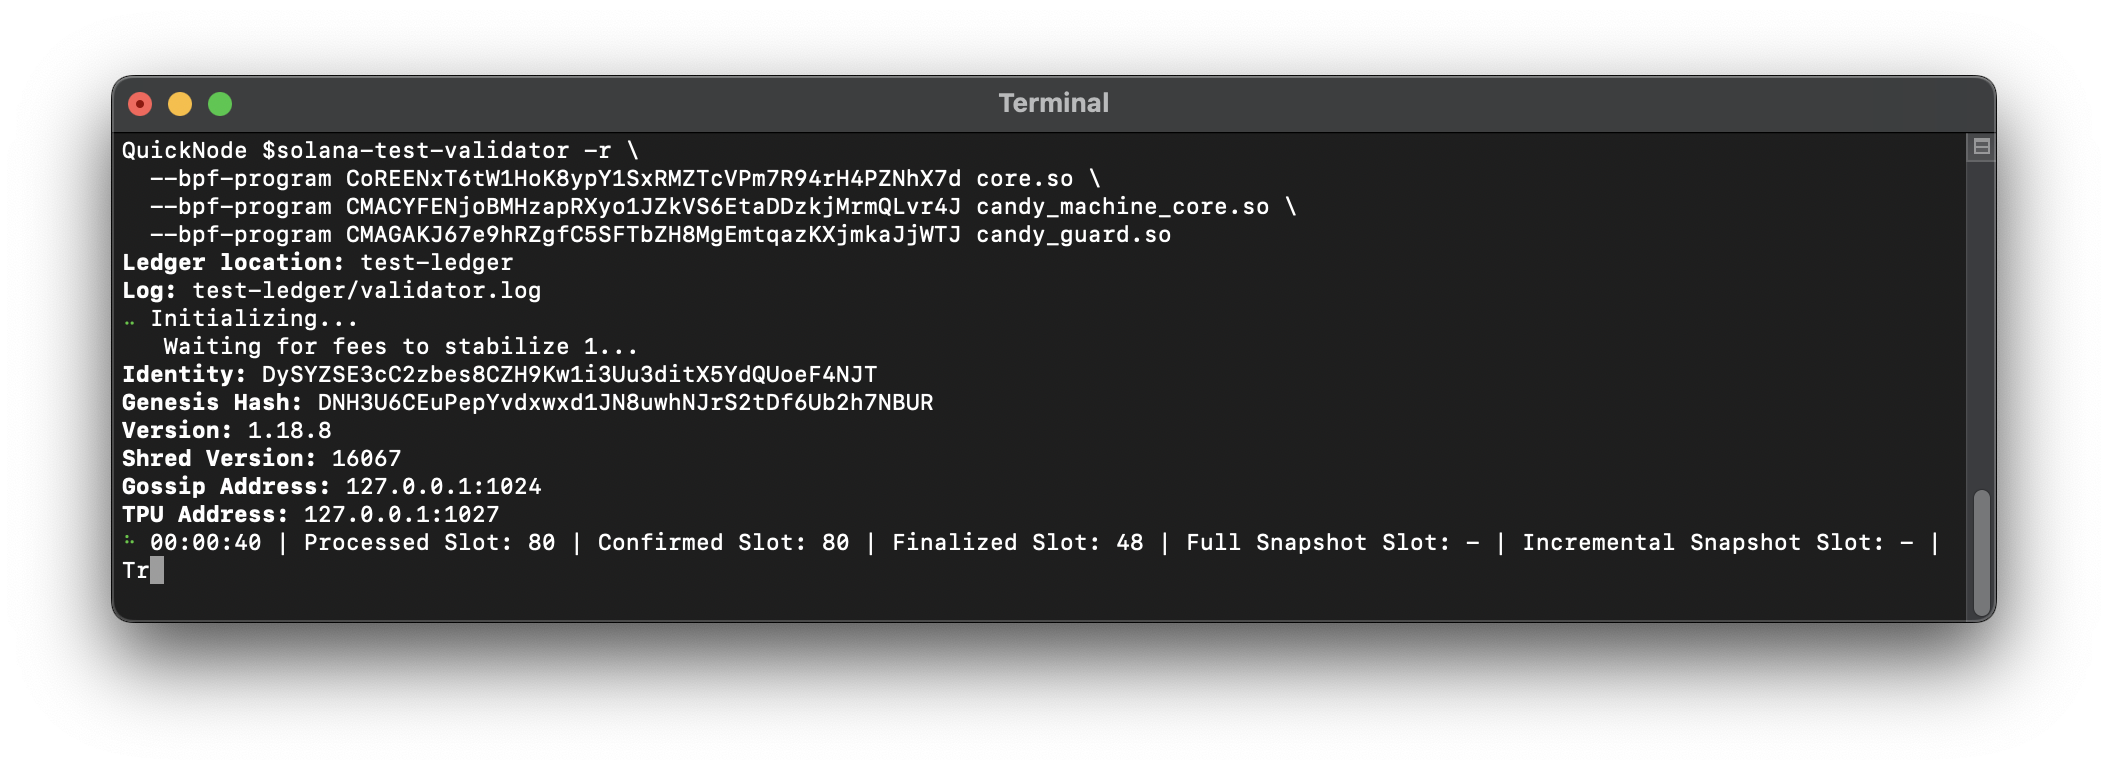
To run your script, start your local validator with the programs we downloaded earlier. Make sure you run this from the same directory that the files are located in (or provide the full path to the files):
solana-test-validator -r \
  --bpf-program CoREENxT6tW1HoK8ypY1SxRMZTcVPm7R94rH4PZNhX7d core.so \
  --bpf-program CMACYFENjoBMHzapRXyo1JZkVS6EtaDDzkjMrmQLvr4J candy_machine_core.so \
  --bpf-program CMAGAKJ67e9hRZgfC5SFTbZH8MgEmtqazKXjmkaJjWTJ candy_guard.so
Your validator should start with the programs loaded:
You should be able to see the programs on-chain using Solana Explorer's custom cluster view, here.
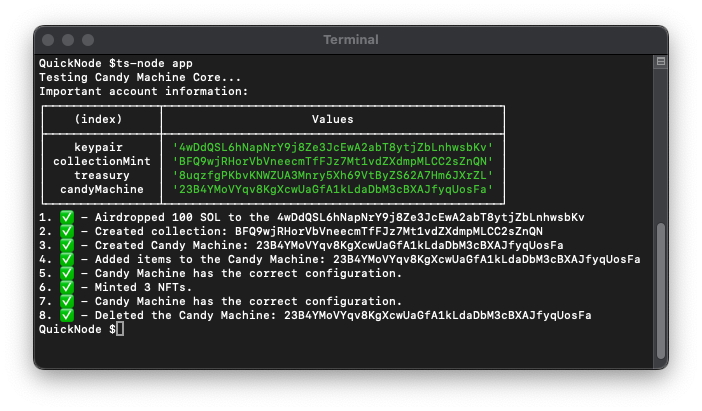
Then, run your Candy Machine script. In your terminal, run:
ts-node app.ts
Your script should run successfully and output something like this:
Great job!
Sweet Success
You have successfully created and minted NFTs using the Metaplex Core Candy Machine. You now have the tools to build and deploy a Candy Machine that takes advantage of the unique flexibility and low cost of the Metaplex Core standard.
If you have a question or idea you want to share, drop us a line on Discord or Twitter!
We ❤️ Feedback!
Let us know if you have any feedback or requests for new topics. We'd love to hear from you.