11 min read
Overview
Rate limiting is crucial for preventing API abuse and ensuring your endpoint's resources remain within the intended usage thresholds. Quicknode provides flexible method rate-limiting mechanisms that allow you to set precise limits on individual API methods, controlling the frequency of specific endpoint calls. This guide will walk you through setting up, testing, and monitoring method specific rate limits on your Quicknode endpoints to optimize and control your API usage.
Let's get started!
What You Will Need
- Basic understanding of interacting with blockchain RPC methods
- A Quicknode account (create an account here)
- A Quicknode endpoint
- Node.js installed
- A Terminal window
What You Will Do
- Learn about rate limiting with Quicknode
- Configure rate limits through the Quicknode dashboard
- Test rate limits using different methods on Ethereum and Solana
| Dependency | Version |
|---|---|
| node.js | ^18.16.0 |
| axios | ^1.7.9 |
| ethers | ^6.13.5 |
| @solana/kit | ^2.0.0 |
Rate Limiting by IP
IP-based rate limiting allows you to control the total number of requests that can be made from a single IP address, regardless of the method being called. This provides a baseline protection against abuse and helps ensure fair usage across all clients accessing your endpoint.
Understanding IP Rate Limits
- Limits apply to the total number of requests from an IP address
- Limits can be set for different time intervals (per second, minute, or day)
- Limits apply across all methods unless a more specific method limit exists
Rate Limit by Method
Method rate limiting allows you to define different request limits for specific REST, RPC, or gRPC methods. This granular control helps optimize your endpoint's performance and manage costs effectively.
Understanding Method Rate Limits
- Set unique limits for individual RPC methods (e.g., control how many requests you can make to
eth_getBlock,getAccountInfo) - Control request frequency per method (e.g., requests per second/minute/day)
HTTP Protocol Considerations
- Rate limits apply to all HTTP POST requests
- Each method call counts against its specific limit
- Synchronous responses count as single requests
WebSocket (WSS) Protocol Considerations
- Limits apply to initial subscription requests
- Subscription responses don't count against limits
Note: Method rate limits apply to requests and not responses.
How to Set Up Method Rate Limits
You can configure method rate limits via a Dashboard UI or programmatically.
Dashboard Method
- Log into your Quicknode dashboard
- Select your endpoint (create one for Ethereum or Solana mainnet if you haven't already)
- Navigate to the Security tab
- Find the Method Limits section to customize your rate limits
Admin API Method
You can also manage method rate limits programmatically using the Admin API. Here are some common operations:
- Get Limits
- Update Rate Limits
- Update Method Limit
- Delete Limit
Gets method rate limits.
curl -X 'GET' \
  'https://api.quicknode.com/v0/endpoints/{id}/method-rate-limits' \
  -H 'accept: application/json' \
  -H 'x-api-key: YOUR_API_KEY'
Updates rate limits.
curl -X 'PUT' \
  'https://api.quicknode.com/v0/endpoints/{id}/rate-limits' \
  -H 'accept: */*' \
  -H 'x-api-key: YOUR_API_KEY' \
  -H 'Content-Type: application/json' \
  -d '{
    "rate_limits": {
      "rps": 300
    }
}'
Updates a method rate limit.
curl -X 'PATCH' \
  'https://api.quicknode.com/v0/endpoints/{id}/method-rate-limits/{method_rate_limit_id}' \
  -H 'accept: application/json' \
  -H 'x-api-key: YOUR_API_KEY' \
  -H 'Content-Type: application/json' \
  -d '{
  "methods": [
    "eth_getlogs"
  ],
  "status": "enabled",
  "rate": 20
}'
Deletes a method rate limit.
curl -X 'DELETE' \
  'https://api.quicknode.com/v0/endpoints/{id}/method-rate-limits/{method_rate_limit_id}' \
  -H 'accept: application/json' \
  -H 'x-api-key: YOUR_API_KEY'
Replace
{id}with your endpoint ID and{method_rate_limit_id}with the specific rate limit ID you want to modify or delete.
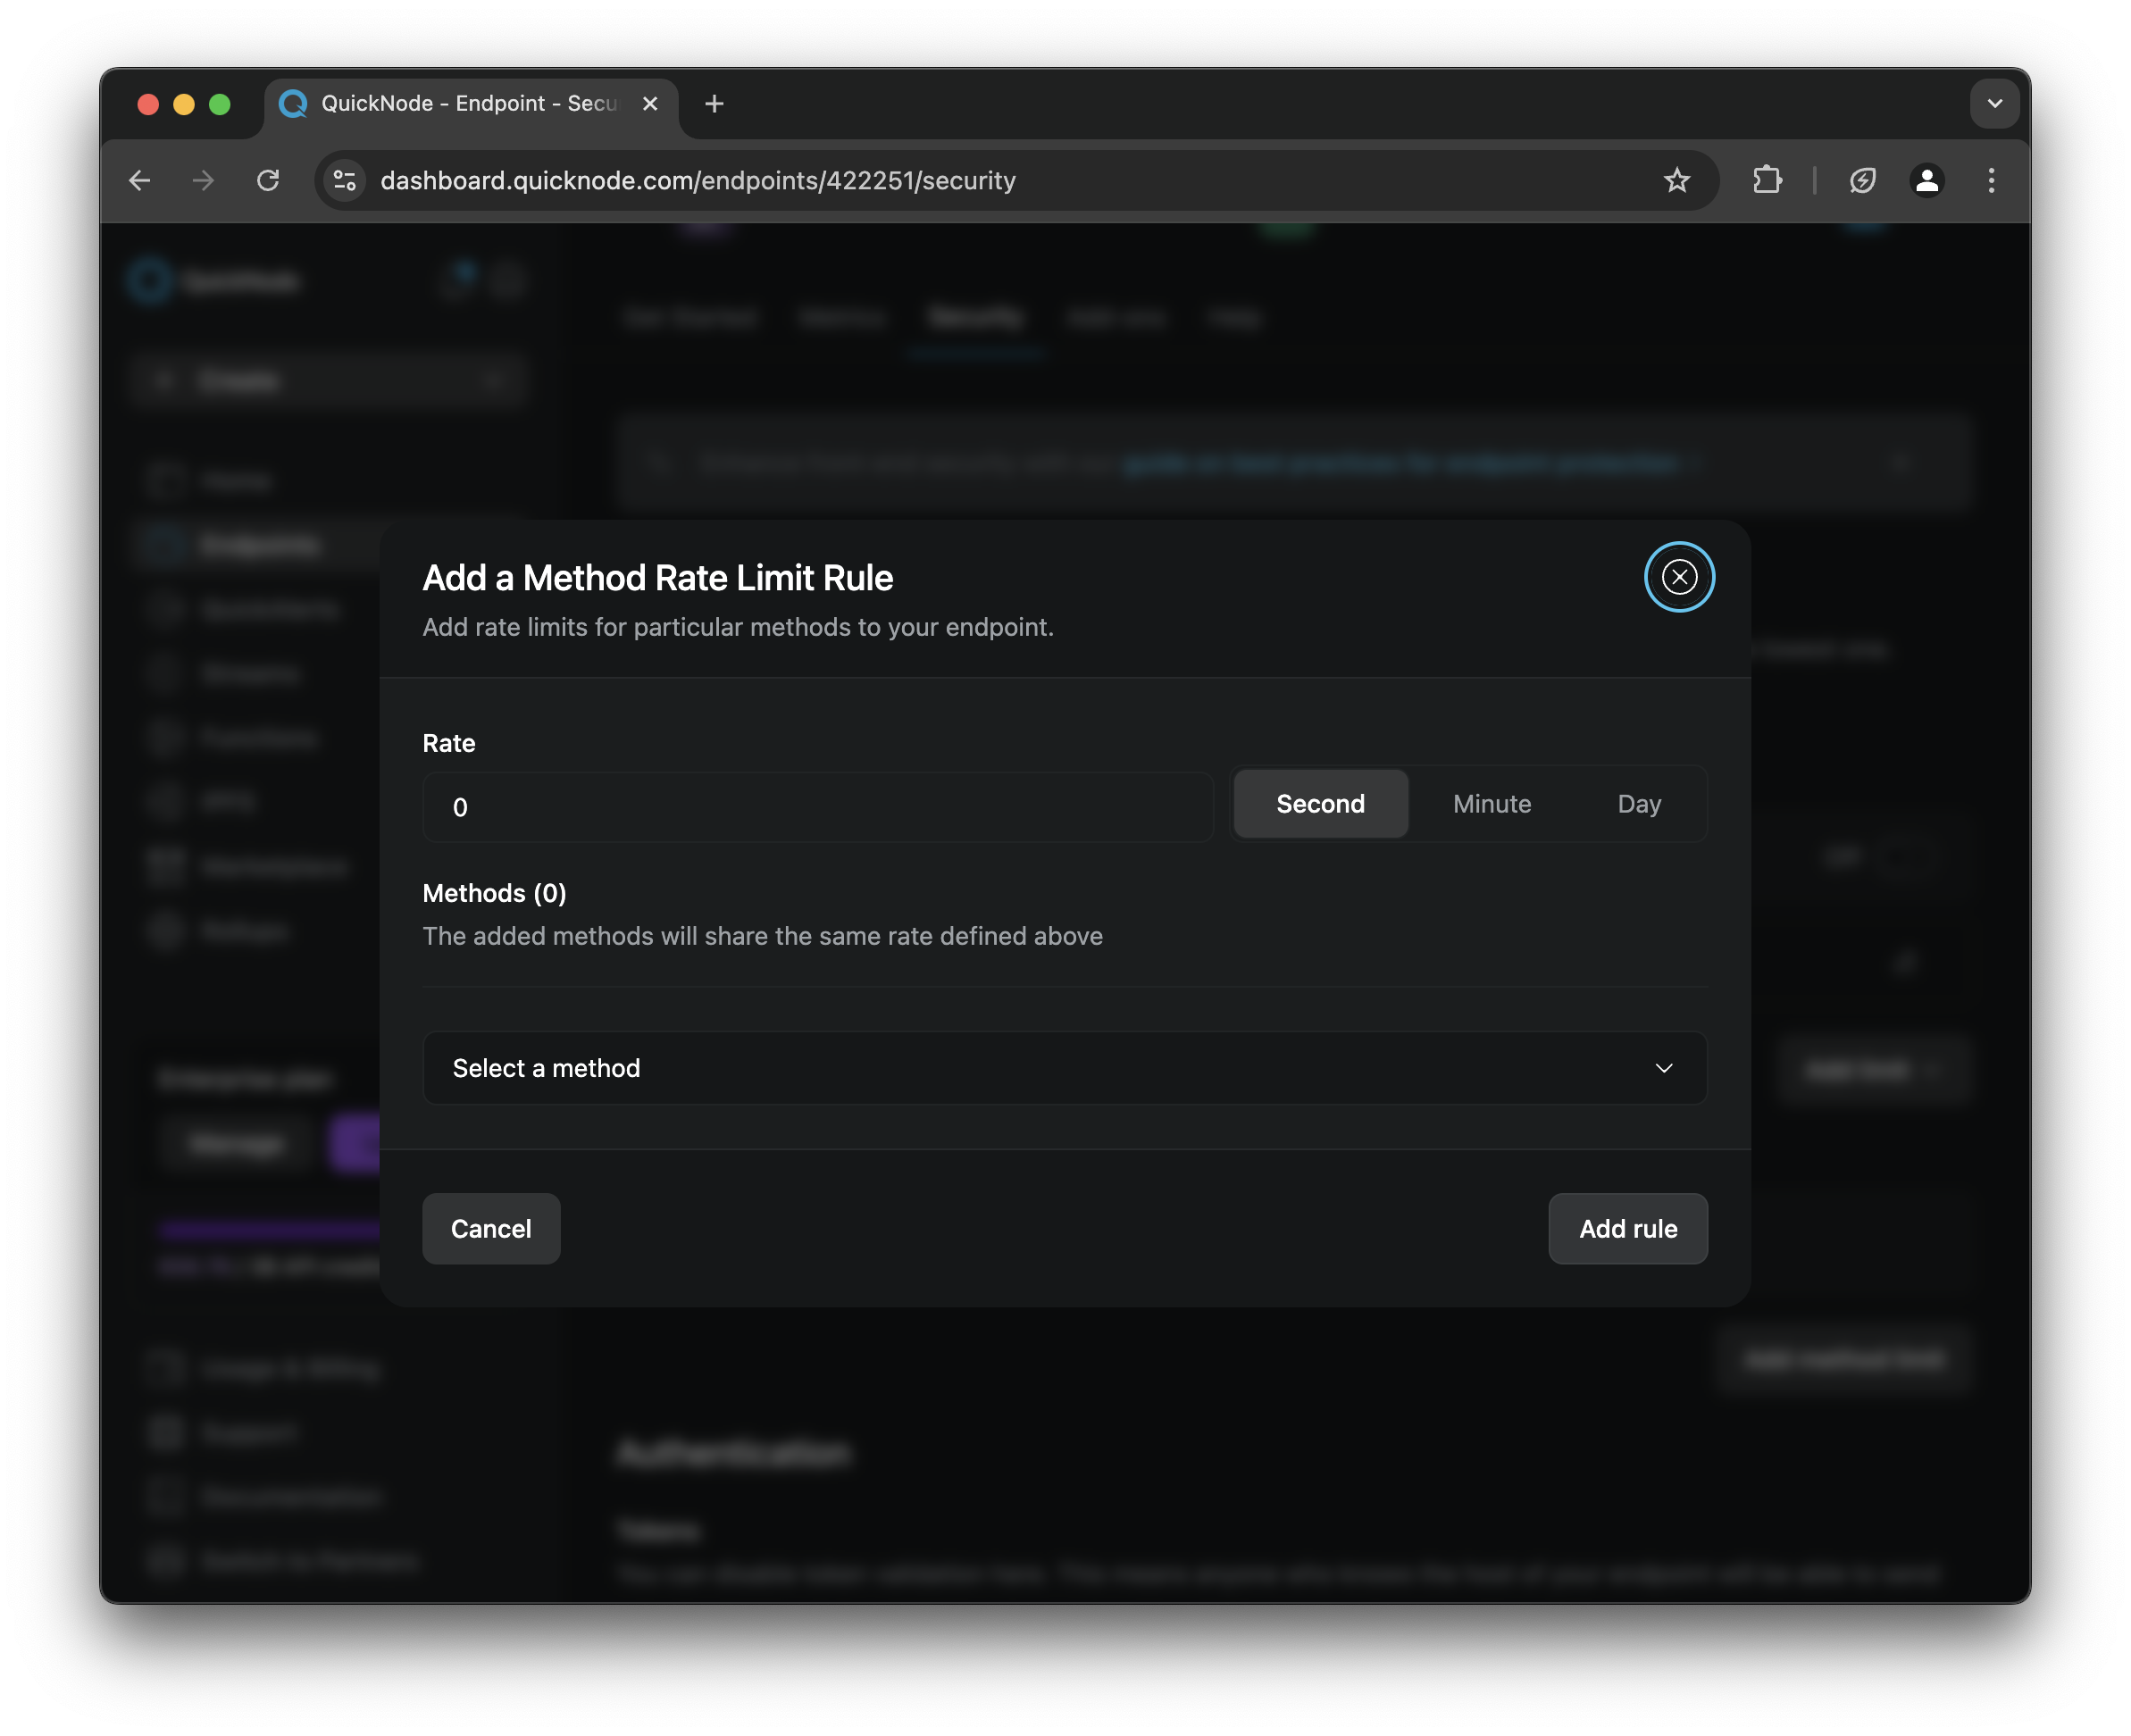
When adding a new method rate limit, you'll need to specify the exact RPC method name and set your request frequency. You can configure limits per second, minute, or day. For this guide, we'll set up the following configuration for testing purposes:
- Ethereum
- Solana
eth_blockNumber: 1 requests/minuteeth_subscribe: 1 requests/minute
getSlot: 1 requests/minuteaccountSubscribe: 1 requests/minute
For the purposes of this guide, set the rate limits above for each method (pick the chain based on your preference). Once set, it'll look like this in your dashboard:

Now, let's create the scripts to test the method rate limits.
Testing Your Rate Limits
Let's create a simple Node.js script to test our rate limits. First, create a folder, initialize a npm project and create files for testing:
mkdir rate-limits
cd rate-limits
npm init --y
npm install axios ethers @solana/kit
echo > http.js
echo > wss.js
Then, update your package.json to use "type":"module" so you can use import statements (e.g., import { ethers } from 'ethers).
Now, we'll demonstrate what happens when you exceed your configured limits. In this example, we'll work with a rate limit of 1 request per minute for the eth_blockNumber method and eth_subscribe (as mentioned above).
Add the code to each appropriate file and remember to replace the YOUR_QUICKNODE_HTTP_ENDPOINT with your actual HTTP endpoint when testing the HTTP endpoint and the WSS endpoint when testing the WSS endpoint
Ethereum
- HTTP (eth_blockNumber)
- WebSocket (eth_subscribe)
const axios = require('axios');

const QUICKNODE_ENDPOINT = 'YOUR_QUICKNODE_HTTP_ENDPOINT';

async function makeRequest() {
const payload = {
    jsonrpc: '2.0',
    id: 1,
    method: 'eth_blockNumber',
    params: []
};

try {
    const response = await axios.post(QUICKNODE_ENDPOINT, payload);
    console.log(`[${new Date().toISOString()}] Success:`,
    parseInt(response.data.result));
    return true;
} catch (error) {
    if (error.response?.status === 429) {
    console.log(`[${new Date().toISOString()}] Rate limit exceeded. ` +
        `Try again in ${error.response.headers['retry-after']} seconds`);
    } else {
    console.error(`[${new Date().toISOString()}] Error:`, error.message);
    }
    return false;
}
}

async function demonstrateRateLimit() {
console.log('Making first request - should succeed');
await makeRequest();

console.log('\nMaking second request immediately - should fail');
await makeRequest();

console.log('\nWaiting 60 seconds...');
await new Promise(resolve => setTimeout(resolve, 60000));

console.log('\nMaking request after waiting - should succeed');
await makeRequest();
}

demonstrateRateLimit();

/* Example output:

Making first request - should succeed
[2025-01-30T19:15:05.703Z] Success: 21739376

Making second request immediately - should fail
[2025-01-30T19:15:05.817Z] Rate limit exceeded. Try again in undefined seconds

Waiting 60 seconds...

Making request after waiting - should succeed
[2025-01-30T19:16:06.140Z] Success: 21739381

*/
import { ethers } from 'ethers';

const QUICKNODE_WSS_ENDPOINT = 'YOUR_QUICKNODE_WSS_ENDPOINT';

async function demonstrateWebSocketRateLimit() {
    let provider = new ethers.WebSocketProvider(QUICKNODE_WSS_ENDPOINT);

    try {
        console.log('[WS] Connected, attempting first subscription');

        const firstSubId = await provider.send('eth_subscribe', ['newHeads']);
        console.log(`[${new Date().toISOString()}] First subscription created:`, firstSubId);

        await new Promise(resolve => setTimeout(resolve, 2000));

        await provider.destroy();
        console.log('[WS] First connection destroyed');

        provider = new ethers.WebSocketProvider(QUICKNODE_WSS_ENDPOINT);
        console.log('[WS] Reconnected, attempting second subscription');

        const secondSubId = await provider.send('eth_subscribe', ['newPendingTransactions']);
        console.log(`[${new Date().toISOString()}] Second subscription created:`, secondSubId);

    } catch (error) {
        if (error.code === -32029) {
            console.log('Rate limit exceeded. Try again in 1 minute.');
        }
        console.error(`[${new Date().toISOString()}] Error:`, error.message);
    }

    provider.websocket.on('message', (data) => {
        console.log(`[${new Date().toISOString()}] Message received:`, data.toString());
    });

    provider.websocket.on('error', (error) => {
        console.error('[WS] Error:', error);
    });
}

demonstrateWebSocketRateLimit()
    .catch(error => console.error('Fatal error:', error));

/* Example output:
[WS] Connected, attempting first subscription
[2025-02-03T15:52:44.778Z] First subscription created: 0x1820bda339b97d450000000000002285
[WS] First connection destroyed
[WS] Reconnected, attempting second subscription
[2025-02-03T15:52:47.218Z] Error: could not coalesce error (error={ "code": -32011, "message": "request limit reached" }, payload={ "id": 1, "jsonrpc": "2.0", "method": "eth_subscribe", "params": [ "newPendingTransactions" ] }, code=UNKNOWN_ERROR, version=6.13.5)
[2025-02-03T15:52:47.218Z] Message received: {"jsonrpc":"2.0","id":2,"result":"0x1"}
*/
Solana
- HTTP (getAccountInfo)
- WebSocket (accountSubscribe)
import { createSolanaRpc, address } from "@solana/kit";

const ENDPOINT = "YOUR_QUICKNODE_HTTP_ENDPOINT";
const ACCOUNT = "7cVfgArCheMR6Cs4t6vz5rfnqd56vZq4ndaBrY5xkxXy";

async function testRateLimit() {
    const solanaRpc = createSolanaRpc(ENDPOINT);
    const searchAddress = address(ACCOUNT);

    try {
        console.log(`[${new Date().toISOString()}] First request`);
        const { value: accountInfo1 } = await solanaRpc.getAccountInfo(searchAddress).send();
        console.log('First response:', accountInfo1);
    } catch (e) {
        console.error('First request error:', e);
    }

    try {
        console.log(`[${new Date().toISOString()}] Second request`);
        const { value: accountInfo2 } = await solanaRpc.getAccountInfo(searchAddress).send();
        console.log('Second response:', accountInfo2);
    } catch (e) {
        console.error('Second request error:', e);
    }
}

testRateLimit()
    .catch(console.error)
    .finally(() => {
        console.log('Test complete');
        process.exit(0);
    });

    /*
    [2025-02-03T16:48:35.521Z] First request
    First response: {
    data: '',
    executable: false,
    lamports: 697460654305n,
    owner: '11111111111111111111111111111111',
    rentEpoch: 18446744073709551615n,
    space: 0n
    }


    [2025-02-03T16:48:35.835Z] Second request
    Second request error: SolanaError: HTTP error (429): Too Many Requests
    at makeHttpRequest
    */
import { createSolanaRpcSubscriptions, address } from "@solana/kit";

const ENDPOINT = 'YOUR_QUICKNODE_WSS_ENDPOINT';
const ACCOUNT = '7cVfgArCheMR6Cs4t6vz5rfnqd56vZq4ndaBrY5xkxXy';

async function testRateLimit() {
    let rpcSubscriptions = createSolanaRpcSubscriptions(ENDPOINT);
    const accountAddress = address(ACCOUNT);
    const abortController1 = new AbortController();

    try {
        console.log(`[${new Date().toISOString()}] First subscription attempt`);
        const sub1 = await rpcSubscriptions.accountNotifications(accountAddress, {
            commitment: 'confirmed',
            encoding: 'base64'
        }).subscribe({ abortSignal: abortController1.signal });

        for await (const notification of sub1) {
            console.log('First subscription update:', notification.value);
            break;
        }
    } finally {
        abortController1.abort();
        await rpcSubscriptions.dispose();
    }

    await new Promise(resolve => setTimeout(resolve, 1000));

    rpcSubscriptions = createSolanaRpcSubscriptions(ENDPOINT);
    const abortController2 = new AbortController();

    try {
        console.log(`[${new Date().toISOString()}] Second subscription attempt`);
        const sub2 = await rpcSubscriptions.accountNotifications(accountAddress, {
            commitment: 'confirmed',
            encoding: 'base64'
        }).subscribe({ abortSignal: abortController2.signal });

        for await (const notification of sub2) {
            console.log('Second subscription update:', notification.value);
            break;
        }
    } catch (e) {
        console.error('Second subscription error:', e);
    } finally {
        abortController2.abort();
        await rpcSubscriptions.dispose();
    }
}

testRateLimit()
    .catch(console.error)
    .finally(() => {
        console.log('Test complete');
        process.exit(0);
    });

    /*
    [2025-02-03T16:52:31.806Z] First subscription attempt
    First subscription update: {
    lamports: 697856097133n,
    data: [ '', 'base64' ],
    owner: '11111111111111111111111111111111',
    executable: false,
    rentEpoch: 18446744073709551615n,
    space: 0n
    }
    [2025-02-03T16:52:48.098Z] Second subscription attempt
    Second subscription error: SolanaError: Transaction history is not available from this node
    */
Run each script (remember to input your endpoint URL) and analyze the outputs. You should see the first request go through and the second request fail (since it triggers the method rate limit). Note: this will not limit the rate of responses**.
And that's it! You just learned how to setup and test method rate limits on both EVM and SVM blockchains.
Monitoring and Troubleshooting
The Quicknode dashboard provides monitoring in the Analytics tab. Here you can track method-specific usage, identify response statuses, and breakdown over time. Use this information to fine-tune your rate limits and understanding your application's behavior. Additionally, you can use the Admin API to view detailed metrics about your endpoint and usage.
Additional Resources
Want to learn more about securing your endpoint? Check out the following guides:
- How to Set Up Referrer Whitelist with Quicknode
- How to Implement JSON Web Tokens (JWT) Authorization with Quicknode
- How to Set Up Multi-Token Authentication on Quicknode
Wrap Up
Method rate limits provide powerful control over your Quicknode endpoint's performance and costs. By carefully configuring these limits and implementing proper handling in your application, you can ensure optimal performance while maintaining control over resource usage.
If you have any questions or need help, feel free to reach out to us on our Discord or Twitter.
We ❤️ Feedback!
Let us know if you have any feedback or requests for new topics. We'd love to hear from you.