3 min read
Overview
Hello reader! Welcome to Quicknode's first Solana guide. Solana is an up-and-coming blockchain that seeks to solve the scalability issues that Ethereum has been handling. You will walk through step-by-step how to create a Solana address using the @solana/web3.js library in this guide.
What You Will Need
- NodeJS installed
- Terminal/CLI familiarity
- Text editor
What is Solana?
Solana's goal is singular in nature. That goal is to scale the blockchain for global adoption. Solana Labs, the developers of the Solana Protocol, are doing a few different things to achieve that dream. Blockchain technology has a few knobs when it comes to tuning performance. One of which is the consensus mechanism. This is how nodes communicate together to arrive at an identical conclusion.
Bitcoin uses Proof of Work or PoW. BNB Smart Chain, also known as BSC, uses a Proof of Staked Authority or PoSA. And Ethereum is migrating to Proof of Stake aka PoS. As you can tell, consensus is by no means a solved game at this point in time. Solana uses a consensus called Proof of History. Proof of History works through a time-stamping solution; each transaction has a time stamp allocated to it that allows it to be verified as a legitimate transaction by the rest of the network in mere fractions of a second. Solana has a breakdown of the eight technologies that they believe position themselves as the fastest, most scalable, and secure blockchain in the game.
Create Your Project
We need to create a project directory. Feel free to use a different directory name.
mkdir SolanaAddressJavaScript
cd SolanaAddressJavaScript
In this new directory, you will need to install the dependencies required for our project. Execute the following commands to do so.
npm install --save @solana/web3.js@1
echo > solana.js
With your dependencies configured, open the solana.js file you created a moment ago. Add the SolanaWeb3.js library:
const solanaWeb3 = require('@solana/web3.js');
Creating an Address in Solana
Creating an address in Solana is a bit different than other libraries, as it will expose the raw Uint8Array for you to manipulate. There are several methods that you can look at over here. However, we will only be going over how to generate a keypair as all of the remaining methods are based off having a pre-existing secret key.
To create a new key pair, you will need to call exactly one function. This is the Keypair.generate() method attached to the Solana Client we initialized earlier. Modify your script to look like this, and you will be all done.
const solanaWeb3 =  require("@solana/web3.js");

const generateKey = async () => {
  const keyPair = solanaWeb3.Keypair.generate();

  console.log("Public Key:", keyPair.publicKey.toString());
  console.log("Secret Key:", keyPair.secretKey)
};

generateKey();
This is the same script from earlier, but with three lines added:
-
Calling the Keypair.generate() function, which gives us access to our public and private keys.
-
Printing out the public and private key.
With this put together, your script will generate a new keyPair; then print out both the public and secret key. If you would like to keep the same key, you will need to copy the secret key and use one of the methods from the documentation that we linked to above.
Run the following to see the fruits of your labor:
node solana.js
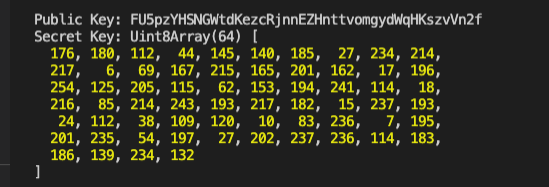
This will show an output like this:

The first portion is the current block information. The second section is your public key outputted in the familiar address format of a long string of random characters. Along with the public key is your secret key. The secret key is the array of numbers. Be sure not to share that with anyone, as they would have full access to your funds.
Conclusion
Congrats on making it to the end! By doing so, you have now successfully generated an address to sign transactions and hold funds. With this new address, you are ready to venture forth into the new frontier that Solana is building. There are many cool projects, and the ecosystem is ripe for participation should you have the wherewithal to take advantage.
Want to create a vanity wallet address (e.g., FUN...NAM3)? Check out our Guide: Create a Custom Vanity Wallet Address!
Subscribe to our newsletter for more articles and guides on Ethereum. If you have any feedback, feel free to reach out to us via Twitter. You can always chat with us on our Discord community server, featuring some of the coolest developers you'll ever meet :)
We ❤️ Feedback!
Let us know if you have any feedback or requests for new topics. We'd love to hear from you.