17 min read
Overview
In Part 1 of this guide, we explored how to integrate QuickNode's Priority Fees Add-on with Solana Web3.js 2.0. In this second part, we'll expand on that foundation to incorporate multiple QuickNode Add-ons, including REST APIs, and demonstrate how to use them alongside native Solana methods.
Let's dive in!
What You Will Do
In this guide, you will:
- Integrate multiple QuickNode Add-ons into your Solana Web3.js 2.0 application
- Implement REST API calls within the Solana Web3.js 2.0 framework
- Combine QuickNode Add-ons with native Solana methods
What You Will Need
- Completion of Part 1 of this guide series (we will use the code from that guide as a starting point)
- Node.js (version 19 or higher) installed
- TypeScript experience and ts-node installed
- A QuickNode account with access to a Solana endpoint with the Priority Fees API, Metis Jupiter V6 Swap API, and IPFS gateway (other add-ons will work, but your code may vary). If you don't have these add-ons, you can add them from your QuickNode dashboard. If you don't have a QuickNode account yet, you can create one for free here.
Dependencies Used in this Guide
| Dependency | Version |
|---|---|
| @solana/web3.js | ^2.0.0 |
Extending Our Project
Let's start by duplicating the example.ts file we created in Part 1 and naming it example2.ts. We'll use this new file to implement our advanced functionality.
cp example.ts example2.ts
Now, let's update our example2.ts file to include the necessary imports and types for our new add-ons.
Define Types
First, let's define the types for the Metis Jupiter V6 Swap API (We are getting these from the Metis Jupiter API Documentation) and the IPFS API (We are using a modified version of the IPFS API Documentation because we will manipulate the request in our Transport function).
Add the following to your types.ts file:
// Leave Your Existing types...
declare const QuoteGetSwapModeEnum: {
    readonly ExactIn: "ExactIn";
    readonly ExactOut: "ExactOut";
};
type QuoteGetSwapModeEnum = typeof QuoteGetSwapModeEnum[keyof typeof QuoteGetSwapModeEnum];

declare const SwapMode: {
    readonly ExactIn: "ExactIn";
    readonly ExactOut: "ExactOut";
};
type SwapMode = typeof SwapMode[keyof typeof SwapMode];

interface QuoteGetRequest {
    inputMint: string;
    outputMint: string;
    amount: number;
    slippageBps?: number;
    swapMode?: QuoteGetSwapModeEnum;
    dexes?: Array<string>;
    excludeDexes?: Array<string>;
    restrictIntermediateTokens?: boolean;
    onlyDirectRoutes?: boolean;
    asLegacyTransaction?: boolean;
    platformFeeBps?: number;
    maxAccounts?: number;
}

interface PlatformFee {
    amount?: string;
    feeBps?: number;
}

interface RoutePlanStep {
    swapInfo: SwapInfo;
    percent: number;
}

interface SwapInfo {
    ammKey: string;
    label?: string;
    inputMint: string;
    outputMint: string;
    inAmount: string;
    outAmount: string;
    feeAmount: string;
    feeMint: string;
}

interface QuoteResponse {
    inputMint: string;
    inAmount: string;
    outputMint: string;
    outAmount: string;
    otherAmountThreshold: string;
    swapMode: SwapMode;
    slippageBps: number;
    platformFee?: PlatformFee;
    priceImpactPct: string;
    routePlan: Array<RoutePlanStep>;
    contextSlot?: number;
    timeTaken?: number;
}

interface IpfsUploadRequest {
    filePath: string;
    fileName: string;
    fileType: string;
}

interface Pin {
    cid: string;
    name: string;
    origins: string[];
    meta: Record<string, any>;
}

interface Info {
    size: string;
}

interface IpfsUploadResponse {
    requestid: string;
    status: string;
    created: string;
    pin: Pin;
    info: Info;
    delegates: string[];
}

export type {
    // Existing exports...
    FeeEstimates,
    EstimatePriorityFeesResponse,
    EstimatePriorityFeesParams,

    // New exports...
    QuoteGetRequest,
    QuoteResponse,
    IpfsUploadRequest,
    IpfsUploadResponse
};
You can now access Logs for your RPC endpoints, helping you troubleshoot issues more effectively. If you encounter an issue with your RPC calls, simply check the logs in your QuickNode dashboard to identify and resolve problems quickly. Learn more about log history limits on our pricing page.
Import the new types into your example2.ts file:
import { QuoteGetRequest, QuoteResponse, IpfsUploadRequest, IpfsUploadResponse } from "./types";
Also, let's import fs from the Node.js standard library to read the file contents (we will need this to upload the file to IPFS):
import * as fs from "fs";
Update API Types
Now, let's update our API type to include Metis and IPFS methods. Since we have a few types of add-ons, let's create a new type for each and then combine them into a single type to be used in our API. Add the following code to your PriorityFeeApi type in your example2.ts file:
type PriorityFeeApi = {
    qn_estimatePriorityFees(params: EstimatePriorityFeesParams): Promise<EstimatePriorityFeesResponse>;
}

type MetisApi = {
    metis_quote(params: QuoteGetRequest): Promise<QuoteResponse>;
    // Add other Metis methods here, e.g.:
}

type IpfsApi = {
    ipfs_upload(params: IpfsUploadRequest): Promise<IpfsUploadResponse>;
    // Add other IPFS methods here, e.g.:
}

type QuickNodeAddons = PriorityFeeApi & MetisApi & IpfsApi;
Notice that we combine the types with the & operator. This allows us to create a single type that includes all of the methods from our add-ons. Depending on your use case, you may choose to use individual types or create a single unified type with only the methods you need. The library gives you a lot of flexibility in how you structure your APIs.
Also, notice that we have left space to add additional methods for each interface. The purpose of this guide is to show you how to integrate an add-on method, not to be an exhaustive list of all available methods. Feel free to explore the QuickNode Marketplace and our documentation to find other add-ons and methods to integrate into your application.
Implement REST API Calls
In the previous guide, we used the createDefaultRpcTransport function to create a transport that uses the default JSON RPC transport. Though this is a good starting point, it does not allow us to handle REST API calls (and both the Metis API and QuickNode IPFS API require REST calls). To handle REST API calls, we need to create a custom transport that can handle the specific requirements of our add-ons (e.g., endpoints, authentication, headers, etc.).
To handle REST API calls within our Solana Web3.js 2.0 framework, we need to modify our createQuickNodeTransport function to first check the method passed to the transport function and then handle the request accordingly. We can then default to the JSON RPC transport if the method is not recognized. Update it in your example2.ts file:
interface CreateAddonsApiParams {
    endpoint: string;
    metisEndpoint?: string;
    ipfsApiKey?: string;
}

function createQuickNodeTransport({ endpoint, metisEndpoint, ipfsApiKey }: CreateAddonsApiParams): RpcTransport {
    const jsonRpcTransport = createDefaultRpcTransport({ url: endpoint });

    return async <TResponse>(...args: Parameters<RpcTransport>): Promise<TResponse> => {
        const { method, params } = args[0].payload as { method: string; params: unknown };
        switch (true) {
            case method.startsWith('metis_'):
                return handleMetisRequest<unknown, TResponse>(method, params, metisEndpoint);

            case method === 'ipfs_upload':
                return handleIpfsUpload<TResponse>(params as IpfsUploadRequest, ipfsApiKey);

            default:
                return jsonRpcTransport(...args);
        }
    };
}
Let's break down what we are doing here:
- First, we are changing params to accept not just an endpoint but also an optional
metisEndpointandipfsApiKeyparameter. - Next, like before, we define a default JSON RPC transport.
- Then, we use a switch statement to check the method passed to the transport function. If the method starts with
metis_, we call a new functionhandleMetisRequestto handle the Metis API request (we will use this handler to handle all Metis requests regardless of the specific method). Additionally, if the method isipfs_upload, we call a new functionhandleIpfsUploadto handle the IPFS API request (we only use this handler to process a specific method). If the method is not recognized, we return the default JSON RPC transport.
It is important to note here that this logic is entirely customizable. We are simply providing an example of how you might use a switch statement to include different APIs or methods, but you can use any other approach that makes sense for your application.
Let's define those API Handler functions next.
Define Metis API Handler
Now, let's define a function to handle the Metis API requests. We will use this function to handle all Metis API requests regardless of the specific method. Update your example2.ts file:
async function handleMetisRequest<TParams, TResponse>(method: string, params: TParams, metisEndpoint?: string): Promise<TResponse> {
    const DEFAULT_METIS_ENDPOINT = 'https://public.jupiterapi.com';
    const jupiterMethod = method.replace('metis_', '');
    const url = new URL(`${metisEndpoint || DEFAULT_METIS_ENDPOINT}/${jupiterMethod}`);
    const paramsToUse = Array.isArray(params) ? params[0] : params;

    if (typeof paramsToUse === 'object' && paramsToUse !== null) {
        Object.entries(paramsToUse as Record<string, unknown>).forEach(([key, value]) => {
            url.searchParams.append(key, String(value));
        });
    }

    const response = await fetch(url.toString(), {
        method: 'GET',
        headers: { 'Content-Type': 'application/json' },
    });

    if (!response.ok) {
        throw new Error(`Error making fetch request to ${url}: ${response.statusText}`);
    }

    const data = await response.json();
    return { result: data } as TResponse;
}
Here's what's happening in this function:
- We define a default Metis endpoint if one is not provided.
- We extract the specific method from the method passed to the transport function.
- We create a URL object with the Metis endpoint and the specific method.
- We iterate through the object's entries and append each key-value pair to the URL as a query parameter.
- We make a fetch request to the URL and return the response as a TResponse.
Worth noting here is that we have hard-coded the request as a GET request. Though this works for our demonstration, some methods require a different request type (e.g., the swap method is a POST request). You can choose to modify this function to handle different request types based on the specific method, or you could create separate handlers based on the type of request (e.g., handleMetisGetRequest, handleMetisPostRequest, etc.).
Define IPFS API Handler
Now, let's define a function to handle the IPFS API requests. We will use this function to handle the ipfs_upload method. Update your example2.ts file:
async function handleIpfsUpload<T>(params: IpfsUploadRequest, ipfsApiKey?: string): Promise<T> {
    if (!ipfsApiKey) {
        throw new Error('No IPFS API key provided');
    }

    const { filePath, fileName, fileType } = params;
    const fileContent = fs.readFileSync(filePath);
    const file = new File([fileContent], fileName, { type: fileType });
    const formData = new FormData();
    formData.append("Body", file);
    formData.append("Key", file.name);
    formData.append("ContentType", file.type);

    const url = new URL('https://api.quicknode.com/ipfs/rest/v1/s3/put-object');
    const response = await fetch(url, {
        method: 'POST',
        headers: {
            'x-api-key': ipfsApiKey,
        },
        body: formData,
        redirect: "follow",
    });

    if (!response.ok) {
        throw new Error(`Error making fetch request to ${url}: ${response.statusText}`);
    }
    const data = await response.json();

    return { result: data } as T;
}
Here's what's happening in this function:
- We check if an IPFS API key is provided (unlike the Metis API, the IPFS API does not have a public endpoint, so we throw an error if no key is provided).
- We create a File object with the file content, file name, and file type.
- We create a FormData object and append the file to it based on the IPFS Documentation.
- We create a URL object with the IPFS API endpoint for the specific method (unlike the Metis Handler we created, this handler is specific to a single method).
- We make a fetch request to the URL and return the response as a TResponse.
Update RPC Creation Function
In the previous guide, we created a function to create our PriorityFeeApi, createPriorityFeeApi. Since our new interface includes multiple add-ons, let's create a more generic function that supports our QuickNodeApi interface. Add a createAddonsApi function to your example2.ts file:
function createAddonsApi(params: CreateAddonsApiParams): Rpc<QuickNodeAddons> {
    const api = createJsonRpcApi<QuickNodeAddons>({
        requestTransformer: (request: RpcRequest<any>) => request.params[0],
        responseTransformer: (response: any) => response.result,
    });

    const transport = createQuickNodeTransport(params);

    return createRpc({ api, transport });
}
This function is very similar to the createPriorityFeeApi function we created in the previous guide. The only differences are:
- We are passing in the CreateAddonsApiParams interface instead of the CreatePriorityFeeApiParams interface (which includes our Metis and IPFS authorization keys).
- We are using the new
createQuickNodeTransportfunction to create the transport. - We are using the QuickNodeAddons interface instead of the PriorityFeeApi interface.
If we have done everything correctly, this function should return an Rpc interface that includes all of the methods from our PriorityFeeApi, MetisApi, and IpfsApi interfaces. Let's test it out!
Use the Combined Functionality
Now, let's test our new combined functionality. Replace your main function in your example2.ts file with the following code:
async function main() {
    const quickNodeRpc = createAddonsApi({
        endpoint: 'https://example.solana-mainnet.quiknode.pro/123456/', // 👈 Replace with your QuickNode Solana Mainnet endpoint
        ipfsApiKey: 'QN_REPLACE_WITH_YOUR_IPFS_API_KEY',                 // 👈 Replace with your QuickNode IPFS API key
        // metisEndpoint: ''                                             // 👈 (optional) Uncomment and replace with your Metis endpoint
    });

    try {
        const priorityFees = await quickNodeRpc.qn_estimatePriorityFees({
            account: 'JUP6LkbZbjS1jKKwapdHNy74zcZ3tLUZoi5QNyVTaV4',
            last_n_blocks: 100,
            api_version: 2
        }).send();
        console.log(`Priority Fees (Med Per CU): ${priorityFees.per_compute_unit.medium}`);
    } catch (error) {
        console.error('Error estimating priority fees:', error);
    }

    try {
        const metisQuote = await quickNodeRpc.metis_quote({
            inputMint: "EPjFWdd5AufqSSqeM2qN1xzybapC8G4wEGGkZwyTDt1v",
            outputMint: "So11111111111111111111111111111111111111112",
            amount: 10 * 1e6,
        }).send();
        console.log(`Metis Quote (lamports): ${metisQuote.outAmount}`);
    } catch (error) {
        console.error('Error getting Metis quote:', error);
    }

    try {
        const result = await quickNodeRpc.ipfs_upload({
            filePath: 'test.png',   // 👈 Replace with the path to your file
            fileName: 'test.png',   // 👈 Replace with the name of your file
            fileType: 'image/png',  // 👈 Replace with the file type of your file
        }).send();
        console.log('File uploaded successfully! CID:', result.pin.cid);
    } catch (error) {
        console.error('Error uploading file:', error);
    }
}

main().catch(console.error);
Make sure to replace the endpoint URL, IPFS API key, and file details with your actuals. You can find your QuickNode endpoint and IPFS API key in your QuickNode dashboard.
Run the Script
To run our advanced example, use the following command:
ts-node example2.ts
You should see an output with the estimated priority fees, a quote amount, and a CID for the uploaded file, e.g.:
Priority Fees (Med Per CU): 29767
Metis Quote (lamports): 77848587
File uploaded successfully! CID: QmcPq5iyjgpuW1RdGKw55fV4RvWMNZYPHCmhPGXbCfbEC3
Nice job!
What about Solana Methods?
If you are paying attention to your type guards, you might notice something unexpected about your quicknodeRpc object. You've probably noticed that Intellisense is not detecting any of the native Solana methods:
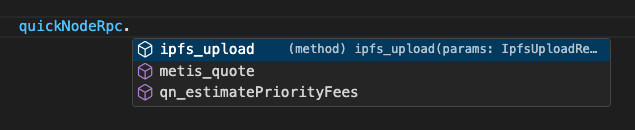
This is due to how we constructed our QuickNodeAddons interface. As-is, we are being exclusive to the methods defined in your add-ons. There are
One way to fix this is to use a Proxy object to intercept method calls and modify them before they are executed. This can be done using the Proxy class in JavaScript. Another way is to create a new interface that includes all of the methods from your add-ons and all of the native Solana methods. Let's give this a try!
Add the following imports to your example2.ts file:
import {
    // ... existing imports
    SolanaRpcApi,
    address,
} from "@solana/web3.js";
Now, create a new, more expansive type that includes all of the methods from your add-ons and all of the native Solana methods. Add the following code to your example2.ts file:
type QuickNodeSolana = SolanaRpcApi & QuickNodeAddons;
The SolanaRpcApi interface is a type that includes an interface like our add-ons for each of the native Solana methods. Now, let's update our createAddonsApi function to return a QuickNodeSolana interface instead of a QuickNodeAddons interface:
export function createQuickNodeApi(params: CreateAddonsApiParams): Rpc<QuickNodeSolana> {
    const METHODS_TO_TRANSFORM_PARAMS = [`qn_estimatePriorityFees`, `metis_quote`, `ipfs_upload`];

    const quickNodeApi = createJsonRpcApi<QuickNodeSolana>({
        requestTransformer: (request: RpcRequest<any>) => {
            if (METHODS_TO_TRANSFORM_PARAMS.includes(request.methodName)) {
                return Array.isArray(request.params) ? request.params[0] : request.params;
            } else {
                return request.params;
            }
        },
        responseTransformer: (response: any) => response.result,
    });

    const transport = createQuickNodeTransport(params);

    return createRpc({ api: quickNodeApi, transport });
}
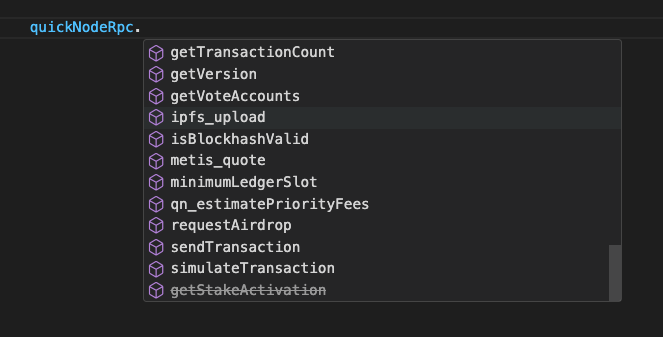
This is almost exactly what we had before, but we are now using the QuickNodeSolana interface instead of the QuickNodeAddons interface, and we are doing a check on our methods before performing the parameter transformation. This allows us to intercept and transform the parameters for our custom methods, while still allowing the params of the native Solana methods to pass through. Make sure to update your main function to call the createQuickNodeApi function, and that's it! You should now see Intellisense working for all of the native Solana methods as well as our custom methods:
Go ahead and add the following to your main function in your example2.ts file:
    try {
        const info = await quickNodeRpc.getAccountInfo(address('JUP6LkbZbjS1jKKwapdHNy74zcZ3tLUZoi5QNyVTaV4')).send();
        console.log(info.value);
    } catch (error) {
        console.error('Error getting epoch info:', error);
    }
If you don't want to upload another file, make sure to delete or comment out the ipfs_upload call in your main function. Run your script again, and you should see the outputs of your getAccountInfo call right next to those of your custom methods! 🎉
Great job!
Wrap Up
In this guide, we've expanded on our previous knowledge to integrate multiple QuickNode Add-ons, including REST APIs, into our Solana Web3.js 2.0 application. We've demonstrated how to:
- Integrate multiple QuickNode Add-ons
- Implement REST API calls within the Solana Web3.js 2.0 framework
- Combine QuickNode Add-ons with native Solana methods
This approach allows for high levels of customization to integrate various QuickNode Add-ons and APIs seamlessly. We hope you have seen that this process allows for a lot of flexibility, so bring your creativity and build something amazing! We are excited to see what you are up to—drop us a line in the QuickNode Discord or on Twitter, and let us know what you've built!
Keep Building
To further enhance your Solana development skills:
- Add more methods to your Metis and IPFS API interfaces
- Explore other QuickNode Add-ons and integrate them into your application
- Create your own QuickNode Function to integrate your add-ons into your application
- Implement error handling and retries in your transport function
Additional Resources
- Sample Code for this Guide
- Solana Web3.js 2.0 Blog
- QuickNode Marketplace Solana Add-ons
- Solana Web3.js 2.0 GitHub
- Solana Web3.js Pricples for a Rewrite
- 🎥 Introduction the New Solana Web3.js 2.0 SDK
We ❤️ Feedback!
Let us know if you have any feedback or requests for new topics. We'd love to hear from you.