12 min read
Overview
QuickNode Functions allow developers to quickly build and deploy serverless functions that can interact with blockchain data. In this guide, we'll walk you through creating a QuickNode Function using TypeScript to manage dynamic Solana wallet portfolios and fetch their balances.
What You Will Do
In this guide, you will:
- Set up a TypeScript development environment
- Create a QuickNode Function for managing Solana wallet portfolios using QuickNode's Key-Value Store
- Build and deploy your function
- Test your function using curl commands
What You Will Need
- A QuickNode account
- Node.js installed (version 20 or higher)
- Typescript experience and ts-node installed
- Basic knowledge of QuickNode Functions and QuickNode Key-Value Store
- Basic knowledge of Solana
Set Up Your Environment
First, let's create a new project directory and initialize it:
mkdir solana-portfolio-manager && cd solana-portfolio-manager
Next, initialize your project with the following command:
npm init -y
Now, let's install the necessary dependencies:
npm install @solana/web3.js@1
Create a tsconfig.json file in your project root:
npx tsc --init
Open tsconfig.json and update it to include:
{
  "compilerOptions": {
    "target": "es2020",
    "module": "commonjs",
    "outDir": "./",
    "rootDir": "./src",
    "strict": true,
    "esModuleInterop": true
  },
  "include": ["src/**/*"],
  "exclude": ["node_modules"]
}
Create a src directory and an index.ts file inside it:
mkdir src && echo > src/index.ts
Build Your QuickNode Function
Let's start by creating our function. The function will manage a dynamic list of Solana wallet addresses. It will allow users to create a wallet list, update the list by adding/removing addresses, retrieve the list, and fetch the balances of the wallets in the list. To enable multiple instructions in a single function, we'll use a switch statement to handle the different instructions.
Import Dependencies and Define Constants
Open src/index.ts in your code editor and add the following code:
import { Connection, PublicKey, LAMPORTS_PER_SOL } from '@solana/web3.js';

interface QNLib {
    qnUpsertList: (key: string, options: { add_items?: string[], remove_items?: string[] }) => Promise<any>;
    qnGetList: (key: string) => Promise<string[]>;
}
declare const qnLib: QNLib;
const ENDPOINT = 'https://example.solana-mainnet.quiknode.pro/123456'; // 👈 Replace with your endpoint URL
You can now access Logs for your RPC endpoints, helping you troubleshoot issues more effectively. If you encounter an issue with your RPC calls, simply check the logs in your QuickNode dashboard to identify and resolve problems quickly. Learn more about log history limits on our pricing page.
Here, we are importing a few dependencies from the @solana/web3.js library - we will use these to validate user inputs and fetch data from the Solana blockchain. We are also defining a QNLib interface which will allow us to ensure Type safety when using the qnLib object available in the global scope of QuickNode Functions.
Finally, we define our ENDPOINT variable with your own endpoint URL. You can find this in the QuickNode Dashboard under the Endpoints tab.
Define Types and Interfaces
Now that we have our dependencies and constants defined let's define the types and interfaces we will use in our function to help with type safety and better code organization. Below your constants, add the following code:
type Instruction = 'createPortfolio' | 'updatePortfolio' | 'getPortfolio' | 'getPortfolioBalances';

interface UserData {
    instruction: Instruction;
    portfolioName: string;
    addAddresses?: string[];
    removeAddresses?: string[];
}

interface FunctionParams {
    user_data: UserData;
}

interface FunctionResult {
    message: string;
    portfolioName: string;
    addresses?: string[];
    balances?: { address: string; balance: number }[];
    error?: string;
}
Let's walk through what each of these types and interfaces are responsible for:
Instruction: This is a Type that defines the different instructions that can be executed by the function. In this case, we define four instructions:createPortfolio,updatePortfolio,getPortfolio, andgetPortfolioBalances.UserData: This interface defines the data that will be passed to the function. It contains three properties:instruction(an Instruction),portfolioName(a unique identifier for the portfolio), andaddAddressesandremoveAddresses(Solana wallet addresses).FunctionParams: This interface defines the parameters that will be passed to the function. It contains one property:user_dataof typeUserData.FunctionResult: This interface defines the result that the function will return. All responses must include amessageandportfolioNameproperty. Depending on the instruction, the response may also includeaddresses,balances, anderrorproperties.
Add Helper Functions
Let's create two helper functions to validate user inputs and handle errors. Add the following code to the bottom of your index.ts file:
function isValidSolanaAddress(address: string): boolean {
    try {
        new PublicKey(address);
        return true;
    } catch (error) {
        return false;
    }
}

function validateInput(params: FunctionParams): void {
    if (!ENDPOINT) {
        throw new Error('SOLANA_RPC_ENDPOINT is not set');
    }

    const validInstructions: Instruction[] = ['createPortfolio', 'updatePortfolio', 'getPortfolio', 'getPortfolioBalances'];
    if (!validInstructions.includes(params.user_data.instruction)) {
        throw new Error(`Invalid instruction: ${params.user_data.instruction}. Must be one of: ${validInstructions.join(', ')}`);
    }

    if (!params.user_data.portfolioName) {
        throw new Error('Portfolio name is required');
    }

    if (params.user_data.instruction === 'updatePortfolio') {
        if (!params.user_data.addAddresses && !params.user_data.removeAddresses) {
            throw new Error('At least one of addAddresses or removeAddresses is required for updatePortfolio instruction');
        }

        if (params.user_data.addAddresses) {
            const invalidAddAddresses = params.user_data.addAddresses.filter(addr => !isValidSolanaAddress(addr));
            if (invalidAddAddresses.length > 0) {
                throw new Error(`Invalid Solana addresses: ${invalidAddAddresses.join(', ')}`);
            }
        }
    }
}
Here, we are defining two helper functions:
isValidSolanaAddress: used to validate user input for Solana addresses. It checks if the input is a valid Solana address by trying to create a newPublicKeyobject from the input string. If the input is not a valid Solana address, it returnsfalse. Otherwise, it returnstrue.validateInput: used to validate the endpoint and user input for the portfolio name and the instructions. It checks if a valid instruction is provided and if the portfolio name is not empty. If theupdatePortfolioinstruction is provided, it also checks if at least one of theaddAddressesorremoveAddressesis provided. If adding a new address to the portfolio, it also checks if the addresses are valid Solana addresses. If any of these conditions are not met, it throws an error.
Define Instruction Handlers
Next, we will define an instruction handler for each instruction. Add the following code to the bottom of your index.ts file:
async function createPortfolio(portfolioName: string): Promise<FunctionResult> {
    await qnLib.qnUpsertList(portfolioName, { add_items: [] });
    return {
        message: `Portfolio ${portfolioName} created successfully.`,
        portfolioName
    };
}

async function updatePortfolio(portfolioName: string, addAddresses: string[] = [], removeAddresses: string[] = []): Promise<FunctionResult> {
    await qnLib.qnUpsertList(portfolioName, { add_items: addAddresses, remove_items: removeAddresses });
    const updatedPortfolio = await qnLib.qnGetList(portfolioName);
    return {
        message: `Updated portfolio ${portfolioName}. Added ${addAddresses.length} addresses, removed ${removeAddresses.length} addresses.`,
        portfolioName,
        addresses: updatedPortfolio
    };
}

async function getPortfolio(portfolioName: string): Promise<FunctionResult> {
    const addresses = await qnLib.qnGetList(portfolioName);
    return {
        message: `Retrieved portfolio ${portfolioName}.`,
        portfolioName,
        addresses
    };
}

async function getPortfolioBalances(portfolioName: string): Promise<FunctionResult> {
    const addresses = await qnLib.qnGetList(portfolioName);

    // @ts-ignore - Already validated in validateInput
    const connection = new Connection(ENDPOINT);

    const balances = await Promise.all(
        addresses.map(async (address) => {
            const publicKey = new PublicKey(address);
            const balance = await connection.getBalance(publicKey);
            return {
                address,
                balance: balance / LAMPORTS_PER_SOL
            };
        })
    );

    return {
        message: `Retrieved balances for portfolio ${portfolioName}.`,
        portfolioName,
        balances
    };
}
Here, we are defining four instruction handlers:
createPortfolio: creates a new portfolio with an empty list of addresses using theqnLib.upsertListmethod.updatePortfolio: updates an existing portfolio by adding or removing addresses using theqnLib.upsertListmethod.getPortfolio: retrieves the list of addresses for a given portfolio using theqnLib.getListmethod.getPortfolioBalances: retrieves the balances for a given portfolio using the@solana/web3.jslibrary.
Define Main Function
Now that we have defined our helper functions and instruction handlers, let's define the main function that will serve as the entry point. Add the following code to the bottom of your index.ts file:
export async function main(params: FunctionParams): Promise<FunctionResult> {
    try {
        validateInput(params);

        const { instruction, portfolioName, addAddresses, removeAddresses } = params.user_data;

        switch (instruction) {
            case 'createPortfolio':
                return await createPortfolio(portfolioName);
            case 'updatePortfolio':
                return await updatePortfolio(portfolioName, addAddresses, removeAddresses);
            case 'getPortfolio':
                return await getPortfolio(portfolioName);
            case 'getPortfolioBalances':
                return await getPortfolioBalances(portfolioName);
            default:
                throw new Error('Invalid instruction');
        }
    } catch (error) {
        console.error('Error:', error);
        return {
            message: 'An error occurred',
            portfolioName: params.user_data.portfolioName,
            error: error instanceof Error ? error.message : String(error)
        };
    }
}
Here, we simply validate our input parameters and then call the appropriate instruction handler based on the instruction property in the user_data object. If any errors occur during validation or execution, we catch them and return a FunctionResult object with an error property.
Create Build and Package Scripts
Now that we have our function code let's set up the build process. Add the following script to your package.json:
  "scripts": {
    "build": "tsc",
  },
This will create a build script will compile your TypeScript code and create an index.js file in your project root. This will be the entry point for our function.
Build and Package Your Function
To build and package your Function, run:
npm run build
This will compile your TypeScript code and create an index.js file in your project root.
Deploy Your Function to QuickNode
Now that you have built your Function, you can deploy it to QuickNode. Head over to the Function's Page on your QuickNode Dashboard and click the + Create Function button.
Set the Environment to Node.js 20 and click Create Function.
You can define your Function's name and description and use the default setup:
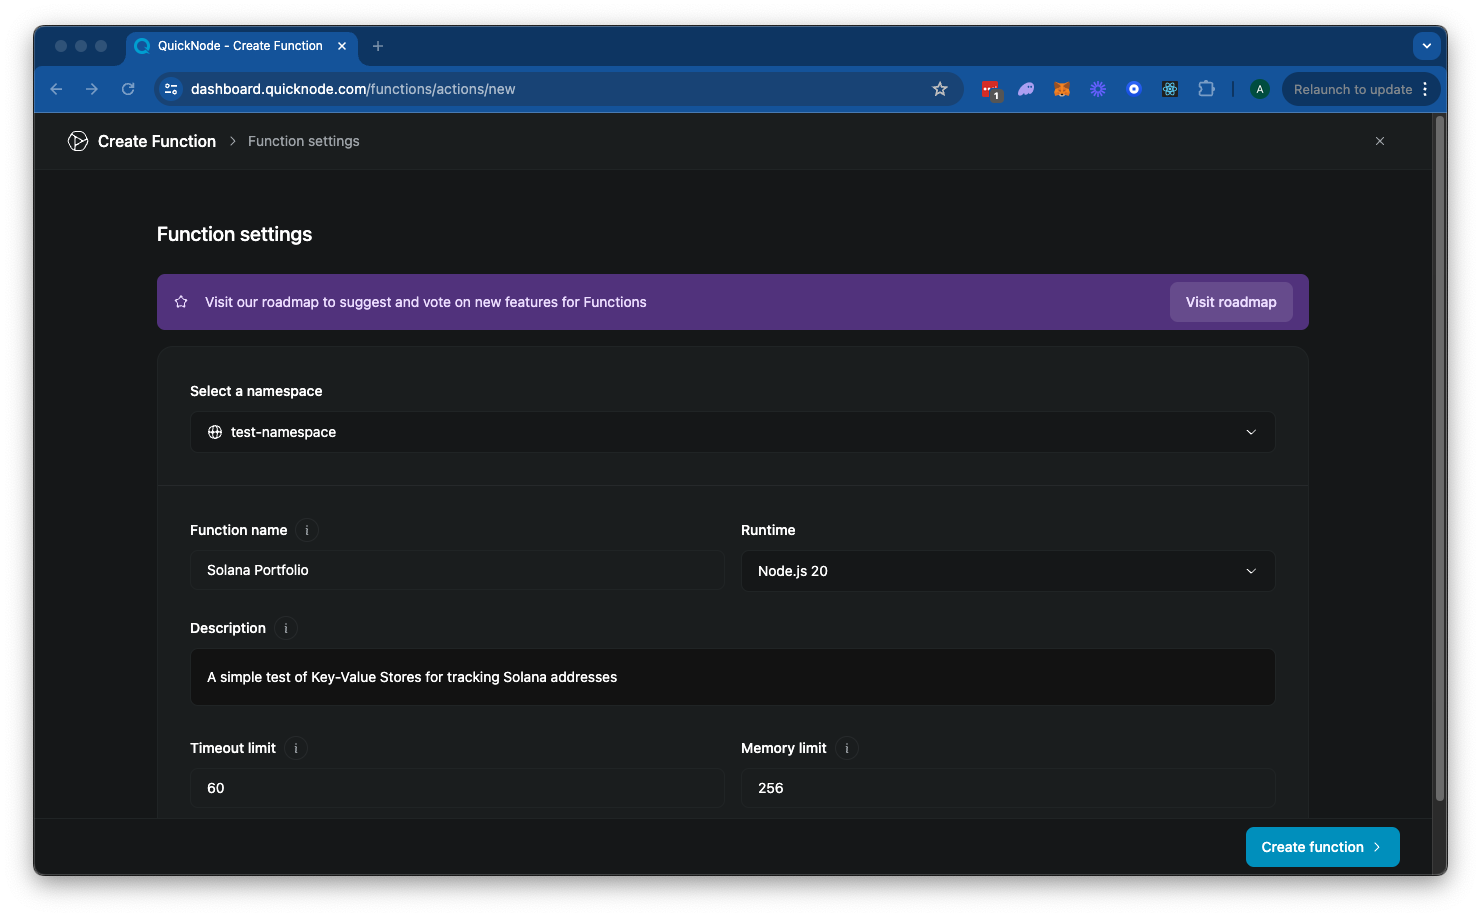
Click Create Function to advance to the next step.
Here, you will need to select Code from the dropdown menu. Then, you can paste the contents of the index.js file you just created. When you are done, click Save & Close. You can ignore the "Testing Parameters" section, which includes chains we will not use in this guide.
Great job! Your Function is now deployed to QuickNode. You should see something like this:
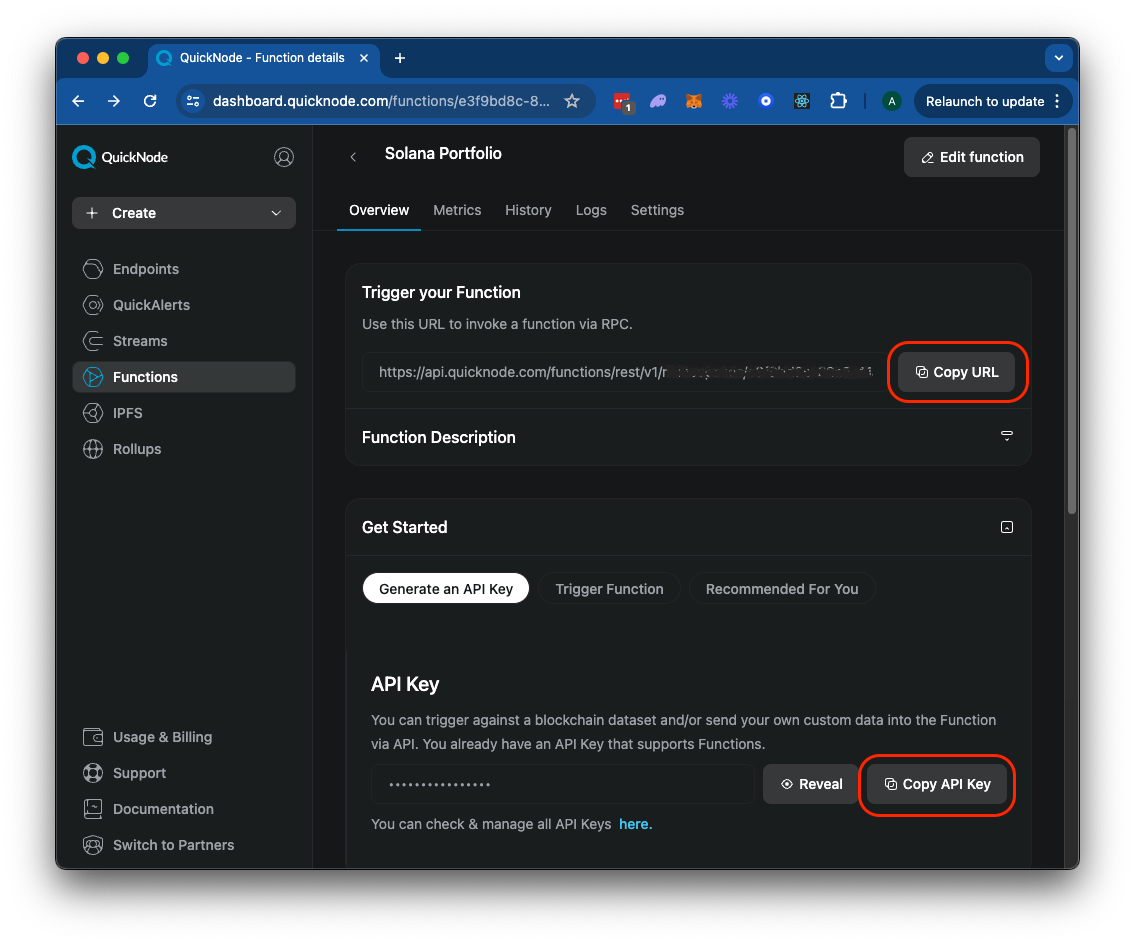
Let's test it out (you will need your Function's endpoint URL and API key - see image above).
Test Your QuickNode Function
Now that your Function is deployed, you can test it using curl commands or any tool like Postman. Replace YOUR_FUNCTION_URL and YOUR_API_KEY with your actual Function URL and API key from QuickNode.
Create a Portfolio
Go ahead and create a portfolio with the name "TEST". Note that just like our Function, our parameters are passed through the user_data object. We define our instruction as createPortfolio and our portfolioName as TEST:
curl -X POST "YOUR_FUNCTION_URL?result_only=true" \
  -H "accept: application/json" \
  -H "Content-Type: application/json" \
  -H "x-api-key: YOUR_API_KEY" \
  -d '{
    "user_data": {
      "instruction": "createPortfolio",
      "portfolioName": "TEST"
    }
  }'
Note that we include ?result_only=true in the URL to only return the result of the function call.
You should see a response like this:
{
    "message": "Portfolio TEST created successfully.",
    "portfolioName": "TEST"
}
Add Addresses to a Portfolio
Now let's add a couple of addresses to our portfolio. Note that we are using the updatePortfolio instruction and passing in an array of addresses to add to our portfolio. Feel free to replace the address below with one or more of your own:
curl -X POST "YOUR_FUNCTION_URL?result_only=true" \
  -H "accept: application/json" \
  -H "Content-Type: application/json" \
  -H "x-api-key: YOUR_API_KEY" \
  -d '{
    "user_data": {
      "instruction": "updatePortfolio",
      "portfolioName": "TEST",
      "addAddresses": ["7v91N7iZ9mNicL8WfG6cgSCKyRXydQjLh6UYBWwm6y1Q"]
    }
  }'
Note that we are using the same portfolioName as before. You should see a response like this:
{
    "addresses": [
        "7v91N7iZ9mNicL8WfG6cgSCKyRXydQjLh6UYBWwm6y1Q"
    ],
    "message": "Updated portfolio TEST. Added 1 addresses, removed 0 addresses.",
    "portfolioName": "TEST"
}
Get Portfolio Balances
Finally, let's get the balances for our portfolio. Note, we are using the getPortfolioBalances instruction and passing in the same portfolioName as before ("TEST"):
curl -X POST "YOUR_FUNCTION_URL?result_only=true" \
  -H "accept: application/json" \
  -H "Content-Type: application/json" \
  -H "x-api-key: YOUR_API_KEY" \
  -d '{
    "user_data": {
      "instruction": "getPortfolioBalances",
      "portfolioName": "TEST"
    }
  }'
You should see a response like this:
{
    "balances": [
        {
            "address": "7v91N7iZ9mNicL8WfG6cgSCKyRXydQjLh6UYBWwm6y1Q",
            "balance": 0
        }
    ],
    "message": "Retrieved balances for portfolio TEST.",
    "portfolioName": "TEST"
}
Nice job!
Conclusion
Congratulations! You've successfully created a QuickNode Function using TypeScript to manage Solana wallet portfolios. This function demonstrates how to interact with QuickNode's Key-Value Store and the Solana blockchain to create, update, and retrieve portfolio information.
To learn more about QuickNode Functions and explore other capabilities, check out our documentation and join our Discord community for support and discussions.
Want to keep building with Functions? Check out our Functions Library for more examples and inspiration.
We ❤️ Feedback!
Let us know if you have any feedback or requests for new topics. We'd love to hear from you.