14 min read
Overview
Managing the high volume of data that Solana produces can be a challenge, and often, you only need a very specific subset of block data. Streams is a powerful tool that allows you to retrieve and filter near real-time or historical data from Solana and send it to your destination of choice. This guide will show you how to use Streams to retrieve near real-time Solana program data and Filters to selectively parse the data you need and send it to your Webhook destination.
Solana Streams is great for near real-time delivery of raw Solana data and sequential backfills pushed directly to your destination. If your use case requires real-time or latency-critical workflows, we recommend that you utilize the Yellowstone gRPC marketplace add-on instead.
Check out a quick video demo to see Solana Streams in action.
Let's get started!
Free plan users can only create Solana Streams that follow the tip of the blockchain in real time. Historical backfills are only available on paid plans.
What You Will Do
- Create a Stream on QuickNode
- Filter incoming Stream data to retrieve new token creations on Pump.fun
- Create a local server to receive the filtered data
- Route the filtered data to your Webhook destination
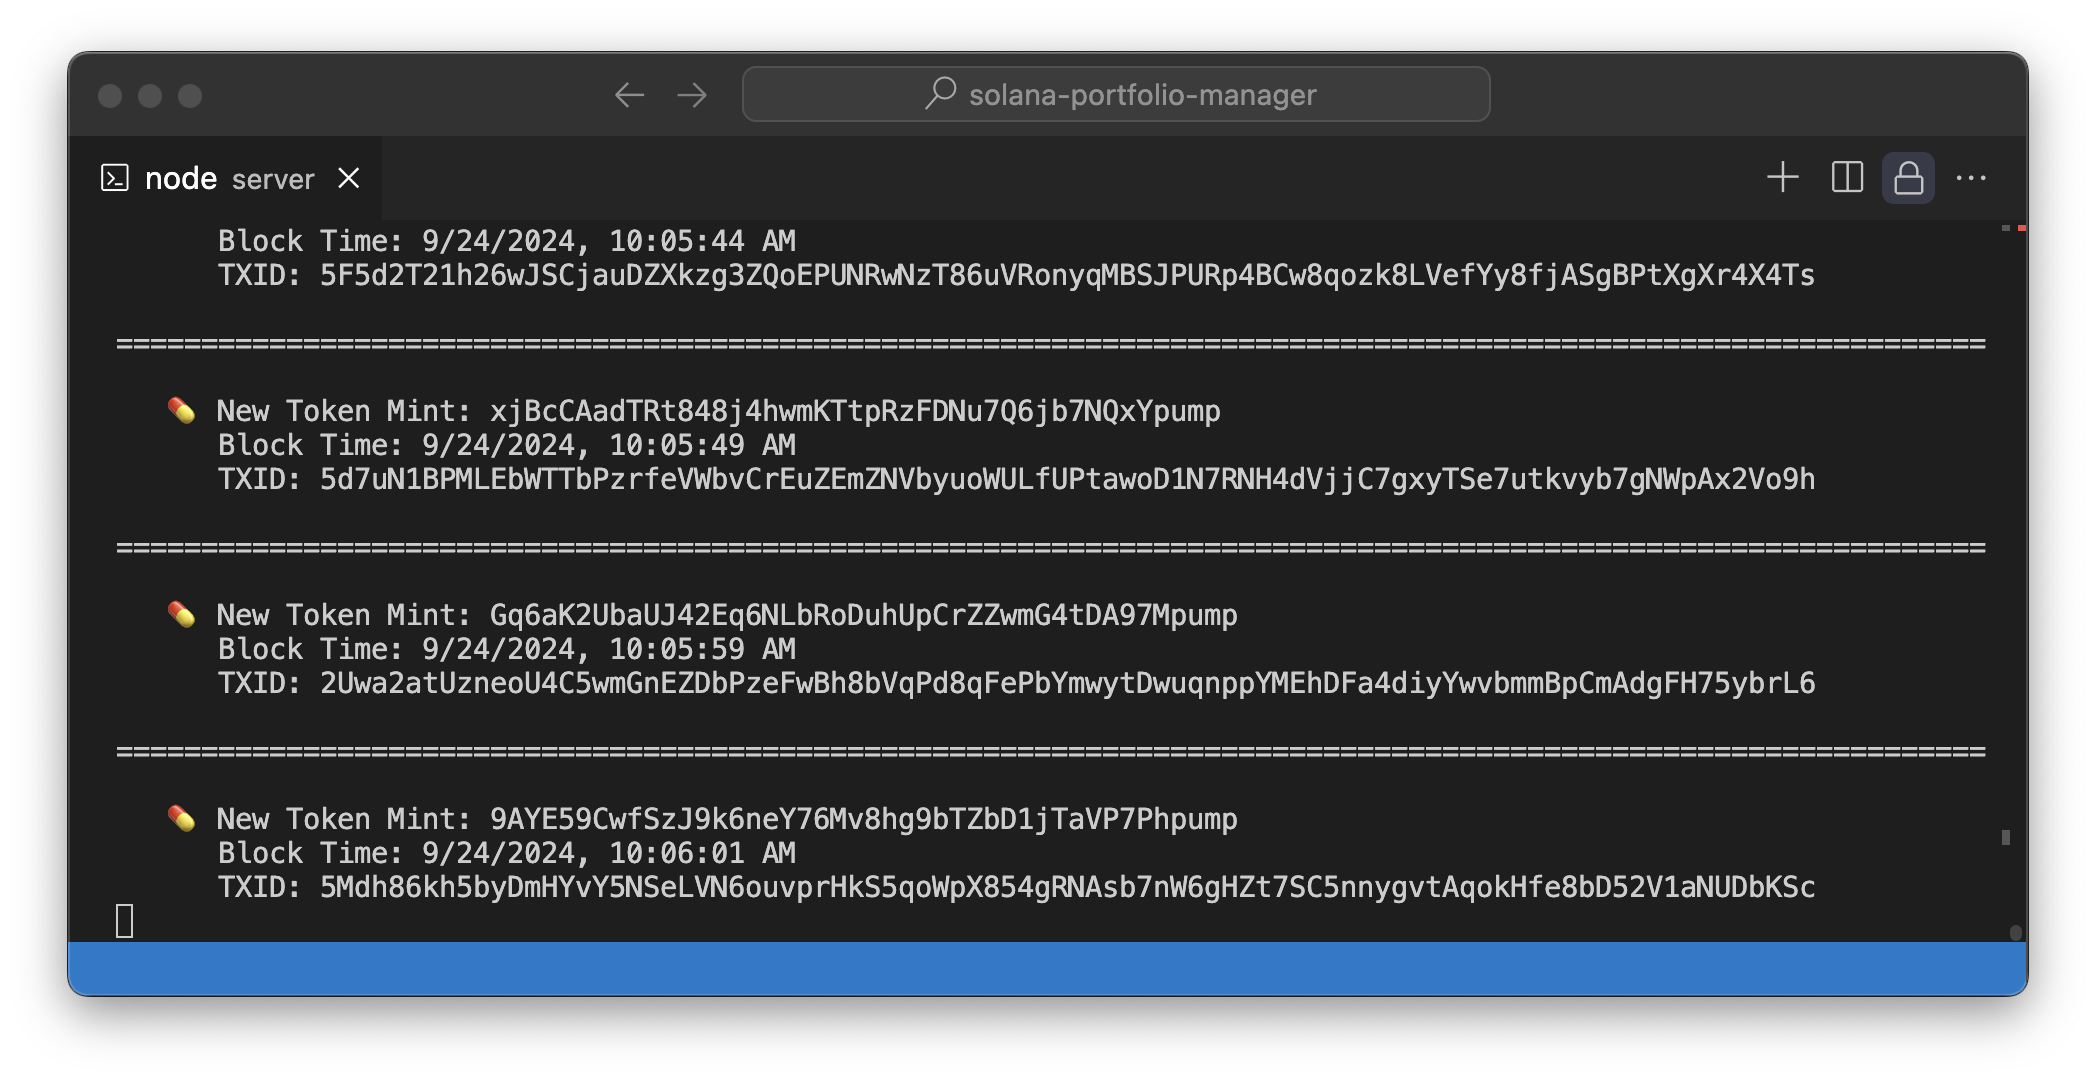
Ultimately, our server will log new Pump.fun mints like this:
What You Will Need
- A QuickNode account
- Node.js installed on your local machine
- ngrok for exposing your local server publicly
- Solana Fundamentals and knowledge of IDLs will be helpful to understand the Solana program data you will be receiving
Step 1: Create a Stream
From your QuickNode dashboard, navigate to the Streams page and click the "+ Create Stream" button, or create one here.
Select "Solana" and "Mainnet" from the settings card:
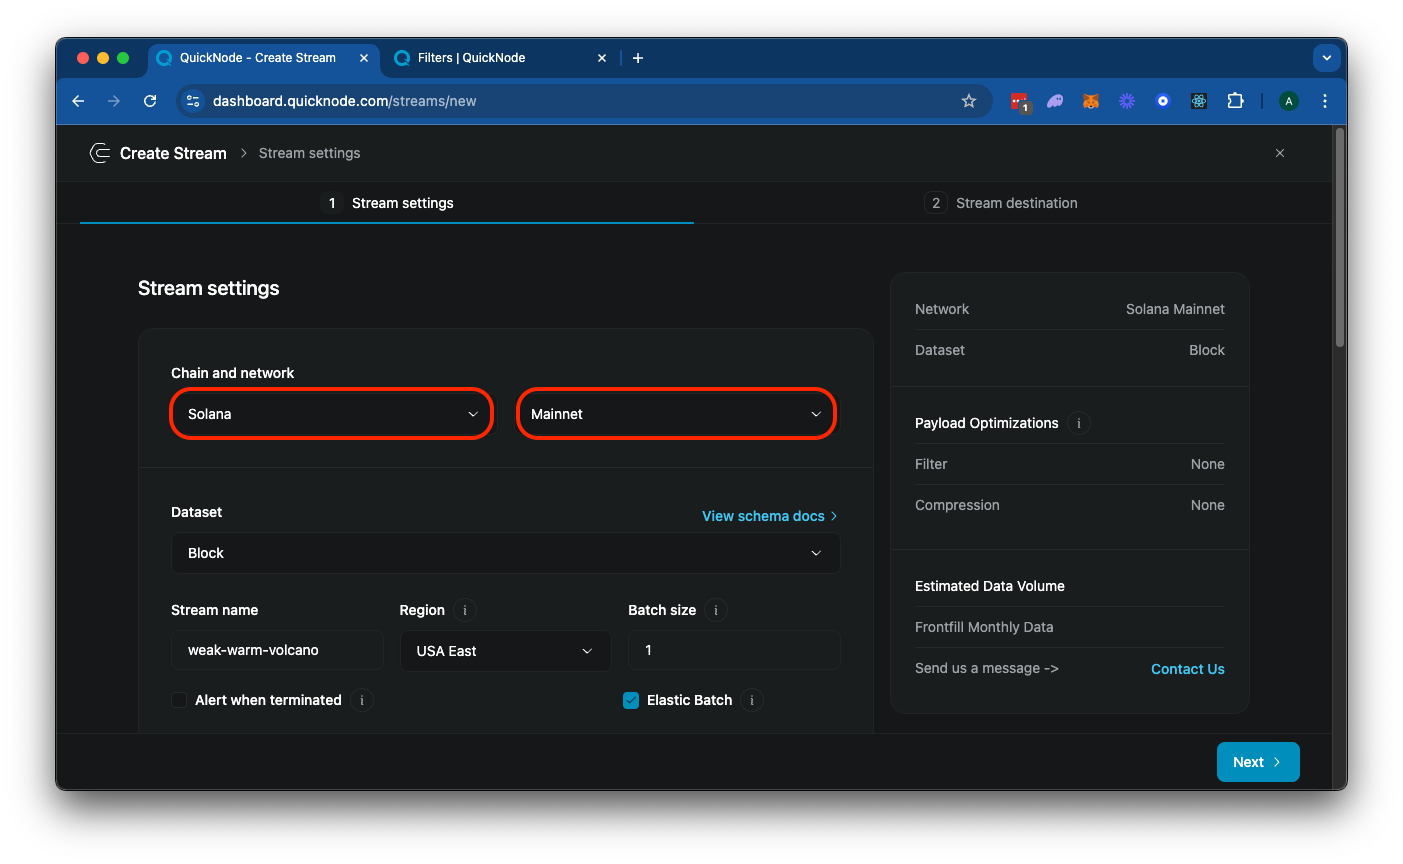
Feel free to add a unique name to your Stream or just use the randomly generated one.
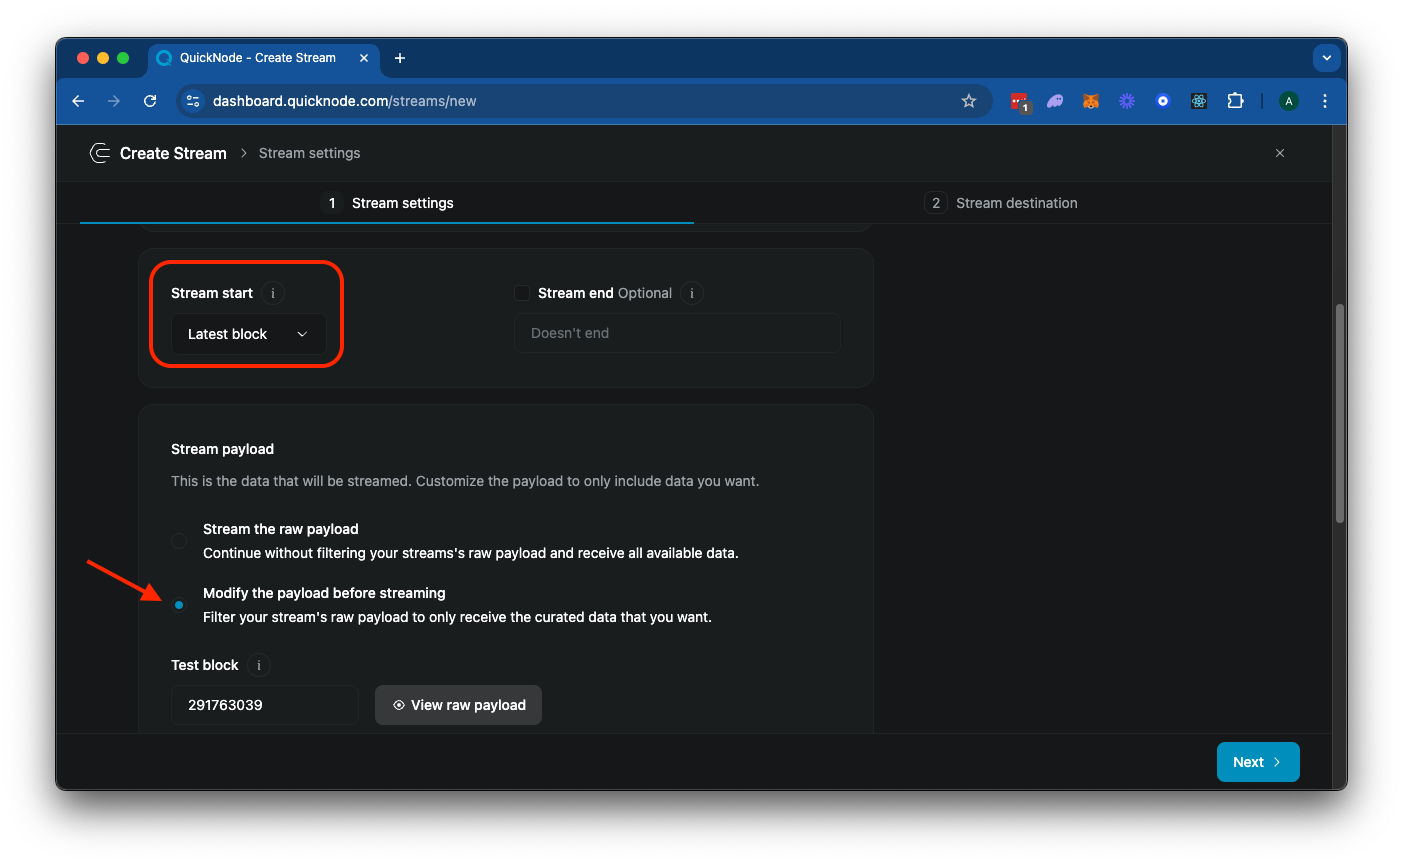
Next, scroll down to the "Stream Start" option, and make sure to select "Latest Block" (this is used for streaming current blocks going forward). Alternatively, if you want to start from a specific block height, you can select "Block #" and enter the block height you want to start from (this option is available on paid plans for Solana Streams). If you are building a Stream that has a fixed end block, you can also enter a "Stream End" (we will leave that blank since we just want to continuously stream new tokens as they are created).
Next, select "Modify the payload before streaming". This is a really important step as you are only billed on the amount of data you send to your destination. Our filter will allow us to:
- Filter only the data you need (in this case, we will filter for new tokens created using the Pump.fun program)
- Modify the returned data to your liking (in this case, we will only return the token mint address, transaction signature, and timestamp)
Alternatively, if you do not filter your data, you will receive all block data for every block, which can be very large and expensive. Block data returned is from Solana's getBlock RPC method and returns a JSON object like this:
{
  "blockHeight": 270646103,
  "blockTime": 1727197869,
  "blockhash": "52egMfezPu8MfzMc1ZPzZAaR6o7ZuJ4633VQPCyDbotJ",
  "parentSlot": 291763038,
  "previousBlockhash": "GG8Y7BEvZf3CRixX5k8GraDSkofcMLC9mXAqteuwKR7d",
  "transactions": [
    /* ... all transactions in the block ... */
  ],
}
Next, you should see a JavaScript code editor for your main function. This is the entry point for your Stream's filter (check out our docs for more information on filters). The default code is:
function main(stream) {
  const data = stream.data

  return data;
}
You can now access Logs for your RPC endpoints, helping you troubleshoot issues more effectively. If you encounter an issue with your RPC calls, simply check the logs in your QuickNode dashboard to identify and resolve problems quickly. Learn more about log history limits on our pricing page.
The stream object includes the data and metadata fields. The data field contains the payload data, and the metadata field contains the metadata of the Stream. Go ahead and click "▶️ Run Test" to test your Stream. Because Solana blocks are quite large, this will take a few seconds to load. Eventually, it should effectively return the block data for the specified "Test Block":
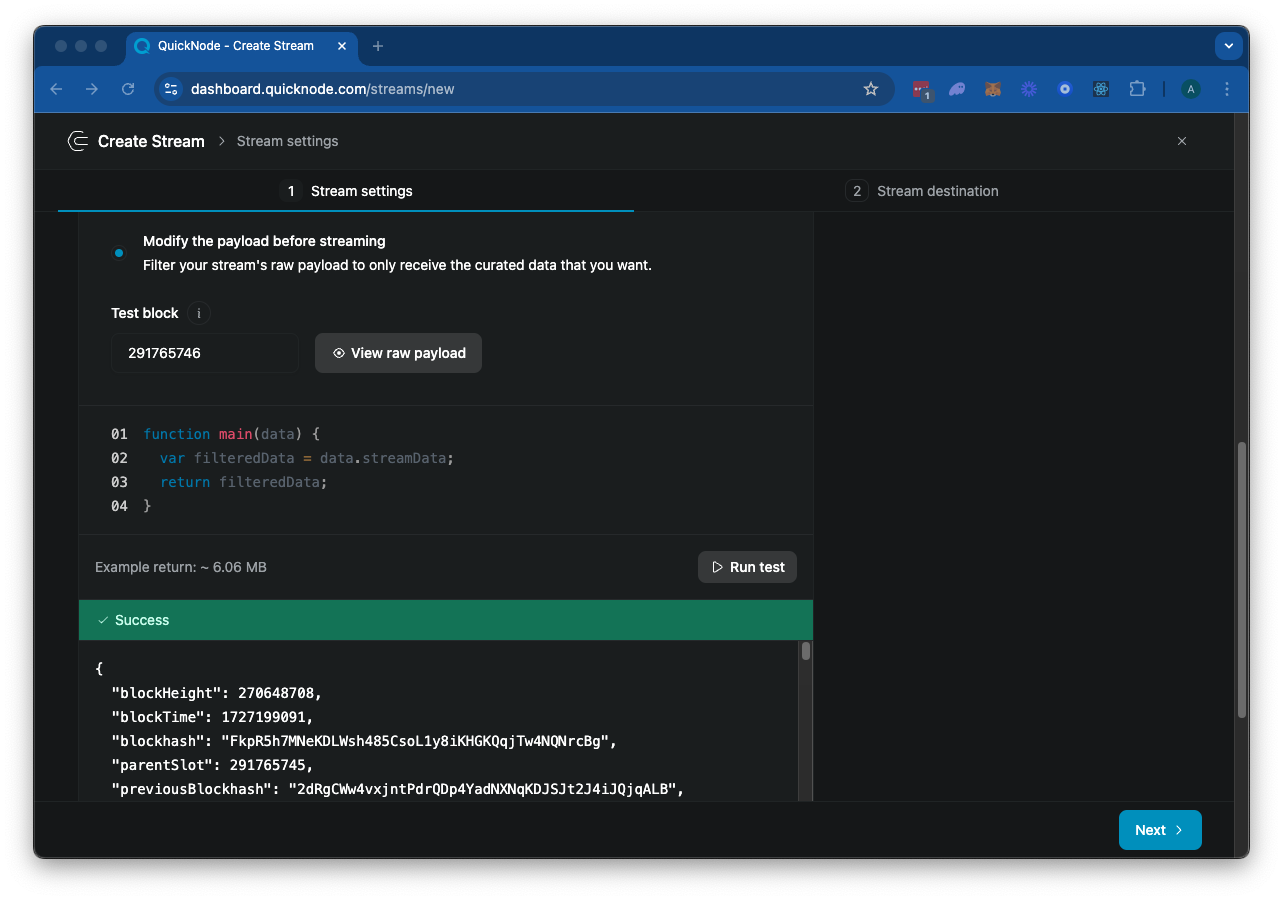
Feel free to scroll through the response. There's quite a lot there--let's see if we can filter it down to just the data we need.
Step 2: Filter the Stream Data
So we have A LOT of data in our block. Let's think about how we can filter this down to just show us the data we want to see. For the purposes of this example, let's plan on our payload including a matchedTransactions array that contains the signature, blockTime, and mint for each transaction:
{
  "matchedTransactions": [
    {
      "signature": "string",
      "blockTime": "string",
      "accounts": {
        "mint": "string"
      }
    }
  ]
}
So let's think about what our filter will need to do:
- Filter out failed transactions (the raw block data will include failed transactions)
- Filter for transactions that include an instruction that invokes the Pump.fun program (6EF8rrecthR5Dkzon8Nwu78hRvfCKubJ14M5uBEwF6P)
- Filter those transactions to only include those that invoke the Pump.fun
createinstruction - Finally, after filtering down our data, we will need to format transaction data to fit our payload
Let's create it.
Create Entry Point
Inside of your Streams page, replace the existing main function with the following:
function main(stream) {
    try {
        const data = stream.data[0];
        if (!data?.transactions?.length) {
            return { error: 'Invalid or missing stream' };
        }

        const matchedTransactions = data.transactions
            .filter(matchesFilter)
            .map(tx => formatTransaction(tx, data));

        if (matchedTransactions.length === 0) {
            return null;
        }
        return { matchedTransactions };
    } catch (error) {
        console.error('Error in main function:', error);
        return { error: error.message, stack: error.stack };
    }
}
Here's a simple function that does exactly what we just described:
- First, we are making sure the Stream data is valid by throwing an error if no data is received
- Then we are filtering the transactions by using a
matchesFilterfunction - Then we are mapping the filtered transactions to a new format using a
formatTransactionfunction - Finally, we are returning the formatted transactions if there are any
Define Constants
Before we define our utility functions, let's define some constants. These will be used to define our filter and account inclusions (and you can adjust these later to support your own use cases). Above the main function, add the following constants:
const BASE58_ALPHABET = '123456789ABCDEFGHJKLMNPQRSTUVWXYZabcdefghijkmnopqrstuvwxyz';
const PUMP_FUN_PROGRAM_ID = '6EF8rrecthR5Dkzon8Nwu78hRvfCKubJ14M5uBEwF6P';
const PUMP_FUN_CREATE_IX_DISCRIMINATOR = [24, 30, 200, 40, 5, 28, 7, 119];
const FILTER_CONFIG = {
    programIds: [PUMP_FUN_PROGRAM_ID],
    skipFailed: true,
    instructionDiscriminators: [PUMP_FUN_CREATE_IX_DISCRIMINATOR]
};
const ACCOUNTS_TO_INCLUDE = [{
    name: "mint",
    index: 0
}];
Let's explain what each of these are:
BASE58_ALPHABET: This constant defines the base58 alphabet. Solana uses base58 encoding to represent Solana addresses, which are strings of characters. We will use this to decode instruction discriminators.PUMP_FUN_PROGRAM_ID: This is the Pump.fun program address.PUMP_FUN_CREATE_IX_DISCRIMINATOR: This is the instruction discriminator for thecreateinstruction in the Pump.fun program. If you did not already have a discriminator for your target instruction, you could check out this helpful Solana StackExchange answer to learn how to find it.FILTER_CONFIG: This object defines the filter configuration for our Stream. It includes the program IDs to filter on, whether to skip failed transactions and the instruction discriminators to filter on. We have set this up so you can add programs or instructions to your filter as needed.ACCOUNTS_TO_INCLUDE: This is an array of objects that defines the accounts to include in the transaction data. In this case, we are only interested in themintaccount of the transaction. We are specifying the expected index of the account in the instruction data. In this case, we know thatmintis the first account in thecreateinstruction (found from the program's IDL, here).
Great. Now we just need to define a few utility functions to make our Stream work.
Define Utility Functions
First, we will need our matchesFilter function. This function will filter transactions based on our filter configuration. We will also create a reusable matchesInstructionDiscriminator function to match the instruction discriminators in our filter configuration. Add the following below your main function:
function matchesFilter(tx) {
    if (FILTER_CONFIG.skipFailed && tx.meta?.err !== null) {
        return false;
    }

    const programIds = new Set(tx.transaction.message.instructions.map(ix => ix.programId));
    if (!FILTER_CONFIG.programIds.some(id => programIds.has(id))) {
        return false;
    }

    return tx.transaction.message.instructions.some(matchesInstructionDiscriminator);
}

function matchesInstructionDiscriminator(ix) {
    if (!ix?.data) return false;
    const decodedData = decodeBase58(ix.data);
    return FILTER_CONFIG.instructionDiscriminators.some(discriminator =>
        discriminator.length === 8 && discriminator.every((byte, index) => byte === decodedData[index])
    );
}
The matchesFilter performs three checks:
- If the
skipFailedflag is set totrueand the transaction has an error, we will returnfalseto skip the transaction - If the transaction does not match the program IDs in our filter configuration, we will return
falseto skip the transaction - If the transaction matches the program IDs and instruction discriminators, we will return
trueto include the transaction
Next, we will define our matchesInstructionDiscriminator function. This function will match the instruction discriminators in our filter configuration. This is done by first decoding the instruction data using the decodeBase58 function, then checking if the discriminator matches one of the expected discriminators. Let's go ahead and define the decodeBase58 function. Below your matchesFilter function, add the following:
function decodeBase58(encoded) {
    if (typeof encoded !== 'string') return [];
    const result = [];
    for (let i = 0; i < encoded.length; i++) {
        let carry = BASE58_ALPHABET.indexOf(encoded[i]);
        if (carry < 0) return []; // Invalid character, return empty array
        for (let j = 0; j < result.length; j++) {
            carry += result[j] * 58;
            result[j] = carry & 0xff;
            carry >>= 8;
        }
        while (carry > 0) {
            result.push(carry & 0xff);
            carry >>= 8;
        }
    }
    // Add leading zeros
    for (let i = 0; i < encoded.length && encoded[i] === '1'; i++) {
        result.push(0);
    }
    return result.reverse();
}
The decodeBase58 function converts a Base58 encoded string back into its original byte array. Here's how it works:
- It iterates through each character in the input string.
- For each character, it finds its numeric value in the Base58 alphabet.
- It uses a carry-based algorithm to build up the bytes of the original data.
- It handles leading zeros (represented as '1' in Base58) by adding zero bytes at the end.
- Finally, it reverses the resulting array to get the correct byte order.
This function is crucial for decoding instruction data in Solana transactions, allowing us to compare it with expected discriminators in our filter configuration.
Finally, let's define our formatTransaction function to clean up our payload. Add the following to the bottom of your code block:
function formatTransaction(tx, stream) {
    const matchingInstruction = tx.transaction.message.instructions.find(matchesInstructionDiscriminator);
    const includedAccounts = ACCOUNTS_TO_INCLUDE.reduce((acc, { name, index }) => {
        acc[name] = matchingInstruction.accounts[index];
        return acc;
    }, {});

    return {
        signature: tx.transaction.signatures[0],
        blockTime: stream.blockTime,
        accounts: includedAccounts
    }
}
This function takes in a transaction and the Stream data and then finds the matching instruction in the transaction using the matchesInstructionDiscriminator function. It then extracts the accounts specified in the ACCOUNTS_TO_INCLUDE array (meaning you could include additional accounts if you wanted to) and returns a new object with the signature, block time, and accounts included.
Test Your Stream
If you scroll up above the code block, you will see a field "Test Block". This is the block number that we will use to test our Stream. In this case, I've found a block that I know has a successful create transaction in it. Change the field to "291788725" and then click "▶️ Run Test". You should see the following response:
{
  "matchedTransactions": [
    {
      "accounts": {
        "mint": "AWcvL1GSNX8VDLm1nFWzB9u2o4guAmXM341imLaHpump"
      },
      "blockTime": 1727209327,
      "signature": "4vzEaCkQnKym4TdDv67JF9VYMbvoMRwWU5E6TMZPSAbHJh4tXhsbcU8dkaFey1kFn6ZLQ2PMVzxb8zaexuFrii7q"
    }
  ]
}
Great job! This demonstrates what our payload would look like for this block! Click "Next" in the bottom right corner to move on to the next step. You'll notice the return data size here is ~274 B compared to ~4.5 MB for the unfiltered block data!
Step 3: Create a Webhook Server
Now that we have our Stream set up, we need a way to receive and process the data. We'll create a simple Express server that listens for incoming webhooks from our Stream.
Set Up Your Project
First, let's set up a new Node.js project:
- Create a new directory for your project and navigate into it:
mkdir pump-fun-stream && cd pump-fun-stream
- Initialize a new Node.js project:
npm init -y
- Install the required dependencies:
npm install express body-parser
Create the Server
Now, let's create our server. Create a new file called server.js and add the following code:
const express = require('express');
const bodyParser = require('body-parser');

const app = express();
const port = 3000;

app.use(bodyParser.json());

app.post('/webhook', (req, res) => {
    if (req.body && req.body.matchedTransactions && Array.isArray(req.body.matchedTransactions)) {
        req.body.matchedTransactions.forEach(transaction => {
                const { accounts: { mint }, blockTime, signature } = transaction;
                const date = new Date(blockTime * 1000).toLocaleString();
                console.log('\n' + '='.repeat(110) + '\n')
                console.log(`   💊 New Token Mint: ${mint}`);
                console.log(`      Block Time: ${date}`);
                console.log(`      TXID: ${signature}`);
        });
    }

    res.status(200).send('Webhook received');
});

app.listen(port, () => {
    console.log(`Webhook server listening at http://localhost:${port}`);
});
Let's break down what this server does:
- We're using Express to create a simple web server.
- The server listens for POST requests on the
/webhookendpoint. - When it receives a request, it checks if the body contains a
matchedTransactionsarray. - For each transaction in the array, it logs the mint address, block time, and transaction signature.
- Finally, it sends a 200 OK response to acknowledge receipt of the webhook.
Run the Server
To start your server, run:
node server.js
You should see the message: Webhook server listening at http://localhost:3000.
Step 4: Expose Your Local Server
For QuickNode to send webhooks to your server, it needs to be publicly accessible. We'll use ngrok to create a secure tunnel to your localhost.
-
If you haven't already, download and install ngrok.
-
In a new terminal window, run:
ngrok http 3000
- ngrok will provide a public URL that forwards to your local server. It will look something like
https://1234-56-78-910-11.ngrok.io.
Copy that URL. We'll need it in the next step.
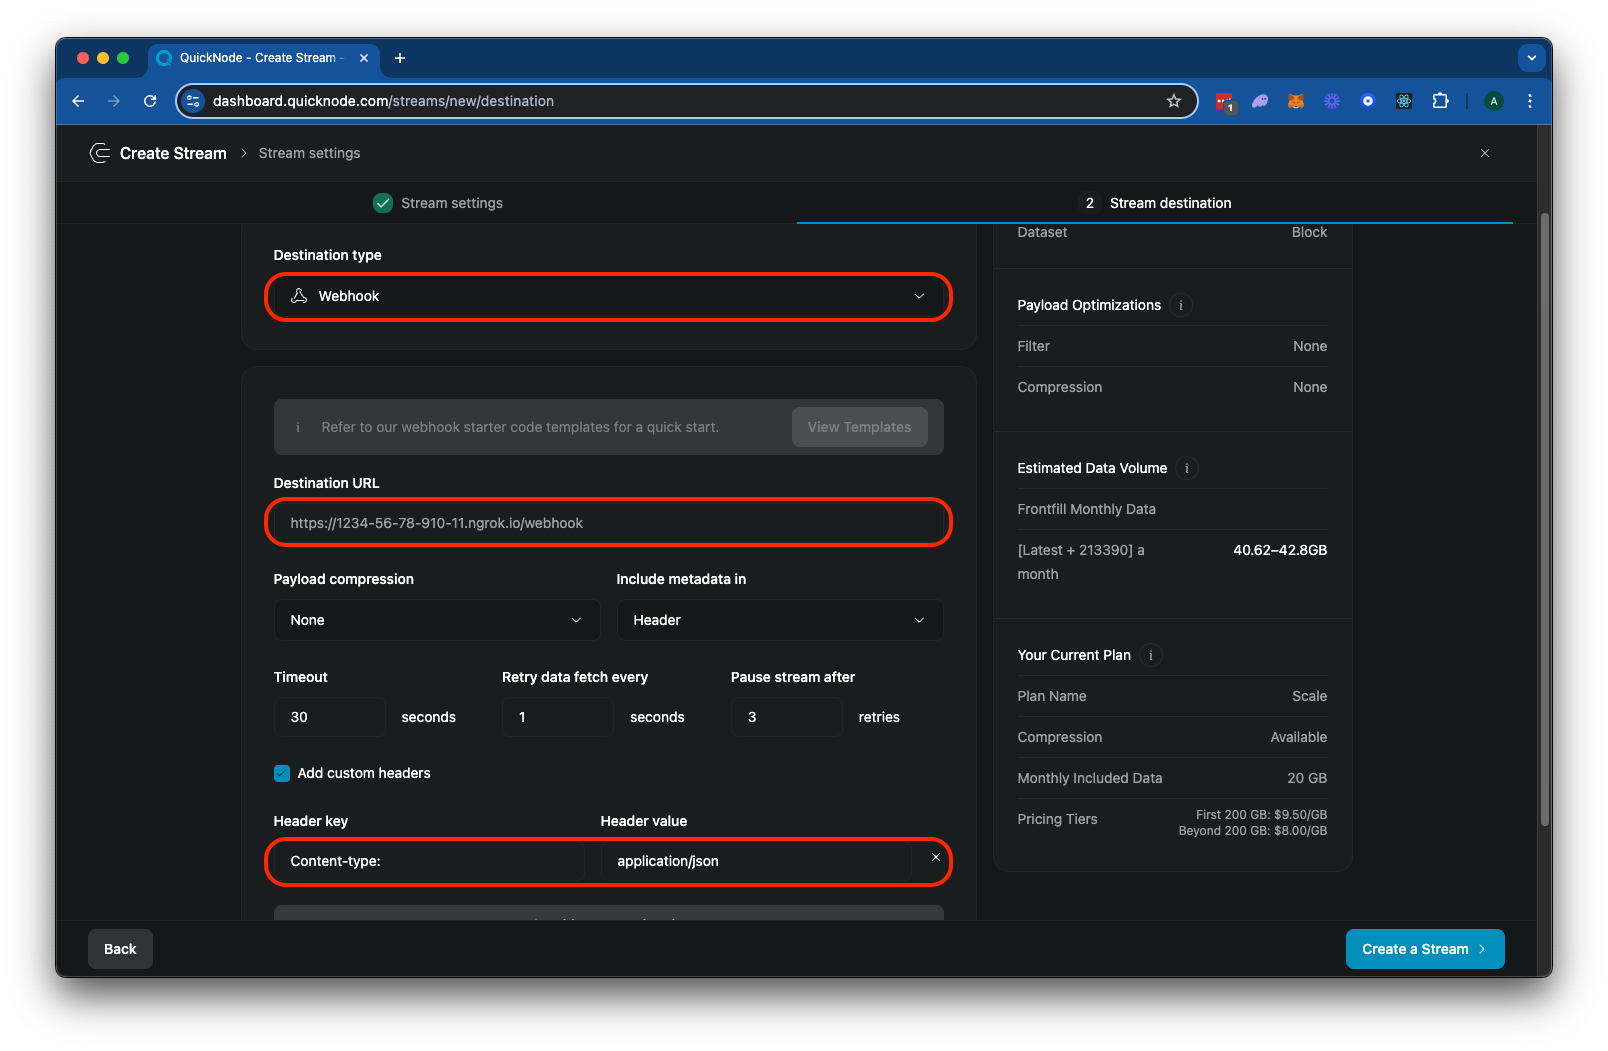
Step 5: Configure Your Stream's Destination
Now that we have our server running and exposed to the internet, let's configure our Stream to send data to it:
- Go back to your Stream configuration page.
- In the "Destination type" section, select "Webhook".
- In the "Destination URL" field, enter the ngrok URL you got in the previous step, followed by
/webhook. For example:https://1234-56-78-910-11.ngrok.io/webhook - Add a custom header to specify the
Content-Typeof the payload. For example:Content-Type: application/json
Your Stream configuration should look like this:
Click "▶️ Test Destination" to send a test webhook to your server. And then click "Create a Stream" to finalize your configuration. You should see transactions start to appear in your server's console:
And that's it! Your Stream is now set up to filter for new Pump.fun token creations and send the data to your local server. Great work!
Keep Building!
You now have the tools to use Streams for your own applications. Keep in mind the filters we created are just an example--the sky is the limit for what you can come up with. Feel free to modify the filter logic to look for different programs, accounts, or instructions. You can also add more complex processing logic to your server. Happy streaming!
Looking for some inspiration on how to keep building? Check out these resources:
- Use QuickNode's Key-Value Store to track many wallets or programs
- Create custom QuickNode Functions to automate workflows and further process your data
- For more latency-sensitive applications, check out our Guide: Monitor Solana Programs with Yellowstone gRPC
Regardless of what you are building, we would love to hear about it. Drop us a line on Discord or Twitter and let us know what you're working on!
We ❤️ Feedback!
Let us know if you have any feedback or requests for new topics. We'd love to hear from you.