17 min read
Streams is available to all users with a QuickNode plan. For teams with unique requirements, we offer tailored datasets, dedicated support, and custom integrations. Contact our team for more information.
Overview
Streams is a powerful tool designed to simplify the processing and management of blockchain data. With Streams, you can access real-time and historical blockchain data, filter it according to your needs, and send it to various destinations like PostgreSQL, Snowflake, or Webhooks. This capability makes it easier to build efficient data pipelines and responsive applications.
The purpose of this guide is to demonstrate a practical use case of Streams by building a simple REST API on top of Streams-filtered and indexed data using PostgreSQL. This will help you get started on building your own blockchain data indexer quickly and efficiently.
In this guide, we will build a blockchain indexer that includes ERC20 token transfers on the Ethereum mainnet.
What You Will Do
- Learn about Streams
- Build a blockchain data indexer using Streams, PostgreSQL, and Node.js
What You Will Need
- Basic knowledge of SQL
- A Stream created on QuickNode account
- PostgreSQL (You can use hosted PostgreSQL services like Tembo, Heroku Postgres, etc.)
- A PostgreSQL client (e.g., pgAdmin, DBeaver, Postico, or any other client)
- A code editor (e.g., VSCode)
- Node.js (version 18.16 or higher)
Want to dive deeper into the benefits of QuickNode Streams? Our blog post provides an in-depth look at its capabilities and advantages over traditional methods like Subgraphs.
Why QuickNode Streams
Before jumping into the development, let's review why Streams is a superior choice for managing blockchain data. Understanding the advantages of Streams will help you appreciate the benefits it brings to your data processing workflows. If you want to dive straight into the development, click here.
Cost-Effective Filtering
Streams allows you to filter blockchain data easily, ensuring that you only pay for the data you actually need. Filtered blocks are billed based on the data delivered to your destination. Free plans have a minimum size of 2.5KB per block, while paid plans charge only for the exact data size received. This targeted approach reduces unnecessary data processing and storage costs. Instead of handling large volumes of raw data, you can specify exactly what data you need, streamlining your operations and saving money.
Support for Multiple Destinations
Streams provides seamless integration with multiple data destinations. Whether you need to send your data to PostgreSQL, Snowflake, Webhooks, or other supported endpoints, Streams has you covered. This flexibility allows you to choose the best data storage and processing solution for your specific use case.
Flexibility in Querying
Unlike Subgraphs, which are limited to GraphQL querying, Streams offers more flexible filtering options. This flexibility means you can easily adapt your data filtering to suit various requirements without being constrained by predefined query languages. It allows for a more tailored approach to data management.
Automatic Reorg Handling
Blockchain reorgs, where blocks are reorganized to maintain the longest chain, can complicate data management. Streams handles these reorgs automatically, ensuring that your data remains consistent and reliable. You don't need to worry about manual adjustments or data inconsistencies caused by reorgs.
Faster Latency
Streams provides faster data processing and delivery compared to traditional methods like Subgraphs. This improved latency ensures that your applications have access to the most up-to-date data quickly, enhancing the user experience and allowing for more responsive applications.
Building a Blockchain Indexer
In this section, we will build a blockchain indexer using Streams to filter and process ERC20 transfer events, store the data in a PostgreSQL database, and provide a REST API to access the data.
The flow of the system is as follows:
- Filtering Data: Streams will filter blockchain data in real time to capture only ERC20 transfer events.
- Sending Data to the Database: The filtered data will be sent to a PostgreSQL database for storage.
- Checking for New Data: A Node.js script will periodically check the main PostgreSQL table (
streams_erc20) for new data. - Parsing and Storing Data: The Node.js script will parse the new data and store it in a separate PostgreSQL table (
erc20_transfers). - Building a Server for API: Another Node.js server will be set up to provide REST API endpoints that query data from the
erc20_transferstable.
By the end of this section, you will have a complete blockchain data indexer up and running. To get started, let's set up your environment by creating a QuickNode account and configuring the necessary tools and services.
Setting Up a PostgreSQL Database
To build your blockchain indexer, you need to set up your development environment. This involves installing the necessary tools and dependencies, configuring your QuickNode account, and setting up the PostgreSQL database.
Before you begin, make sure you have Node.js installed on your system. If not, download and install it from the official website. Node.js comes with npm (Node Package Manager), which you will use to install other dependencies.
Step 1: Create a PostgreSQL Account
First, we need a PostgreSQL database to store the data. You can use a hosted PostgreSQL service like Tembo.
1. Sign Up for Tembo:
- Go to Tembo.io and sign up for a new account.
- Create a new PostgreSQL instance.
- Check their documentation for more detail and a step-by-step guide, if needed.
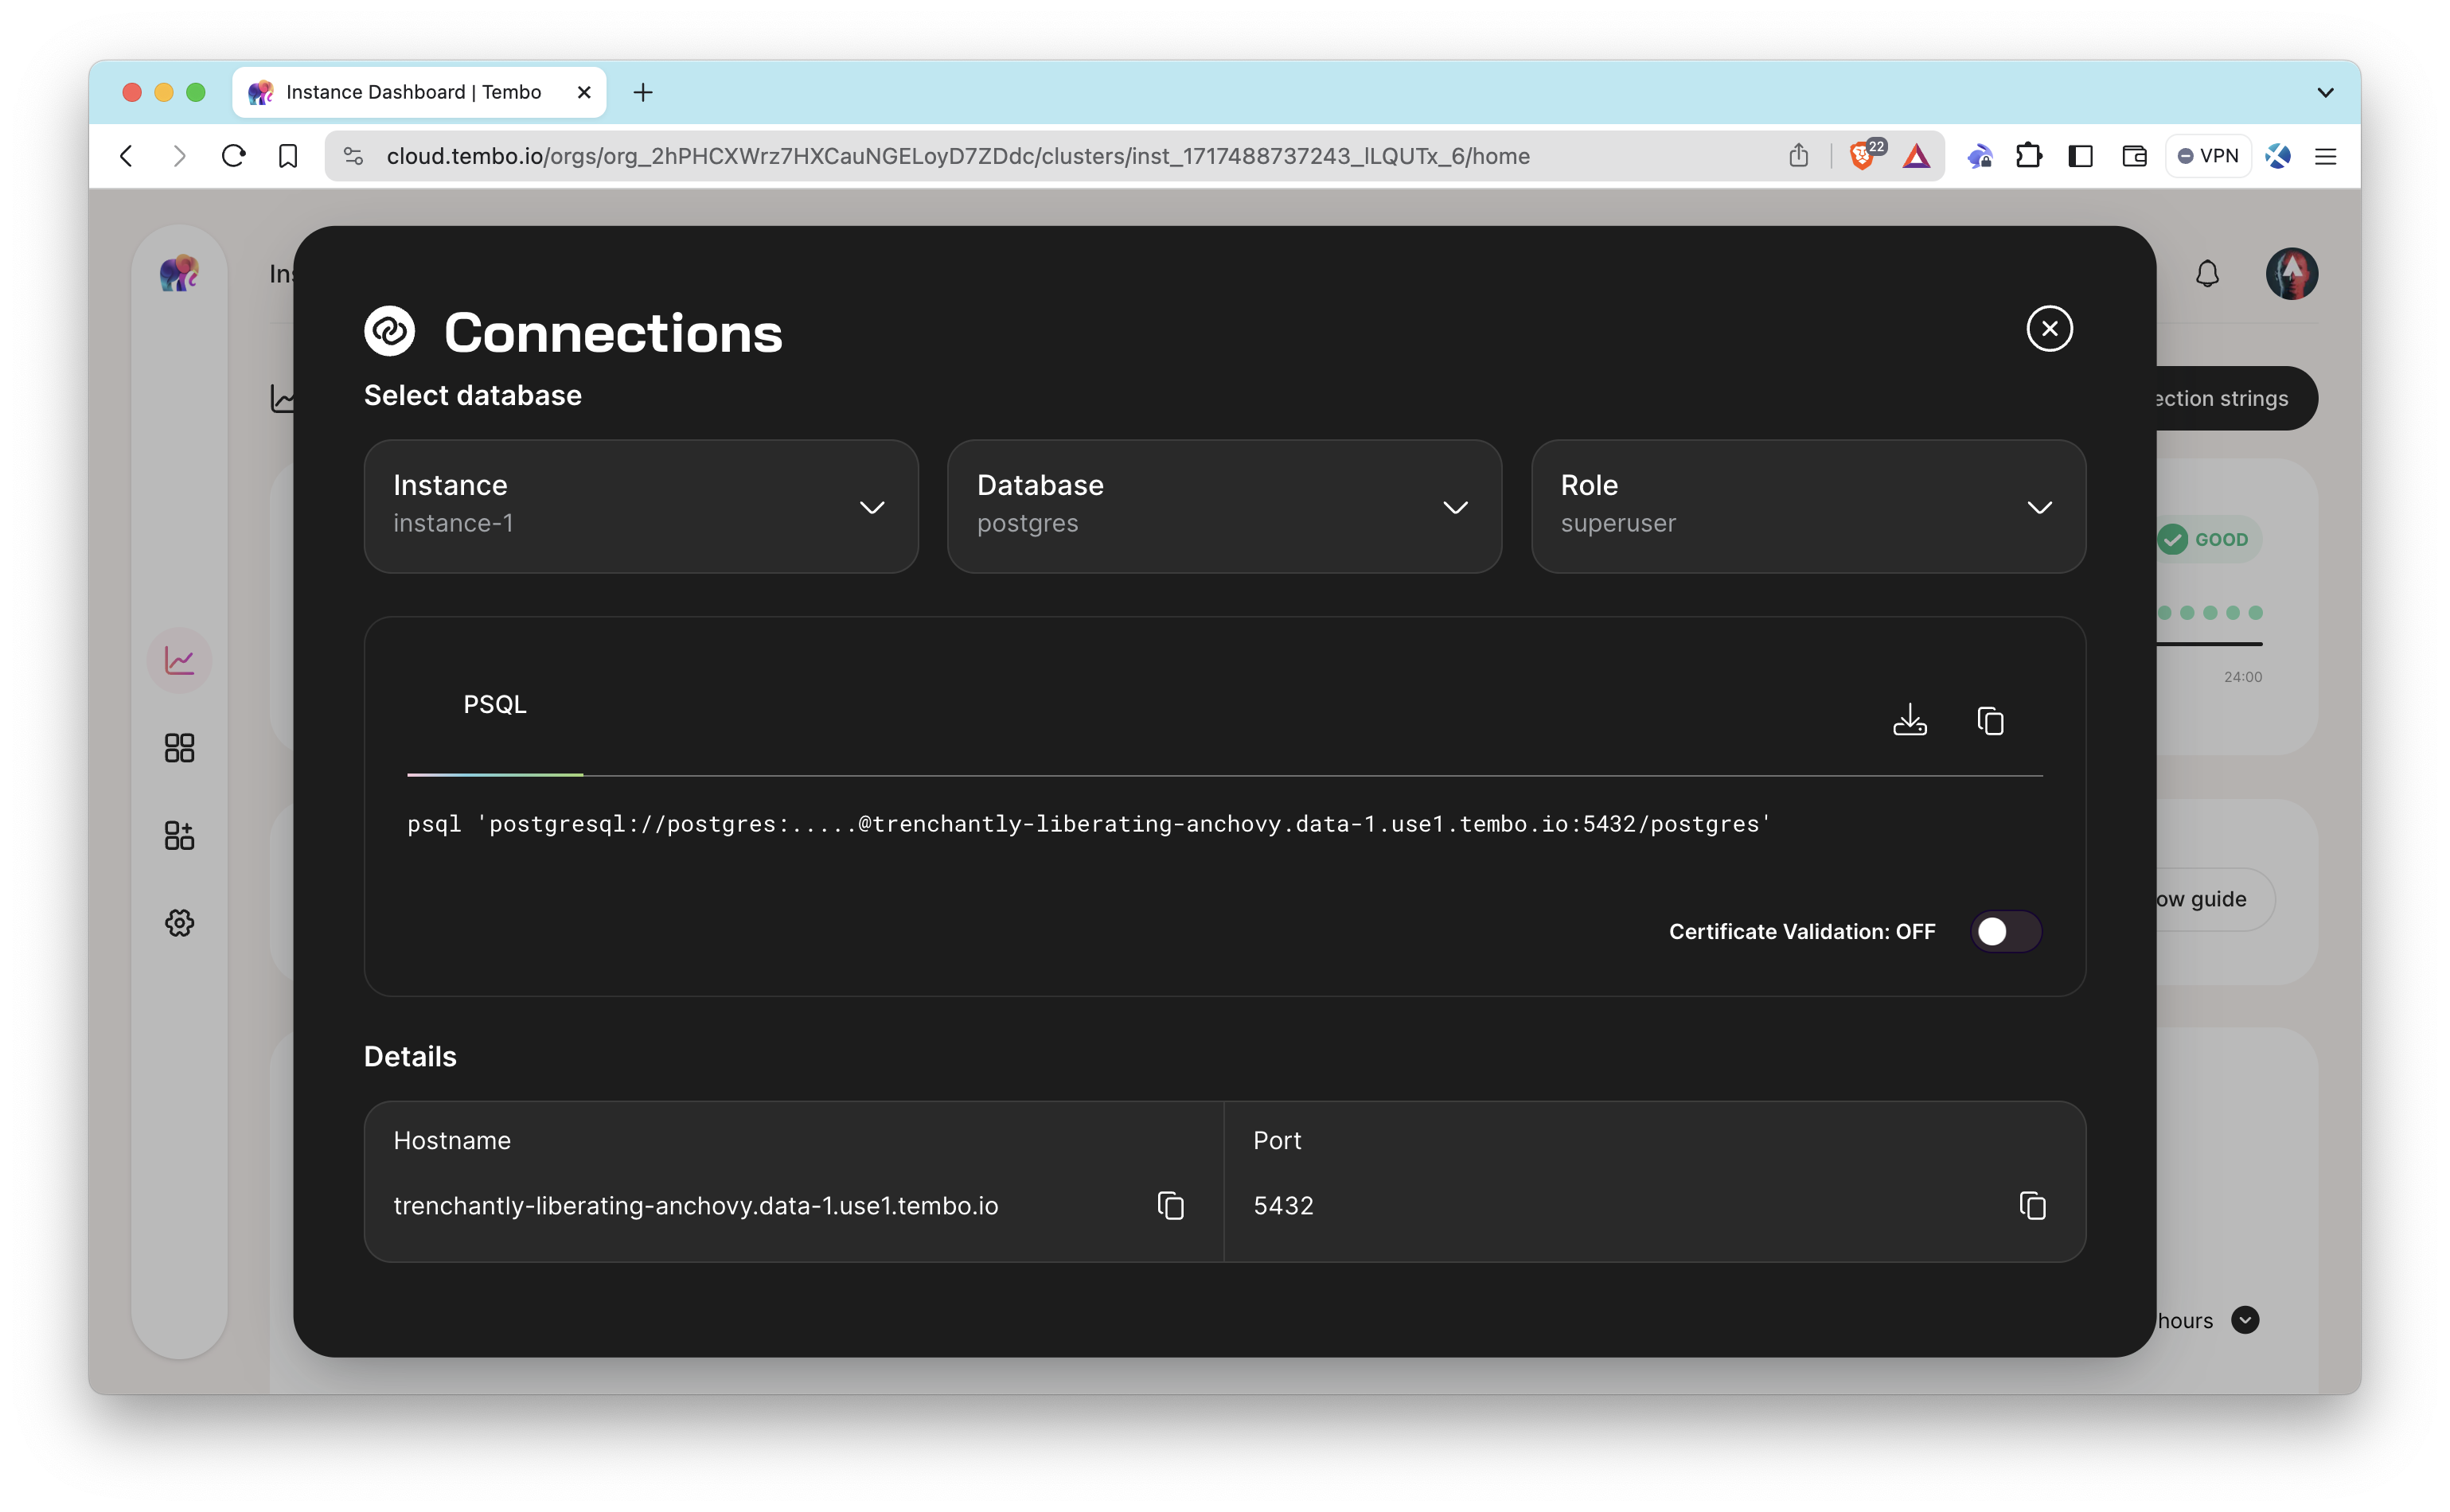
2. Get Connection Details: Once the instance is created, note down the connection details (host, port, username, password, and database name) as you need them later.
Step 2: Create the Necessary Function and Table
1. Connect to PostgreSQL:
Use a PostgreSQL client (e.g., pgAdmin, DBeaver, Postico, or any other client) or psql, an interactive PostgreSQL terminal, to connect to your Tembo PostgreSQL instance using the connection details.
psql 'postgresql://YOUR_USERNAME:YOUR_PASSWORD@YOUR_HOSTNAME:YOUR_PORT/YOUR_DATABASE'
If you connect with psql, you can follow the steps by running the codes in each step. If you are going to use a client, the steps may vary from interface to interface.
2. Create a Table
The table (streams_erc20) into which Streams will send filtered data will be created automatically after running the Stream. You just need to create the erc20_transfers table to store the parsed ERC20 transfer data.
You can now access Logs for your RPC endpoints, helping you troubleshoot issues more effectively. If you encounter an issue with your RPC calls, simply check the logs in your QuickNode dashboard to identify and resolve problems quickly. Learn more about log history limits on our pricing page.
CREATE TABLE erc20_transfers (
  block_number BIGINT,
  block_timestamp BIGINT,
  token_address VARCHAR,
  from_address VARCHAR,
  to_address VARCHAR,
  value NUMERIC,
  transaction_hash VARCHAR,
  log_index BIGINT,
  PRIMARY KEY (transaction_hash, log_index)
);
3. Create a Function
Create the process_erc20_transfers_range function to process the raw data and insert parsed data into the erc20_transfers table.
CREATE OR REPLACE FUNCTION process_erc20_transfers_range(start_block BIGINT, end_block BIGINT)
RETURNS VOID AS $$
DECLARE
  transfers RECORD;
  transfer JSONB;
BEGIN
  -- Loop through the new rows in the streams_erc20 table
  FOR transfers IN (
    SELECT data -> 'erc20Transfers' AS erc20_transfers, data
    FROM streams_erc20
    WHERE block_number >= start_block AND block_number <= end_block
  )
  LOOP
    -- Handle the case when erc20Transfers is an empty array
    IF transfers.erc20_transfers IS NULL OR jsonb_array_length(transfers.erc20_transfers) = 0 THEN
      CONTINUE; -- Skip this iteration
    END IF;

    -- Loop through each transfer and insert it into the erc20_transfers table
    FOR transfer IN SELECT jsonb_array_elements(transfers.erc20_transfers)
    LOOP
      INSERT INTO erc20_transfers (
        block_number,
        block_timestamp,
        token_address,
        from_address,
        to_address,
        value,
        transaction_hash,
        log_index
      )
      SELECT
        (transfer ->> 'block_number')::BIGINT,
        (transfer ->> 'block_timestamp')::BIGINT,
        transfer ->> 'token_address',
        transfer ->> 'from_address',
        transfer ->> 'to_address',
        (transfer ->> 'value')::NUMERIC,
        transfer ->> 'transaction_hash',
        (transfer ->> 'log_index')::BIGINT
      ON CONFLICT (transaction_hash, log_index) DO NOTHING;
    END LOOP;
  END LOOP;
END;
$$ LANGUAGE plpgsql;
Setting Up a Stream
Step 1: Log in to Your QuickNode Account
Now, let's set up a Stream to filter and send data to our PostgreSQL database. If you haven't created a QuickNode account already, you can create an account here.
First, navigate to your QuickNode dashboard, then navigate to the Streams tab and click Create Stream.
In the Stream Settings section, follow this configuration:
Stream Settings
- Chain: Ethereum
- Network: Mainnet
- Dataset: Receipts
- Stream start: Latest block
- Stream end: Leave unchecked
- Stream payload: Modify the payload before streaming
- Reorg Handling: Leave unchecked
You can also copy and paste this QuickShare URL into your browser's address bar to automatically fill in the fields in your Stream settings according to this guide.
For any other fields not mentioned above, leave them as their default values.
Step 2: Set Up a Filter
After selecting the modify the payload option, a code box appears to allow you to modify the payload to capture only the relevant ERC20 transfer events and formatting them for storage in a PostgreSQL database.
The function filters the logs in each receipt to find the relevant ERC20 transfer events. It uses the topics array in each log to identify these events.
- The first element in the topics array is the event signature for ERC20 transfers (
Transfer(address,address,uint256)):0xddf252ad1be2c89b69c2b068fc378daa952ba7f163c4a11628f55a4df523b3ef. - The
topicsarray should have a length of 3 to include thefromandtoaddresses.
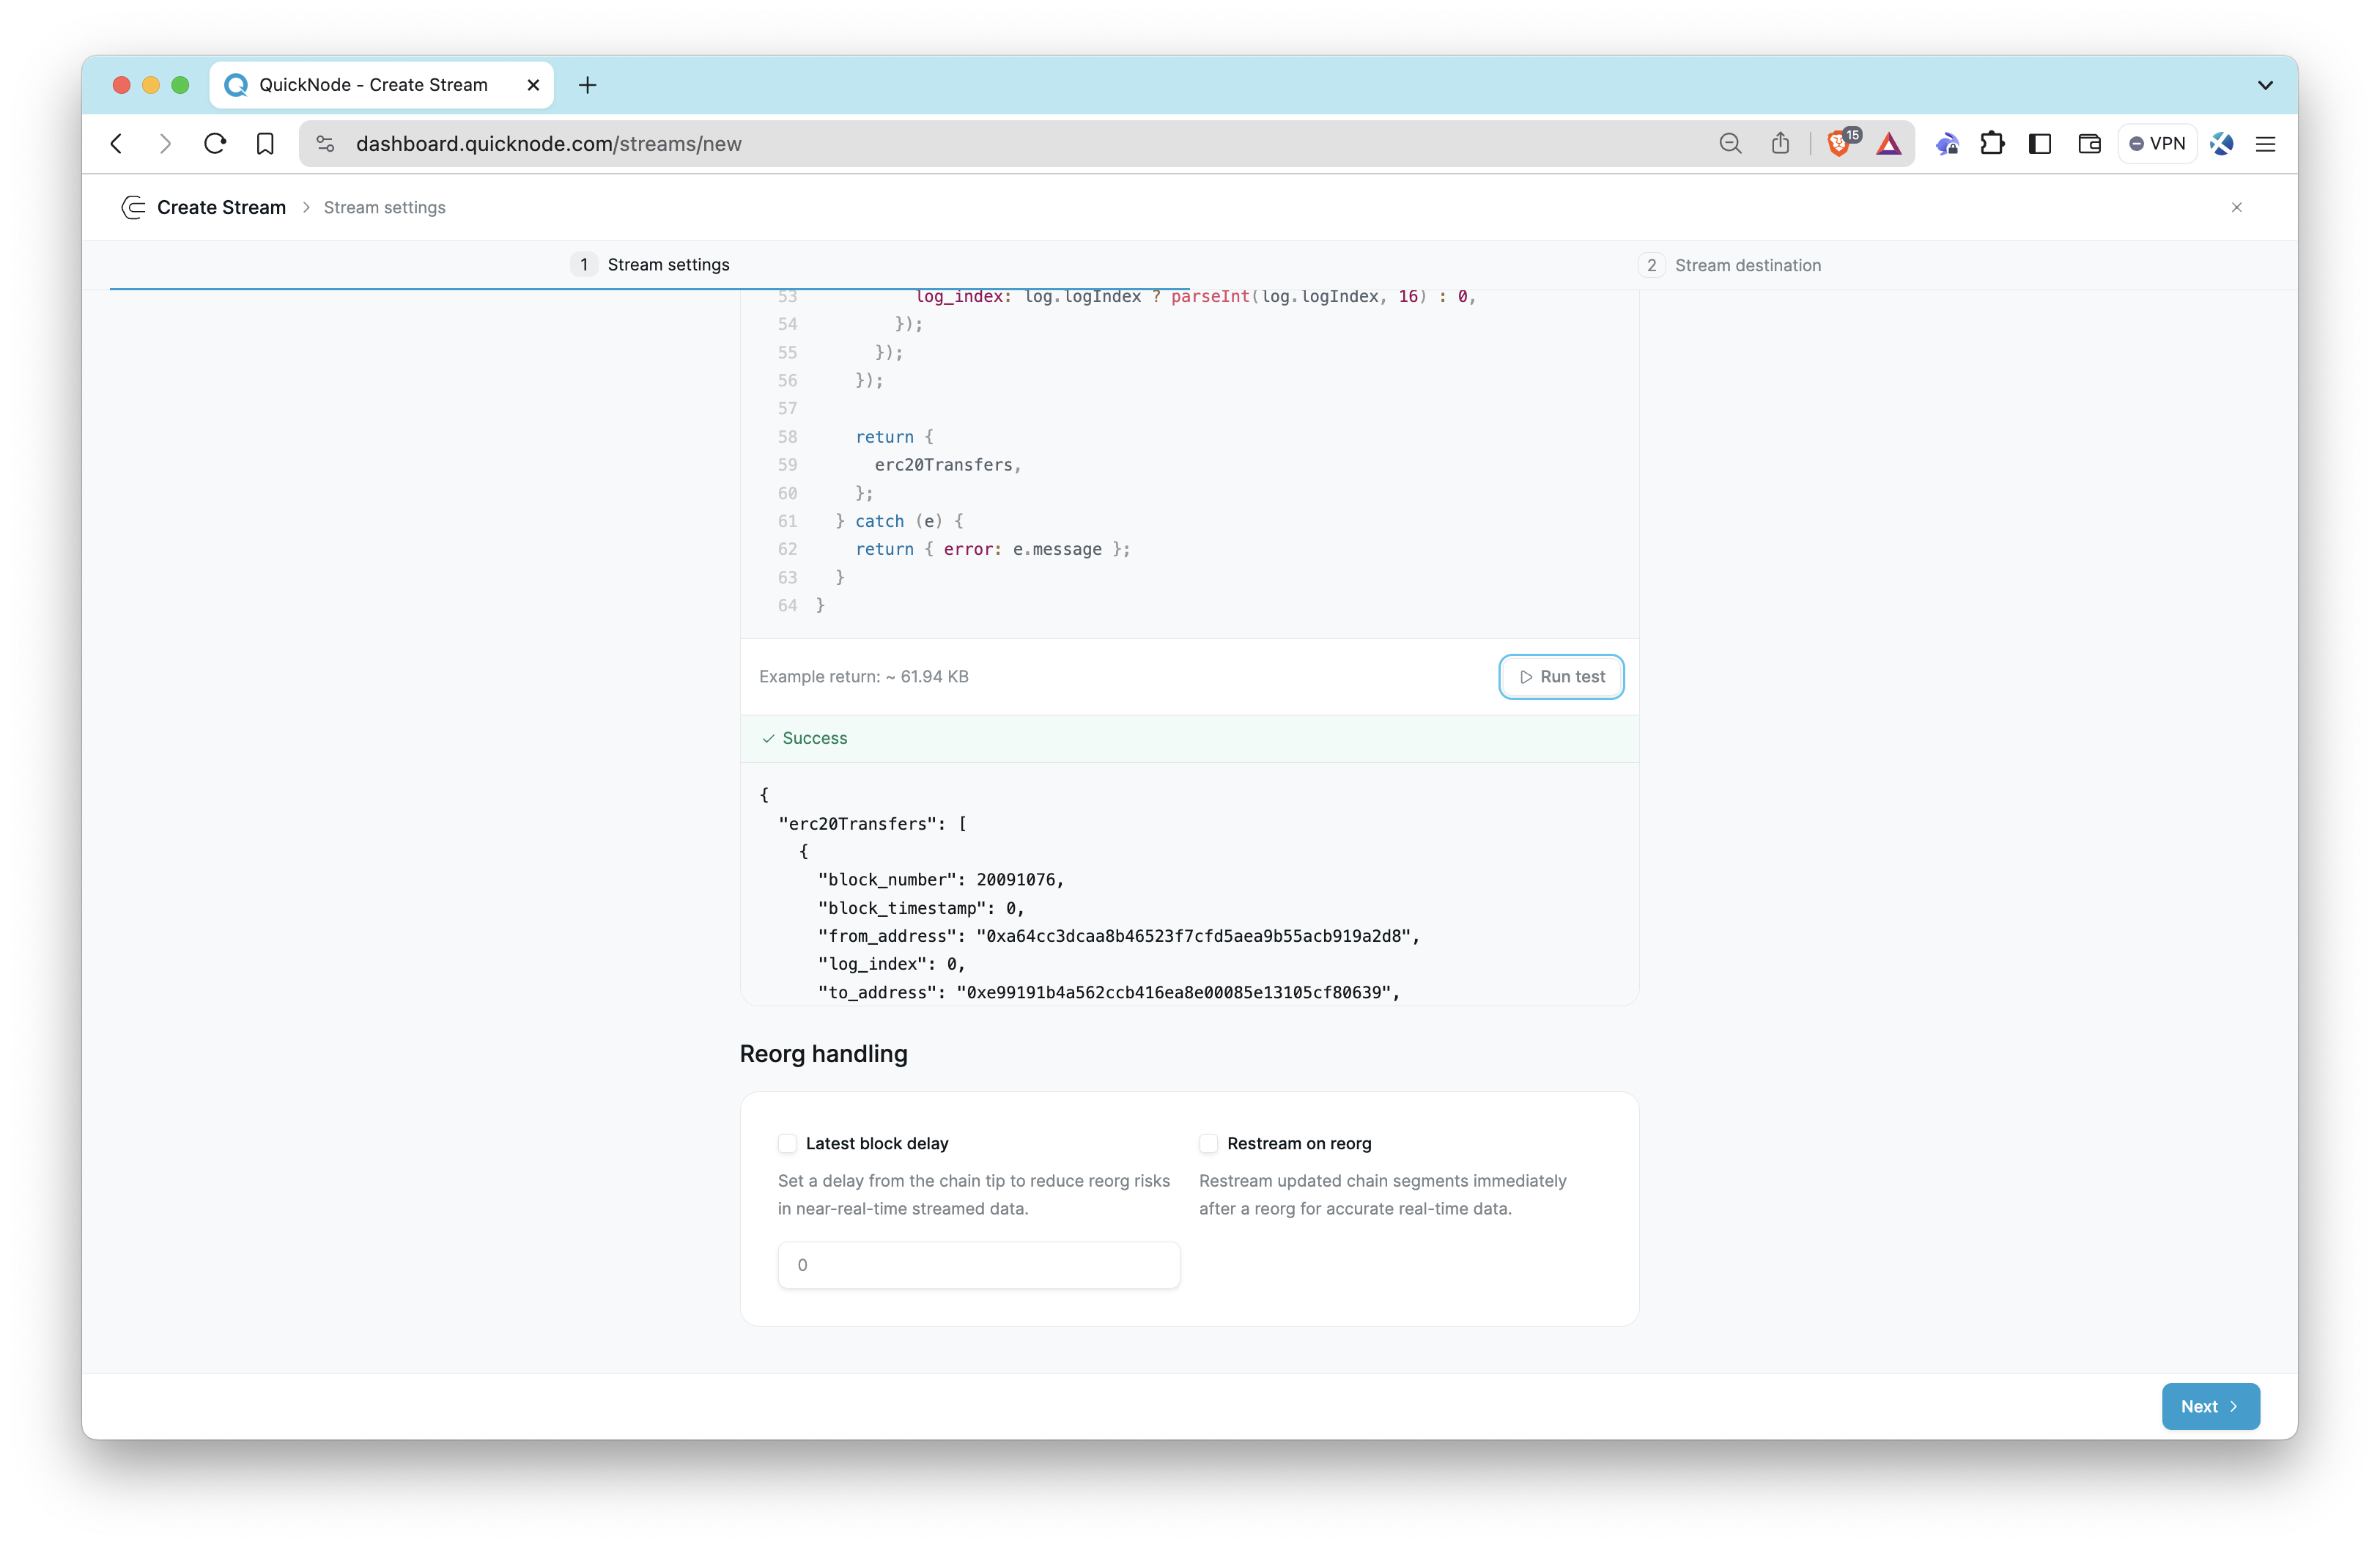
Paste the code below into the code box, then click the Run test button.
function main(stream) {
	try {
		// Check if stream exists and has data
        if (!stream || !stream.data) {
            throw new Error('Invalid data: stream must exist and contain data')
        }

        // Check if stream is an array
        if (!Array.isArray(stream.data[0])) {
            throw new Error('Invalid data: stream property must be an array')
        }

        var data = stream.data[0]
        var erc20Transfers = []

		data.forEach(receipt => {
			// Check if receipt is an object
			if (typeof receipt !== 'object' || receipt === null) {
				// Skip invalid receipt
				return
			}

			// Check if receipt has a logs property
			if (!receipt.hasOwnProperty('logs')) {
				// Skip receipts with no logs
				return
			}

			// Check if logs is an array
			if (!Array.isArray(receipt.logs)) {
				// Skip receipts with invalid logs
				return
			}

			let relevantLogs = receipt.logs.filter(
				log =>
					log.topics &&
					log.topics[0] ===
						'0xddf252ad1be2c89b69c2b068fc378daa952ba7f163c4a11628f55a4df523b3ef' &&
					log.topics.length === 3
			)

			relevantLogs.forEach(log => {
				erc20Transfers.push({
					block_number: log.blockNumber ? parseInt(log.blockNumber, 16) : 0,
					block_timestamp: log.blockTimestamp
						? parseInt(log.blockTimestamp, 16)
						: 0,
					token_address: log.address || '',
					from_address: log.topics[1] ? '0x' + log.topics[1].slice(26) : '',
					to_address: log.topics[2] ? '0x' + log.topics[2].slice(26) : '',
					value: log.data ? parseInt(log.data, 16) : 0,
					transaction_hash: log.transactionHash || '',
					log_index: log.logIndex ? parseInt(log.logIndex, 16) : 0,
				})
			})
		})

		return {
			erc20Transfers,
		}
	} catch (e) {
		return { error: e.message }
	}
}
After reviewing the test results, if there is nothing you want to change, proceed to the next step by pressing the Next button.
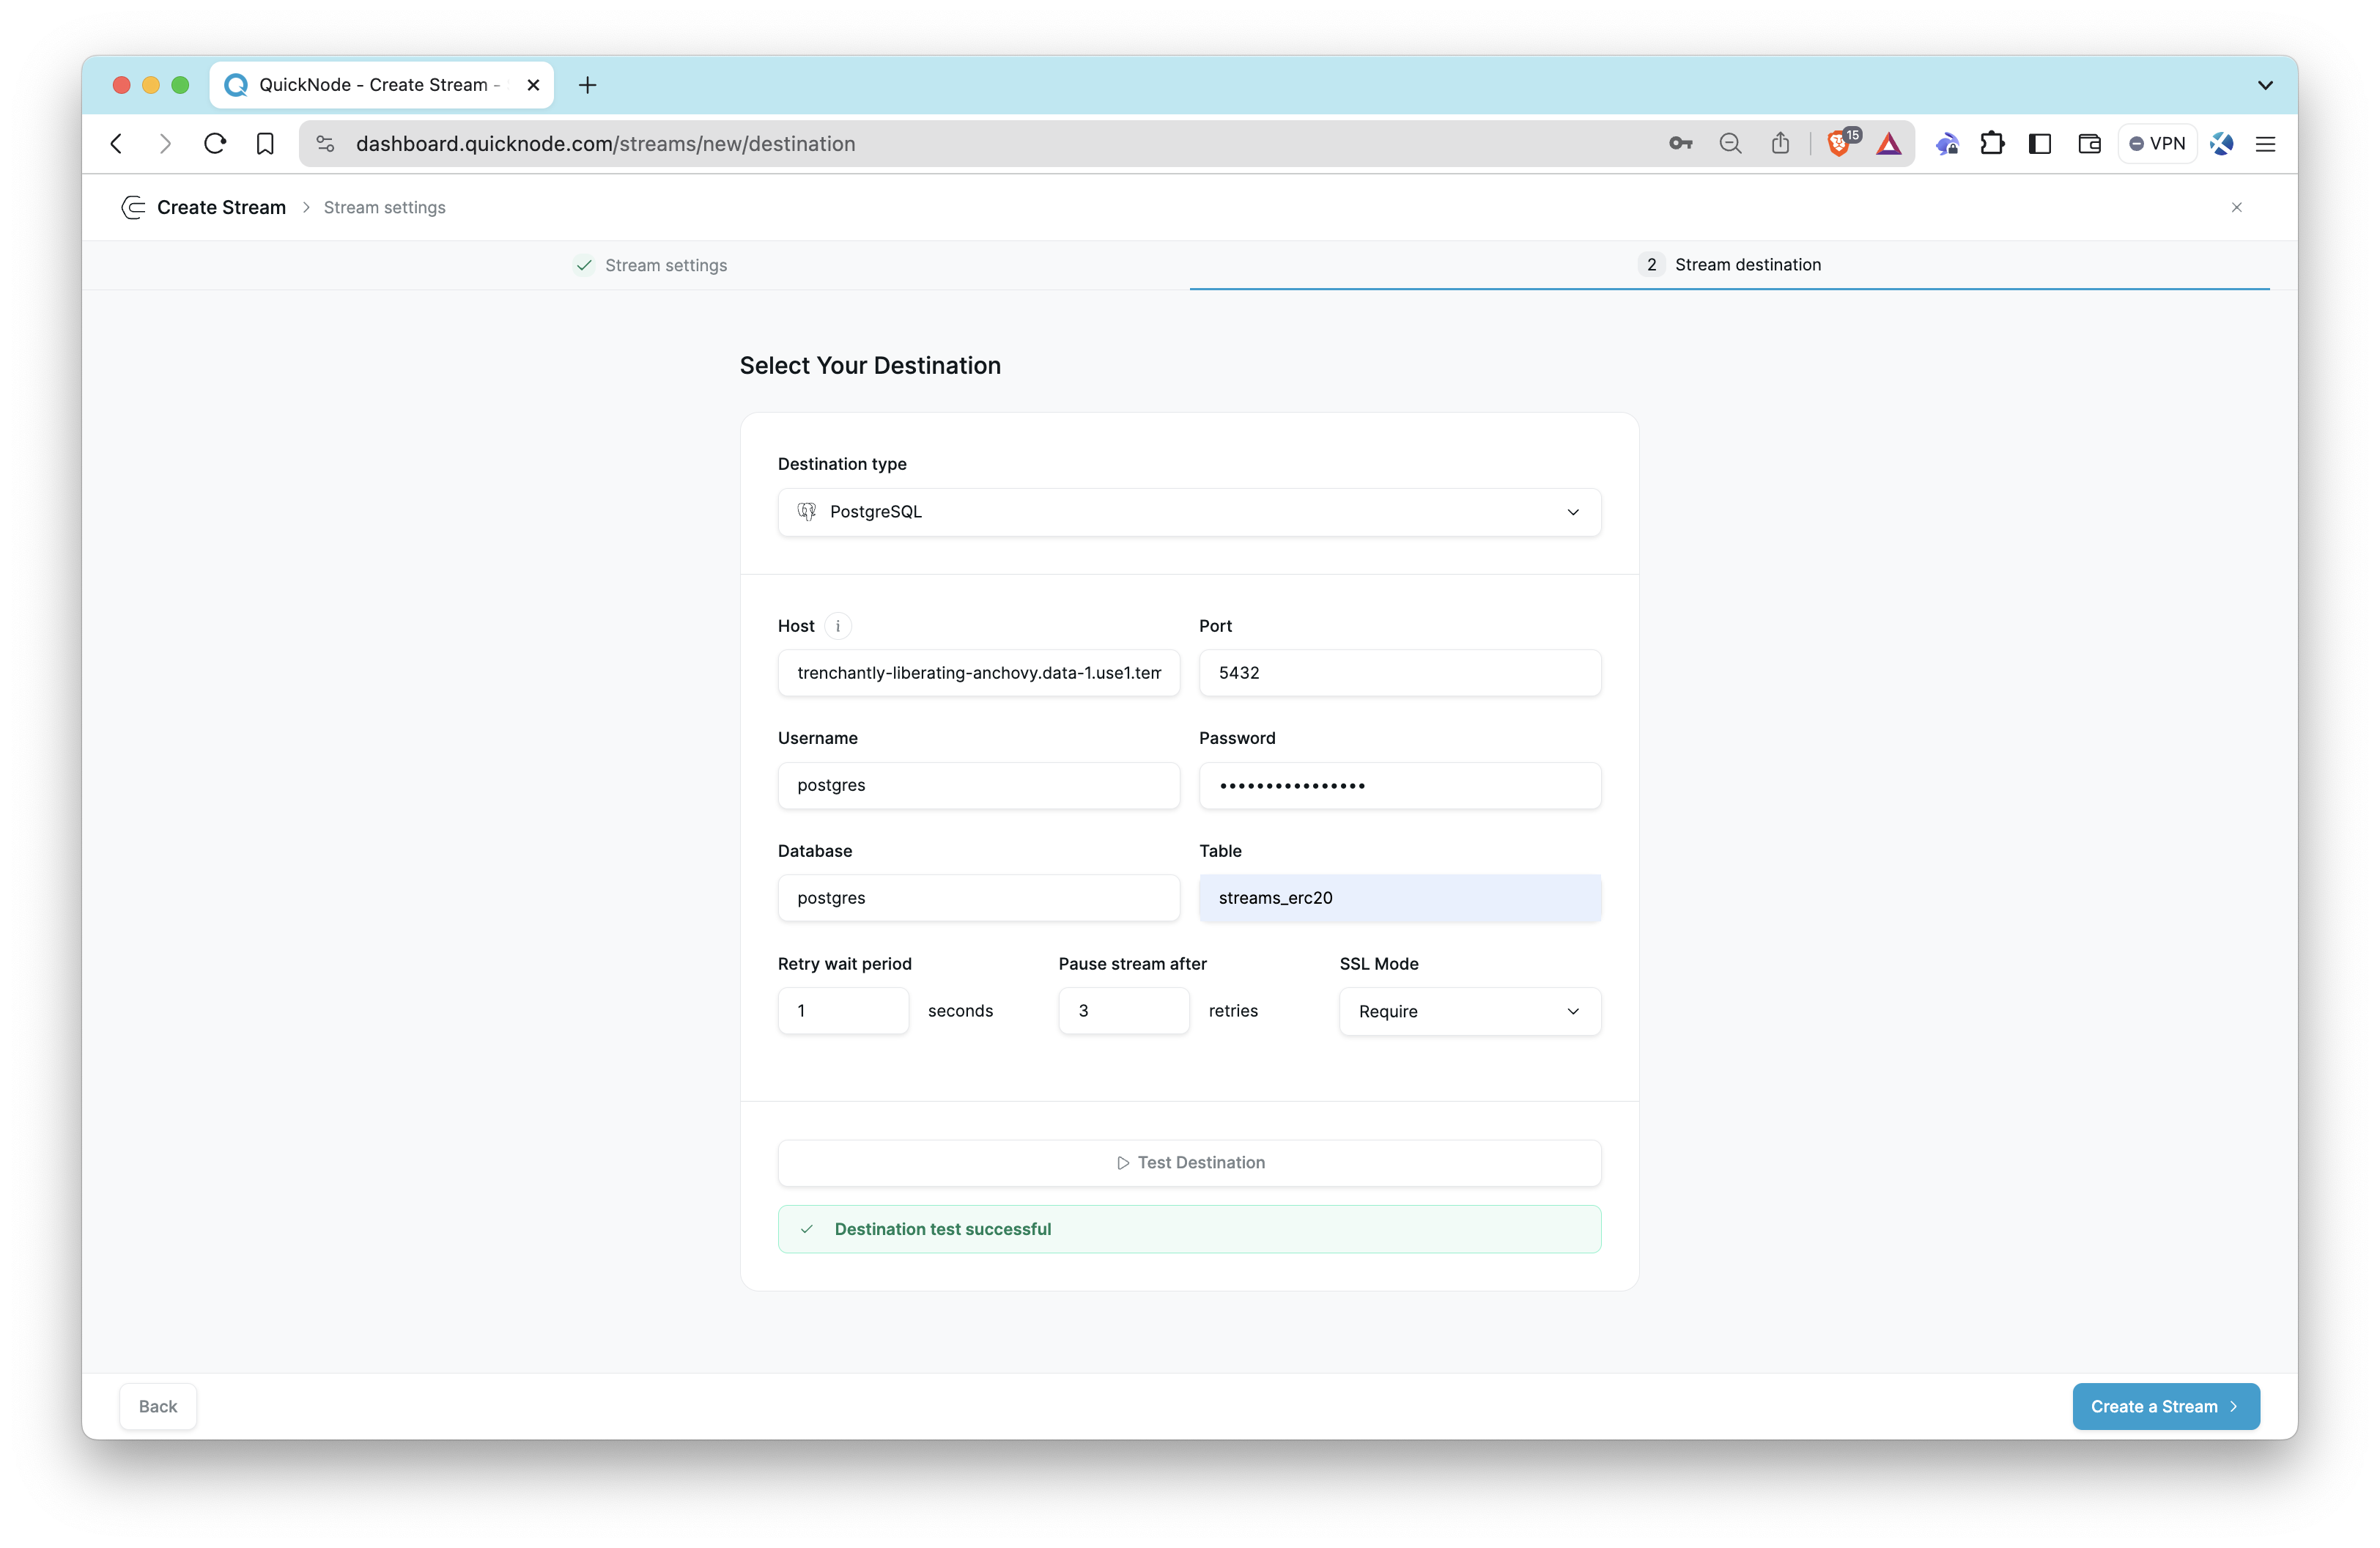
Then, select PostgreSQL as the destination type and enter your PostgreSQL connection details.
It is important to use
streams_erc20as the table name because we use this name in the SQL function we use. In case of using another table name, modify the SQL function (process_erc20_transfers_range) accordingly.
Now that everything is ready, start Stream and then verify that data is being correctly fed into the streams_erc20 table before setting up the servers.
Step 3: Verify Data
To verify the contents of the streams_erc20 table, execute the following SQL query in your PostgreSQL client or use your preferred database management tool to inspect the data:
SELECT * FROM streams_erc20 LIMIT 10;
Ensure that you see the filtered stream data being populated in the table.
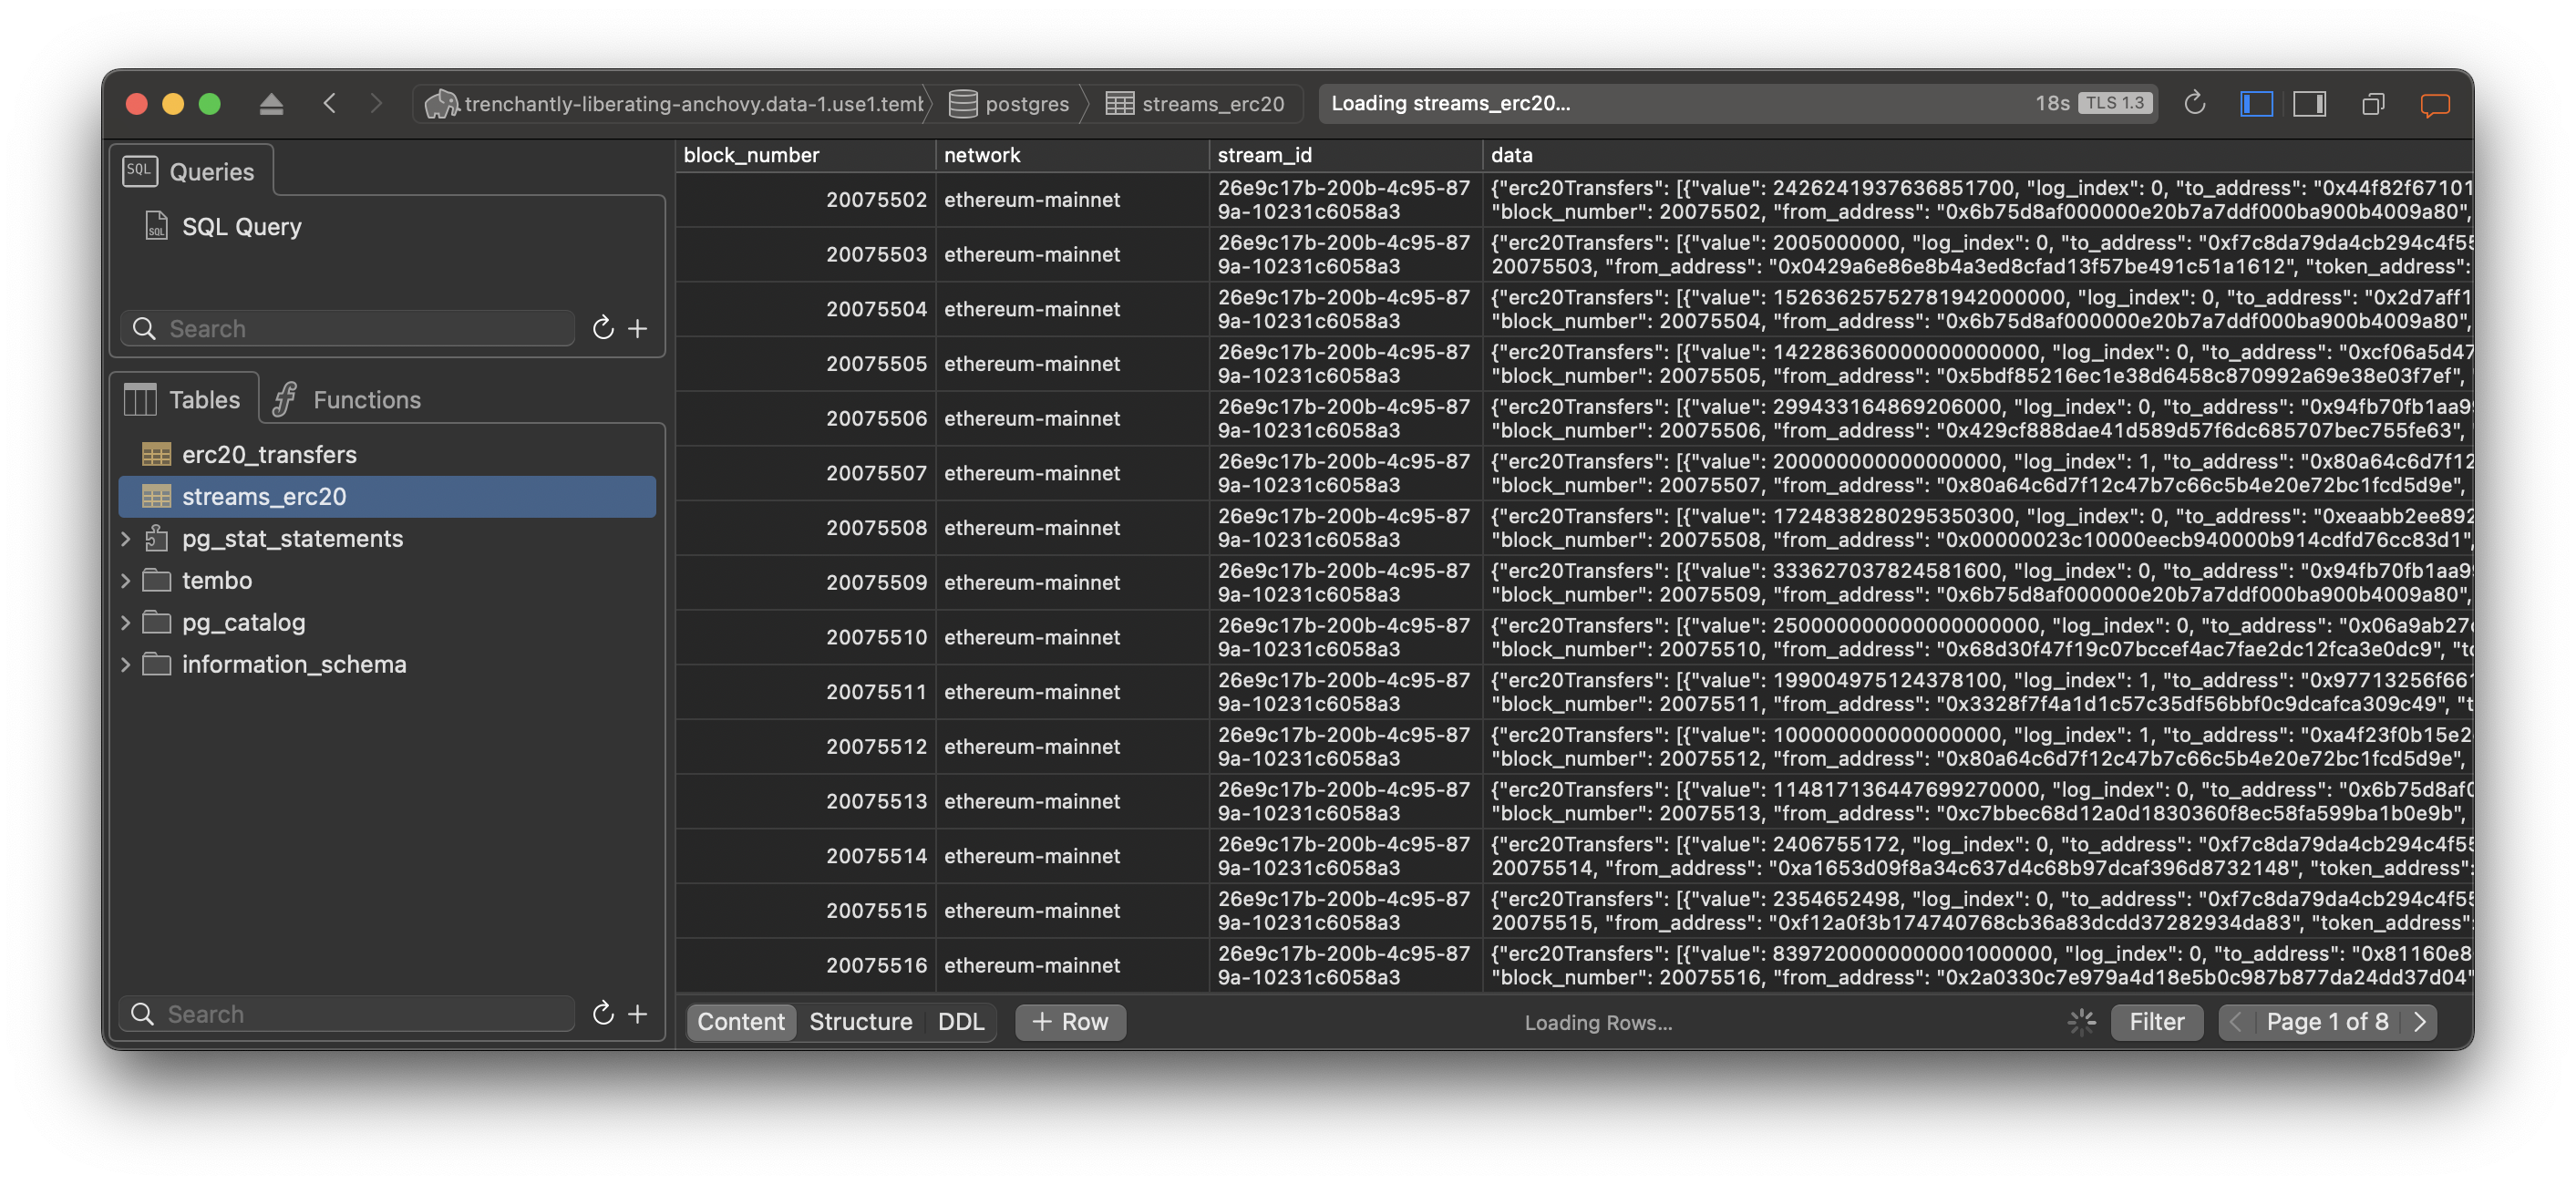
Stream will continue to add new information to the table as new blocks are released, now let's move forward.
Setting Up the Servers
We will set up the Node.js servers to process the data and provide a REST API.
Step 1: Create Project Directory
mkdir blockchain-indexer
cd blockchain-indexer
Step 2: Set Up the Node.js Project
Initialize the Node.js project and install necessary packages.
npm init -y
npm install pg express body-parser
Step 3: Create the Data Processing Script
Create a file named process-data.js in the blockchain-indexer directory. This file periodically checks the streams_erc20 for new data, processes it, and stores it in the erc20_transfers table.
echo > process-data.js
Open it in your preferred code editor, write the following code.
Do not forget to replace PostgreSQL credentials with your PostgreSQL connection details.
const { Pool } = require('pg')

const pool = new Pool({
	user: 'your-username', // Replace with your username
	host: 'your-host', // Replace with your host
	database: 'your-database', // Replace with your database name
	password: 'your-password', // Replace with your password
	port: 5432, // Replace with your port
	ssl: { rejectUnauthorized: false },
})

// Function to process the new data
async function processNewData(startBlock, endBlock) {
	try {
		if (startBlock <= endBlock) {
			const query = `SELECT process_erc20_transfers_range($1, $2)`
			console.log(`Processing new data from block ${startBlock} to ${endBlock}`)
			await pool.query(query, [startBlock, endBlock])
			console.log('Data processed successfully')
		} else {
			console.log('No new blocks to process')
		}
	} catch (error) {
		console.error('Error processing new data:', error)
	}
}

// Function to process data in chunks
async function processInChunks(startBlock, endBlock, chunkSize) {
	for (
		let currentStart = startBlock;
		currentStart <= endBlock;
		currentStart += chunkSize
	) {
		const currentEnd = Math.min(currentStart + chunkSize - 1, endBlock)
		await processNewData(currentStart, currentEnd)
	}
}

// Function to get the block range and process data
async function getAndProcessData() {
	try {
		let lastProcessedBlock

		// Check if the erc20_transfers table is empty
		const transfersCountQuery = 'SELECT COUNT(*) FROM erc20_transfers'
		const transfersCountResult = await pool.query(transfersCountQuery)
		const transfersCount = transfersCountResult.rows[0].count

		if (transfersCount === '0') {
			// If the erc20_transfers table is empty, get the minimum block_number from streams_erc20
			const minBlockQuery =
				'SELECT MIN(block_number) AS min_block FROM streams_erc20'
			const minBlockResult = await pool.query(minBlockQuery)
			lastProcessedBlock = minBlockResult.rows[0].min_block - 1 // Start from one block before the minimum
		} else {
			// If the erc20_transfers table is not empty, get the last processed block from streams_erc20
			const lastProcessedBlockQuery = `
        SELECT COALESCE(MAX(block_number), 0) AS last_processed_block
        FROM streams_erc20
        WHERE block_number IN (
          SELECT block_number
          FROM erc20_transfers
        );
      `
			const lastProcessedBlockResult = await pool.query(lastProcessedBlockQuery)
			lastProcessedBlock =
				lastProcessedBlockResult.rows[0]?.last_processed_block || 0
		}

		// Get the highest block number in the streams_erc20 table
		const highestBlockQuery =
			'SELECT MAX(block_number) AS highest_block FROM streams_erc20'
		const highestBlockResult = await pool.query(highestBlockQuery)
		const highestBlock = highestBlockResult.rows[0]?.highest_block || 0

		const startBlock = lastProcessedBlock + 1
		const endBlock = highestBlock

		// Get the current time
		const currentTime = new Date().toLocaleString()

		console.table([
			{
				'Current Time': currentTime,
				'Last Processed Block Number': lastProcessedBlock,
				'Highest Block Number': highestBlock,
			},
		])

		await processInChunks(startBlock, endBlock, 100)
	} catch (error) {
		console.error('Error in scheduled processing:', error)
	}
}

// Schedule the getAndProcessData function to run periodically (e.g., every 5 minutes)
setInterval(async () => {
	await getAndProcessData()
}, 5 * 60 * 1000)

// Initial call to process data immediately
;(async () => {
	await getAndProcessData()
})()
Then, run the script using the following command:
node process-data.js
Step 4: Create the REST API Server
Create a file named server.js in the blockchain-indexer directory. This file will serve as the REST API server to handle API requests and query the erc20_transfers table.
echo > server.js
Open it in your preferred code editor, write the following code.
Do not forget to replace PostgreSQL credentials with your PostgreSQL connection details.
const express = require('express')
const bodyParser = require('body-parser')
const { Pool } = require('pg')

const app = express()
const PORT = process.env.PORT || 3000

const pool = new Pool({
	user: 'your-username', // Replace with your username
	host: 'your-host', // Replace with your host
	database: 'your-database', // Replace with your database name
	password: 'your-password', // Replace with your password
	port: 5432, // Replace with your port
	ssl: { rejectUnauthorized: false },
})

app.use(bodyParser.json())
app.get('/transactions', async (req, res) => {
	try {
		const limit = parseInt(req.query.limit) || 10 // Default limit is 10
		const maxLimit = 100 // Maximum limit allowed

		// Sanitize the limit value
		const safeLimit =
			isNaN(limit) || limit <= 0 ? 10 : Math.min(limit, maxLimit)

		const query = `
      SELECT
        block_number,
        block_timestamp,
        token_address,
        from_address,
        to_address,
        value,
        transaction_hash,
        log_index
      FROM erc20_transfers
      ORDER BY block_number DESC, log_index DESC
      LIMIT $1
    `

		const result = await pool.query(query, [safeLimit])

		res.status(200).json(result.rows)
	} catch (error) {
		console.error('Error fetching transactions', error)
		res.status(500).send('Internal Server Error')
	}
})

app.listen(PORT, () => {
	console.log(`Server is running on port ${PORT}`)
})
Keep the first terminal open, then execute the following command on another terminal to run the REST API server.
node server.js
Calling the REST API
Once your REST API server is running, you can call the API to retrieve data from the erc20_transfers table.
The API endpoint to retrieve transactions is /transactions. The API supports an optional limit query parameter to specify the number of records to retrieve. The default limit is 10.
You can use tools like curl, Postman, or any HTTP client to call the API.
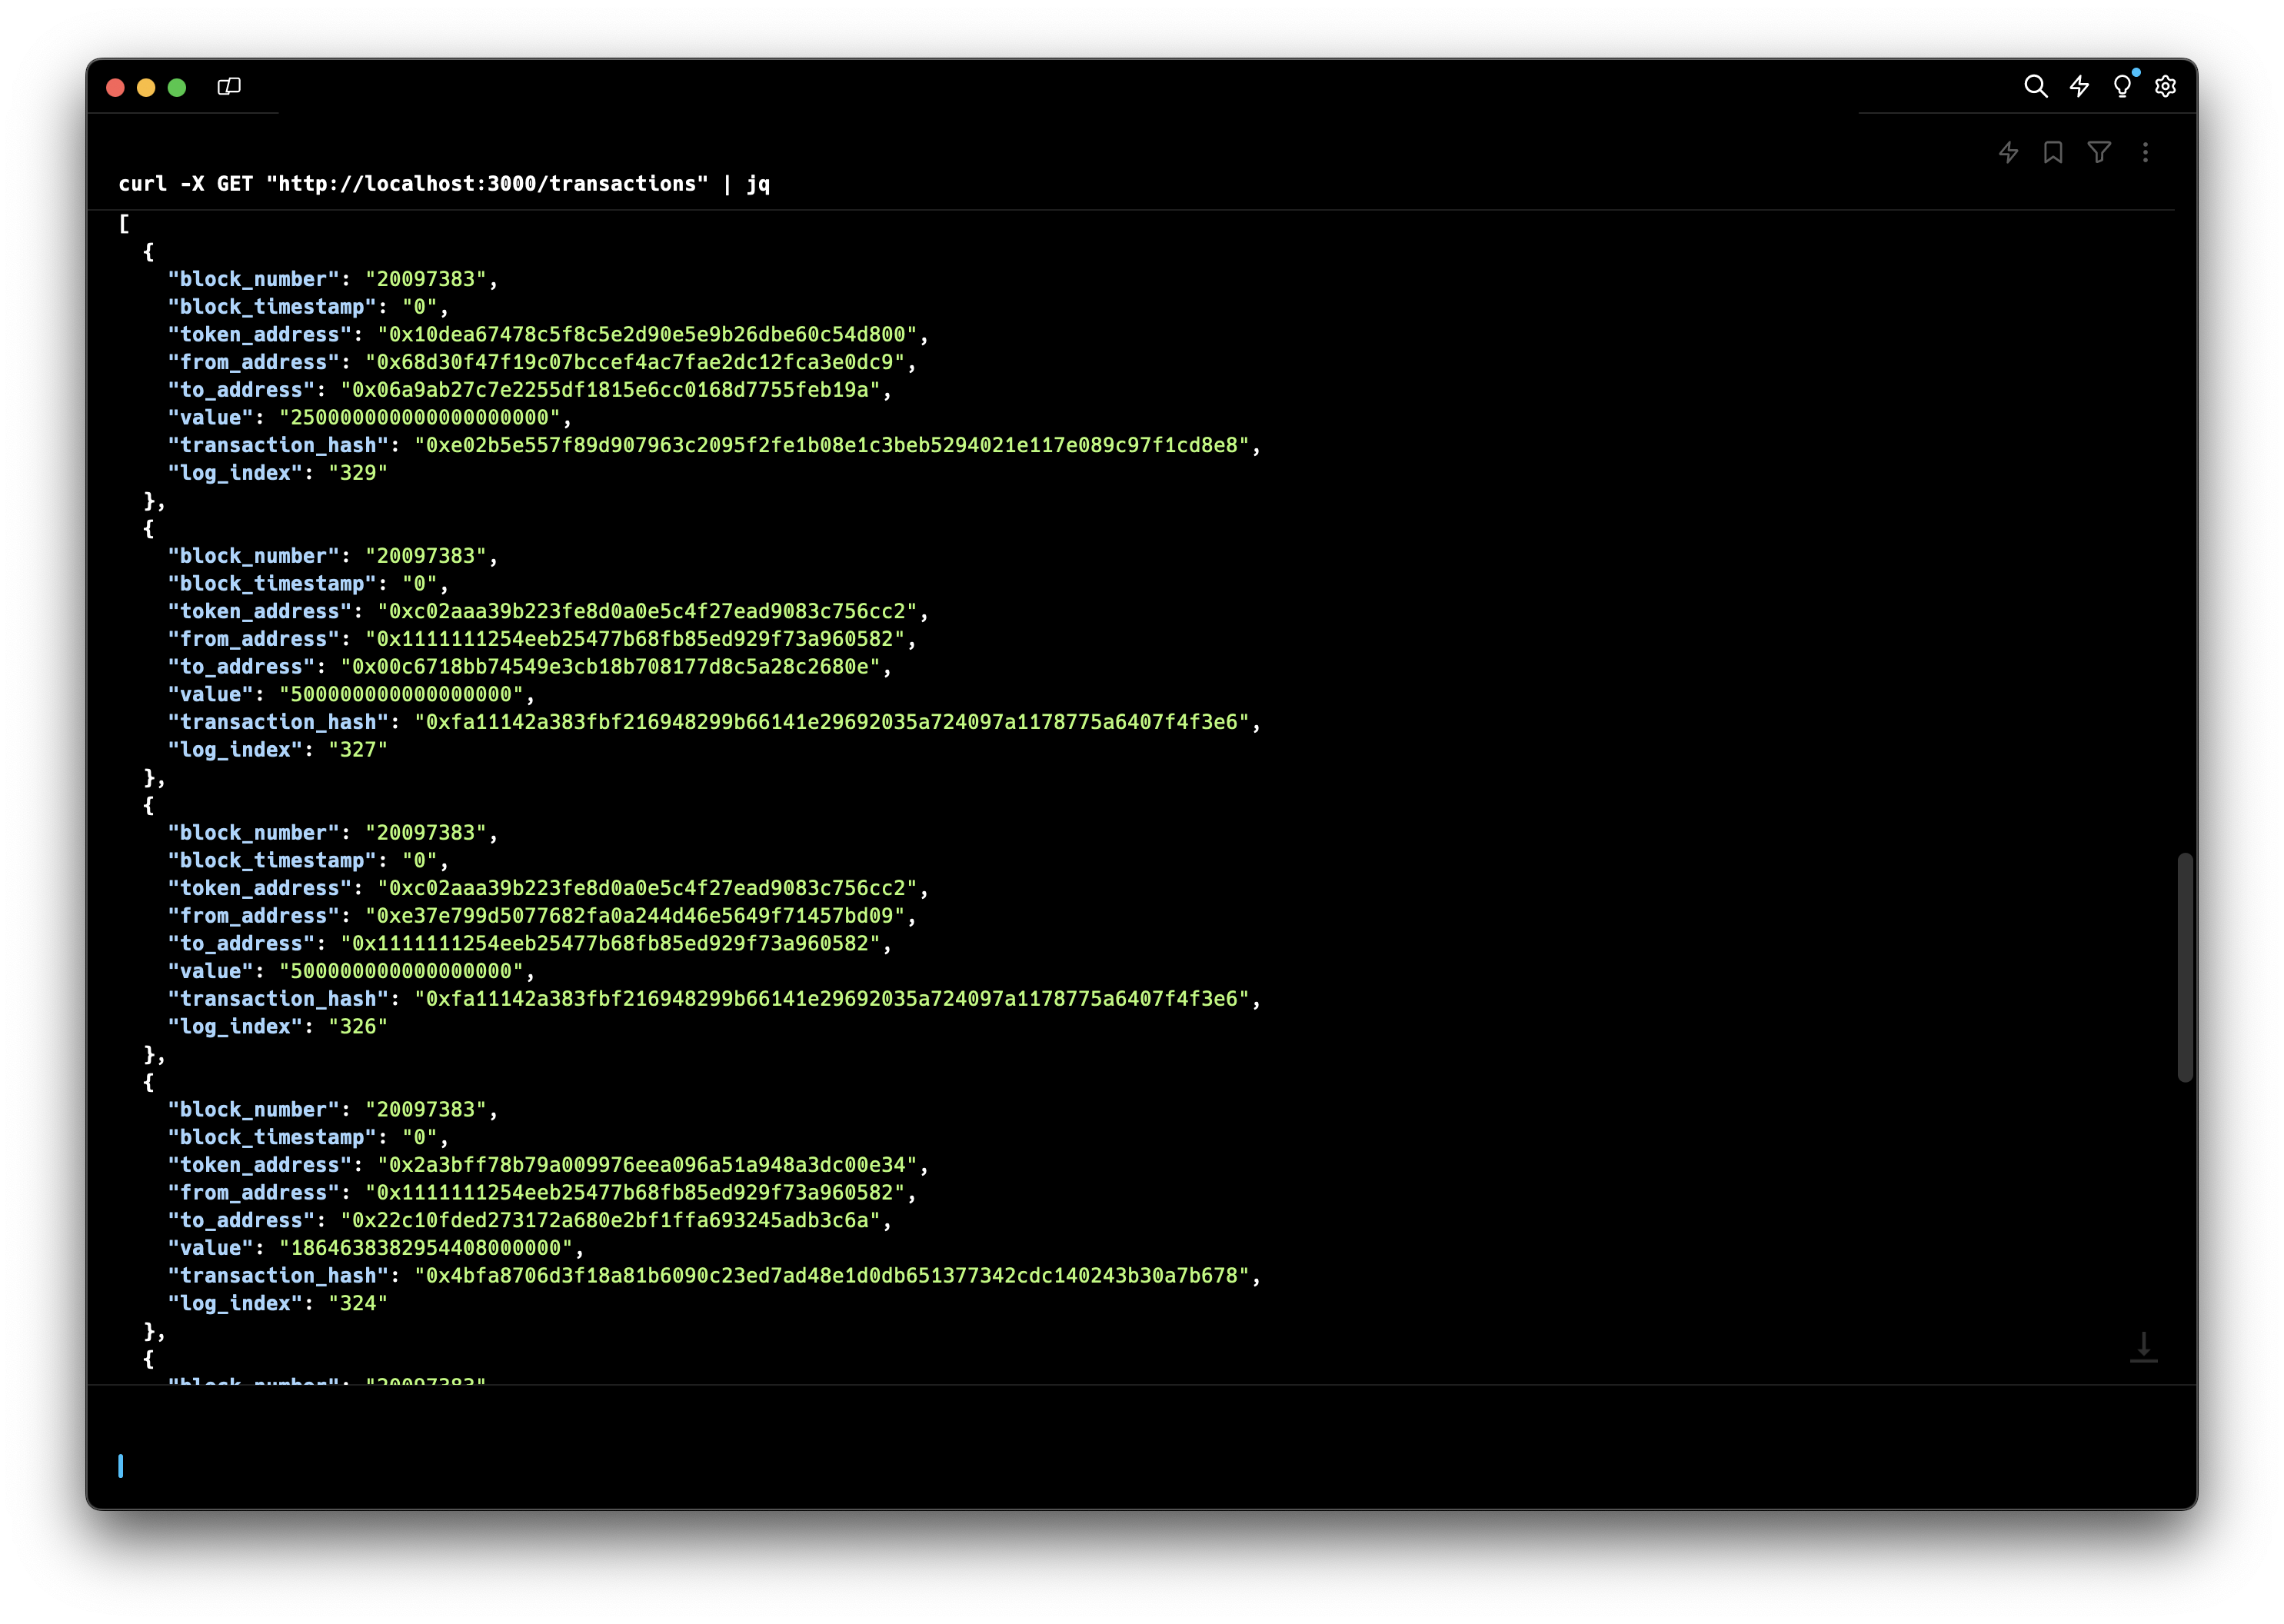
Here's an example of how to use curl to call the API and retrieve the latest 10 transactions:
curl -X GET "http://localhost:3000/transactions"
To retrieve a different number of transactions, use the limit parameter. For example, to retrieve 20 transactions:
curl -X GET "http://localhost:3000/transactions?limit=20"
Here is an example response. The API will return a JSON array of transactions. Each transaction object will contain the following fields:
[
  {
    "block_number": "20082751",
    "block_timestamp": "1718279891",
    "token_address": "0x10dea67478c5f8c5e2d90e5e9b26dbe60c54d800",
    "from_address": "0x68d30f47f19c07bccef4ac7fae2dc12fca3e0dc9",
    "to_address": "0x06a9ab27c7e2255df1815e6cc0168d7755feb19a",
    "value": "250000000000000000000",
    "transaction_hash": "0x5280fdf01e0c188feb299992642d1c45d2e09dca6d46ecd22a096e54cf6c8aab",
    "log_index": "270"
  },
  {
    "block_number": "20082751",
    "block_timestamp": "1718279891",
    "token_address": "0xbe0ed4138121ecfc5c0e56b40517da27e6c5226b",
    "from_address": "0x9c050472ccd69791a94d42bb8183036b84575170",
    "to_address": "0xcf939ab64b20fcccf4df71400d0aa82626c99b3f",
    "value": "4950219960000000000000",
    "transaction_hash": "0xf419967cd79f6d24592684a6b67e5836f3053e72ba512d5e4327d1e7c1d1bcf3",
    "log_index": "269"
  },
  {
    "block_number": "20082751",
    "block_timestamp": "1718279891",
    "token_address": "0xbe0ed4138121ecfc5c0e56b40517da27e6c5226b",
    "from_address": "0x932522ede00a769e178bf9b0dfff54474ba50f13",
    "to_address": "0xb3d319f1acba278ccf7fedaa3071a4992a668742",
    "value": "620000000000000000000",
    "transaction_hash": "0x1aea156bd62db2a0bb975ae3312f3dcef99276df15456191c7f6d35c9221c574",
    "log_index": "268"
  },
  {
    "block_number": "20082751",
    "block_timestamp": "1718279891",
    "token_address": "0xf3c3745894d979f8f85761bd060520bddbc464e9",
    "from_address": "0xd8e3c45154302c15c06ee1faf694ce6e53b09bee",
    "to_address": "0x8ad91364259b42f7c84ccd1d3661eaf3a06cbca7",
    "value": "41810000000000000000",
    "transaction_hash": "0x0499d13e2d0f15e7c379857b1354fc7fb9e4c1c5cbf6f167abf7d68812e49dca",
    "log_index": "267"
  }
]
To see the contents of the erc20_transfers table, run the following SQL query in your PostgreSQL client or use your preferred database management tool to inspect the data:
SELECT * FROM erc20_transfers LIMIT 10;
By following these steps, you will have a complete system that filters ERC20 transfer events using Streams.
More resources
- Technical Guide: How to Validate Incoming Streams Webhook Messages
- Technical Guide: Visualizing Real-Time Blockchain Data With Streams and React
- Technical Guide: How to Use Streams and Filters to Get Telegram Alerts
- Documentation: Streams - Getting Started
- Blog Post: Accelerate Your Blockchain Products with Streaming Indexed Data
Possible Ideas to Explore with Streams
- Token Analytics Dashboard: Create a dashboard to track and visualize token transfers, volumes, and trends.
- NFT Marketplace: Build an application to monitor and display NFT transactions and ownership changes.
- DeFi Monitoring Tool: Develop a tool to track DeFi protocol activities, including lending, borrowing, and liquidity provision.
- Real-Time Alerts: Set up a system to send real-time alerts for specific blockchain events or transactions.
- Historical Data Analysis: Use Streams to collect and analyze historical blockchain data for research or trading strategies.
Conclusion
In this guide, we've walked through the process of building a blockchain data indexer using QuickNode Streams, PostgreSQL, and Node.js.
Streams offers a powerful, flexible, and cost-effective solution for blockchain data management. By leveraging its capabilities, you can focus on developing innovative features and bringing products to market faster. We encourage you to explore Streams further and see how it can transform your blockchain data processing needs.
By utilizing Streams, you can build powerful applications and services that harness the full potential of blockchain data. The possibilities are endless, and we can't wait to see what you create!
If you have questions, please contact us directly. If you have any ideas or suggestions, such as new destinations, features, metrics, or datasets, you want us to support.
Also, stay up to date with the latest by following us on Twitter and joining our Discord and Telegram announcement channel.
We ❤️ Feedback!
Let us know if you have any feedback or requests for new topics. We'd love to hear from you.