9 min read
Your Quicknode Stream can now deliver to multiple destinations simultaneously from a single pipeline. No duplicate streams, no config drift, and no additional charge per destination. Available destinations per stream vary by plan. Learn more.
Overview
Retrieving historical data on Ethereum can be challenging, especially when you only need a specific subset of data. This guide will show you how to use Quicknode's Streams to backfill historic Ethereum data, filter it for ERC-20 token transfers, and send it to a Postgres database for further analysis.
Let's get started!
What You Will Do
- Create a Stream on Quicknode
- Filter a specified historic range of Ethereum blocks to retrieve ERC-20 token transfers
- Create a Supabase Postgres database to store the filtered data
- Route the filtered data to your database
- Create a table in your database that contains the parsed transaction data
- Write SQL queries to analyze the token transfer history
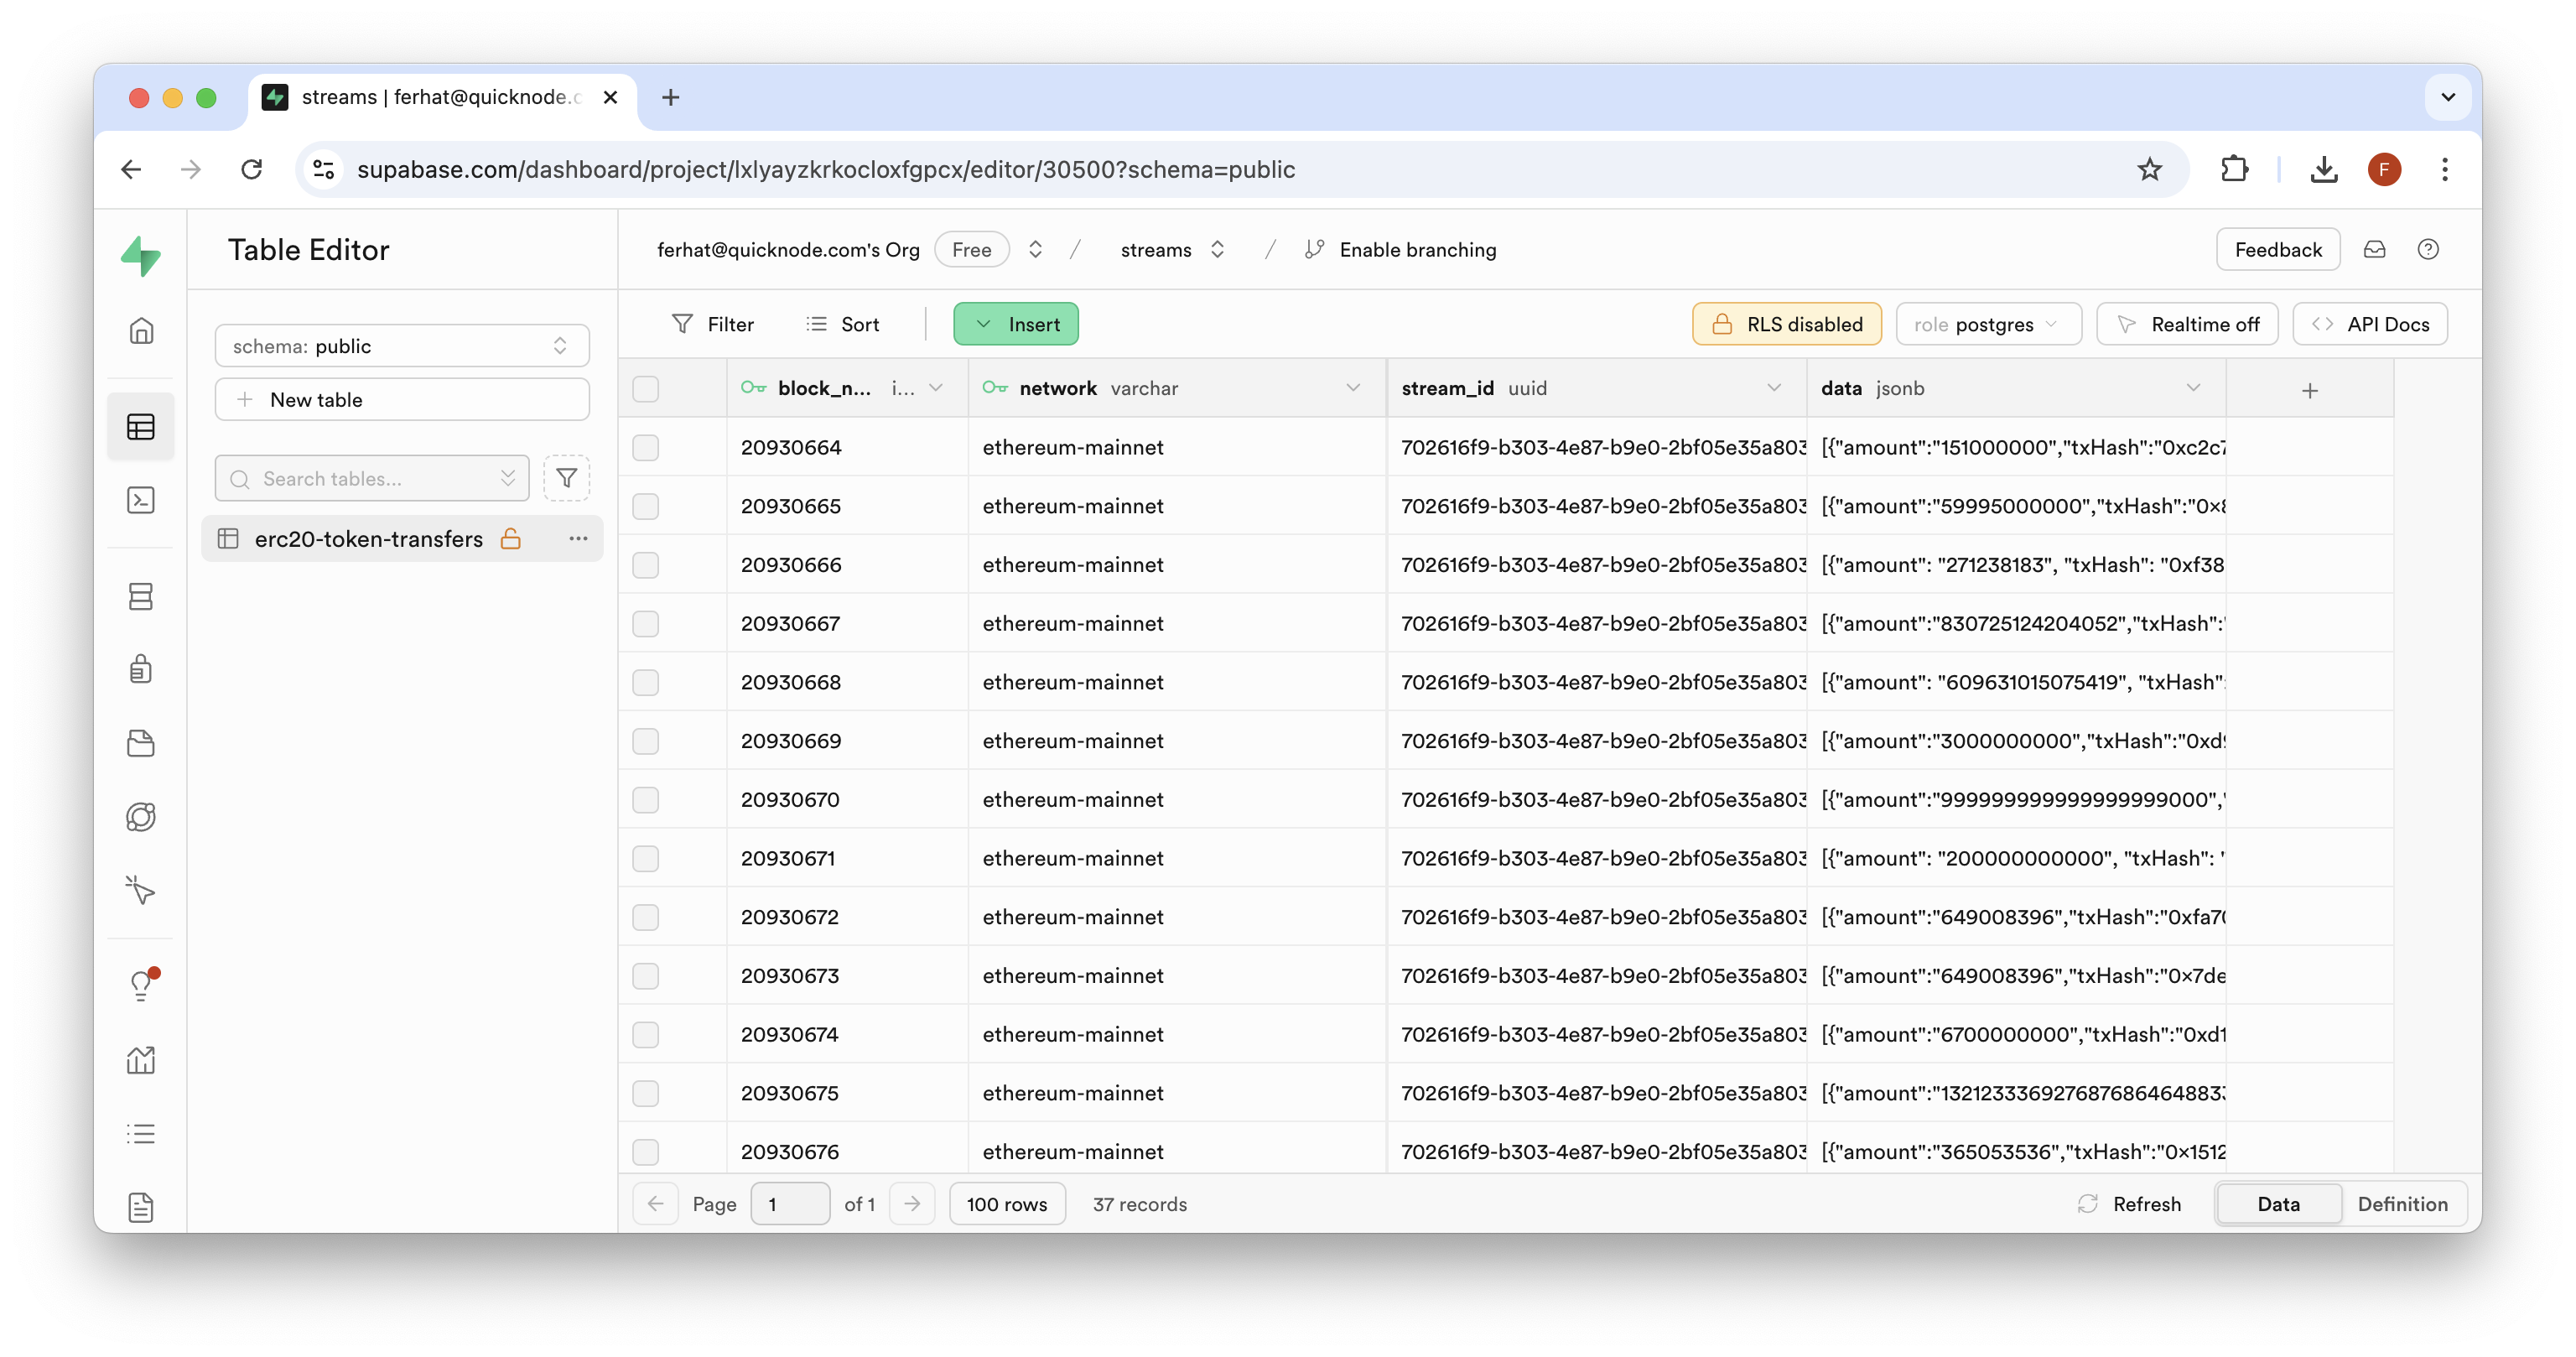
By the end of this guide, you will have a Postgres database containing filtered Ethereum ERC-20 token transfer data:
What You Will Need
- A Quicknode account
- Basic knowledge of Ethereum and ERC-20 tokens
- A Postgres database - we will be using Supabase in this guide
Step 1: Create a Stream
From your Quicknode dashboard, navigate to the Streams page and click the "+ Create Stream" button, or create one here.
Select "Ethereum" and "Mainnet" network from the settings card, and "Transactions" as the dataset:
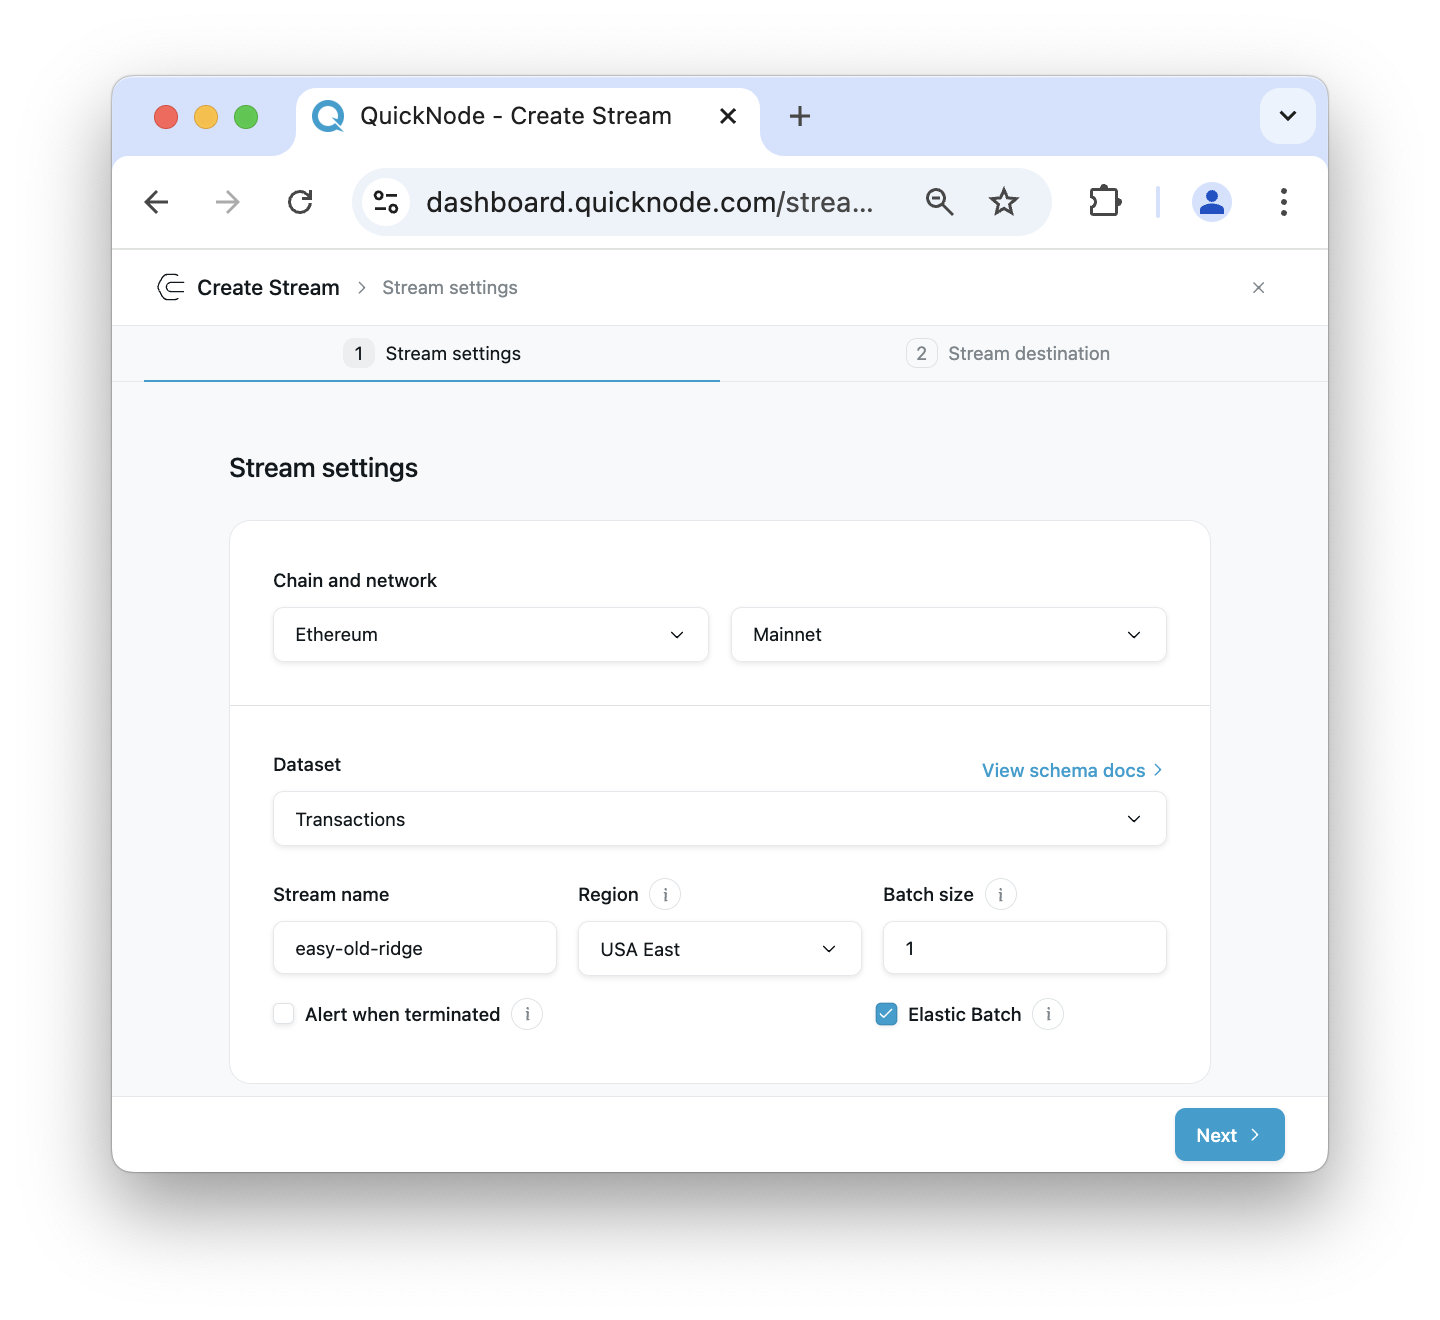
You can choose to give your Stream a unique name or use the automatically generated one. You'll also see an option to set the batch size for your Stream data. The default setting of 1 is optimized for real-time streaming. However, for historical data backfilling, a larger batch size can be more efficient. Consider setting the batch size to 10 for this example, but feel free to adjust based on your specific requirements and use case.
For the "Stream Start" option, we'll use the latest block number at the given time as our starting block. However, if you were backfilling historical data, you would typically choose a much earlier block number as your starting point. For the "Stream end" option, check the toggle box and set the end block number to 100 blocks further than the start block. This gives us a manageable sample size for the demonstration. Optionally, you can set the Stream to not end, but be aware this will result in continuous data retrieval.
Next, select "Modify the payload before streaming", this step is crucial as you will be only filtering for the relevant data you need and won't have to deal with cleaning unwanted data.
You should now see a JavaScript code editor for your main function.
function main(stream) {
  const data = stream.data

  return data;
}
If you don't filter your data, you'll receive all transaction data for every block in the specified block range, which can be very large and potentially expensive. The transaction data returned is from Quicknode's transaction dataset and returns a JSON object for each transaction. Here's an example of what a single unfiltered transaction object looks like below:
{
  "blockNumber": "17528802",
  "timeStamp": "1686787319",
  "hash": "0x9d8a0c70d50e3a6dd742264eba6eedc233715b28e1801dd4fbc504beb09d1465",
  "nonce": "1563",
  "blockHash": "0x9ef846bd228c7d11c5e7b63758ed1fda0c2d95b536f4e0bb37568f510e7d2ee1",
  "transactionIndex": "38",
  "from": "0x06fda0758c17416726f77cb11305eac4c6dc4ae1",
  "to": "0xa0b86991c6218b36c1d19d4a2e9eb0ce3606eb48",
  "value": "0",
  "gas": "65428",
  "gasPrice": "14704923731",
  "isError": "0",
  "txreceipt_status": "1",
  "input": "0xa9059cbb000000000000000000000000d6df932a45c0f255f85145f286ea0b292b21c90b000000000000000000000000000000000000000000000000000000006b9aa980",
  "contractAddress": "",
  "cumulativeGasUsed": "2392341",
  "gasUsed": "52379",
  "confirmations": "2504025",
  "methodId": "0xa9059cbb",
  "functionName": "transfer(address _to, uint256 _value)"
}
In the next section, we'll dive into modifying the Filter code so it only tracks ERC-20 transfers.
Step 2: Filter the Stream Data
Now, let's adjust the Filter code so that it only tracks transactions with ERC-20 transfers. Update the code to match the following:
function main(stream) {
    try {
        const data = stream.data
        const transactions = data[0];
        const filteredTransactions = [];
        const transferMethodId = "0xa9059cbb";

        transactions.forEach(transaction => {
            if (typeof transaction === 'object' && transaction !== null && typeof transaction.input === 'string') {
                if (transaction.input.startsWith(transferMethodId)) {
                    const toAddress = "0x" + transaction.input.substr(34, 40);
                    const value = BigInt("0x" + transaction.input.substr(74));

                    filteredTransactions.push({
                        txHash: transaction.hash,
                        fromAddress: transaction.from,
                        toAddress: toAddress,
                        amount: value.toString(),
                        tokenContract: transaction.to,
                        blockNumber: transaction.blockNumber,
                    });
                }
            }
        });

        return filteredTransactions;
    } catch (e) {
        return {error: e.message};
    }
}
Here's a recap of what the filter code does:
- The
mainfunction takes astreamparameter, which is expected to contain the payload data (an array of transactions in this case) and the metadata of the Stream. - It initializes an empty array
filteredTransactionsto store the filtered results. - The
transferMethodIdis set to "0xa9059cbb", which is the method ID for the ERC20 token transfer function. - The function iterates over each transaction in the
streamarray: a. It checks if the transaction is a valid object with aninputproperty that's a string. b. If theinputstarts with the transfer method ID, it processes the transaction:- Extracts the
toAddressfrom the input data (bytes 4-23 of the input, excluding the method ID). - Extracts the
value(transfer amount) from the input data (bytes 24 onwards) and converts it to a BigInt. c. It then constructs a new object with the relevant transaction details and adds it to thefilteredTransactionsarray.
- Extracts the
- Finally, it returns the
filteredTransactionsarray. - If any error occurs during this process, it catches the error and returns an object with an error message.
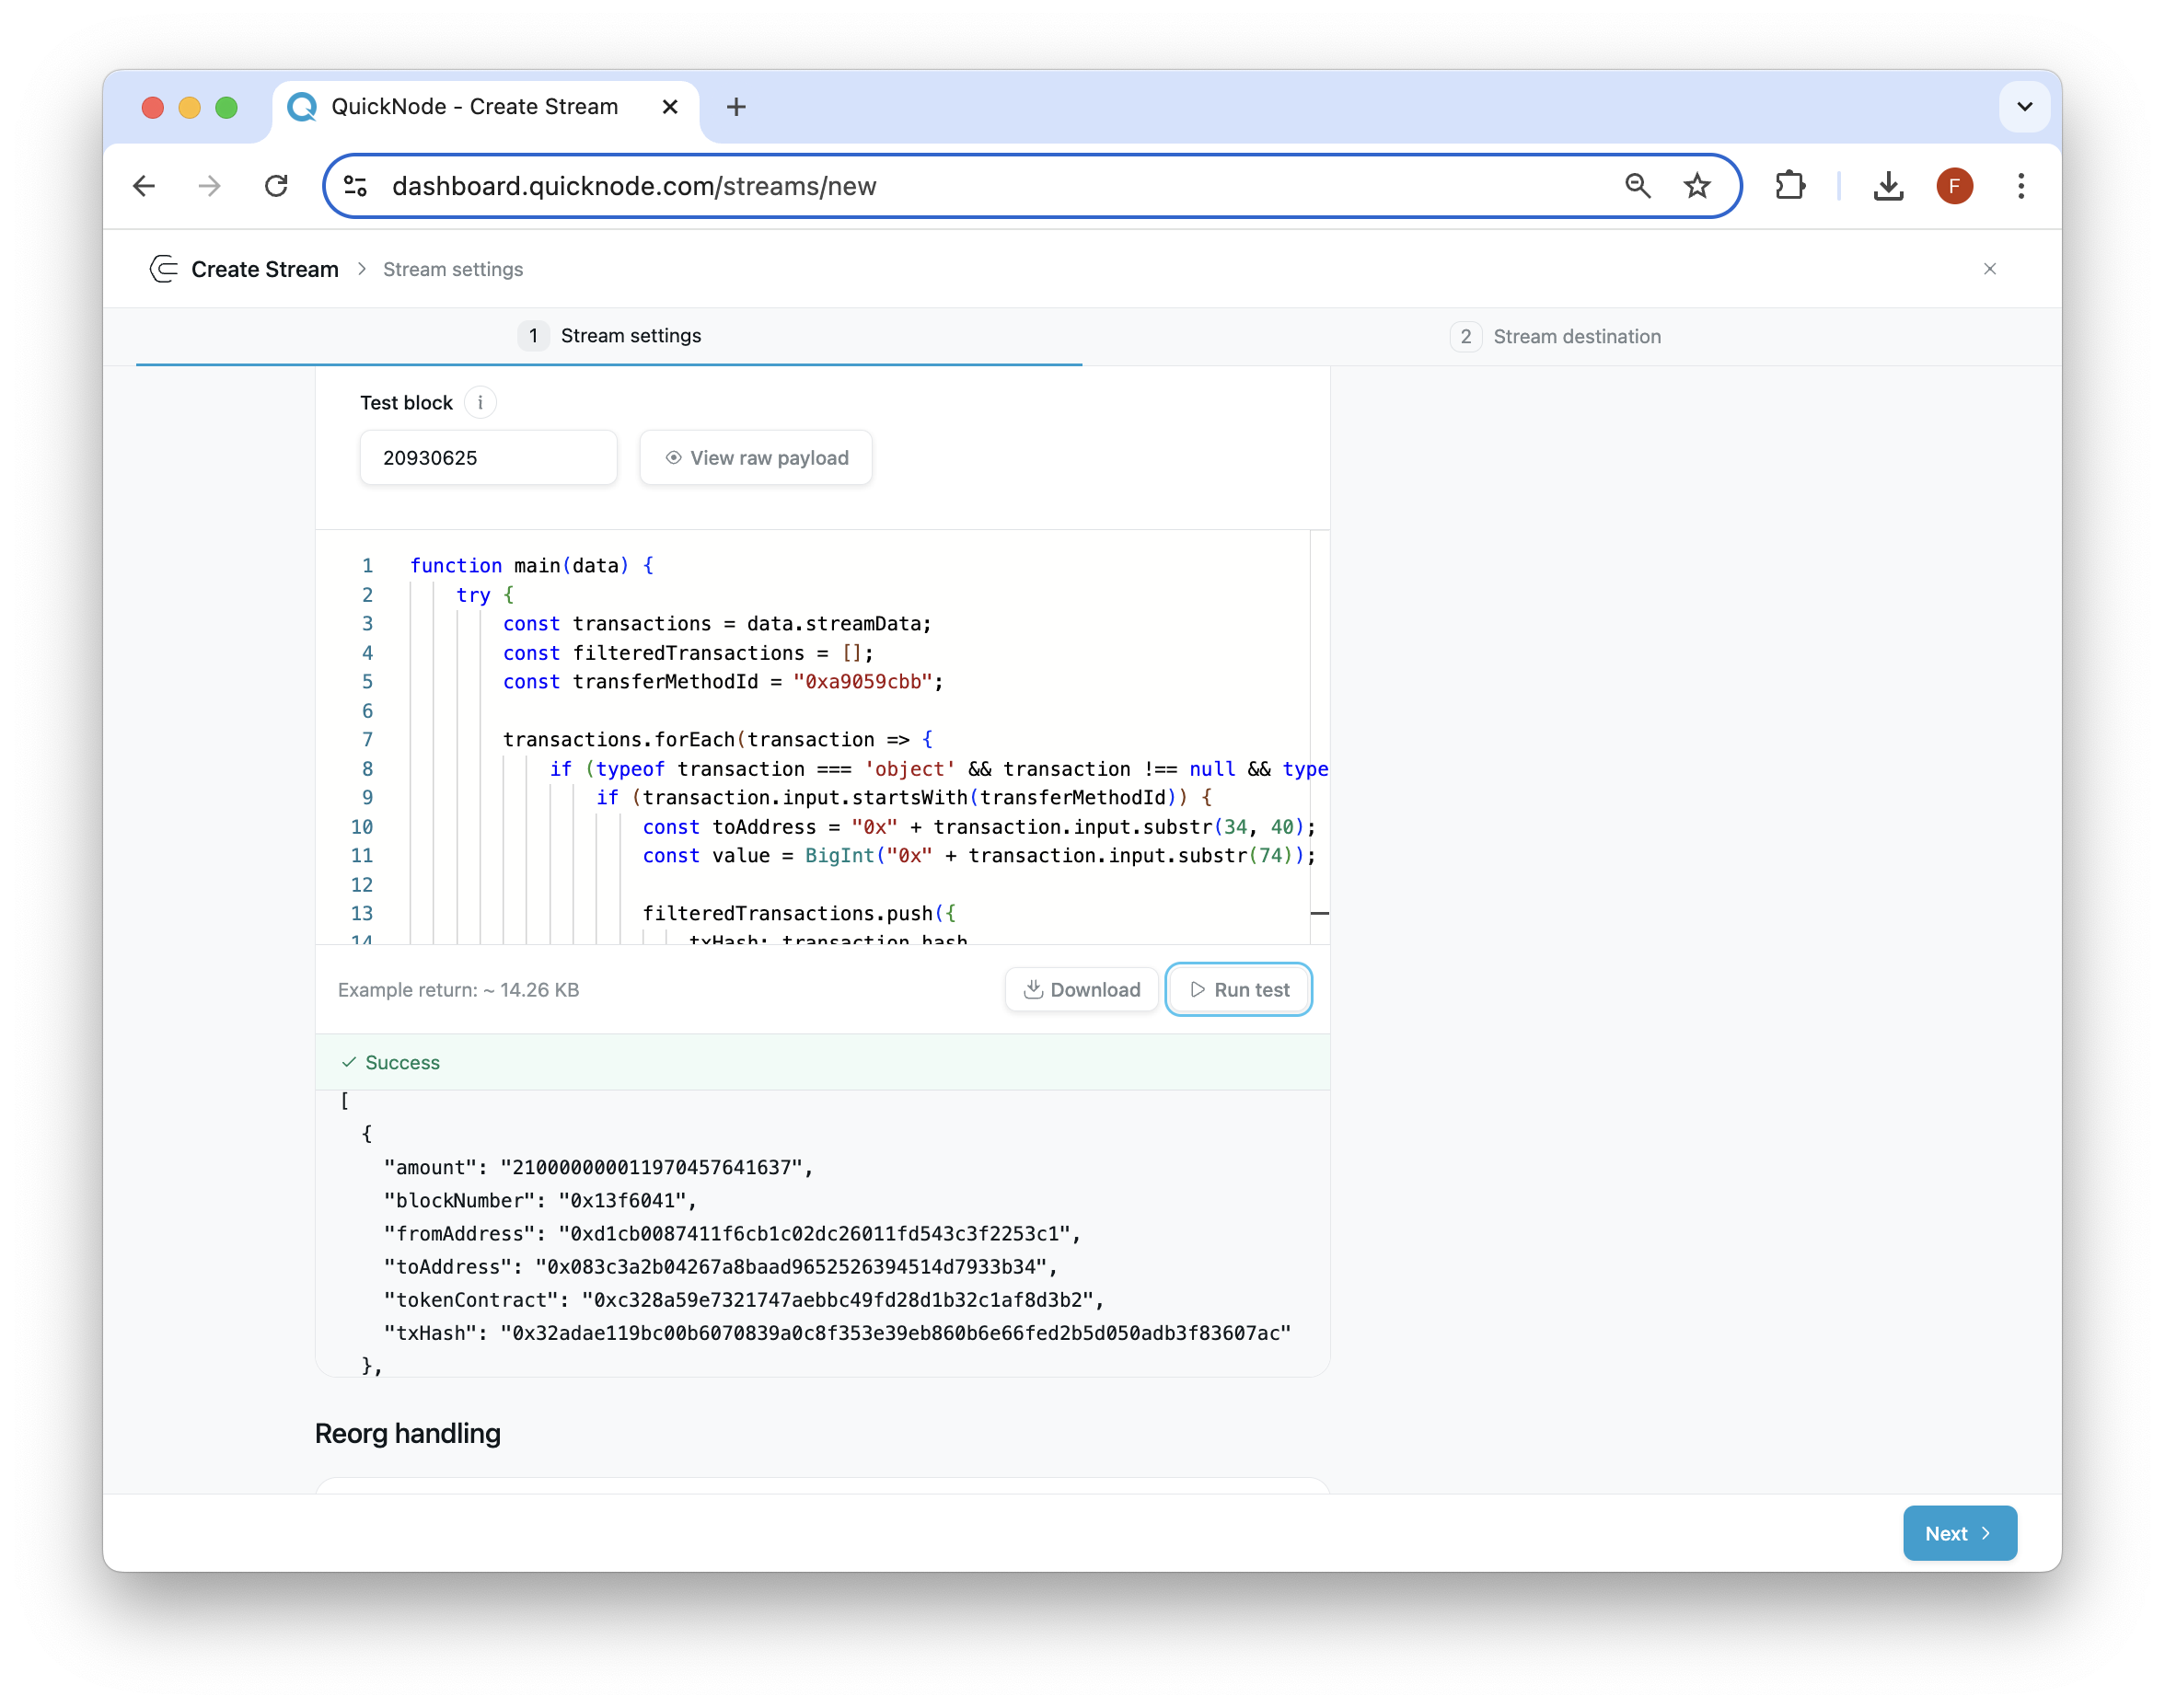
If you click "Run test", you should see some transfers similar to the below (this is assuming the block number you tested on has token transfer transactions). You can use the block 20930625 for testing to replicate the same results:
Now, click Next in the bottom-right corner to move to the Stream destination set up.
Step 3: Set Up Your Database
Before we set up our Stream's destination, we need a place to store the data. We'll use a Postgres database for this guide. If you don't have a database, you can create one on Supabase. Remember your database password as you'll need it later.
Our Stream will create a table in your database automatically. We just need to provide the connection details to our Stream.
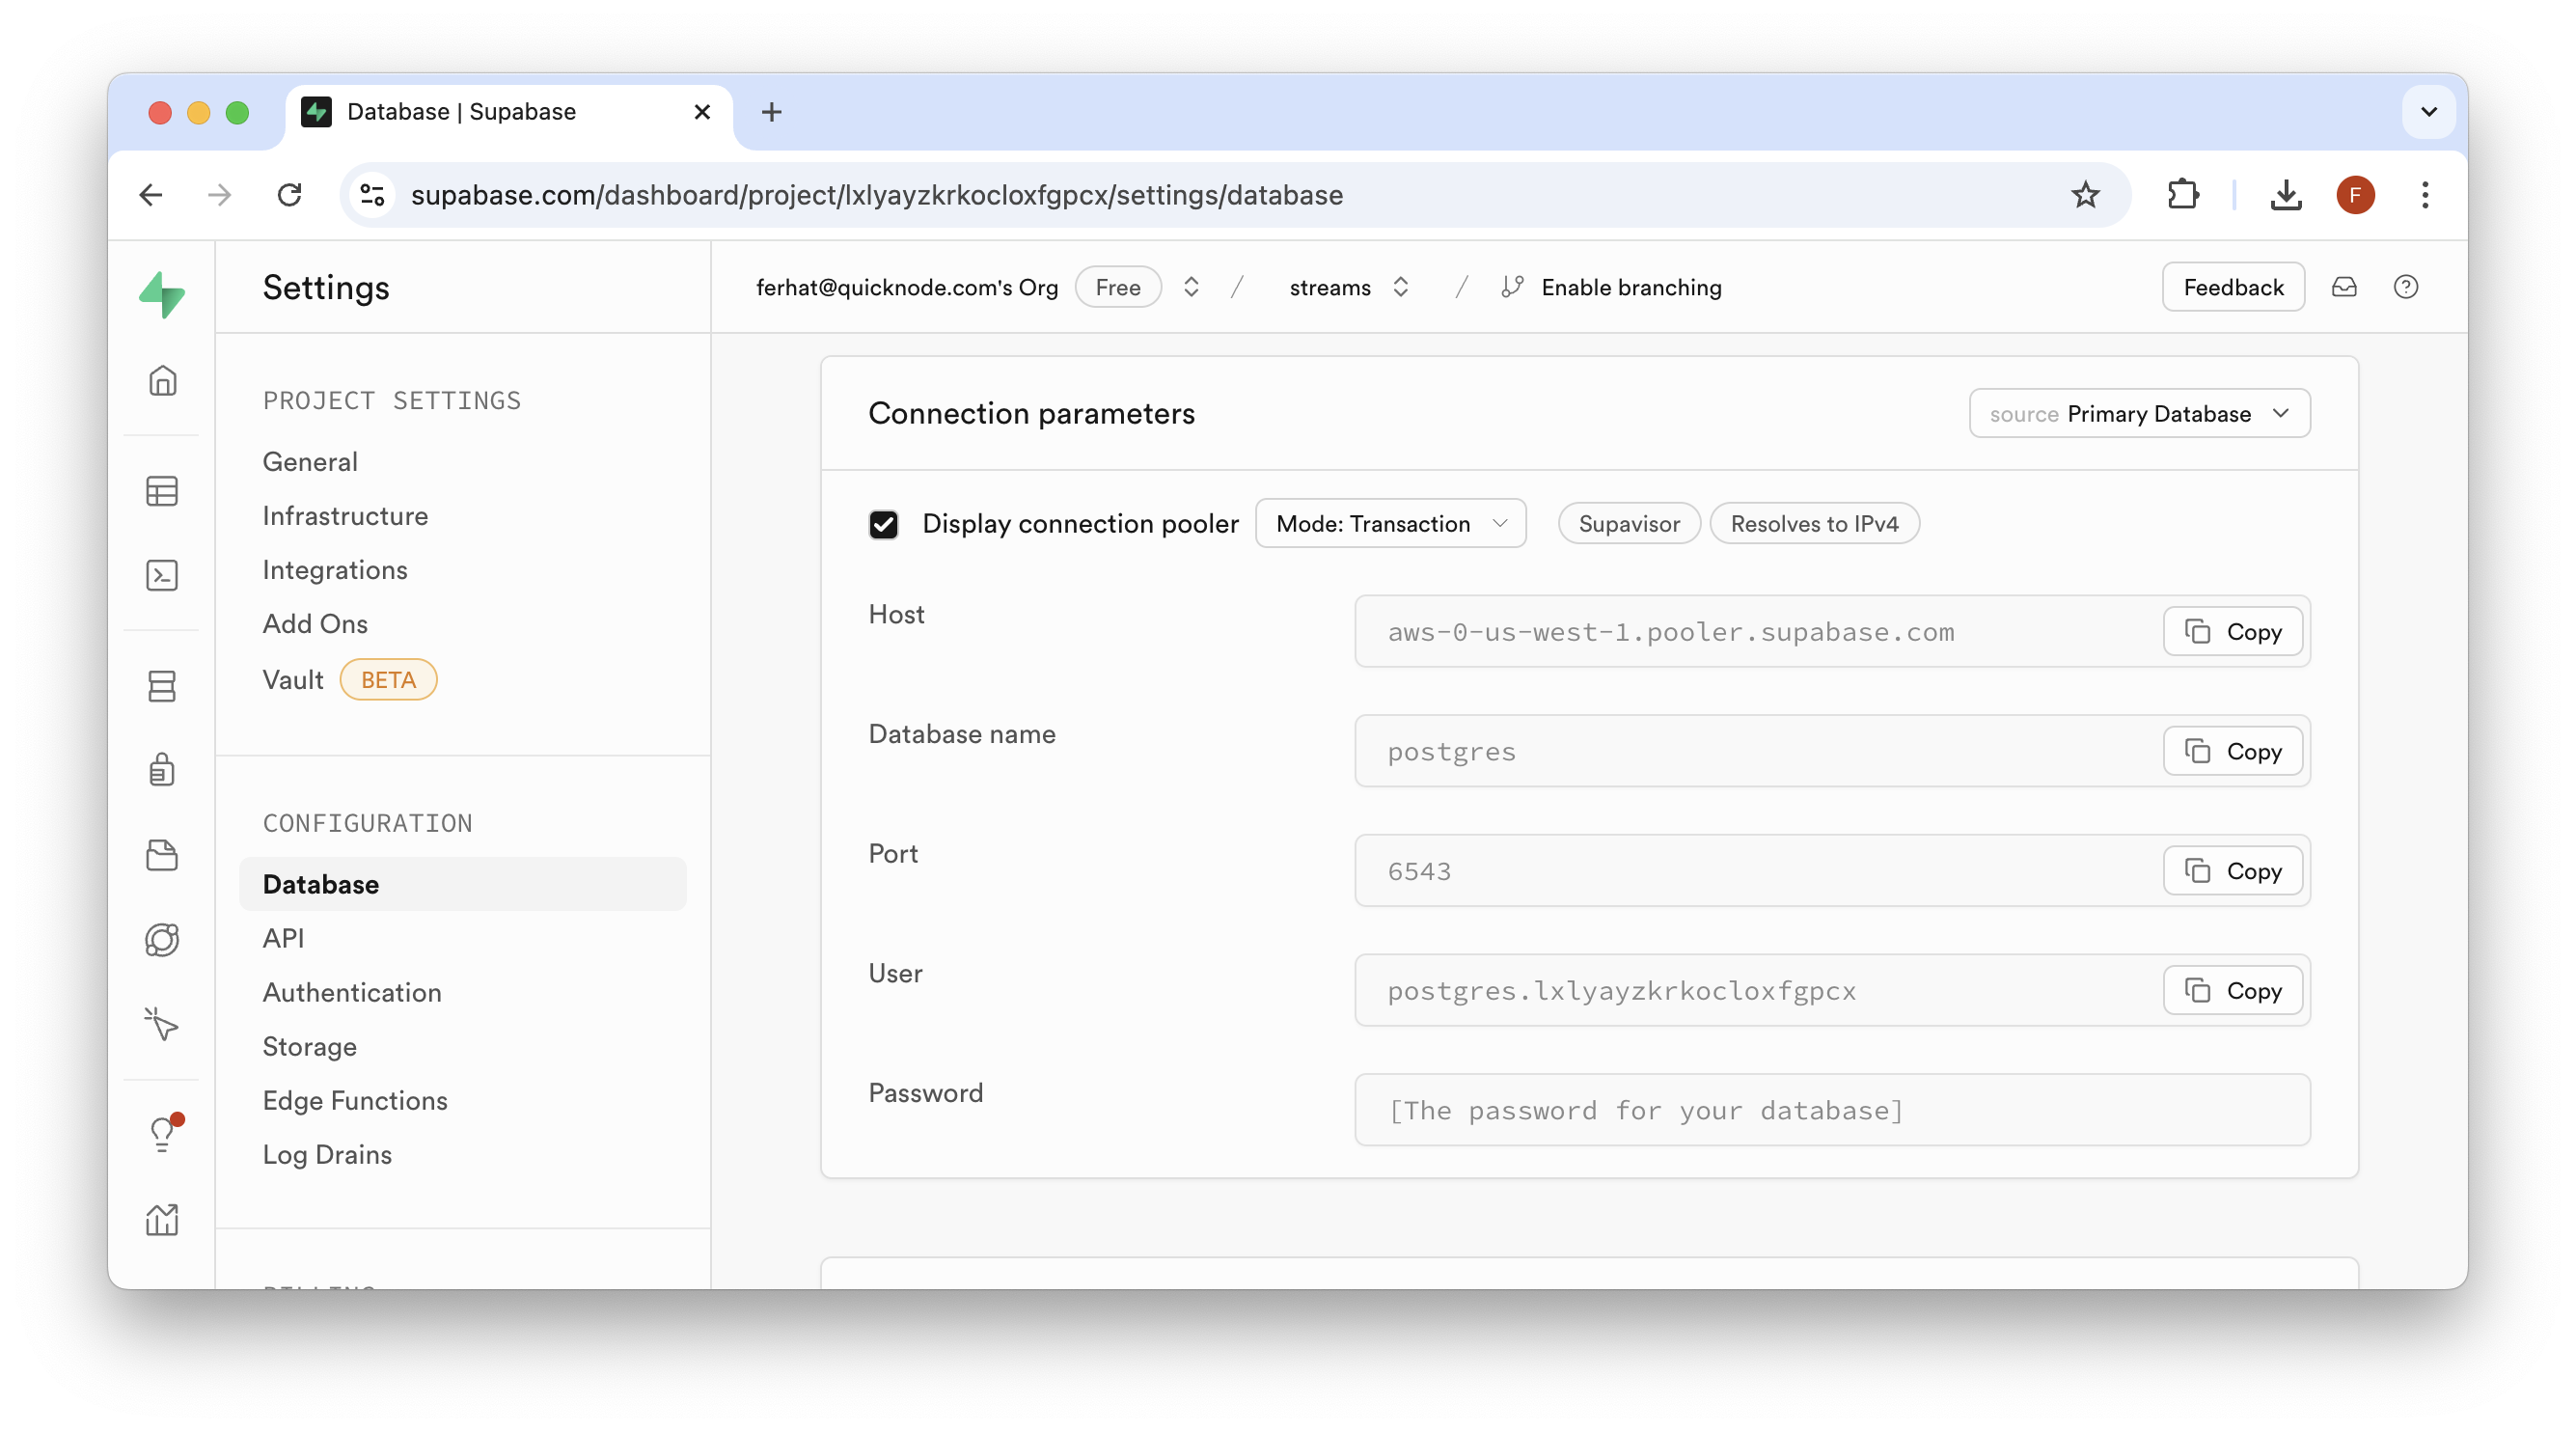
If you're using Supabase, find your connection information in the "Project Settings" page, under the "Database" tab:
Keep this information ready. Now, let's go back to our Stream setup page.
Step 4: Set Up Your Stream's Destination
Now we'll tell our Stream where to send the data:
- Go to your Stream configuration page.
- In "Destination type", choose "PostgreSQL".
- Enter your database connection details (from Step 3) and name your table - we'll use
erc20-token-transfers.
Once the details are filled in, test the connection by clicking the "Test Destination" button. If successful, you'll see a green popup:
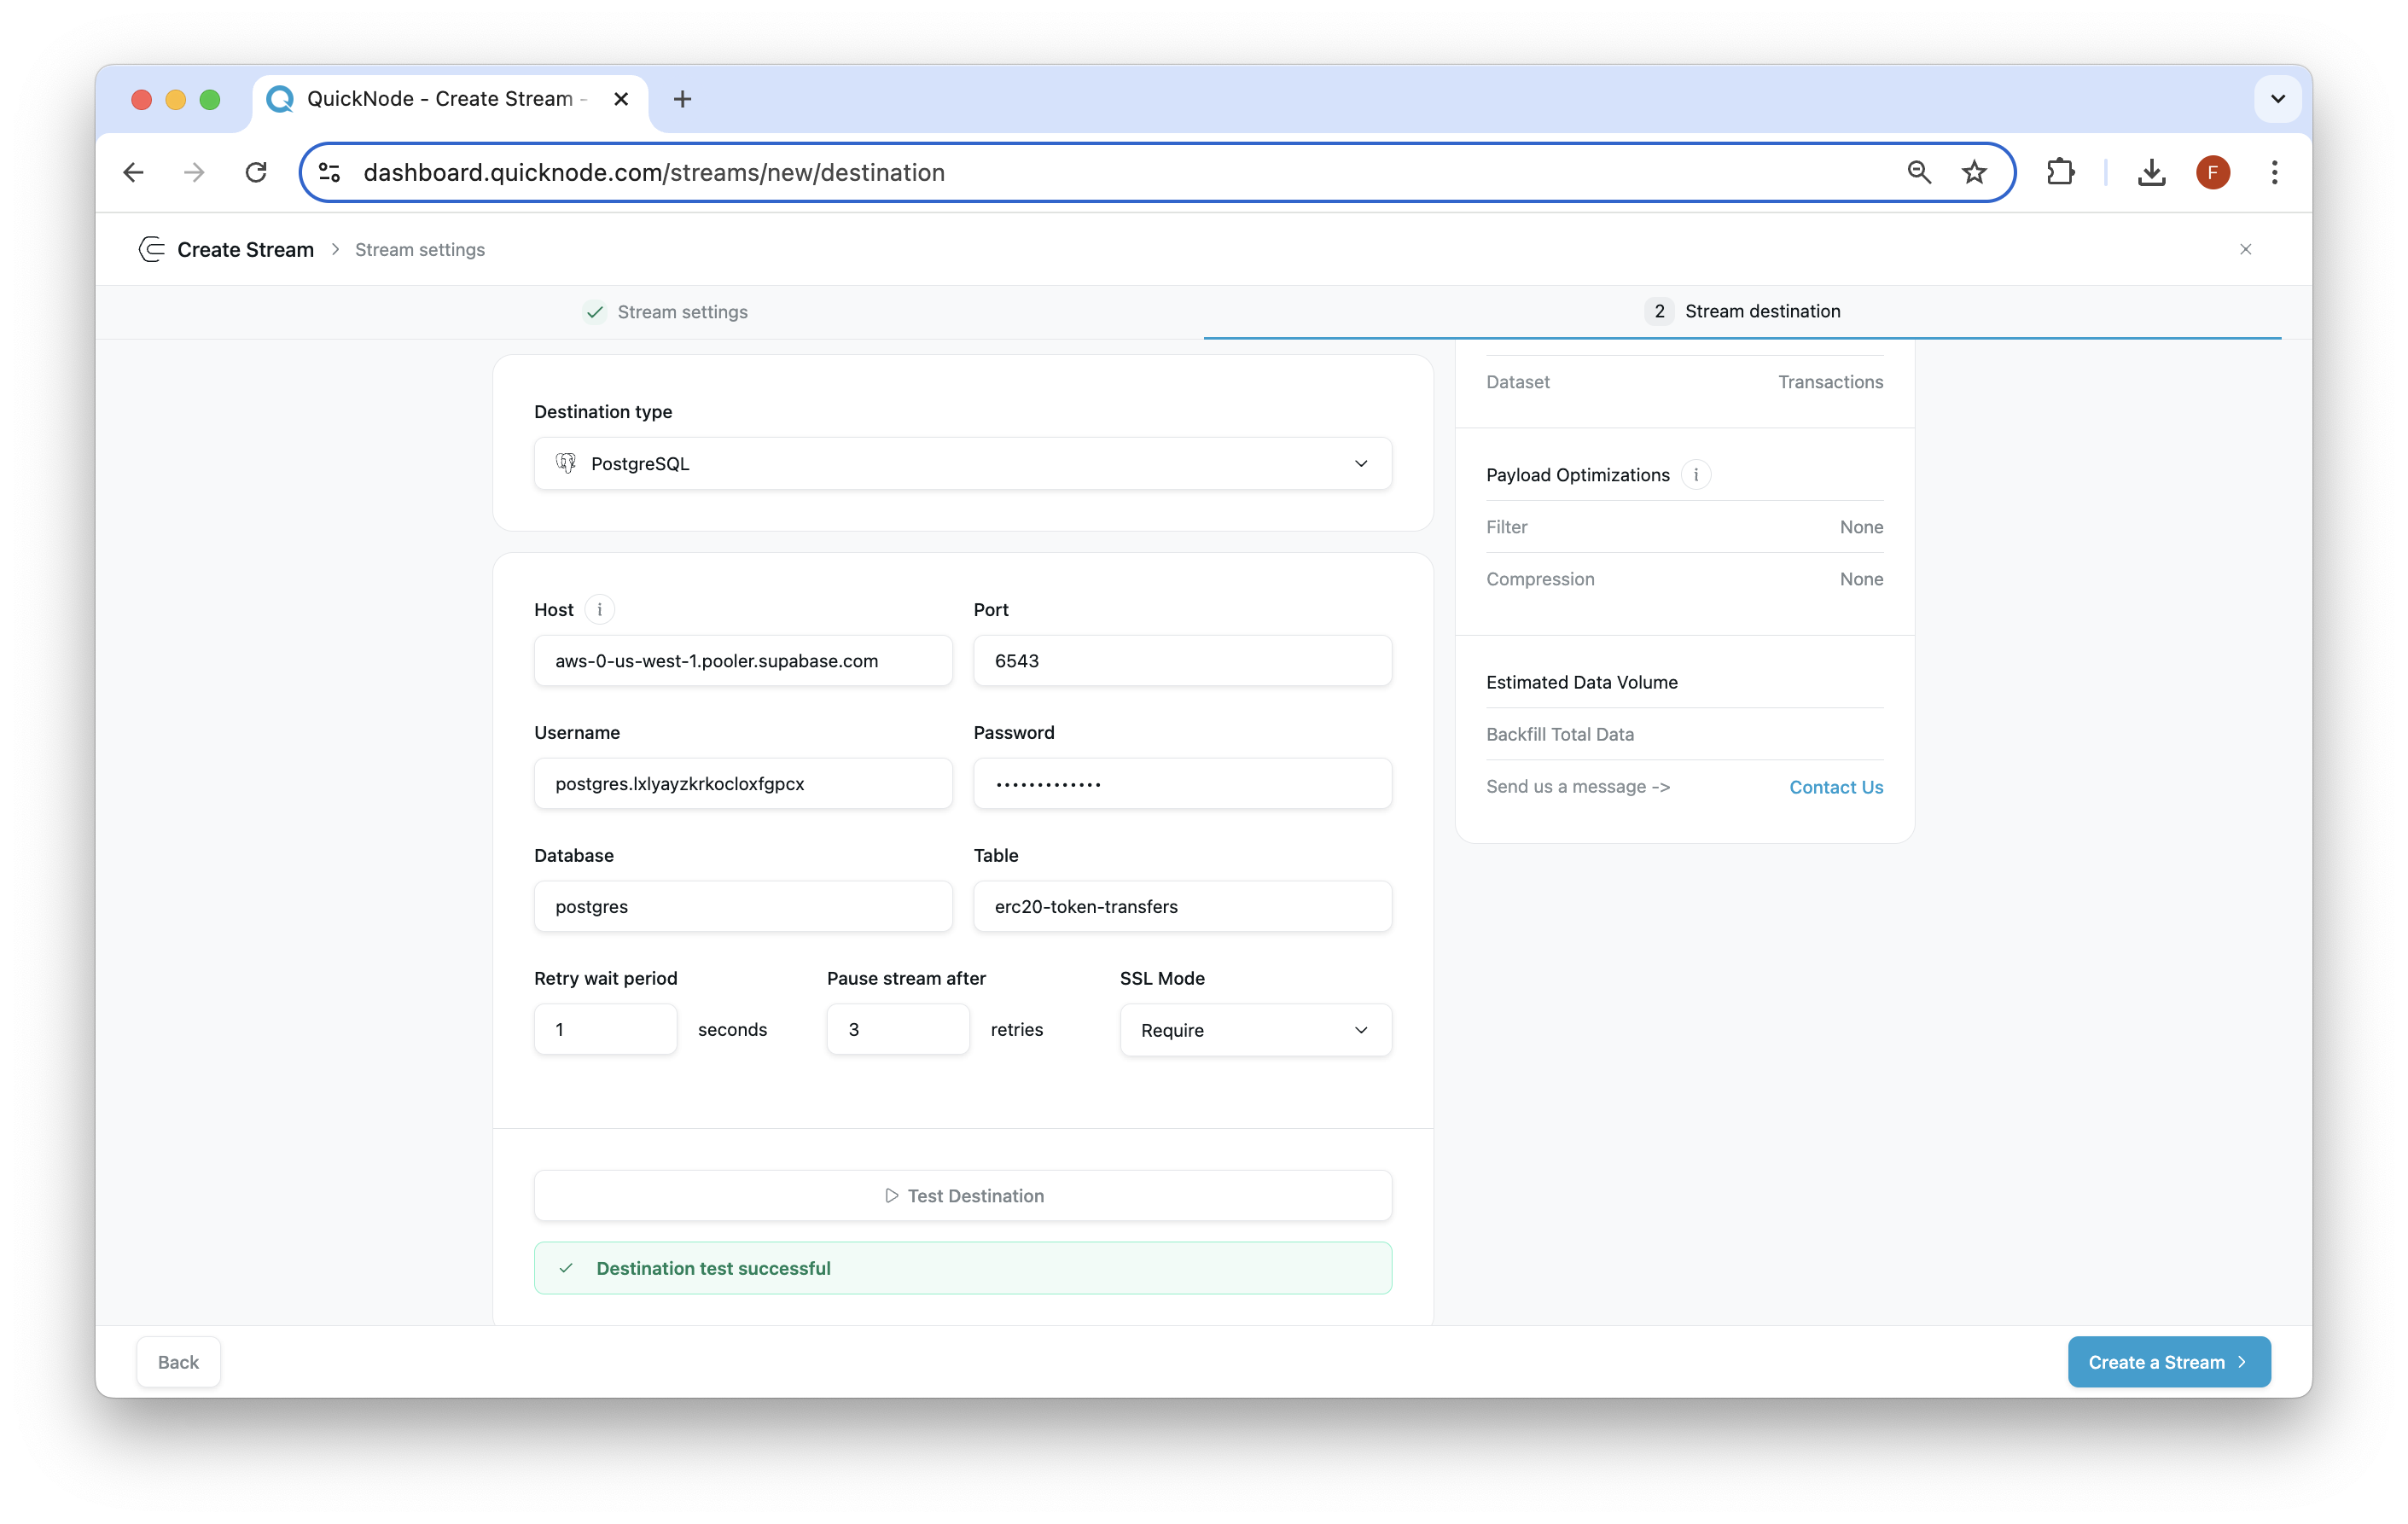
Then, click "Create a Stream" to finish.
Step 5: View Database & Query
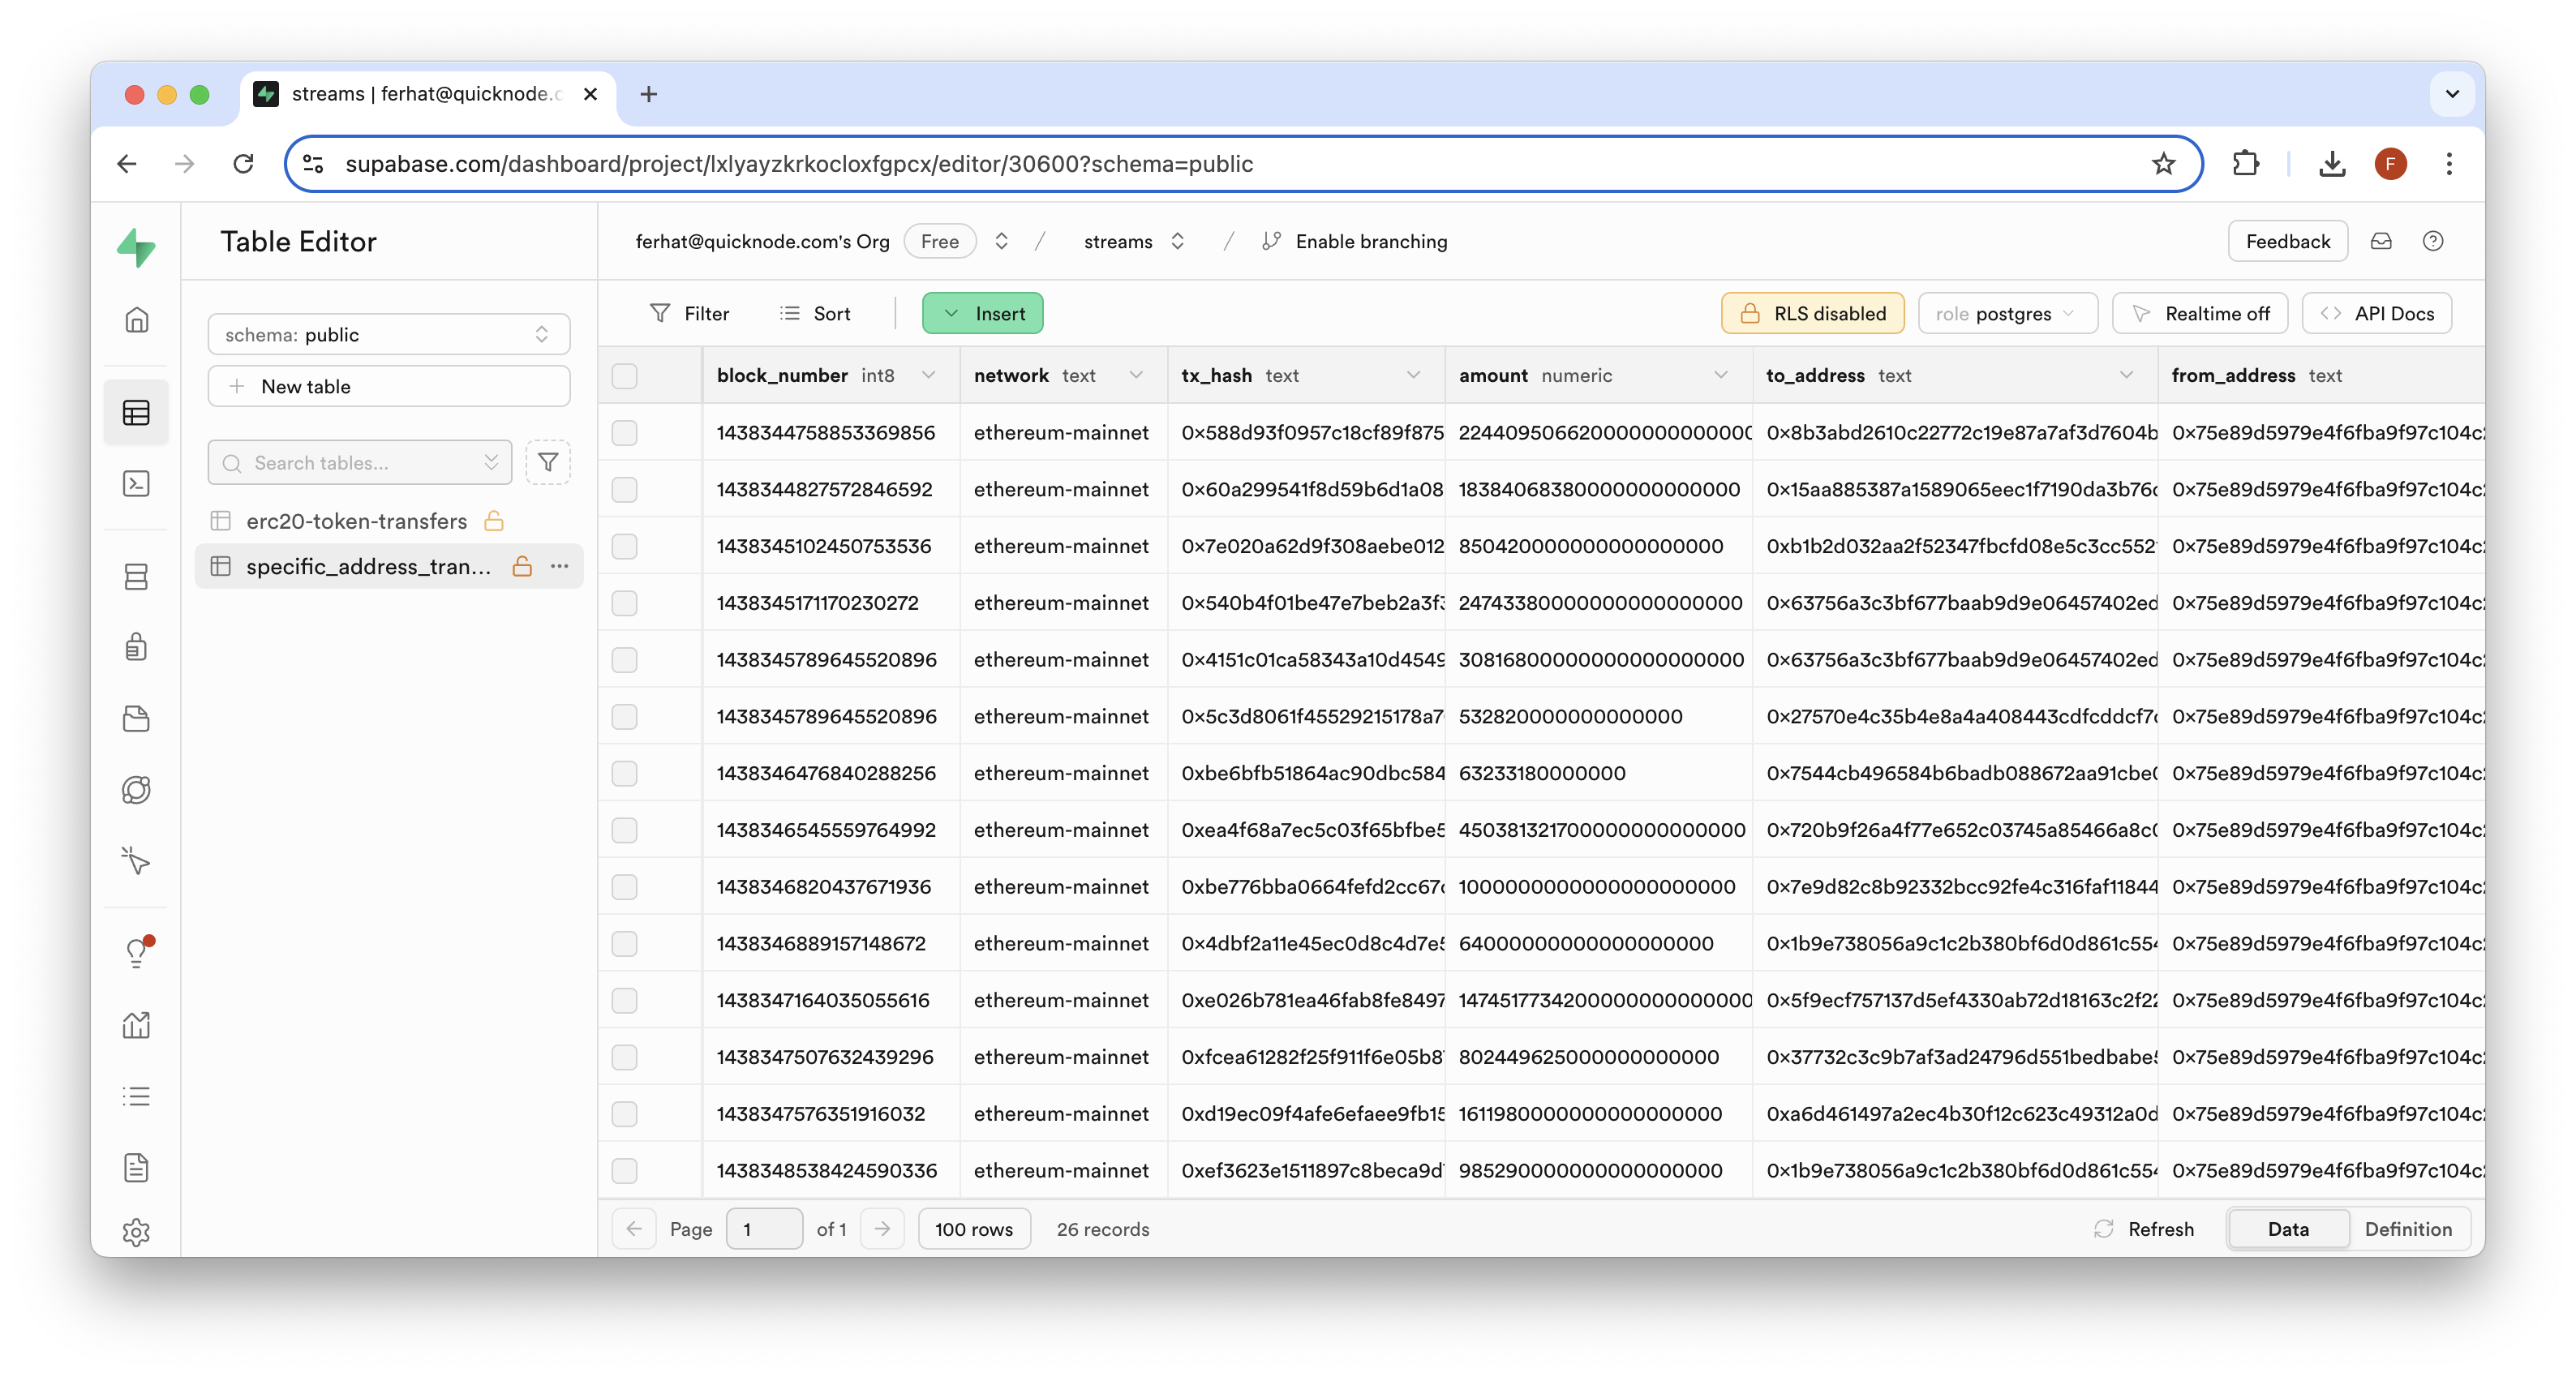
Now that your Stream is created, you should see Ethereum transaction data in Supabase's table viewer:
We can see that each row contains a JSON object within the data field. Since these transfers cover all types of addresses, you might want to focus on a particular wallet address. Let's set up a new table with only transfers matching a specific address. Before we do so, we need to find an address to look up.
Go back to your "erc20-token-transfers" table and find an address you want to investigate (i.e., within the data column, look for either the fromAddress or toAddress fields). Once you've identified an address you want to create a separate token transfer table for, you can continue.
Now, navigate to the "SQL Editor" tab on Supabase. We'll input the following queries together (i.e., Step 1 & Step 2), then click "Run" to execute them.
1. Create Table
CREATE TABLE specific_address_transfers (
    block_number BIGINT,
    network TEXT,
    tx_hash TEXT,
    amount NUMERIC,
    to_address TEXT,
    from_address TEXT,
    token_contract TEXT
);
This will create a new table named specific_address_transfers with columns for transfer details.
2. Insert Data
INSERT INTO specific_address_transfers (
    block_number,
    network,
    tx_hash,
    amount,
    to_address,
    from_address,
    token_contract
)
SELECT
    (('x' || LTRIM(transfer->>'blockNumber', '0x'))::bit(64)::bigint),
    network,
    transfer->>'txHash',
    (transfer->>'amount')::NUMERIC,
    transfer->>'toAddress',
    transfer->>'fromAddress',
    transfer->>'tokenContract'
FROM
    "erc20-token-transfers",
    jsonb_array_elements(data::jsonb) AS transfer
WHERE
    transfer->>'fromAddress' = 'ETHEREUM_ADDRESS'
    OR transfer->>'toAddress' = 'ETHEREUM_ADDRESS';

SELECT COUNT(*) FROM specific_address_transfers;
This will insert data into the new table by:
- Selecting from the "erc20-token-transfers" table (update this if needed)
- Parsing the JSON data in the 'data' column
- Converting the hexadecimal block number to a bigint
- Filtering for transfers where the specified address is either the sender or receiver (you will need to update the
ETHEREUM_ADDRESSvalue to a valid address) - Counting the number of times a transfer was detected for the given address
IMPORTANT: If you are using a different table name, you will need to update the table name
erc20-token-transfersto your table name. Additionally, update theETHEREUM_ADDRESSto a valid Ethereum address you want to create a separate table to track transfers for.
Now, with both queries in the editor, click the "Run" button to execute the query. You should see a result of "Success. No rows returned" or "Count: {number}", and a new table once you navigate back to the "Table Editor" tab:
That's it for now! You've successfully created a data pipeline for tracking ERC-20 transfers with Streams and Supabase. This is just the beginning of what you can do. Continue practicing and implementing your own interesting ideas as you explore more features of Streams.
Next Steps
Want to continue building on this idea? Try the following:
- Consider fetching additional metadata for each token contract such as token decimals (for accurately representing token amounts), token name, and the token symbol.
- Create queries to analyze token transfer patterns (like trends or whale movements)
- Build a dashboard to visualize token transfer activity over time
Check out these additional resources to learn how to build on top of your newly found knowledge with other Quicknode products:
- Use Quicknode's Key-Value Store to track multiple wallets
- Create curated contract deployment lists with Streams using this guide: Contract Deployment Indexer
Regardless of what you are building, we would love to hear about it. Drop us a line on Discord or Twitter and let us know what you're working on!
We ❤️ Feedback!
Let us know if you have any feedback or requests for new topics. We'd love to hear from you.