12 min read
Overview
Getting historical data on Solana can be a challenge, and often, you only need a particular subset of block data (e.g., wallet transfers in a given tax year). Streams is a powerful tool that allows you to retrieve and filter near real-time or historical data from Solana and send it to your destination of choice (e.g., Webhooks, Postgres Database, Snowflake, AWS). This guide will show you how to use Streams to backfill historic Solana data that has been filtered to selectively parse the data you need and send it to a Postgres database.
Check out a quick video demo to see Solana Streams in action.
Let's get started!
Free Trial plan users can only create Solana Streams that follow the tip of the blockchain in real time. Historical backfills are only available on paid plans.
What You Will Do
- Create a Stream on Quicknode
- Filter a specified historic range of Solana blocks to retrieve SOL transfers for a specified wallet
- Create a Supabase Postgres database to store the filtered data
- Route the filtered data to your database
- Create a table in your database that contains the parsed transaction data
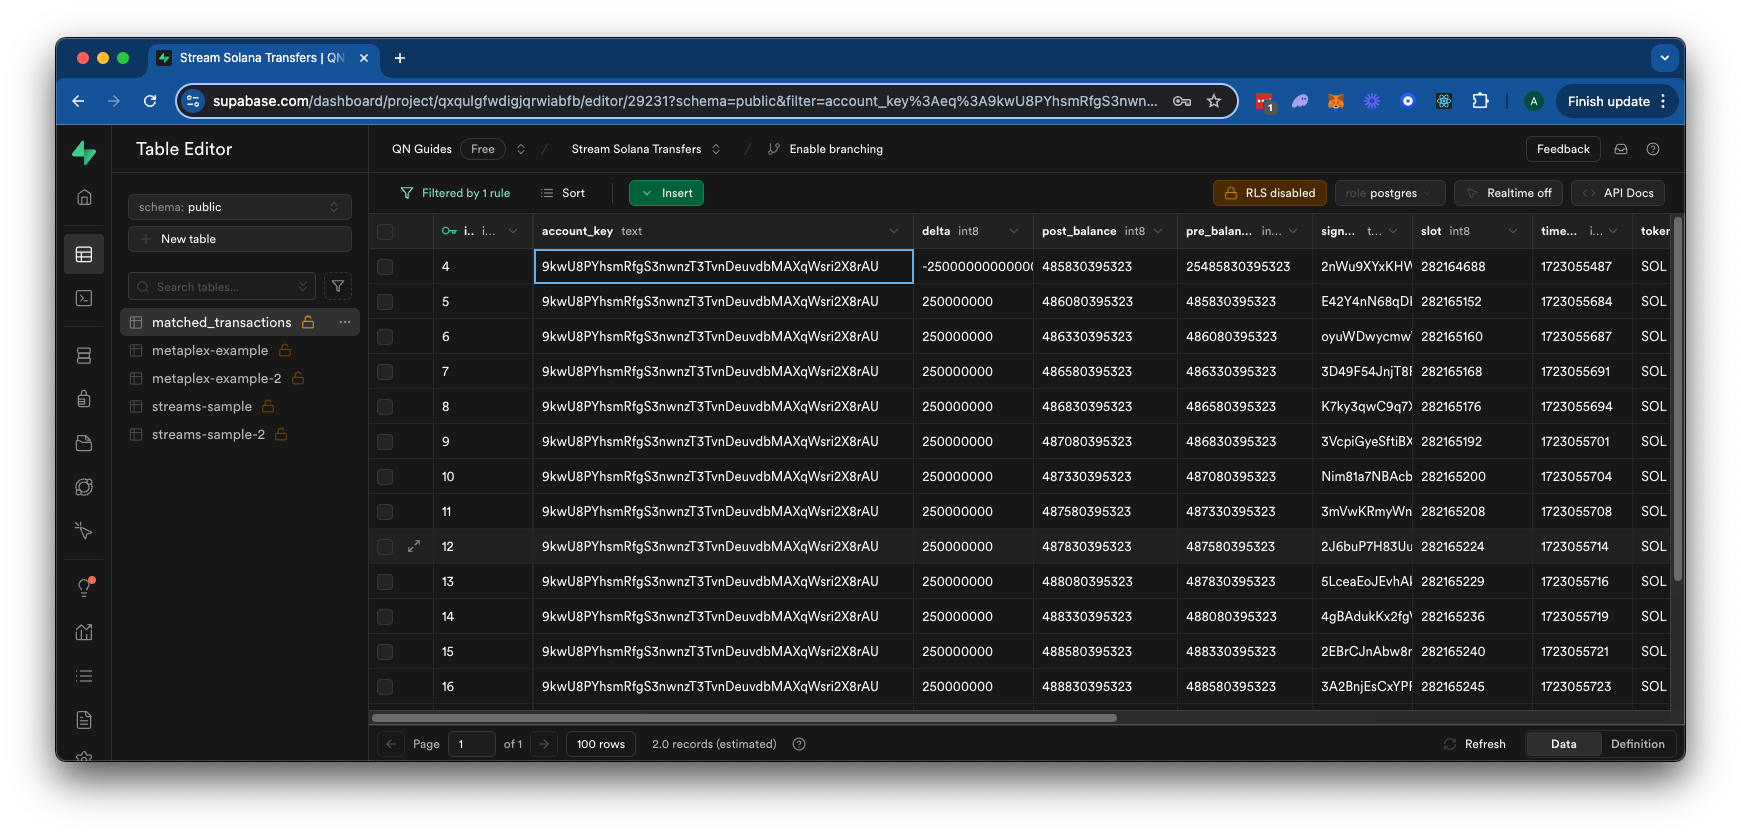
By the end of this guide, you will have a Postgres database containing filtered Solana transaction data for a specific wallet like this:
What You Will Need
- A Quicknode account - paid plan required for backfilling on Solana
- Solana Fundamentals
- A Postgres database - we will be using Supabase in this guide, but feel free to use any Postgres database of your choice
Step 1: Create a Stream
From your Quicknode dashboard, navigate to the Streams page and click the "+ Create Stream" button, or create one here.
Select "Solana" and "Mainnet" from the settings card:
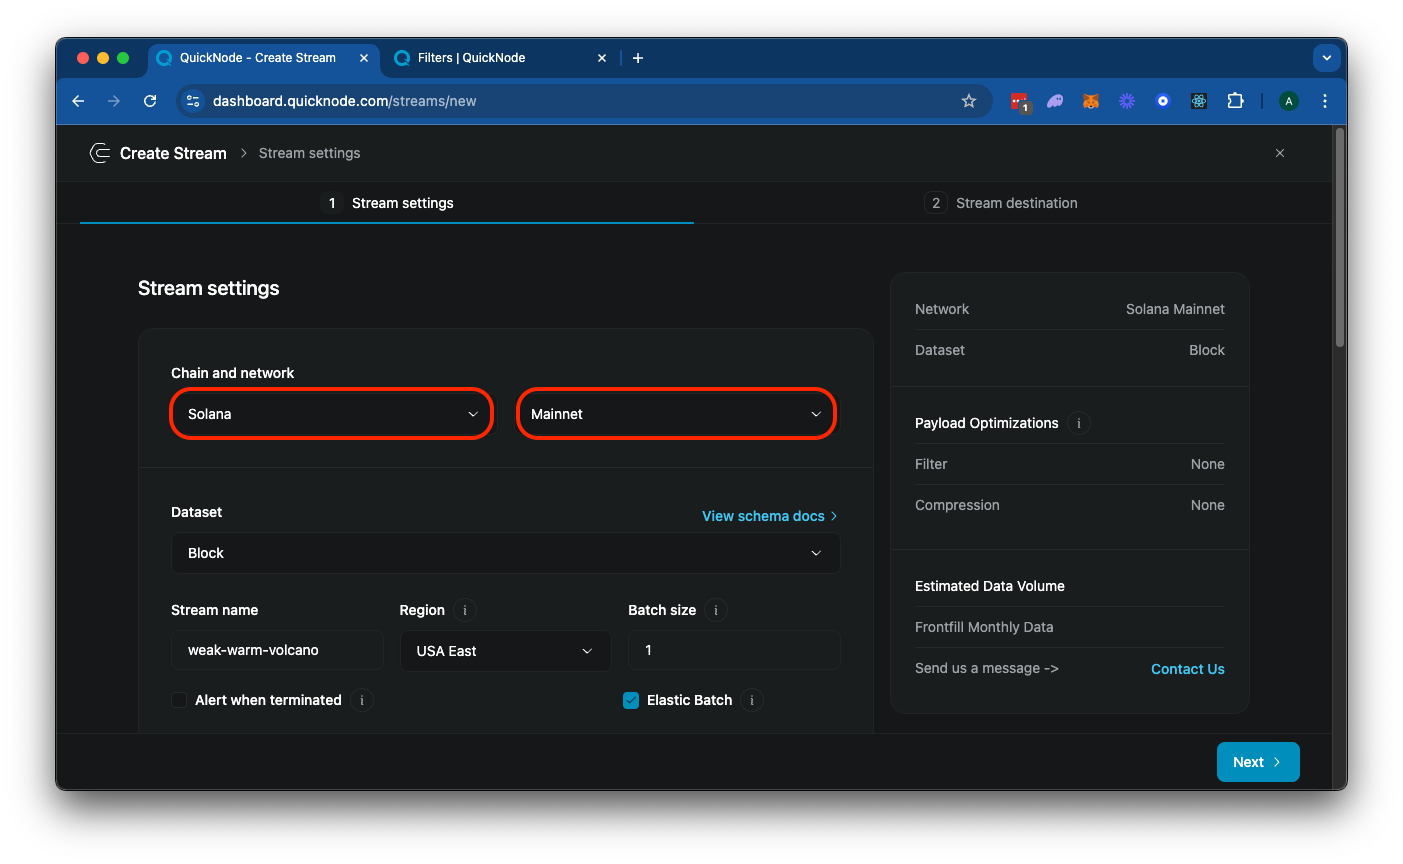
Feel free to add a unique name to your Stream or just use the randomly generated one. You will also notice an option to batch your Stream data. The default setting, 1, is optimized for streaming blocks as they are processed. The right value for your use case can vary depending on your data volume and data processing capabilities. For this example, try running with a batch size of 10 and adjust as needed to best serve your use case and operating environment.
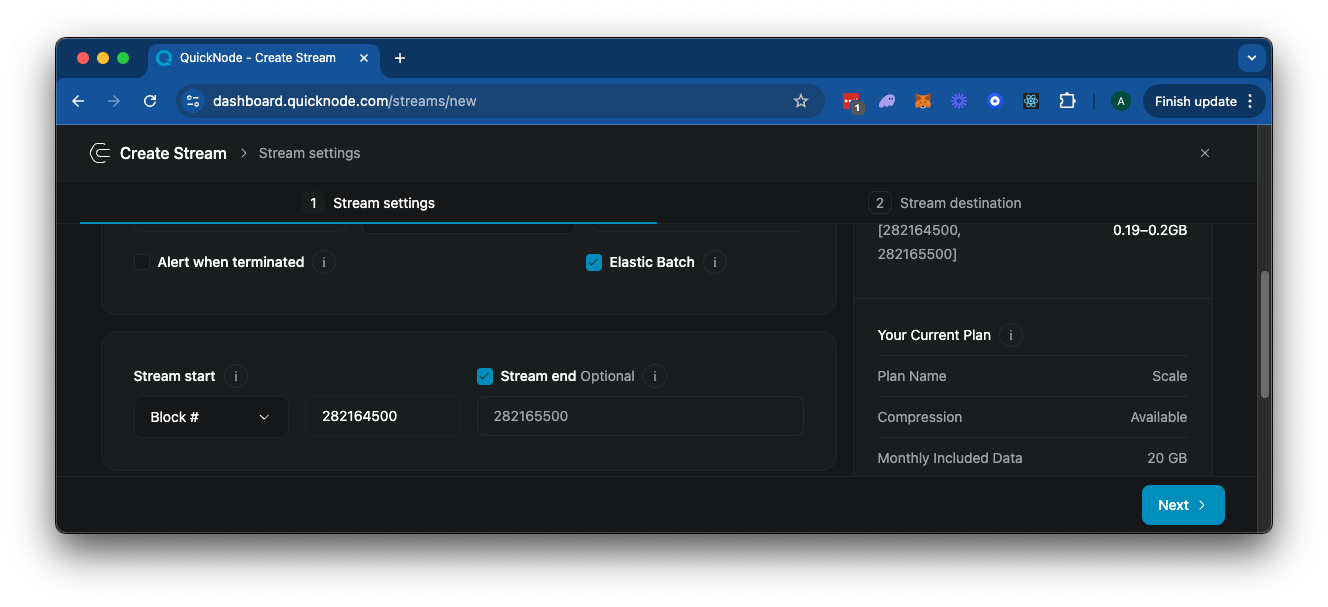
Next, scroll down to the "Stream Start" option, and make sure to select "Block #" (this is used for historical data). Enter the block height you want to start from (we will use 282164500 to 282165500 for this demonstration). Since we want to specify a fixed end block, toggle that option and specify the end block.
Next, select "Modify the payload before streaming". This step allows you to filter for only the relevant data you need. Our filter will allow us to:
- Filter only the data you need (in this case, we will filter for transactions that include a specified wallet address and include a SOL balance change)
- Modify the returned data to your liking (in this case, we will only return some details about the transaction, including the pre- and post-balances)
Alternatively, if you do not filter your data, you will receive all block data for every block, which can be very large and require more processing and storage on your end. Block data returned is from Solana's getBlock RPC method and returns a JSON object like this:
{
  "blockHeight": 270646103,
  "blockTime": 1727197869,
  "blockhash": "52egMfezPu8MfzMc1ZPzZAaR6o7ZuJ4633VQPCyDbotJ",
  "parentSlot": 291763038,
  "previousBlockhash": "GG8Y7BEvZf3CRixX5k8GraDSkofcMLC9mXAqteuwKR7d",
  "transactions": [
    /* ... all transactions in the block ... */
  ],
}
Next, you should see a JavaScript code editor for your main function. This is the entry point for your Stream's filter (check out our docs for more information on filters). The default code is:
function main(stream) {
  const data = stream.data

  return data;
}
The stream object includes the data and metadata fields. The data field contains the payload data, and the metadata field contains the metadata of the Stream. Go ahead and click "▶️ Run Test" to test your Stream. Because Solana blocks are quite large, this will take a few seconds to load. Eventually, it should effectively return the block data for the specified "Test Block":
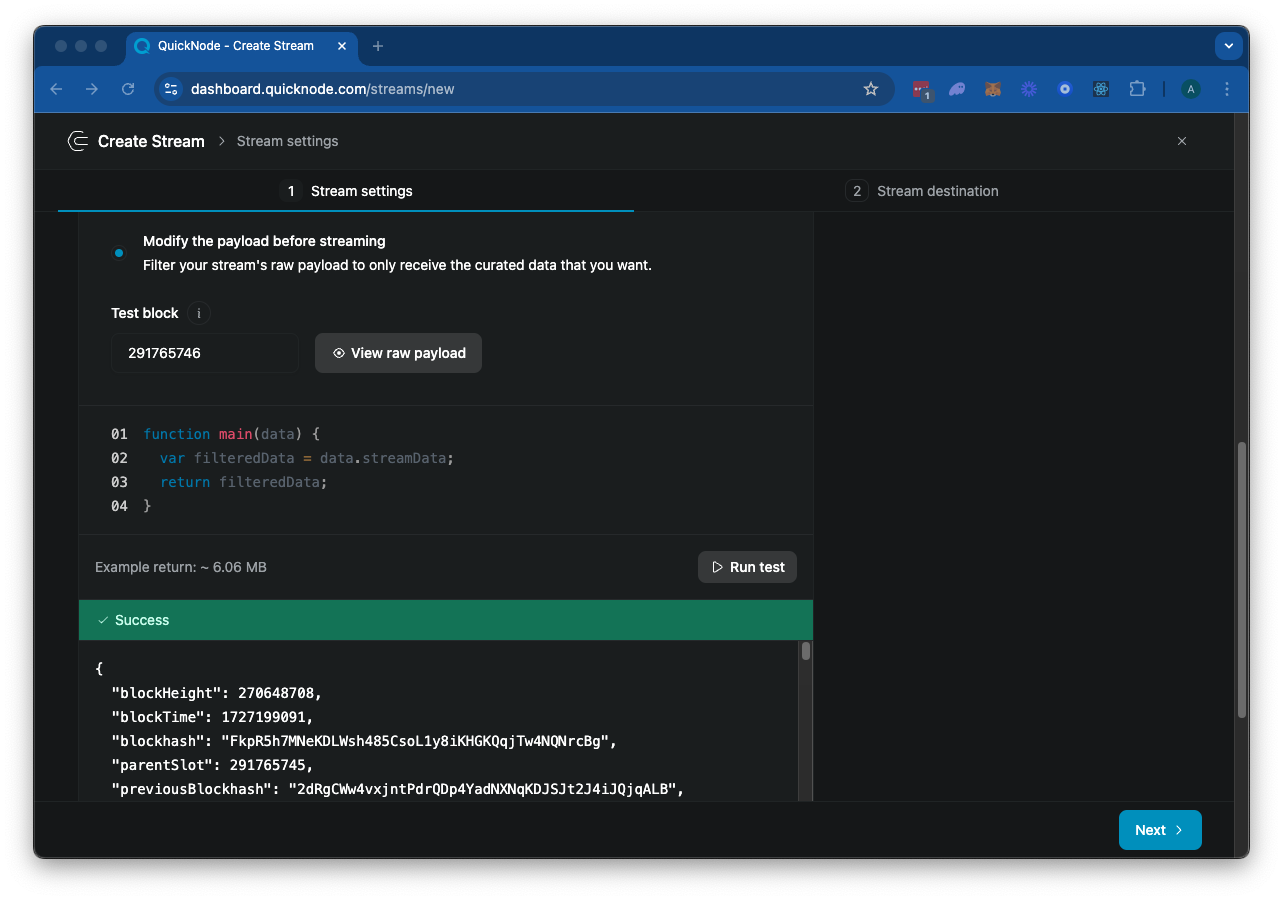
Feel free to scroll through the response. There's quite a lot there--let's see if we can filter it down to just the data we need.
Step 2: Filter the Stream Data
So we have A LOT of data in our block. Let's think about how we can filter this down to just show us the data we want to see. For the purposes of this example, let's plan on our payload including a matchedTransactions array that contains the signature, timeStamp, slot, delta (SOL balance change), token (in this case just SOL), accountKey, preBalance, and postBalance for each transaction:
{
    "matchedTransactions": [
        {
            "slot": "number",
            "delta": "number",
            "token": "SOL",
            "signature": "string",
            "timeStamp": "number",
            "accountKey": "string",
            "preBalance": "number",
            "postBalance": "number"
        }
    ]
}
So, let's think about what our filter will need to do:
- Filter out failed transactions (the raw block data will include failed transactions)
- Filter for transactions that include our specified wallet address
- Filter those transactions only to include those that include a SOL balance change for our target wallet
- Finally, after filtering down our data, we will need to format transaction data to fit our payload
Let's create it.
Create Entry Point
Inside of your Streams page, replace the existing main function with the following:
const FILTER_CONFIG = {
    accountId: '9kwU8PYhsmRfgS3nwnzT3TvnDeuvdbMAXqWsri2X8rAU',
    skipFailed: true,
};

function main(stream) {
    try {
        const data = stream.data[0]
        if (!data?.transactions?.length) {
            return { error: 'Invalid or missing stream' };
        }

        const matchedTransactions = data.transactions
            .map(tx => processTransaction(tx, data))
            .filter(Boolean);

        return { matchedTransactions };
    } catch (error) {
        return { error: error.message, stack: error.stack };
    }
}
Here's what we are doing:
- First, we are defining a
FILTER_CONFIGobject that contains the account ID to search for and whether to skip failed transactions - Then, we are making sure the Stream data is valid by throwing an error if no data is received
- Then we filter and format the transactions by using a
processTransactionfunction - Finally, we are returning the formatted transactions in the
matchedTransactionsarray if there are any
Great. Now, we just need to define processTransaction to filter and clean up our transaction data.
Define Process Transaction Function
Let's add the processTransaction function to the bottom of your code block:
function processTransaction(transactionWithMeta, stream) {
    const { meta, transaction } = transactionWithMeta;

    if (FILTER_CONFIG.skipFailed && meta.err !== null) {
        return null;
    }

    const accountIndex = transaction.message.accountKeys.findIndex(account =>
        account.pubkey === FILTER_CONFIG.accountId
    );

    if (accountIndex === -1) {
        return null;
    }

    const preBalance = meta.preBalances[accountIndex];
    const postBalance = meta.postBalances[accountIndex];
    const delta = postBalance - preBalance;

    if (delta === 0) {
        return null;
    }

    return {
        signature: transaction.signatures[0],
        slot: stream.parentSlot + 1,
        timeStamp: stream.blockTime,
        accountKey: FILTER_CONFIG.accountId,
        preBalance,
        postBalance,
        delta,
        token: "SOL"
    };
}
Here's what this function does:
- First, we check if the transaction failed and if so, we return
nullto skip the transaction - Then, we find the index of the account in the
transaction.message.accountKeysarray that matches ourFILTER_CONFIG.accountId - If the account index is -1 (not found), we return
nullto skip the transaction - We are getting the pre- and post-balances for the account using
meta.preBalancesandmeta.postBalances - We are calculating the delta between the pre- and post-balances
- If the delta is 0, we return
nullto skip the transaction - Finally, we return an object with the signature, slot, timeStamp, accountKey, preBalance, postBalance, delta, and token
Test Your Stream
If you scroll up above the code block, you will see a field "Test Block". This is the block number that we will use to test our Stream. In this case, I've found a block that I know has a successful create transaction in it. Change the field to "282164688" and then click "▶️ Run Test". If you used the same Account ID as we did (9kwU8PYhsmRfgS3nwnzT3TvnDeuvdbMAXqWsri2X8rAU), you should see the following response:
{
  "matchedTransactions": [
    {
      "accountKey": "9kwU8PYhsmRfgS3nwnzT3TvnDeuvdbMAXqWsri2X8rAU",
      "delta": -25000000000000,
      "postBalance": 485830395323,
      "preBalance": 25485830395323,
      "signature": "2nWu9XYxKHWNiwGDHLnHYqrF3uGZCN5subE3rbuFqnxwoGQ11FxSEoz6CffmssYhqC43ewDyhiAhvPZNMSzbqVMC",
      "slot": 282164688,
      "timeStamp": 1723055487,
      "token": "SOL"
    }
  ]
}
Great job! This demonstrates that in our test block, there was a single transaction that changed the balance of the specified account. You'll notice the return data size here is ~300 B compared to ~4.5 MB for the unfiltered block data! Click "Next" in the bottom right corner to move on to the next step.
Step 3: Set Up Your Database
Before we deploy our Stream, we will need a destination to send the data to. If you'd like to use a webhook, you can check our guide on How to Stream Solana Program Data, but for this demonstration we will send our data to a Postgres database.
To do this, we will need to set up a Postgres database. If you don't have one already, you can create one here. Make sure to note your Database Password on creation--you will need it for configuring your Stream.
Our Stream will actually initialize a table in your table to store the data, so we do not need to worry about that. We will just need to get the database connection information and send it to your Stream. If you are using Supabase, you can find the connection information in the "Project Settings" page, "Database" tab:
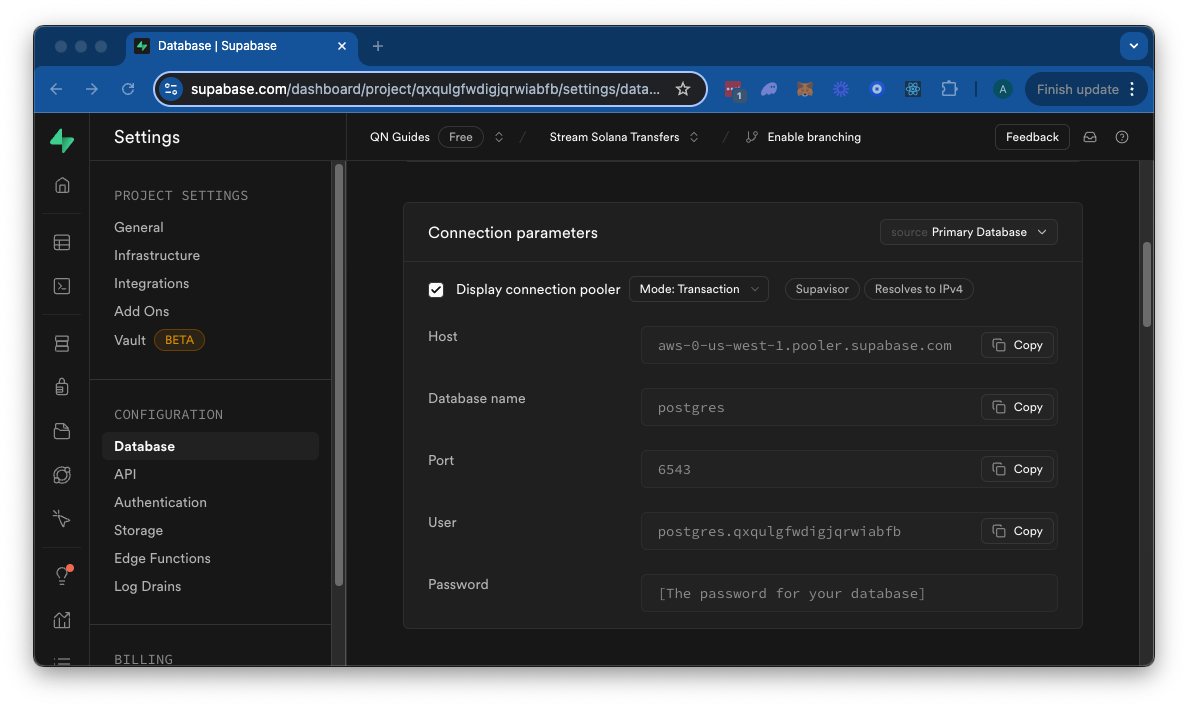
Keep this information handy, and let's move back to our Stream configuration page.
Step 4: Configure Your Stream's Destination
Now that we have our server running and exposed to the internet let's configure our Stream to send data to it:
- Go back to your Stream configuration page.
- In the "Destination type" section, select "PostgreSQL".
- Enter the database connection information from your Postgres database. You can give the table a name of your choice--we will use
metaplex-example.
Your Stream configuration should look like this:
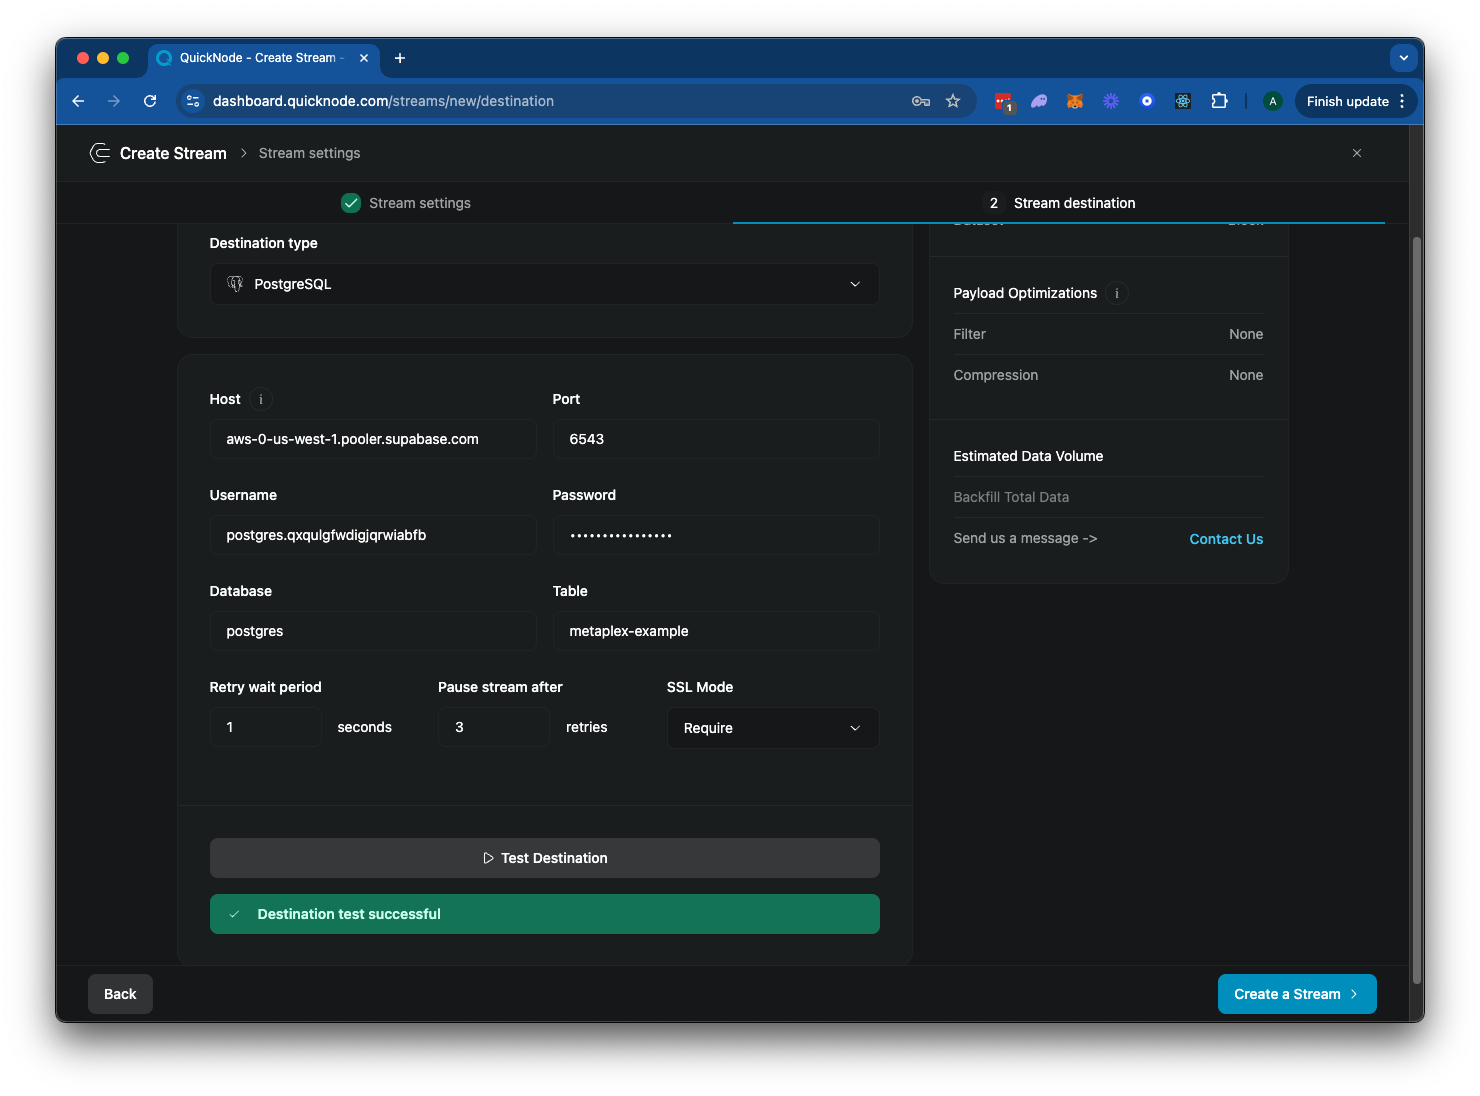
Click "▶️ Test Destination" to ensure your connection credentials are correct. And then click "Create a Stream" to finalize your configuration.
And in a few moments, our filtered block data should start to appear in your Database. If you navigate to Supabase's table viewer, you should see the data being populated:
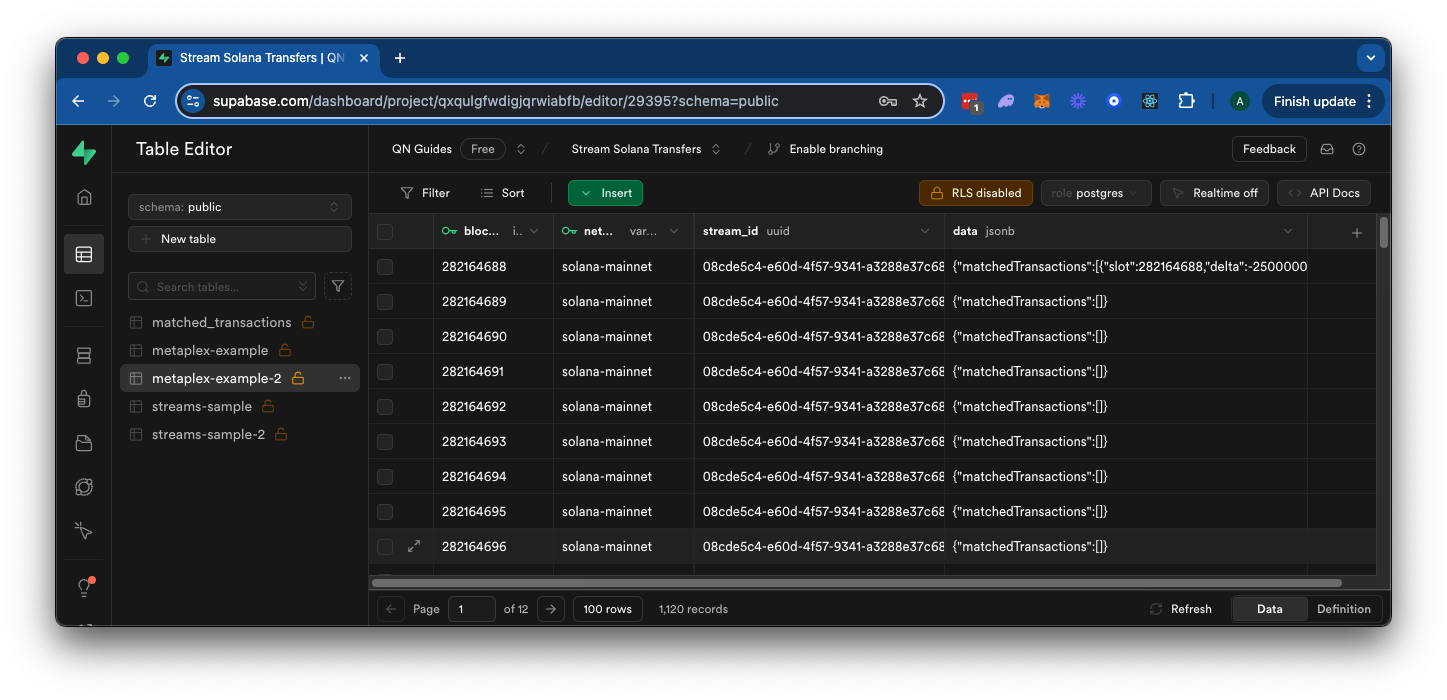
Great job! Your Stream is now set up to filter for new Solana transactions and send the data to your local Postgres database. If you'd like, you can add some custom SQL to your database to parse the returned data and store it in a different format. Here's an example of how you might do that:
In the SQL editor, add the following code:
CREATE TABLE IF NOT EXISTS matched_transactions (
    id SERIAL PRIMARY KEY,
    account_key TEXT NOT NULL,
    delta BIGINT NOT NULL,
    post_balance BIGINT NOT NULL,
    pre_balance BIGINT NOT NULL,
    signature TEXT UNIQUE NOT NULL,
    slot BIGINT NOT NULL,
    time_stamp BIGINT NOT NULL,
    token TEXT NOT NULL,
    block_number BIGINT NOT NULL,
    network TEXT NOT NULL,
    stream_id TEXT NOT NULL,
    created_on TIMESTAMPTZ DEFAULT NOW()
);

-- Create an index on signature for faster lookups
CREATE INDEX IF NOT EXISTS idx_matched_transactions_signature ON matched_transactions(signature);
And press "Run". This should create a new table in your database with the same structure as the one we created in our Stream. Now, let's run a script to populate the table with our data:
INSERT INTO matched_transactions (
    account_key,
    delta,
    post_balance,
    pre_balance,
    signature,
    slot,
    time_stamp,
    token,
    block_number,
    network,
    stream_id
)
SELECT
    (transaction_data->>'accountKey')::TEXT,
    (transaction_data->>'delta')::BIGINT,
    (transaction_data->>'postBalance')::BIGINT,
    (transaction_data->>'preBalance')::BIGINT,
    (transaction_data->>'signature')::TEXT,
    (transaction_data->>'slot')::BIGINT,
    (transaction_data->>'timeStamp')::BIGINT,
    (transaction_data->>'token')::TEXT,
    se.block_number,
    se.network,
    se.stream_id
FROM
-- Make sure to Replace the Table Name with the one you created in your Stream 👇
    "metaplex-example" se,
    jsonb_array_elements(
        CASE
            WHEN se.data->>'error' IS NOT NULL THEN '[]'::jsonb
            ELSE se.data->'matchedTransactions'
        END
    ) as transaction_data
WHERE
    se.data->>'error' IS NULL
ON CONFLICT (signature) DO NOTHING;
This script will insert all of the transactions from our Stream's table into the new table we created. You can run this script in Supabase's SQL editor by clicking "Run". You should get a response, "Success. No rows returned." This means the script successfully ran. You can then navigate to your table editor and see the parsed data in your new table:
Keep Building!
You now have the tools to use Streams for your own applications. Keep in mind the filters we created are just an example--the sky is the limit for what you can come up with. Feel free to modify the filter logic to look for different programs, accounts, or instructions. You can also add more complex processing logic to your server. Happy streaming!
Looking for some inspiration on how to keep building? Check out the resource below:
- Use Quicknode's Key-Value Store to track many wallets or programs
Regardless of what you are building, we would love to hear about it. Drop us a line on Discord or Twitter and let us know what you're working on!
We ❤️ Feedback!
Let us know if you have any feedback or requests for new topics. We'd love to hear from you.