10 min read
This guide has been updated to reflect the new name for Solana Web3.js 2.0 — Solana Kit. We're following the latest best practices to help you stay current. Learn more about Solana Kit here.
Overview
Solana accounts store data as raw bytes, which must be properly decoded to be useful in your applications. This guide demonstrates how to use Solana Kit's codec utilities ([https://github.com/anza-xyz/kit/tree/main/packages/codecs-core]) to encode and decode Solana data structures. In this guide, we will generate a decoder to parse a Raydium AMM config file. Let's jump in!
This guide walks you through account deserialization with Solana Kit.
If you prefer building with Solana Web3.js Legacy (v1.x), check out our sample code on GitHub or our Guide: How to Deserialize Account Data with Solana Web3.js 1.x.
What You Will Do
- Learn how binary data encoding works in Solana accounts
- Understand endianness and byte ordering
- Create decoders for parsing complex account structures
- Fetch and decode a Raydium AMM configuration account
What You Will Need
- A Quicknode Account with a Solana Mainnet endpoint enabled.
- Node.js (version 21.0 or higher recommended)
- Basic familiarity with TypeScript and Solana development concepts
- Experience with Solana Kit is recommended
- Understanding of Program Derived Addresses
Understanding Binary Data in Solana
Before diving into the implementation, let's understand some key concepts about how binary data works in Solana.
Binary Data Layout
Solana accounts store data as a sequence of bytes. When reading this data, we need to:
- Know the exact order and size of each field
- Read bytes in sequence - you can't skip around since each field's position depends on the previous ones
- Decode each field using the appropriate decoder for its data type
For example, a simple account with a u8 (1 byte) followed by an 11 byte/character string would be read like this:
[1, 104, 101, 108, 108, 111, 32, 119, 111, 114, 108, 100]
└─┘ └──────────────────────────────────────────────────┘
 │   └── string (11 bytes) = "hello world"
 │       (104='h', 101='e', 108='l', 108='l', 111='o', 32=' ',
 │        119='w', 111='o', 114='r', 108='l', 100='d')
 └────── u8 (1 byte) = 1
So this deserializes to:
- First field (u8): 1
- Second field (string): "hello world"
Check out this helpful Space Reference Table to get space allocations for common types in Solana programming.
Endianness
Endianness determines how multi-byte numbers are stored in memory:
- Little-endian: Least significant byte first (0x1234 stored as [0x34, 0x12])
- Big-endian: Most significant byte first (0x1234 stored as [0x12, 0x34])
Solana programs can use either endianness as specified in the program. In our example, Raydium's program uses big-endian (as seen in their source code using to_be_bytes(), as opposed to to_le_bytes()), so we must decode using big-endian as well.
Base64 Encoding
In most cases, you should use encoding: 'jsonParsed' when fetching account data, as it returns already-parsed data that's easier to work with. However, for custom deserialization like we're doing in this guide, we need raw binary data.
When performing custom deserialization, Solana's getAccountInfo can return account data encoded rather than raw bytes. We will specify base64-encoded strings because:
- Base64 is a safe way to transmit binary data as text
- It's consistent across different platforms and languages
- It prevents data corruption during transmission
This means we will need to:
- Request the account data with base64 encoding (when custom deserialization is required)
- Decode the base64 string to get the raw bytes
- Parse the raw bytes into our data structure
Implementation
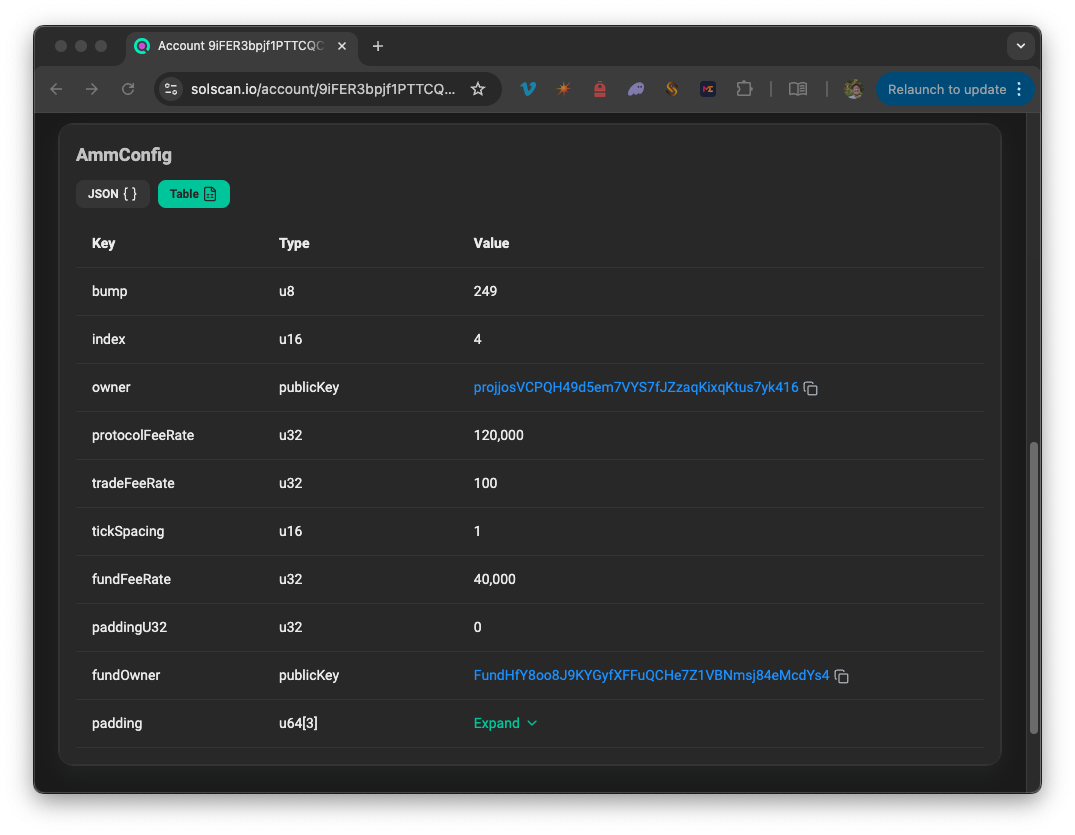
Let's walk through implementing an account data decoder for a Raydium AMM Config account, 9iFER3bpjf1PTTCQCfTRu17EJgvsxo9pVyA9QWwEuX4x (SolScan).

Our goal will be to extract the same information found in SolScan's data tab from a getAccountInfo call. Let's do it!
1. Setup Project
Create a new project and install dependencies:
mkdir account-decoder && cd account-decoder
Then, initialize the project:
npm init -y
And install the dependencies:
npm install @solana/kit dotenv
Add these dev dependencies if you do not have them globally installed:
npm install --save-dev typescript ts-node @types/node
Initialize your tsconfig:
tsc --init
Add the following script to your package.json:
"start": "ts-node app.ts"
Connect to a Solana Cluster with Your Quicknode Endpoint
To build on Solana, you'll need an API endpoint to connect with the network. You're welcome to use public nodes or deploy and manage your own infrastructure; however, if you'd like 8x faster response times, you can leave the heavy lifting to us.
See why over 50% of projects on Solana choose Quicknode and start your free trial here. We're going to use a Solana Mainnet endpoint.
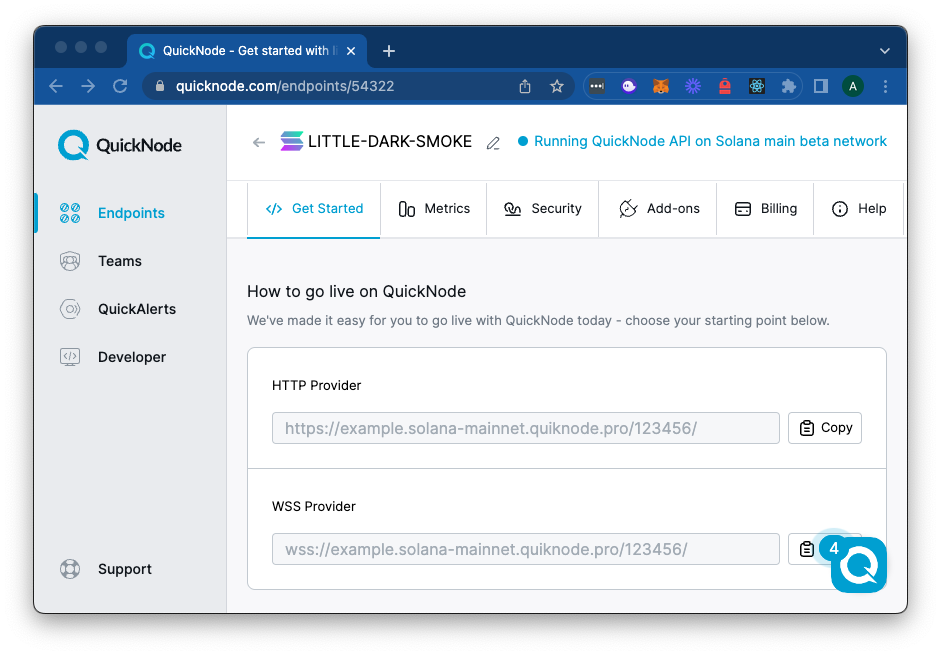
Copy the HTTP Provider link:
Create a .env file with your Solana RPC endpoint:
HTTP_ENDPOINT=https://your-quicknode-endpoint.example
2. Define Constants and Types
Create a new file app.ts, and add the following imports and constants:
import {
    createSolanaRpc
} from "@solana/rpc"
import {
    Address,
    address,
    getAddressDecoder,
    getProgramDerivedAddress,
} from "@solana/addresses";
import {
    Endian,
    getU16Encoder,
    getBase64Encoder,
    getStructDecoder,
    FixedSizeDecoder,
    fixDecoderSize,
    getBytesDecoder,
    getU8Decoder,
    getU16Decoder,
    getU32Decoder,
    getU64Decoder,
    getArrayDecoder,
    ReadonlyUint8Array
} from "@solana/codecs";
import dotenv from "dotenv";

dotenv.config();

const PROGRAM_ID = address('CAMMCzo5YL8w4VFF8KVHrK22GGUsp5VTaW7grrKgrWqK');
const AMM_CONFIG_SEED = "amm_config";
const AMM_CONFIG_INDEX = 4;
Notice that we are importing our Solana elements from a few different packages--each of these is available in @solana/web3.js as well, but we are just highlighting that you can choose to import specific packages if you prefer. You will see that the codecs package has a number of tools for encoding and decoding data based on type. We'll use these in a bit.
The constants we are defining are:
PROGRAM_IDis that of the CLMM Program (Ref: GitHub)AMM_CONFIG_SEEDis specified in the program and used to derive the Config Account PDA. (Ref: GitHub)AMM_CONFIG_INDEXis an admin-specified value that Raydium uses to define the Config Account PDAs. (Ref: GitHub)
3. Define Account Structure
Add the interface that describes our account's data structure. We are getting this directly from the Raydium IDL (at idl.accounts.find(account => account.name == "AmmConfig")). Data structures must be listed in the correct order and of the correct type to avoid any parsing or type errors when we go to decode:
interface AmmConfig {
    anchorDiscriminator: ReadonlyUint8Array;
    bump: number;
    index: number;
    owner: Address;
    protocolFeeRate: number;
    tradeFeeRate: number;
    tickSpacing: number;
    fundFeeRate: number;
    paddingU32: number;
    fundOwner: Address;
    padding: bigint[];
}
Notice that SW3js2 requires that we define Buffers as ReadonlyUint8Array and u64 (and larger) must be declared as bigint.
4. Create Account Decoder
The decoder specifies how to read each field from the binary data and should match the IDL and the interface we just defined. Add the following to your code:
const ammConfigDecoder: FixedSizeDecoder<AmmConfig> =
    getStructDecoder([
        ["anchorDiscriminator", fixDecoderSize(getBytesDecoder(), 8)],
        ["bump", getU8Decoder()],
        ["index", getU16Decoder()],
        ["owner", getAddressDecoder()],
        ["protocolFeeRate", getU32Decoder()],
        ["tradeFeeRate", getU32Decoder()],
        ["tickSpacing", getU16Decoder()],
        ["fundFeeRate", getU32Decoder()],
        ["paddingU32", getU32Decoder()],
        ["fundOwner", getAddressDecoder()],
        ["padding", getArrayDecoder(
            getU64Decoder(),
            { size: 3 }
        )]
    ]);
Each field in the decoder specifies:
- Field name (matching our interface)
- Appropriate decoder for the field's data type
- Size constraints where needed (like the 8-byte discriminator or in the array decoder)
5. Derive the PDA
Since we already know the address we are searching for, we technically do not need to do this step, but it's good practice for working with the Solana address and codec libraries.
Add the main function to fetch and decode the account data:
async function main() {
    // Create encoders for PDA derivation
    const u16BEEncoder = getU16Encoder({ endian: Endian.Big });

    // Derive config account address
    const [configPda] = await getProgramDerivedAddress({
        programAddress: PROGRAM_ID,
        seeds: [
            AMM_CONFIG_SEED,
            u16BEEncoder.encode(AMM_CONFIG_INDEX),
        ]
    });

    console.log(`Parsing AMM Config PDA: ${configPda}`);

    // TODO - fetch and parse PDA
}

main().catch(console.error);
Here, we are using the getProgramDerivedAddress to derive our PDA (Source: GitHub). The method expects a Program address and an array of Seeds, which are defined as type Seed = ReadonlyUint8Array | string;. This means we can use our AMM_CONFIG_SEED as-is, but we need to first encode our AMM_CONFIG_INDEX as a ReadonlyUint8Array.
To do this, we define a u16 Big Endian Encoder (recall, the Raydium program utilizes .to_be_bytes()) and then call the encode method on our index.
We pass the program ID and seeds (in order) into the getProgramDerivedAddress function and await the results.
Before adding our account decoder, let's ensure we are properly deriving the PDA. If our constants are defined correctly and we encoded our seeds properly, we should be returning the correct PDA, 9iFER3bpjf1PTTCQCfTRu17EJgvsxo9pVyA9QWwEuX4x.
In your terminal, run the script:
npm start
You should see the correct PDA logged to your terminal:
Parsing AMM Config PDA: 9iFER3bpjf1PTTCQCfTRu17EJgvsxo9pVyA9QWwEuX4x
Great job!
6. Decode the Account
Now, let's update that TODO we had in our main function. Inside your main function, below the existing code, add the following:
async function main() {
    // Create encoders for PDA derivation
    const u16BEEncoder = getU16Encoder({ endian: Endian.Big });

    // Derive config account address
    const [configPda] = await getProgramDerivedAddress({
        programAddress: PROGRAM_ID,
        seeds: [
            AMM_CONFIG_SEED,
            u16BEEncoder.encode(AMM_CONFIG_INDEX),
        ]
    });

    console.log(`Parsing AMM Config PDA: ${configPda}`);

    // Note: We use 'base64' encoding here because we need raw binary data for custom deserialization.
    // In most cases, use 'jsonParsed' encoding which returns already-parsed data.
    const rpc = createSolanaRpc(process.env.HTTP_ENDPOINT as string);
    const base64Encoder = getBase64Encoder();

    const { value } = await rpc.getAccountInfo(configPda, { encoding: 'base64' }).send();
    if (!value || !value?.data) {
        throw new Error(`Account not found: ${configPda.toString()}`);
    }
    let bytes = base64Encoder.encode(value.data[0]);
    const decoded = ammConfigDecoder.decode(bytes);
    console.log(decoded);
}
Let's break this down:
- First, we define our
rpcusing thecreateSolanaRpcfunction and our Solana Mainnet endpoint - Next, we create a base64 encoder--we will use this to encode our base64
getAccountInfodata into bytes - Then, we fetch our
configPdaaccount info using base64-encoding (this is an exception for custom deserialization; normally you'd usejsonParsed) - If a response is received, we encode the response data to get its bytes
- Finally, we use our
ammConfigDecoderto call thedecodemethod to deserialize the raw data
Let's give it a shot.
In your terminal, run the script:
npm start
You should see the decoded AMM configuration data printed to the console:
{
  anchorDiscriminator: Uint8Array(8) [
    218, 244, 33, 104,
    203, 203, 43, 111
  ],
  bump: 249,
  index: 4,
  owner: 'projjosVCPQH49d5em7VYS7fJZzaqKixqKtus7yk416',
  protocolFeeRate: 120000,
  tradeFeeRate: 100,
  tickSpacing: 1,
  fundFeeRate: 40000,
  paddingU32: 0,
  fundOwner: 'FundHfY8oo8J9KYGyfXFFuQCHe7Z1VBNmsj84eMcdYs4',
  padding: [ 0n, 0n, 0n ]
}
Nice job! You now have the tools required to deserialize and parse Solana Account data using Solana Kit.
Generating Codecs with Codama
Codama is a tool that standardizes Solana programs into a format known as the Codama IDL. These Codama IDLs can be used to generate various outputs, including program clients. The generated program clients automatically create account codecs for serializing and deserializing data - for example, methods like getAmmConfigurationAccountDecoder could be created automatically by passing in the Raydium IDL (and under the hood, these methods use the @solana/codecs package).
To learn more about building program clients with Codama, check out our guides:
- How to Create Custom Program Clients in Solana Kit with Codama
- How to Create Anchor Program Clients using Codama
Key Considerations
There is no margin for error when working with binary data in Solana. Your whole response can be distorted if a single byte is out of place. Here are some essential things to consider when working with byte data:
- Field Order Matters: Fields must be decoded in the exact order they're stored
- Check Endianness: Verify the endianness used by the program (check their source code or documentation)
- Validate Sizes: Ensure your decoders match the exact field sizes in the program
- Handle Discriminators: Anchor programs typically start with an 8-byte discriminator (different programs utilize different approaches here)
- Test Thoroughly: Binary parsing errors can be subtle - test with known data like we did in this example
Note that these tools can also be used for instruction data! You just need to make sure you understand the expected input params to derive your decoder structure.
We are excited to see what you are up to—drop us a line in the Quicknode Discord or on Twitter, and let us know what you've built!
We ❤️ Feedback!
Let us know if you have any feedback or requests for new topics. We'd love to hear from you.