25 min read
The code in this guide is strictly for educational and demonstration purposes. It is not production-ready and should not be used in live environments.
Overview
While centralized stablecoins like USDC and USDT dominate the market (data: Ethereum, Solana) and make up for significant part of blockchain volume today, the need for decentralized alternatives continues to grow. This guide will walk you through creating, testing, deploying, and interacting with your own overcollateralized stablecoin using Foundry v1.0 as our smart contract development toolkit, OpenZeppelin for standardized token contracts, and Chainlink for our price oracle.
Let's get started!
What You Will Do
- Learn about Foundry
- Recap the changes in Foundry v1.0 and migration tips
- Create a Quicknode endpoint + fund your wallet (get some test funds here!)
- Write, test, deploy, and interact with stablecoin smart contract (Foundry v1.0 compatible)
What You Will Need
- Basic understanding of Solidity and smart contracts
- Foundry v1.0 installed (latest version)
- A code editor (VSCode recommended)
- Terminal/Command Line Interface
- Git installed
- Node.js (latest LTS version)
Foundry
Foundry is a smart contract development framework for building and deploying smart contracts on EVM blockchains. It is designed to make it easier for developers of all levels to create and deploy secure and efficient smart contracts.
More recently, Foundry released v1.0 which represents a major milestone in Ethereum development tooling, bringing more efficiency and stability to how we build and test smart contracts.
Foundry v1.0 Migration Tips
If you're new to Foundry, feel free to skip over this section, as it won't relate to future smart contract development work you do.
Foundry v1.0 brings changes to how we develop smart contracts. Key changes include:
-
Solc Optimizer Changes: The optimizer is now disabled by default to prevent potential optimization bugs. This means you'll need to explicitly enable it in your
foundry.toml. -
Testing Framework Updates:
- Removed support for
testFailprefix (usevm.expectRevert()instead) - Changed behavior of
expectReverton internal calls - New assertion methods and testing utilities
- Removed support for
-
Remapping and Dependencies:
- Stricter handling of conflicting remappings
- New approach to managing project dependencies
- More explicit source file handling
You won't have to worry about migrating code in this guide as it will all be v1.0 compliant. To learn more, check out this migration post from Foundry.
Project Prerequisite: Create a Quicknode Endpoint
To communicate with the blockchain, you need access to a node. While we could run our own node, here at Quicknode, we make it quick and easy to fire up blockchain nodes. You can register for an account here.
Once logged in, create an endpoint for the Ethereum Sepolia testnet blockchain. Keep the HTTP URL handy, it should look like this:
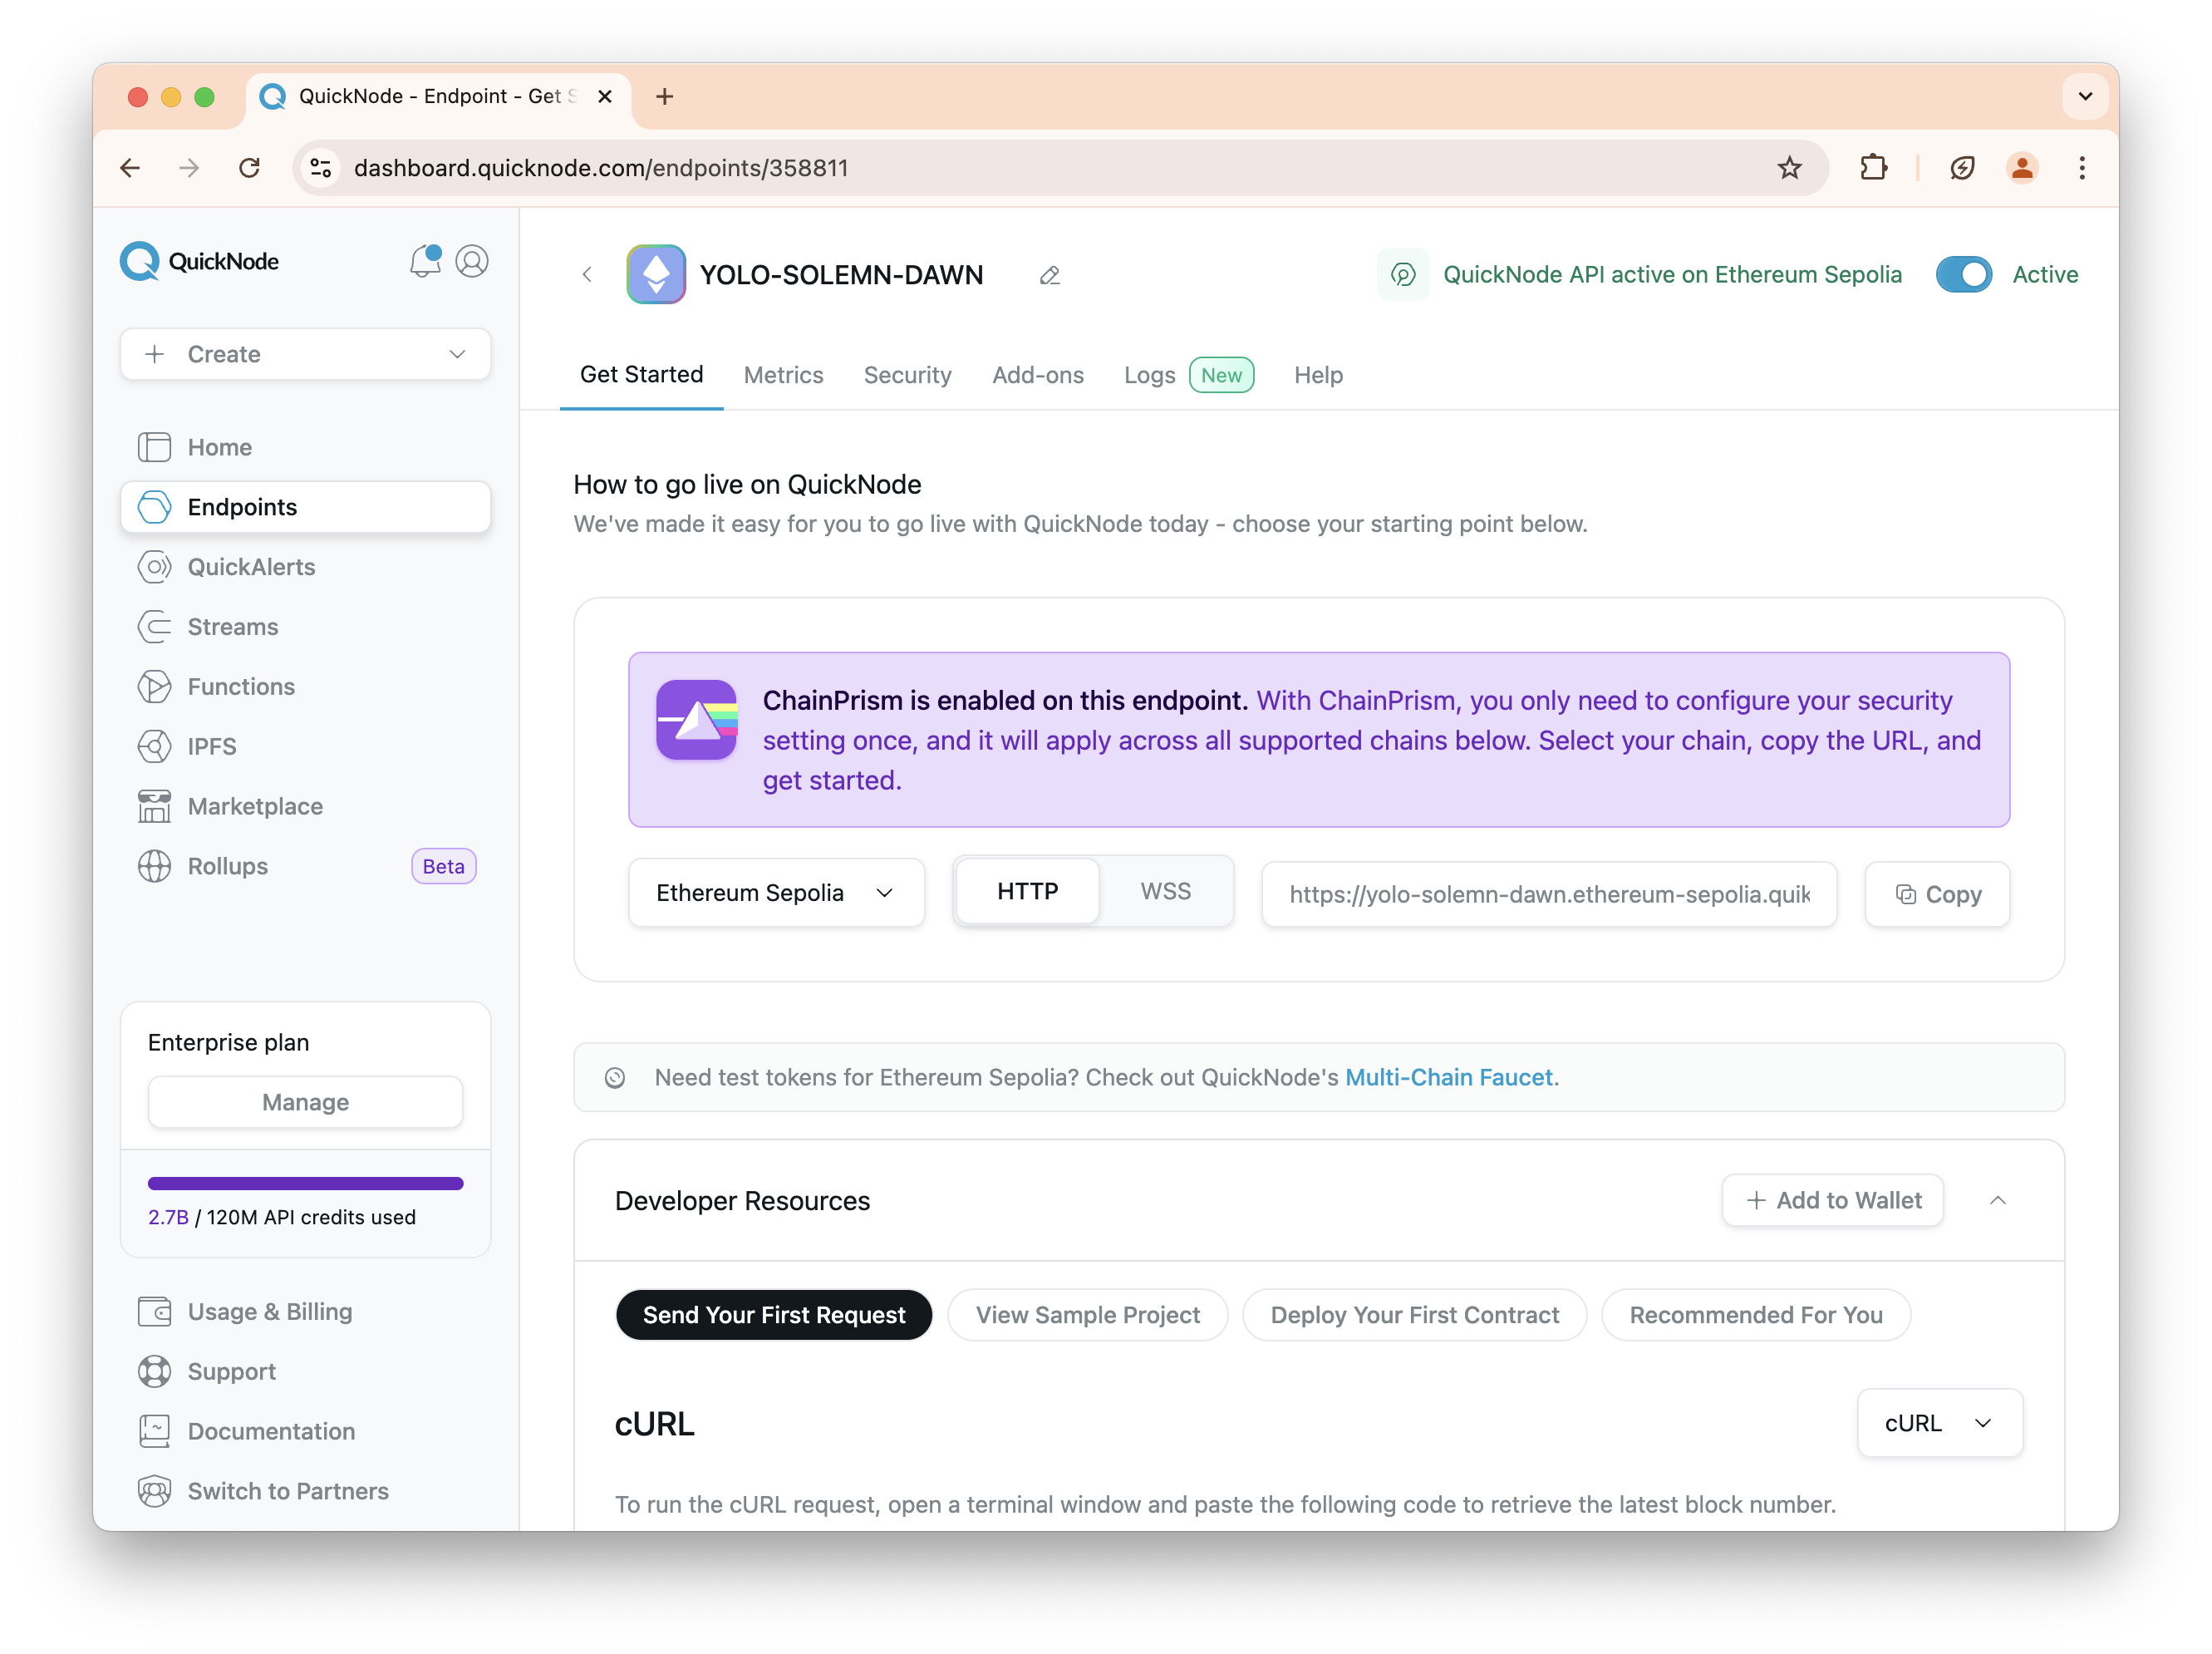
This guide is EVM-compatible. If you want to deploy your token on another chain, pick another EVM-compatible chain (e.g., Optimism, Arbitrum, etc.) and update the wallet and RPC URL's accordingly. You can also add the Chain Prism add-on to your endpoint so you can access multiple blockchain RPC URLs within the same endpoint.
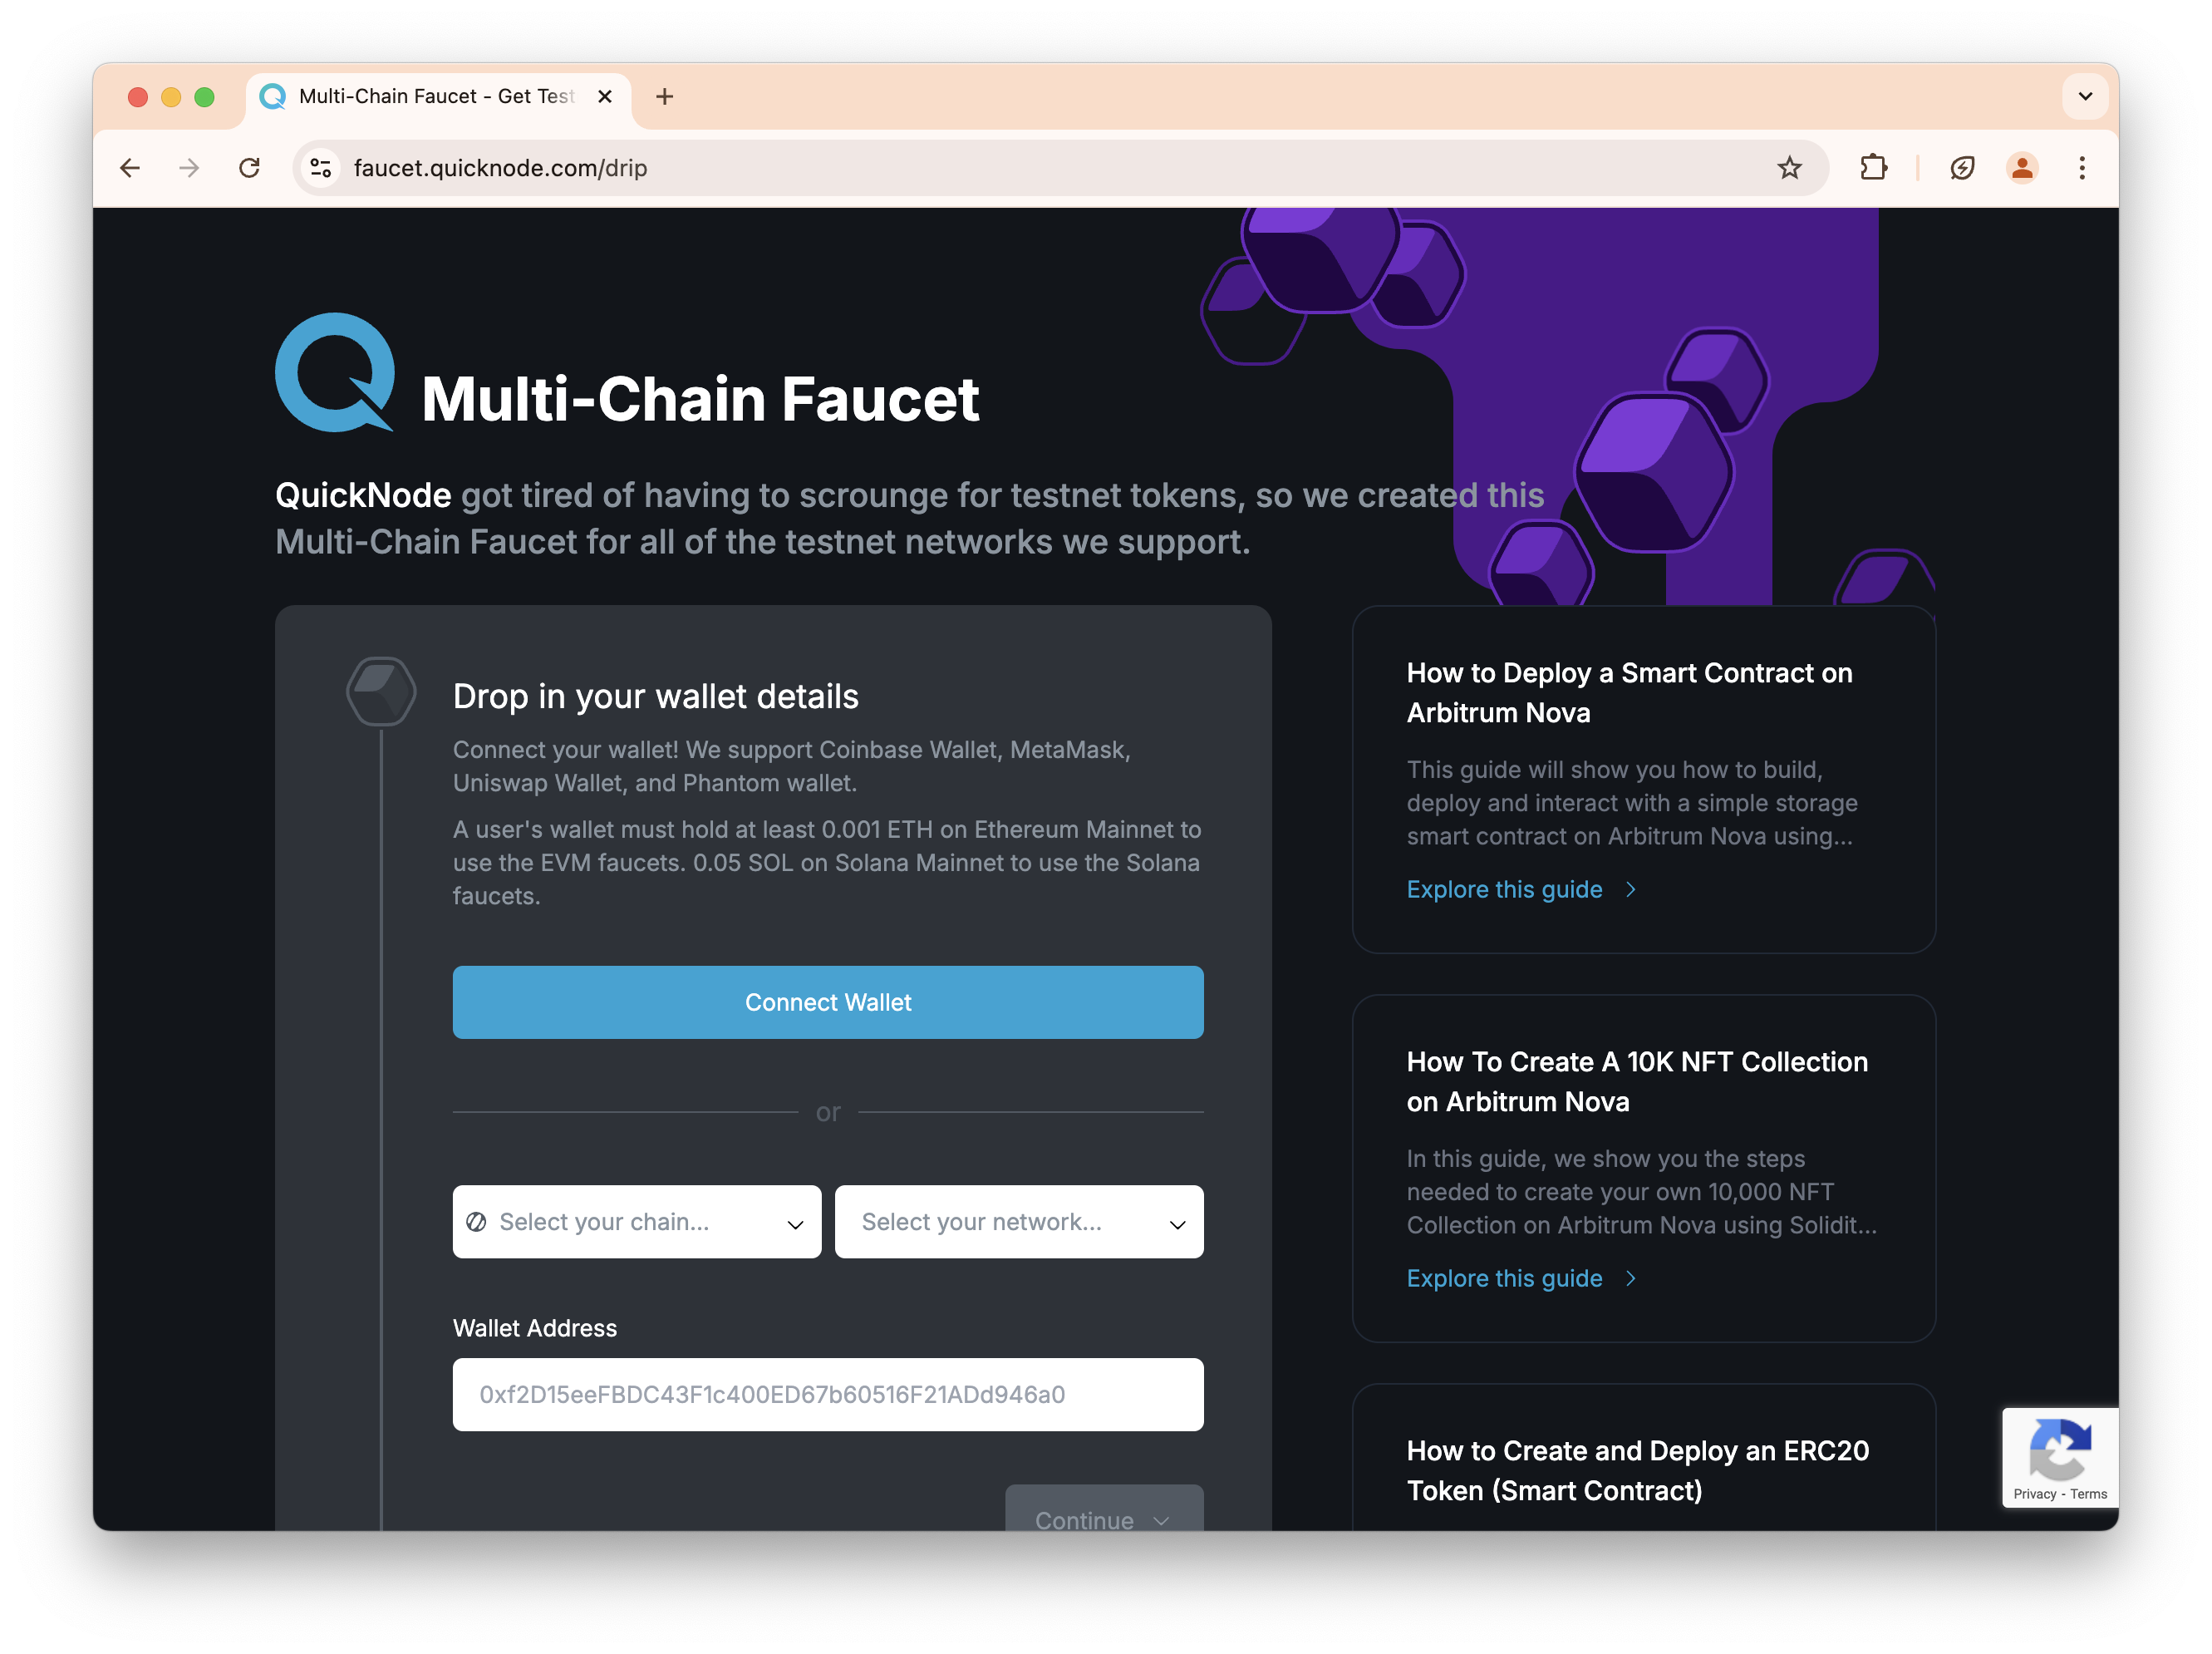
Project Prerequisite: Get ETH from Quicknode Multi-Chain Faucet
In order to conduct activity on-chain, you'll need ETH to pay for gas fees. Since we're using the Sepolia testnet, we can get some test ETH from the Multi-Chain Quicknode Faucet.
Navigate to the Multi-Chain Quicknode Faucet and connect your wallet (e.g., MetaMask, Coinbase Wallet) or paste in your wallet address to retrieve test ETH. Note that there is a mainnet balance requirement of 0.001 ETH on Ethereum Mainnet to use the EVM faucets. You can also tweet or log in with your Quicknode account to get a bonus!
Stablecoin Types and Architectures
Stablecoins have evolved from simple fiat-backed tokens like USDT (2014) to more complex mechanisms like FRAX (algorithmic-based). While USDC and USDT remain dominant in their market share (data: Ethereum, Solana), decentralized alternatives like DAI (2017; now USDS) pioneered crypto-collateralization. Notably, other algorithmic experiments like UST (2020) demonstrated the risks of untested stabilization mechanisms after its collapse in 2022.
Stablecoins typically maintain their peg through collateralization (like USDC's 1:1 USD backing), over-collateralization (like DAI's 150% ETH backing), or algorithmic (e.g., FRAX) methods. Each approach trades off between centralization, capital efficiency, and stability risks.
Now, let's recap the common types of stablecoins today.
Overcollateralized (DAI Model)
- Each $1 of DAI is backed by overcollateralized amount of ETH (i.e., %150)
- Market maintains confidence in $1 peg
- If ETH keeps dropping, liquidations kick in at certain threshold
- Liquidators buy discounted ETH by burning DAI
- This process helps maintain the peg by:
- Removing weak positions before they threaten peg
- Creating DAI buy pressure during liquidations
- Ensuring system always stays overcollateralized
1:1 Backed (USDC Model)
- Each USDC backed by $1 in Circle's bank accounts
- Monthly attestations prove backing
- Users can always redeem 1 USDC for $1 (if KYC'd)
- Peg issues can occur when there is loss of backing asset confidence and banking/reserve issues. For example, in March 2023, USDC briefly depegged to $0.87 during the SVB crisis. Why? The market feared USDC's backing dollars in SVB might be lost.
Algorithmic (FRAX Model)
FRAX introduced a hybrid approach, combining collateralized and algorithmic stability mechanisms. Where:
- Partially backed by collateral (USDC, USDT, etc.).
- Partially stabilized algorithmically via FRAX’s governance token, FXS.
- The collateralization ratio adjusts dynamically based on market conditions.
Building a Simple Overcollateralized Stablecoin
In this guide, we'll demonstrate how to create a simple-version of an overcollateralized stablecoin. This stablecoin will have the following features:
- ETH Collateralization
- Accepts ETH as collateral with Chainlink price feeds
- 150% minimum collateralization ratio
- 130% liquidation threshold
- Core Functionality
- Mint stablecoins by depositing ETH
- Repay debt to retrieve collateral
- Liquidation system for undercollateralized positions
- Simple Vault System
- One vault per user
- Tracks collateral and debt amounts
- Standard ERC20 implementation ("Simple USD" - sUSD)
Now let's move onto the technical coding portion of the guide.
Set Up The Project
Now that we have an understanding of Foundry v1.0, let's get coding.
If you don't have Foundry yet, install it now. You can run the foundryup command to install the latest stable version.
Next, open your terminal command window in the directory of your choice and run the following command:
forge init my-foundry-project
cd my-foundry-project
This will create the following directory structure:
.
├── README.md
├── foundry.toml
├── lib
├── script
├── src
└── test
Where:
foundry.toml: Acts as the configuration filelib: Holds libraries like @openzeppelinscript: Store scripts such as smart contract interactions, deployments, etc.src: Source code for your smart contracts (e.g., written in Solidity, Yul)test: Store and run tests (one of the most important steps!)
Let's install the required library dependencies:
forge install foundry-rs/forge-std --no-commit
forge install OpenZeppelin/openzeppelin-foundry-upgrades --no-commit
forge install OpenZeppelin/openzeppelin-contracts-upgradeable --no-commit
forge install smartcontractkit/chainlink-brownie-contracts@1.1.1 --no-commit
Then, create a file called remappings.txt in the projects main directory and set these values:
@openzeppelin/contracts/=lib/openzeppelin-contracts-upgradeable/lib/openzeppelin-contracts/contracts/
@openzeppelin/contracts-upgradeable/=lib/openzeppelin-contracts-upgradeable/contracts/
@chainlink/contracts/=lib/chainlink-brownie-contracts/contracts/
Now, before we get into coding, let's cover exactly what we'll be building next.
Writing the Stablecoin Smart Contract
The Stablecoin smart contract demonstrated in this guide is not meant for production usage. Use at your own risk! It is highly recommended that you audit any smart contract code before deploying it to production environments.
Now, let's get into building. Navigate into your src folder and create a file called Stablecoin.sol.
Let's start adding each code block while explaining along the way.
Imports
// SPDX-License-Identifier: MIT
pragma solidity ^0.8.19;

import "@openzeppelin/contracts/token/ERC20/ERC20.sol";
import "@openzeppelin/contracts/utils/ReentrancyGuard.sol";
import "@chainlink/contracts/src/v0.8/shared/interfaces/AggregatorV3Interface.sol";
We're using OpenZeppelin for the smart contract code, this includes ERC-20 implementation and ReentrancyGuard to prevent reentrancy attacks. We also import Chainlink's AggregatorV3Interface to get price feeds for ETH/USD.
Contract Initialization + State Variables
In our contract initialization (i.e., contract SimpleStablecoin), we set up the basic structure by inheriting from ERC20 and ReentrancyGuard. We declare our Chainlink price feed interface and define our core parameters for collateralization and liquidation thresholds. The Vault struct tracks each user's collateral and debt positions.
contract SimpleStablecoin is ERC20, ReentrancyGuard {
    AggregatorV3Interface public priceFeed;

    uint256 public constant COLLATERAL_RATIO = 15000; // 150%
    uint256 public constant RATIO_PRECISION = 10000;  // 100%
    uint256 public constant MIN_COLLATERAL = 0.1 ether;
    uint256 public constant LIQUIDATION_THRESHOLD = 13000; // 130%

    struct Vault {
        uint256 collateralAmount;
        uint256 debtAmount;
    }

    mapping(address => Vault) public vaults;

    event VaultUpdated(address indexed user, uint256 collateral, uint256 debt);
    event Liquidated(address indexed user, address indexed liquidator, uint256 debt, uint256 collateralSeized);

    constructor(address _priceFeed) ERC20("Simple USD", "sUSD") {
        priceFeed = AggregatorV3Interface(_priceFeed);
    }
}
Fetch ETH/USD Price From Chainlink Oracle
The getEthPrice function queries Chainlink's price feed for the latest ETH/USD price.
// Get ETH/USD price from Chainlink
function getEthPrice() public view returns (uint256) {
    (, int256 price, , , ) = priceFeed.latestRoundData();
    require(price > 0, "Invalid price");
    return uint256(price);
}
Mint Stablecoins
The mint function allows users to create new stablecoins by depositing ETH as collateral. It ensures the minimum collateral requirement is met and calculates the maximum safe amount of stablecoins that can be minted while maintaining the required collateralization ratio.
// Mint stablecoins by depositing ETH
function mint() external payable nonReentrant {
    require(msg.value >= MIN_COLLATERAL, "Below min collateral");

    Vault storage vault = vaults[msg.sender];
    uint256 ethPrice = getEthPrice();

    uint256 newCollateral = vault.collateralAmount + msg.value;
    uint256 collateralValue = (newCollateral * ethPrice) / 1e8;
    uint256 maxSafeDebt = (collateralValue * RATIO_PRECISION) / COLLATERAL_RATIO;

    uint256 additionalDebt = maxSafeDebt;
    if (vault.debtAmount > 0) {
        require(maxSafeDebt > vault.debtAmount, "No additional debt available");
        additionalDebt = maxSafeDebt - vault.debtAmount;
    }

    vault.collateralAmount = newCollateral;
    vault.debtAmount += additionalDebt;

    _mint(msg.sender, additionalDebt);

    emit VaultUpdated(msg.sender, newCollateral, vault.debtAmount);
}
Repay Stablecoin Debt
The repay function allows users to pay back their debt and retrieve their collateral. Users can make partial repayments, and if they repay all their debt, they receive their full collateral back.
// Repay stablecoin debt
function repay(uint256 amount) external nonReentrant {
    Vault storage vault = vaults[msg.sender];
    require(vault.debtAmount >= amount, "Repaying too much");
    require(balanceOf(msg.sender) >= amount, "Insufficient balance");

    _burn(msg.sender, amount);
    vault.debtAmount -= amount;

    if (vault.debtAmount == 0) {
        uint256 collateralToReturn = vault.collateralAmount;
        vault.collateralAmount = 0;
        (bool success, ) = msg.sender.call{value: collateralToReturn}("");
        require(success, "ETH transfer failed");
    }

    emit VaultUpdated(msg.sender, vault.collateralAmount, vault.debtAmount);
}
Liquidation Mechanism
The liquidate function is crucial for maintaining system solvency. It allows anyone to liquidate an undercollateralized position by repaying the user's debt in exchange for their collateral at market price.
// Liquidate users that are undercollateralized
function liquidate(address user) external nonReentrant {
    Vault storage vault = vaults[user];
    require(vault.debtAmount > 0, "No debt to liquidate");
    require(getCurrentRatio(user) < LIQUIDATION_THRESHOLD, "Position not liquidatable");

    uint256 debtToRepay = vault.debtAmount;
    require(balanceOf(msg.sender) >= debtToRepay, "Insufficient balance to liquidate");

    uint256 ethPrice = getEthPrice();
    uint256 collateralToSeize = (debtToRepay * 1e8) / ethPrice;

    require(collateralToSeize <= vault.collateralAmount, "Not enough collateral");

    vault.collateralAmount = 0;
    vault.debtAmount = 0;

    _burn(msg.sender, debtToRepay);

    (bool success, ) = msg.sender.call{value: collateralToSeize}("");
    require(success, "ETH transfer failed");

    emit Liquidated(user, msg.sender, debtToRepay, collateralToSeize);
    emit VaultUpdated(user, 0, 0);
}
Current Ratio
The getCurrentRatio function calculates the current collateralization ratio for a user's vault, which is essential for determining if a position can be liquidated.
// Get Current Ratio of Collateralization
function getCurrentRatio(address user) public view returns (uint256) {
    Vault storage vault = vaults[user];
    if (vault.debtAmount == 0) return type(uint256).max;

    uint256 ethPrice = getEthPrice();
    uint256 collateralValue = (vault.collateralAmount * ethPrice) / 1e8;
    return (collateralValue * RATIO_PRECISION) / vault.debtAmount;
}
Receive() ETH
Finally, we implement a receive function that enables our contract to accept ETH transfers, which is necessary for handling collateral deposits.
receive() external payable {}
This completes our collateralized stablecoin implementation. The smart contract maintains stability through overcollateralization and liquidation mechanisms, while providing users with the ability to mint, repay, and manage their positions. Again, this code is not production ready but meant as an simple example to getting started with stablecoin development.
Next, let's call the build command to compile the contract:
forge build
After, we'll write tests (very important!) to ensure all functions and safeguards work as intended.
Writing Tests
Create a file in your test directory called Stablecoin.t.sol and input the following code snippets in order:
// SPDX-License-Identifier: MIT
pragma solidity ^0.8.19;

import "forge-std/Test.sol";
import "../src/Stablecoin.sol";
import "@chainlink/contracts/src/v0.8/shared/interfaces/AggregatorV3Interface.sol";

contract MockV3Aggregator is AggregatorV3Interface {
    int256 private _price;
    uint8 private _decimals;

    constructor(uint8 decimals_, int256 initialPrice) {
        _decimals = decimals_;
        _price = initialPrice;
    }

    function setPrice(int256 price) external {
        _price = price;
    }

    function decimals() external view override returns (uint8) {
        return _decimals;
    }

    function description() external pure override returns (string memory) {
        return "Mock V3 Aggregator";
    }

    function version() external pure override returns (uint256) {
        return 1;
    }

    function getRoundData(uint80) external view override returns (uint80, int256, uint256, uint256, uint80) {
        return (0, _price, block.timestamp, block.timestamp, 0);
    }

    function latestRoundData() external view override returns (uint80, int256, uint256, uint256, uint80) {
        return (0, _price, block.timestamp, block.timestamp, 0);
    }
}

contract SimpleStablecoinTest is Test {
    SimpleStablecoin public stablecoin;
    MockV3Aggregator public mockPriceFeed;

    address public user1 = address(1);
    address public user2 = address(2);
    address public liquidator = address(3);

    uint8 public constant DECIMALS = 8;
    int256 public constant INITIAL_PRICE = 2000e8; // $2000 per ETH
    uint256 public constant INITIAL_ETH_BALANCE = 100 ether;

    event VaultUpdated(address indexed user, uint256 collateral, uint256 debt);
    event Liquidated(address indexed user, address indexed liquidator, uint256 debt, uint256 collateralSeized);

    function setUp() public {
        // Deploy mock price feed and stablecoin
        mockPriceFeed = new MockV3Aggregator(DECIMALS, INITIAL_PRICE);
        stablecoin = new SimpleStablecoin(address(mockPriceFeed));

        // Setup test accounts
        vm.deal(user1, INITIAL_ETH_BALANCE);
        vm.deal(user2, INITIAL_ETH_BALANCE);
        vm.deal(liquidator, INITIAL_ETH_BALANCE);
    }

    function test_InitialState() public view {
        assertEq(stablecoin.name(), "Simple USD");
        assertEq(stablecoin.symbol(), "sUSD");
        assertEq(address(stablecoin.priceFeed()), address(mockPriceFeed));
    }

    function test_Mint() public {
        uint256 ethToMint = 1 ether;

        // Calculate expected tokens:
        // 1 ETH = $2000
        // At 150% collateral ratio, maximum debt is:
        // (2000 * 10000) / 15000 = 1333.33...
        uint256 collateralValue = (ethToMint * uint256(INITIAL_PRICE)) / 1e8;
        uint256 expectedTokens = (collateralValue * stablecoin.RATIO_PRECISION()) / stablecoin.COLLATERAL_RATIO();

        vm.startPrank(user1);

        stablecoin.mint{value: ethToMint}();

        (uint256 collateral, uint256 debt) = stablecoin.vaults(user1);
        assertEq(collateral, ethToMint);
        assertEq(debt, expectedTokens);
        assertEq(stablecoin.balanceOf(user1), expectedTokens);

        vm.stopPrank();
    }

    function test_MultipleVaultOperations() public {
        vm.startPrank(user1);

        // Initial mint with 1 ETH
        stablecoin.mint{value: 1 ether}();
        uint256 firstMintAmount = stablecoin.balanceOf(user1);

        // Add more collateral (0.5 ETH)
        stablecoin.mint{value: 0.5 ether}();
        uint256 secondMintAmount = stablecoin.balanceOf(user1) - firstMintAmount;

        // Verify total position
        (uint256 collateral, uint256 debt) = stablecoin.vaults(user1);
        assertEq(collateral, 1.5 ether);
        assertEq(debt, firstMintAmount + secondMintAmount);

        vm.stopPrank();
    }

    function test_Liquidation() public {
        // 1. User1 creates a vault with 1 ETH at $2000 (god knows when we'll get 10k...)
        vm.startPrank(user1);
        stablecoin.mint{value: 1 ether}();
        uint256 mintedAmount = stablecoin.balanceOf(user1);
        vm.stopPrank();

        // 2. Transfer tokens to liquidator
        vm.prank(user1);
        stablecoin.transfer(liquidator, mintedAmount);

        // 3. Drop ETH price to $1500 (below liquidation threshold)
        mockPriceFeed.setPrice(1500e8);

        // 4. Check position is now liquidatable
        uint256 currentRatio = stablecoin.getCurrentRatio(user1);
        assertTrue(currentRatio < stablecoin.LIQUIDATION_THRESHOLD());

        // 5. Liquidator performs liquidation
        vm.startPrank(liquidator);
        stablecoin.liquidate(user1);

        // 6. Verify liquidation results
        (uint256 collateral, uint256 debt) = stablecoin.vaults(user1);
        assertEq(debt, 0, "Debt should be zero after liquidation");
        assertEq(collateral, 0, "Collateral should be zero after liquidation");
        vm.stopPrank();
    }

    function test_FullRepayment() public {
        // Setup: Create vault and mint tokens
        vm.startPrank(user1);
        stablecoin.mint{value: 1 ether}();
        uint256 initialDebt = stablecoin.balanceOf(user1);

        // Repay full debt
        stablecoin.repay(initialDebt);

        // Verify full repayment and collateral return
        (uint256 collateral, uint256 debt) = stablecoin.vaults(user1);
        assertEq(debt, 0);
        assertEq(collateral, 0);
        assertEq(stablecoin.balanceOf(user1), 0);
        vm.stopPrank();
    }

    function test_RevertWhen_MintingBelowMinCollateral() public {
        vm.startPrank(user1);
        vm.expectRevert("Below min collateral");
        stablecoin.mint{value: 0.09 ether}();
        vm.stopPrank();
    }

    function test_LiquidationPrice() public {
        vm.startPrank(user1);

        // Create position with 1 ETH at $2000
        stablecoin.mint{value: 1 ether}();
        (uint256 collateral, uint256 debt) = stablecoin.vaults(user1);

        // Calculate liquidation price
        uint256 liquidationPrice = (debt * stablecoin.LIQUIDATION_THRESHOLD() * 1e8) /
                                 (collateral * stablecoin.RATIO_PRECISION());

        // Transfer tokens to liquidator for liquidation
        vm.stopPrank();
        vm.prank(user1);
        stablecoin.transfer(liquidator, debt);

        // Price just above liquidation - should fail
        mockPriceFeed.setPrice(int256(liquidationPrice + 1e8));
        vm.prank(liquidator);
        vm.expectRevert("Position not liquidatable");
        stablecoin.liquidate(user1);

        // Price below liquidation - should succeed
        mockPriceFeed.setPrice(int256(liquidationPrice - 1e8));
        vm.prank(liquidator);
        stablecoin.liquidate(user1);
    }

    function test_PartialRepayment() public {
        // Setup: Create vault and mint tokens
        vm.startPrank(user1);
        stablecoin.mint{value: 1 ether}();
        uint256 initialDebt = stablecoin.balanceOf(user1);

        // Repay half the debt
        uint256 repayAmount = initialDebt / 2;
        stablecoin.repay(repayAmount);

        // Verify partial repayment
        (uint256 collateral, uint256 debt) = stablecoin.vaults(user1);
        assertEq(debt, initialDebt - repayAmount);
        assertEq(collateral, 1 ether); // Collateral should remain unchanged
        vm.stopPrank();
    }
}
This test file is pretty long so ensure you recap each function and its comments to get a better understanding of its test logic.
To run the test, run the command:
forge test
Test results:
Ran 8 tests for test/Stablecoin.t.sol:SimpleStablecoinTest
[PASS] test_FullRepayment() (gas: 119625)
[PASS] test_InitialState() (gas: 25080)
[PASS] test_Liquidation() (gas: 158381)
[PASS] test_LiquidationPrice() (gas: 160892)
[PASS] test_Mint() (gas: 132465)
[PASS] test_MultipleVaultOperations() (gas: 148648)
[PASS] test_PartialRepayment() (gas: 136783)
[PASS] test_RevertWhen_MintingBelowMinCollateral() (gas: 23629)
Suite result: ok. 8 passed; 0 failed; 0 skipped; finished in 5.62ms (2.89ms CPU time)
Now that our are contracts are working as intended, let's deploy them to a testnet such as Sepolia.
Deploying the Stablecoin
In order to deploy this to a remote testnet such as Sepolia, we'll need to configure a few things first.
- Ensure your wallet has enough ETH to deploy and interact with your stablecoin contract
- Have your wallet private key and Quicknode endpoint URL handy (as you'll be using in soon)
Next, create a file in your script folder called DeployStablecoin.s.sol, and add the following code:
// SPDX-License-Identifier: MIT
pragma solidity ^0.8.19;

import "forge-std/Script.sol";
import "../src/Stablecoin.sol";

contract DeployStablecoin is Script {
    function run() external {
        // Sepolia ETH/USD Price Feed
        address priceFeedAddress = 0x694AA1769357215DE4FAC081bf1f309aDC325306;

        // Start broadcasting transactions
        vm.broadcast();

        // Deploy the contract
        SimpleStablecoin stablecoin = new SimpleStablecoin(priceFeedAddress);

        console.log("Stablecoin deployed to:", address(stablecoin));
        console.log("Price Feed Address:", priceFeedAddress);
    }
}
This script uses Chainlink's price feed and deploys the contract to Sepolia testnet.
To deploy the contract, run the following command:
forge script script/DeployStablecoin.s.sol:DeployStablecoin --rpc-url your_rpc_url --private-key your_private_key_here --broadcast -vvvv
-vvvvis used for more verbose logging
In the end, you'll see an output such as:
##### sepolia
✅  [Success] Hash: 0xb9a5008e8acf16d72afa53f381c742bf1539cb610bf7dc9db6e23174c79d438c
Contract Address: 0x244FBFA8b2E02A0c5634d30Bb16E2d9B1B63Cb0d
Block: 7721469
Paid: 0.002110001463996228 ETH (2071014 gas * 1.018825302 gwei)

✅ Sequence #1 on sepolia | Total Paid: 0.002110001463996228 ETH (2071014 gas * avg 1.018825302 gwei)


==========================

ONCHAIN EXECUTION COMPLETE & SUCCESSFUL.
Let's move onto the next steps which will be minting sUSD by depositing ETH. Then, we'll be burning the sUSD to retrieve back ETH.
Managing Stablecoin Actions
Create a file in your script directory called VaultOperations.s.sol and input the following code:
// SPDX-License-Identifier: MIT
pragma solidity ^0.8.19;

import "forge-std/Script.sol";
import "forge-std/console.sol";
import "../src/Stablecoin.sol";

contract VaultOperations is Script {
    SimpleStablecoin stablecoin;
    address constant STABLECOIN_ADDRESS = REPLACE_WITH_YOUR_CONTRACT_ADDRESS;  // Replace with your contract address

    function setUp() public {
        stablecoin = SimpleStablecoin(payable(STABLECOIN_ADDRESS));
    }

    function createAndMint() public {
        vm.broadcast();

        // Mint directly with collateral (vault creation is handled in mint function)
        uint256 collateralAmount = 0.1 ether;
        stablecoin.mint{value: collateralAmount}();

        // Log results
        (uint256 collateral, uint256 debt) = stablecoin.vaults(msg.sender);
        console.log("Created vault with", collateralAmount, "ETH");
        console.log("Current collateral:", collateral);
        console.log("Current debt:", debt);
        console.log("Current ratio:", stablecoin.getCurrentRatio(msg.sender));
    }

    function repayAndWithdraw(uint256 amount) public {
        (uint256 collateral, uint256 debt) = stablecoin.vaults(msg.sender);
        require(debt > 0, "No debt to repay");
        require(amount <= debt, "Amount exceeds debt");

        vm.broadcast();
        stablecoin.repay(amount);

        // Log results
        (uint256 newCollateral, uint256 newDebt) = stablecoin.vaults(msg.sender);
        console.log("Repaid", amount, "tokens");
        console.log("Collateral returned:", collateral - newCollateral);
        console.log("Remaining debt:", newDebt);
    }

    function checkLiquidation(address user) public view {
        (uint256 collateral, uint256 debt) = stablecoin.vaults(user);
        if (debt == 0) {
            console.log("No active vault for user");
            return;
        }

        uint256 currentRatio = stablecoin.getCurrentRatio(user);
        uint256 liquidationThreshold = stablecoin.LIQUIDATION_THRESHOLD();

        console.log("Current collateral:", collateral);
        console.log("Current debt:", debt);
        console.log("Current ratio:", currentRatio);
        console.log("Liquidation threshold:", liquidationThreshold);
        console.log("Liquidatable:", currentRatio < liquidationThreshold);
    }

    function liquidatePosition(address user) public {
        require(stablecoin.getCurrentRatio(user) < stablecoin.LIQUIDATION_THRESHOLD(), "Position not liquidatable");

        (uint256 collateral, uint256 debt) = stablecoin.vaults(user);
        console.log("Attempting to liquidate position with %d collateral and %d debt", collateral, debt);

        vm.broadcast();
        stablecoin.liquidate(user);

        console.log("Position liquidated successfully");
    }
}
This script demonstrates four key vault operations:
- Creating a vault and minting tokens: Deposit ETH as collateral and mint sUSD
- Repaying debt: Return sUSD to retrieve your ETH collateral
- Checking liquidation status: Monitor vault health
- Liquidating positions: Liquidate unsafe vaults
To use these functions, run the following commands in your project's root directory:
Create Vault and Mint Tokens
forge script script/VaultOperations.s.sol:VaultOperations --sig "createAndMint()" \
    --rpc-url https://your-quicknode-endpoint \
    --private-key your_private_key_here \
    --broadcast \
    -vvvv
This creates a vault with 0.1 ETH collateral (minimum required amount) and mints the maximum safe amount of sUSD based on the current ETH price (i.e., the amount of tokens minted will depend on ETH price) and collateral ratio.
Repay Debt and Withdraw Collateral
The repayment amount needs to be specified in wei. Example below shows a partial repayment of 1 sUSD (1e18 wei). To get your full collateral back, you'll need to repay your full debt amount.
forge script script/VaultOperations.s.sol:VaultOperations --sig "repayAndWithdraw(uint256)" 1000000000000000000 \
    --rpc-url https://your-quicknode-endpoint \
    --private-key your_private_key_here \
    --broadcast \
    -vvvv
This pays down your outstanding debt and returns your collateral if debt is fully repaid.
Check Vault Status
forge script script/VaultOperations.s.sol:VaultOperations --sig "checkLiquidation(address)" "TARGET_ADDRESS" \
    --rpc-url https://your-quicknode-endpoint \
    -vvvv
Example output:
Script ran successfully.

== Logs ==
  Current collateral: 100000000000000000
  Current debt: 178447799885333333333
  Current ratio: 15084
  Liquidation threshold: 13000
  Liquidatable: false
This shows the current health of a vault, including collateral ratio and liquidation risk.
Liquidate Unsafe Position
forge script script/VaultOperations.s.sol:VaultOperations --sig "liquidatePosition(address)" "TARGET_ADDRESS" \
    --rpc-url https://your-quicknode-endpoint \
    --private-key your_private_key_here \
    --broadcast \
    -vvvv
This liquidates a vault that has fallen below the liquidation threshold.
Example transaction (note this contract used different parameters to simulate liquidation)
Remember to:
- Replace
YOUR_CONTRACT_ADDRESSwith your deployed contract address - Replace
your-quicknode-endpointwith your RPC URL - Use your actual private key (never share or commit this!)
- For liquidations, replace
TARGET_ADDRESSwith the address of the vault you want to liquidate
Next Steps
- Enhanced vault mechanisms: Support multiple collateral types, implement dynamic ratios based on market conditions, and create a more robust system for collateral management. Study how DAI manages multi-collateral positions and how Liquity handles single-collateral stability.
- Advanced liquidation systems: Build more sophisticated liquidation mechanisms like Dutch auctions, partial liquidations, and keeper incentive structures. Implement a fair system that maintains stability while protecting users from unnecessary losses.
- Price oracle architecture: Develop a more robust price feed system using multiple oracles, TWAP (Time-Weighted Average Price) mechanisms, and heartbeat checks. Understand oracle attacks and how to prevent them.
- Interest rate dynamics: Create dynamic stability fees that adjust based on market conditions and utilization. Study how lending protocols like Aave implement interest rate curves.
- Write production-ready code. You will need to explore different vulnerabilities, such as (oracle dependency, volatile price movements, etc.). It is recommended to look at existing Stablecoin projects, review their code, see what you can learn from them, and implement them in your own.
- More tests. Then audit.
If you want to see part 2 of this guide where we implement some of the next steps highlighed above, please leave some feedback below!
Final Thoughts
That's it! We just showed you how to create your own simple overcollateralized stablecoin using Foundry for smart contract development and testing.
If you have any questions or need help, feel free to reach out to us on our Discord or Twitter.
We ❤️ Feedback!
Let us know if you have any feedback or requests for new topics. We'd love to hear from you.