18 min read
Overview
The ability to adapt and evolve smart contracts post-deployment has become paramount. As projects grow, unforeseen requirements, potential optimizations or different products often emerge. For many, the traditional method of deploying a completely new contract and migrating users isn't just impractical; it's a recipe for potential user frustration and lost trust. Enter the power of upgradeable contracts, allowing you to evolve your token's logic while retaining its address and user data. In this guide, we'll show you how to harness OpenZeppelin's pre-audited contract suite and Foundry's deployment capabilities to create and roll out an upgradeable ERC-20 token.
What You Will Do
- Solidify your understanding of ERC-20 tokens
- Learn how upgradeability can add more functionality to your ERC-20 token
- Connect to the blockchain using Quicknode
- Create and deploy an upgradeable ERC-20 token with OpenZeppelin and Foundry
What You Will Need
- Basic understanding of Ethereum and Smart Contracts
- Knowledge of the ERC-20 token standard
- Node.js installed
- A Web3 Wallet
What is an ERC-20 token?
The ERC-20 token standard is a blueprint for creating fungible tokens on Ethereum and EVM-based blockchains. "ERC" stands for Ethereum Request for Comment, and "20" is its proposal identifier. Before its inception, token creators faced a chaotic landscape, with each token's architecture being unique—leading to complexity in integration, especially for wallets and exchanges. However, ERC-20 introduced a standardized set of rules encapsulated in mandatory functions like transfer, balanceOf, and totalSupply, ensuring consistent behavior across tokens. Similar to an interface in Object-Oriented Programming, developers can appreciate its role in enforcing the adoption of these key functions. This uniformity has revolutionized token interactions, making them seamless and efficient, with tokens now easily traded, used in dApps, or stored in wallets, all while operating on Ethereum's blockchain.
What is an Upgradeable ERC-20 Token?
At its core, an upgradeable token embraces the flexibility to enhance or modify its functionality post-deployment. This is achieved through a layered architecture: the Proxy serves as the immutable smart contract interacting with users, while the Logic smart contract (also sometimes referred to as the implementation contract) contains the business logic. Upgrades are orchestrated by changing the proxy's reference to newer logic contracts, ensuring token balances and other state variables remain intact. In this design, an Admin role typically governs the upgrade process, making decisions about when and how the logic contract changes, thereby introducing an element of governance into the token's life cycle.
There are different types of upgradeable smart contracts, so let's cover the most common and compare them.
Transparent Proxy
The Transparent Proxy pattern is designed to distinguish between an administrator and a regular user. It works by using two different addresses: one for the admin (who can upgrade the contract) and one for regular users (who can interact with the contract's functions). The proxy contract includes logic to separate calls made by the admin from those made by regular users, preventing accidental execution of administrative functions during regular use.
UUPS Proxy
UUPS (Universal Upgradeable Proxy Standard) Proxy is a more streamlined and gas-efficient approach. In this pattern, the upgrade functionality is embedded within the logic contract itself. This design reduces the need for an additional 'admin' contract, simplifying the structure. However, it also requires that the logic contract is designed with upgradability in mind, embedding the necessary upgrade functions within it.
Beacon Proxy
The Beacon Proxy pattern introduces a central "Beacon" contract that all proxy instances reference to obtain the address of the current logic contract. This design allows for a more efficient upgrade process, as updating the logic contract address in the beacon automatically updates all associated proxies. It's particularly useful in scenarios where multiple proxy contracts need to be kept in sync with the same logic contract.
To learn more about Proxies, check out this Quicknode guide and OpenZeppelin Proxy.
For the technical demonstration in this guide, we'll be covering the UUPS Proxy method.
Why OpenZeppelin?
OpenZeppelin provides a library of reusable smart contracts that are secure and well-audited, ensuring that the basic building blocks of your smart contract are safe. For upgradeability, OpenZeppelin offers proxy contracts that delegate calls to an implementation contract. This approach allows developers to replace the implementation contract while keeping the proxy's storage, address, and balance.
To learn more about OpenZeppelin and its upgradeability plug-in, check out this resource.
Project Prerequisite: Create a Quicknode Endpoint
To deploy a smart contract to the blockchain, you'll need an API endpoint to communicate with the network. You're welcome to use public nodes or deploy and manage your own infrastructure; however, if you'd like 8x faster response times, you can leave the heavy lifting to us. Sign up for an account here.
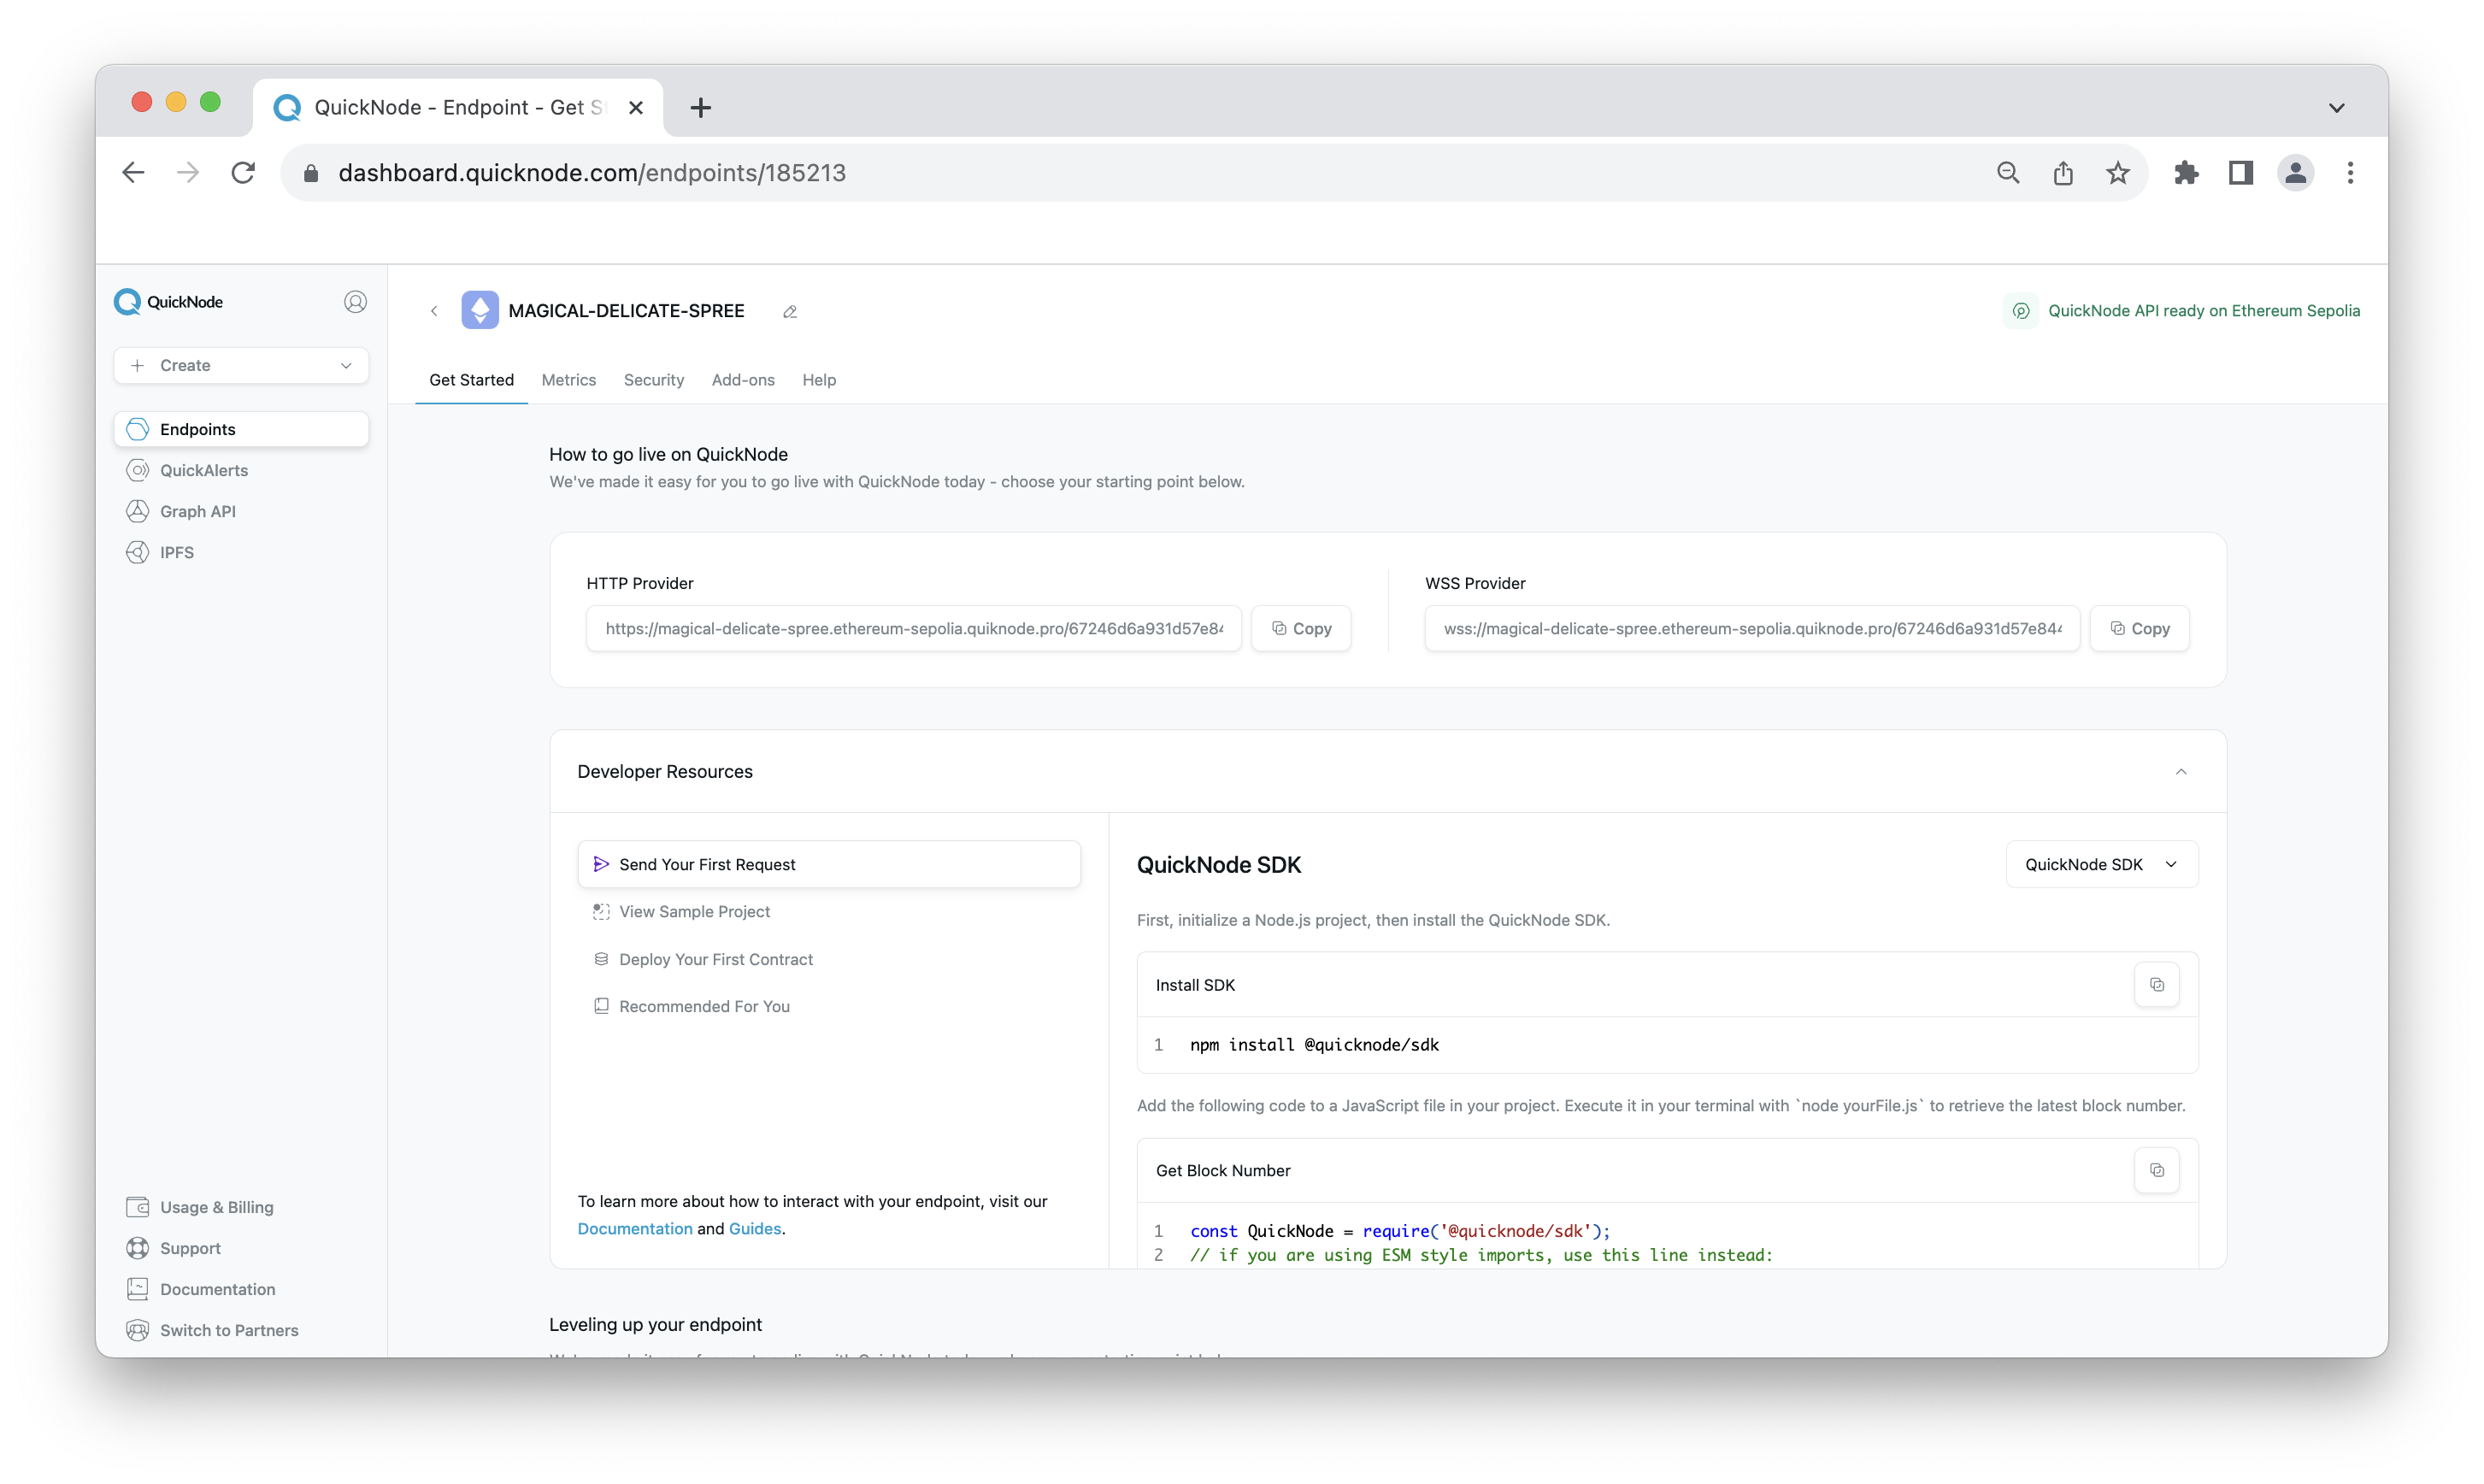
Once logged in, click the Create an endpoint button, then select the blockchain and network you want to deploy on. For the purpose of this guide, we'll choose the Ethereum Sepolia chain.
After creating your endpoint, copy the HTTP Provider link and keep it handy, as you'll need it in the following sections.
Project Prerequisite: Fund Your Wallet
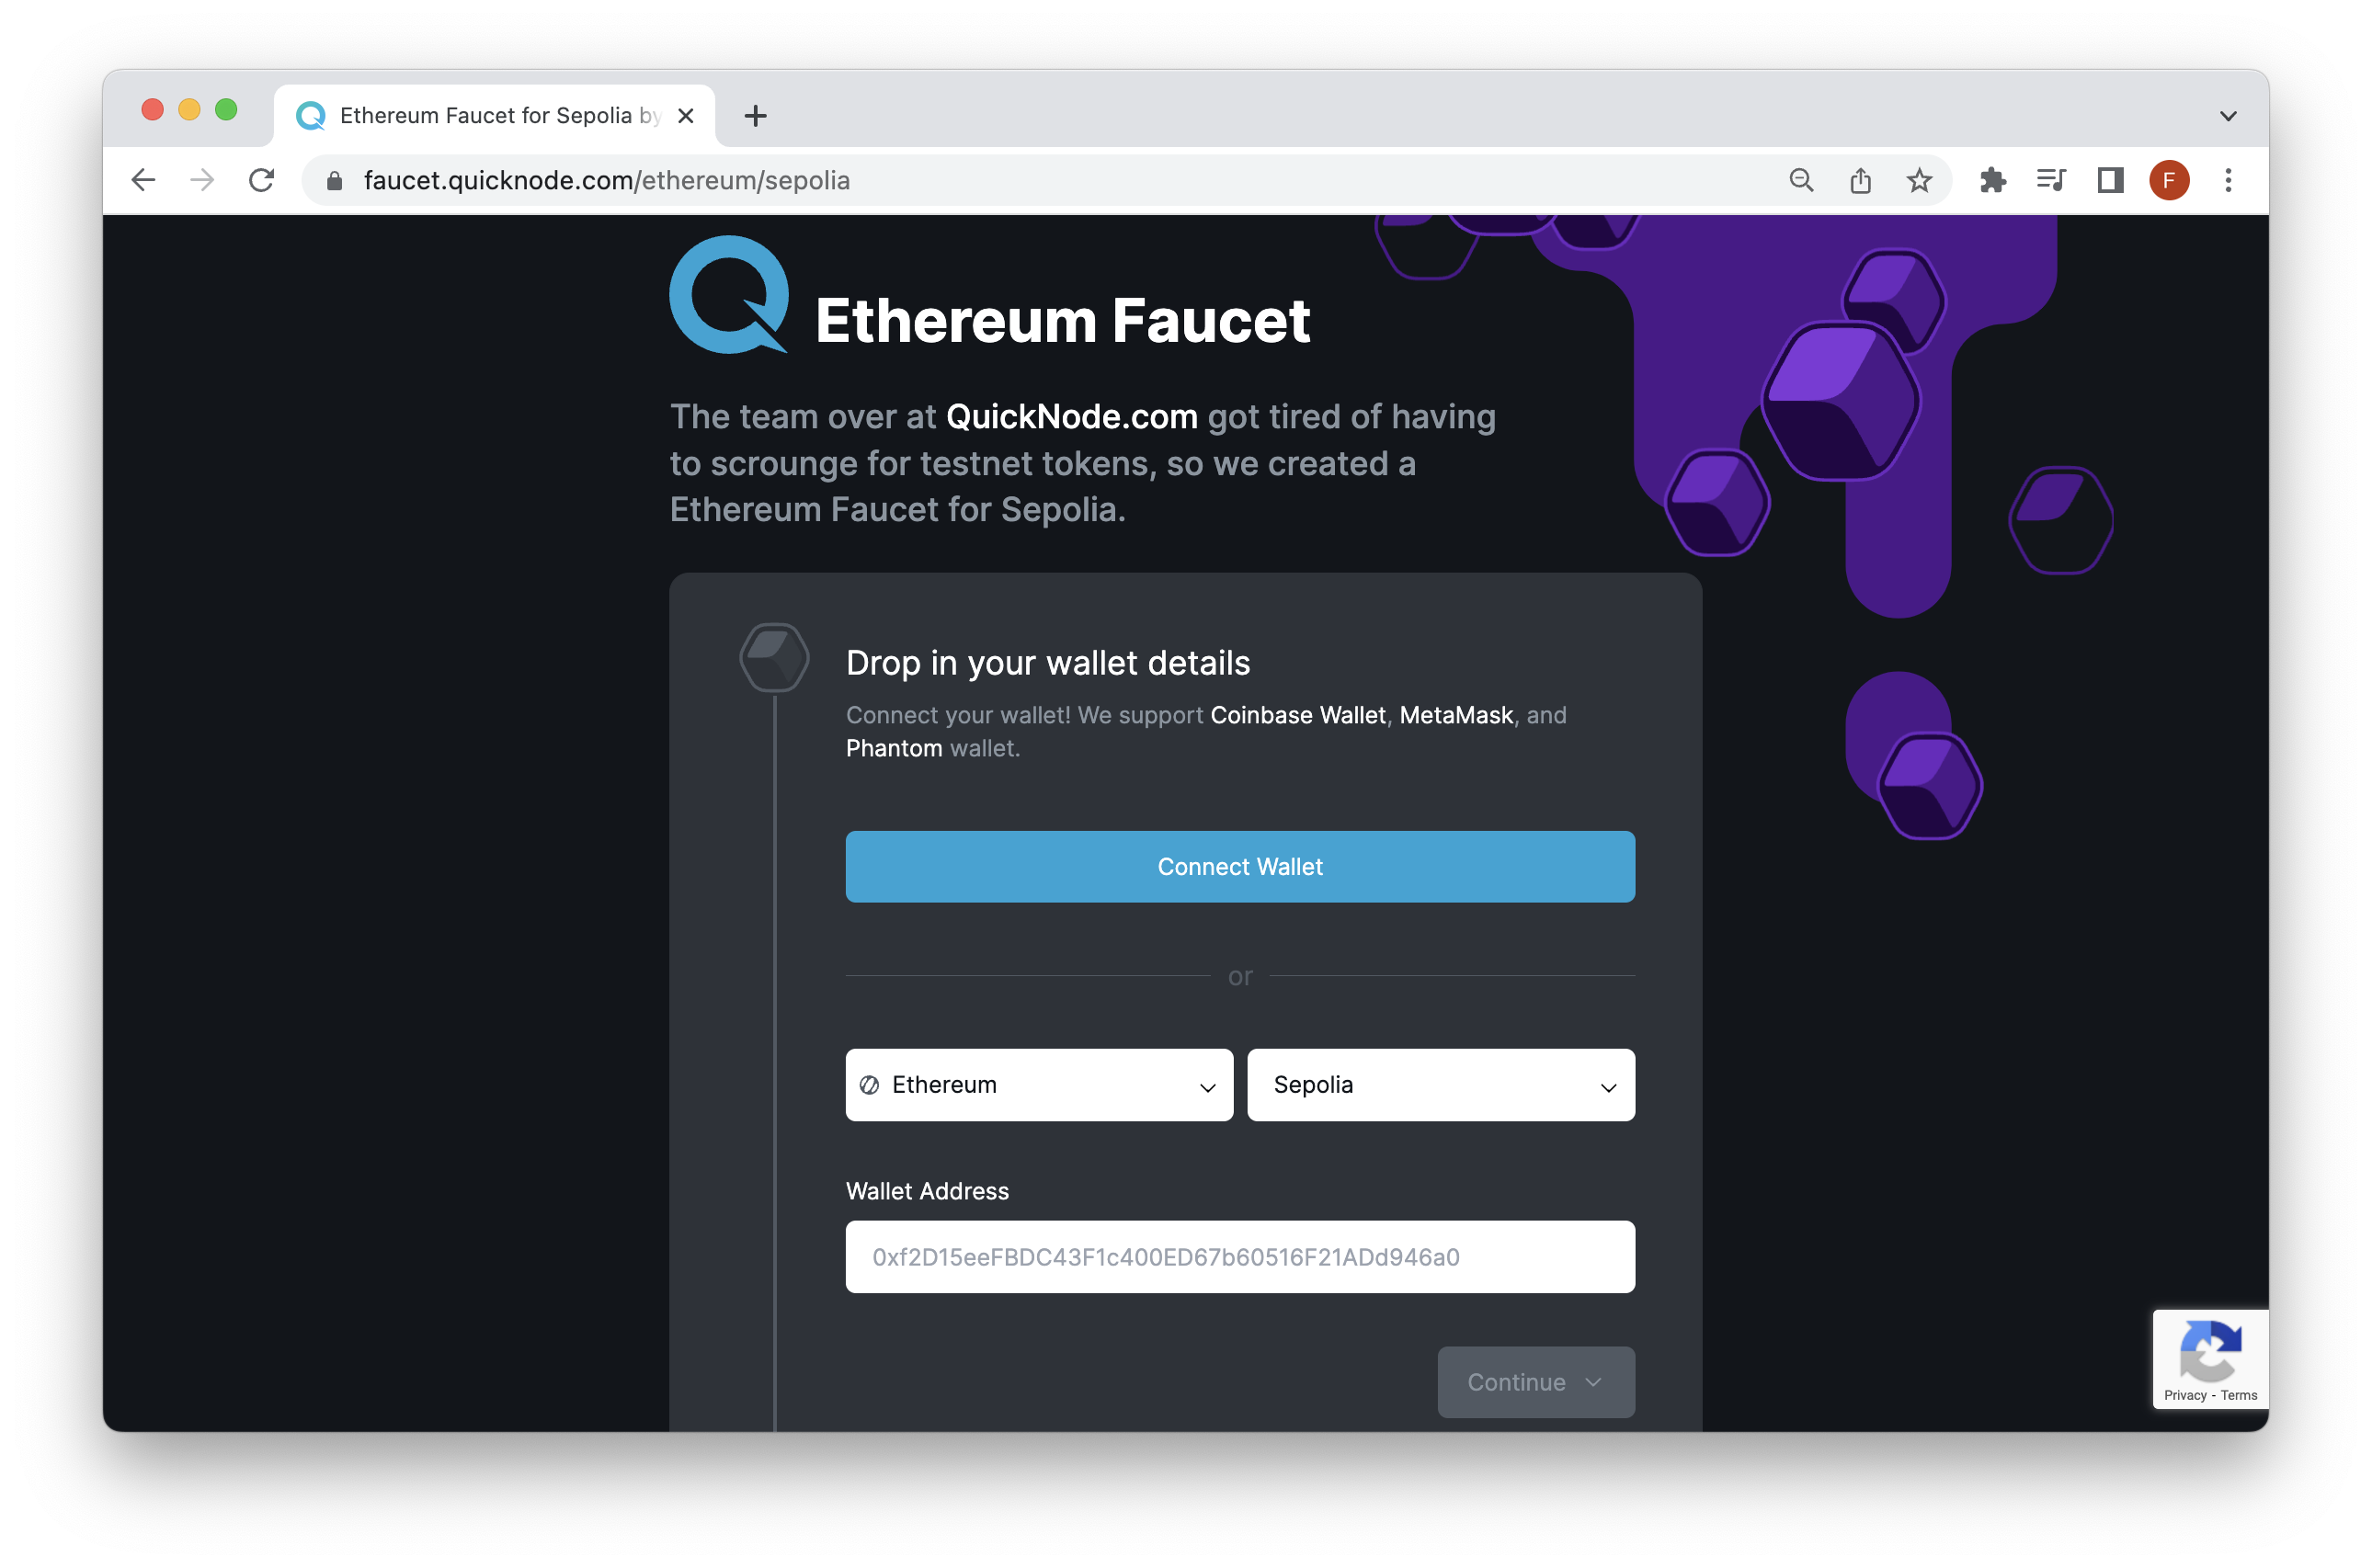
If you're in need of ETH on Sepolia testnet, the Multi-Chain Quicknode Faucet makes it easy to obtain test ETH!
Navigate to the Multi-Chain Quicknode Faucet and connect your wallet (e.g., MetaMask, Coinbase Wallet) or paste in your wallet address to retrieve test ETH. Note that there is a mainnet balance requirement of 0.001 ETH on Ethereum Mainnet to use the EVM faucets. You can also tweet out your request to get a bonus!
In the next section, we will transition over to creating our project directory and configuring the project's files and dependencies.
Create the Upgradeable ERC-20 Token Project
Now that we have a good fundamental understanding of ERC-20 tokens and how upgradeability works on Ethereum, let's start coding up a practical example. First, let's install and initialize a Foundry project.
Install Foundry
If you don't have Foundry installed already, open your terminal and run the following command:
curl -L https://foundry.paradigm.xyz | bash
The command above will install Foundryup. Then, proceed according to the on-screen directions, which will enable you to use the foundryup command in your CLI. Once installed, you can run the foundryup -v command in your terminal to check the version and install the latest (nightly) precompiled binaries.
If you're using Windows, you will need to install and use Git BASH or WSL as your terminal since Foundryup currently does not support Powershell or Cmd. Follow the instructions here for Windows and alternate sources.
Alternatively, if you're on M1 Mac, and get the error:
dyld[32719]: Library not loaded: /usr/local/opt/libusb/lib/libusb-1.0.0.dylib; Try installing the library via brew:brew install libusb.
Once your installation is configured, initialize a Foundry project with the following command and navigate inside the directory:
forge init erc20_upgradeable && cd erc20_upgradeable
Then, navigate inside erc20_upgradeable, and your project structure should look like this:
.
�├── lib
├── script
├── src
└── test
foundry.toml
You may see some existing sample files in the project, but you can disregard them.
Let's recap this structure.
- lib: A directory where dependencies are stored
- script: A directory to deploy contracts or interact with existing smart contracts
- src: The default directory for smart contracts
- test: The default directory for running tests
- foundry.toml: The configuration file that can modify settings like versioning, optimization, RPC networks, contract verification, and more.
We'll also need to create the required files for our project. Run the command below to create the smart contract file, test file, deployment files, and remappings.txt (which we'll use to map our library dependencies properly).
echo > src/MyToken.sol && echo > src/MyTokenV2.sol && echo > test/MyTokenTest.t.sol && echo > script/deployToken.s.sol && echo > script/deployProxy.s.sol && echo > remappings.txt
In the next section, we'll install the required libraries and set up our configuration.
Configure the Project
With our project initialized, let's install the OpenZeppelin library we'll be using for this guide. In your terminal within your project's root folder, run the command:
forge install OpenZeppelin/openzeppelin-contracts --no-commit
forge install OpenZeppelin/openzeppelin-foundry-upgrades --no-commit
forge install OpenZeppelin/openzeppelin-contracts-upgradeable --no-commit
Notice the --no-commit flag at the end. This is because your project folder is already tied to a git repository, so we have to specify not to commit anything.
Now, let's configure the imports to the correct paths by filling in the remappings.txt file we created earlier.
Add the following config to the file:
@openzeppelin/contracts/=lib/openzeppelin-contracts-upgradeable/lib/openzeppelin-contracts/contracts/
@openzeppelin/contracts-upgradeable/=lib/openzeppelin-contracts-upgradeable/contracts/
Once the file is saved, let's open up the foundry.toml file and add the following code to your file:
build_info = true
extra_output = ["storageLayout"]
[rpc_endpoints]
sepolia = "QUICKNODE_ENDPOINT_URL"
The first two lines (e.g., build_info & extra_output) refer to the configuration needed when working with OpenZeppelins Foundry Upgrades library (thanks ericglau!). Additionally, since we deploy on Sepolia testnet in this guide, we'll name this endpoint sepolia. If you are deploying on another network, you can change the name. Note, remember to replace the QUICKNODE_ENDPOINT_URL placeholder with the actual Quicknode HTTP Provider URL you previously created.
Lastly, let's set our private key in our environment with the following variable name and your private key. Run the following command in your terminal and update the YOUR_PRVATE_KEY placeholder with your actual private key.
export PRIVATE_KEY=YOUR_PRIVATE_KEY
With our configuration setup, let's move on to creating the upgradeable ERC-20 token.
Create the ERC-20 Upgradeable Token Smart Contract
It's time to build out the logic for the upgradeable ERC-20 token contract. Before we get into the code, let's cover the exact functionality our ERC-20 token will have.
We'll be inheriting different smart contracts into our ERC-20 token:
ERC20Upgradeable- Contains the upgradeable functionality for the ERC-20 tokenOwnableUpgradeable- Allows only the owner to execute certain functions (the owner can be transferred)ERC20PermitUpgradeable- Adds a permit functionality that users can use to save costs for off-chain approvalsInitializable- Similar to a constructor, and we'll use it to set the initial parameters for the tokenUUPSUpgradeable- The Universal Upgradeable Proxy Standard pattern logic our ERC-20 token will inherit
Now, navigate into your src folder and open the MyToken.sol file. Update the contents of the file to include:
// SPDX-License-Identifier: MIT
pragma solidity ^0.8.19;

import "openzeppelin-contracts-upgradeable/contracts/token/ERC20/ERC20Upgradeable.sol";
import "openzeppelin-contracts-upgradeable/contracts/access/OwnableUpgradeable.sol";
import "openzeppelin-contracts-upgradeable/contracts/token/ERC20/extensions/ERC20PermitUpgradeable.sol";
import "openzeppelin-contracts-upgradeable/contracts/proxy/utils/Initializable.sol";
import "openzeppelin-contracts-upgradeable/contracts/proxy/utils/UUPSUpgradeable.sol";

contract MyToken is Initializable, ERC20Upgradeable, OwnableUpgradeable, ERC20PermitUpgradeable, UUPSUpgradeable {
    /// @custom:oz-upgrades-unsafe-allow constructor
    constructor() {
        _disableInitializers();
    }

    function initialize(address initialOwner) initializer public {
        __ERC20_init("MyToken", "MTK");
        __Ownable_init(initialOwner);
        __ERC20Permit_init("MyToken");
        __UUPSUpgradeable_init();

        _mint(msg.sender, 1000000 * 10 ** decimals());
    }

    function mint(address to, uint256 amount) public onlyOwner {
        _mint(to, amount);
    }

    function _authorizeUpgrade(address newImplementation)
        internal
        onlyOwner
        override
    {}
}
For easy deployment next time, check out the code on Remix.IDE
Remember to save the file. Let's recap the code.
As mentioned above, we inherited different smart contracts into our ERC-20 token. Then, in the contract's constructor, we ensure that initialization methods are run only once by invoking _disableInitializers(), a safeguard against accidental reinitialization. The central initialize function sets up the token with its name "MyToken" and symbol "MTK", assigns ownership to the provided initialOwner, and activates enhanced approval mechanisms and upgradeability features. An initial token supply is also minted to the caller of this function. Additionally, the contract provides a mint function exclusive to the owner, allowing the creation of new tokens. Secure contract upgrades are ensured through the internal _authorizeUpgrade method, which permits only the owner to authorize new contract versions.
Now, let's open the MyTokenV2.sol file and input the following code below. The purpose of the MyTokenV2 is to showcase the upgradability flow from our MyToken contract to MyTokenV2. Note that MyToken in this case is the logic contract, but ultimately the state will be tracked within the proxy.
// SPDX-License-Identifier: MIT
pragma solidity ^0.8.19;

import "openzeppelin-contracts-upgradeable/contracts/token/ERC20/ERC20Upgradeable.sol";
import "openzeppelin-contracts-upgradeable/contracts/access/OwnableUpgradeable.sol";
import "openzeppelin-contracts-upgradeable/contracts/token/ERC20/extensions/ERC20PermitUpgradeable.sol";
import "openzeppelin-contracts-upgradeable/contracts/proxy/utils/Initializable.sol";
import "openzeppelin-contracts-upgradeable/contracts/proxy/utils/UUPSUpgradeable.sol";

/// @custom:oz-upgrades-from MyToken
contract MyTokenV2 is Initializable, ERC20Upgradeable, OwnableUpgradeable, ERC20PermitUpgradeable, UUPSUpgradeable {
    /// @custom:oz-upgrades-unsafe-allow constructor
    constructor() {
        _disableInitializers();
    }

    function initialize(address initialOwner) initializer public {
        __ERC20_init("MyTokenV2", "MTKV2");
        __Ownable_init(initialOwner);
        __ERC20Permit_init("MyTokenV2");
        __UUPSUpgradeable_init();

        _mint(msg.sender, 1000000 * 10 ** decimals());
    }

    function mint(address to, uint256 amount) public onlyOwner {
        _mint(to, amount);
    }

    function _authorizeUpgrade(address newImplementation)
        internal
        onlyOwner
        override
    {}
}
Overall, the ERC-20 smart contract above is very similar to MyToken.sol but has differences, such as a different contract name, symbol and contains a Foundry/OpenZepplin annotation needed to upgrade our contract (e.g., /// @custom:oz-upgrades-from MyToken).
Now, let's move on to compiling and testing.
Compile and Test the Upgradeable ERC-20 Token
With our smart contract written, let's try to compile the contract and test the behavior of the upgradeable ERC-20 token logic.
We'll be testing the following functionality:
- Checking the
mintfunctionality of our contract (note this is restricted to theowner) - Testing and verifying the upgradeability of our ERC-20 token
Now, navigate into the test folder and open the MyTokenTest.t.sol file. As you may have assumed, tests in Foundry are written in Solidity. Update the contents of the file to include the following:
// SPDX-License-Identifier: MIT
pragma solidity ^0.8.19;

import "forge-std/Test.sol";
import "../src/MyToken.sol";
import "forge-std/console.sol";
import "@openzeppelin/contracts/proxy/ERC1967/ERC1967Proxy.sol";
import "@openzeppelin/contracts/proxy/ERC1967/ERC1967Utils.sol";
import { Upgrades } from "openzeppelin-foundry-upgrades/Upgrades.sol";

contract MyTokenTest is Test {
    MyToken myToken;
    ERC1967Proxy proxy;
    address owner;
    address newOwner;

    // Set up the test environment before running tests
    function setUp() public {
        // Deploy the token implementation
        MyToken implementation = new MyToken();
        // Define the owner address
        owner = vm.addr(1);
        // Deploy the proxy and initialize the contract through the proxy
        proxy = new ERC1967Proxy(address(implementation), abi.encodeCall(implementation.initialize, owner));
        // Attach the MyToken interface to the deployed proxy
        myToken = MyToken(address(proxy));
        // Define a new owner address for upgrade tests
        newOwner = address(1);
        // Emit the owner address for debugging purposes
        emit log_address(owner);
    }

    // Test the basic ERC20 functionality of the MyToken contract
    function testERC20Functionality() public {
        // Impersonate the owner to call mint function
        vm.prank(owner);
        // Mint tokens to address(2) and assert the balance
        myToken.mint(address(2), 1000);
        assertEq(myToken.balanceOf(address(2)), 1000);
    }

    // Test the upgradeability of the MyToken contract
    function testUpgradeability() public {
        // Upgrade the proxy to a new version; MyTokenV2
        Upgrades.upgradeProxy(address(proxy), "MyTokenV2.sol:MyTokenV2", "", owner);
    }
}
The test code is quite long, but we've added comments so you can better understand what is happening for each test case.
Now, to compile our contracts and execute the tests, run the command below in your terminal:
forge build && forge test --ffi
The
--ffiflag is included in order to run external scripts our code needs to access.
You may receive some warnings such as "Source file does not specify required compiler version!" but this can be ignored.
Why do we need to compile? The EVM cannot interpret high-level code like Solidity, so instead, code must be compiled into bytecode so that the EVM can interpret it.
You'll see an output similar to the following:
[⠢] Compiling...
[⠃] Compiling 62 files with 0.8.22
[⠰] Solc 0.8.22 finished in 3.79s
Compiler run successful with warnings:
Warning (3420): Source file does not specify required compiler version! Consider adding "pragma solidity ^0.8.22;"
--> script/deployProxy.s.sol

Warning (3420): Source file does not specify required compiler version! Consider adding "pragma solidity ^0.8.22;"
--> script/deployToken.s.sol

[⠢] Compiling...
No files changed, compilation skipped

Running 2 tests for test/MyTokenTest.t.sol:MyTokenTest
[PASS] testERC20Functionality() (gas: 48673)
[PASS] testUpgradeability() (gas: 1642043)
Test result: ok. 2 passed; 0 failed; 0 skipped; finished in 2.43s

Running 2 tests for test/Counter.t.sol:CounterTest
[PASS] testFuzz_SetNumber(uint256) (runs: 256, μ: 27709, ~: 28409)
[PASS] test_Increment() (gas: 28379)
Test result: ok. 2 passed; 0 failed; 0 skipped; finished in 2.43s

Ran 2 test suites: 4 tests passed, 0 failed, 0 skipped (4 total tests)
Note: If you experience an error with your test, you may want to run the command -
forge clean && forge build && forge test --ffito remove the build artifacts and cache directories, then re-compile and run tests.
Also, you'll notice two new directories; the out directory contains the contract artifact, such as the ABI, while the cache folder is used by forge to recompile what is necessary.
The only thing that's left is to deploy the upgradeable ERC-20 token. Let's go!
Deploy the Upgradeable ERC-20 Token
Foundry makes it easy to deploy smart contracts via the CLI using the forge create command; however, you can also deploy using scripts. Note that Foundry can only deploy one contract at a time, but this is not a roadblock for us at this time.
To deploy the ERC-20 token, let's use a script. Open the scripts/deployToken.s.sol file we previously created and update the file to use the following code:
// SPDX-License-Identifier: MIT
pragma solidity ^0.8.19;

import "../src/MyToken.sol";
import "forge-std/Script.sol";

contract DeployTokenImplementation is Script {
    function run() public {
        // Use address provided in config to broadcast transactions
        vm.startBroadcast();
        // Deploy the ERC-20 token
        MyToken implementation = new MyToken();
        // Stop broadcasting calls from our address
        vm.stopBroadcast();
        // Log the token address
        console.log("Token Implementation Address:", address(implementation));
    }
}
Remember to save the file! All that's left is to execute the script.
forge script script/DeployToken.s.sol --rpc-url sepolia --private-key $PRIVATE_KEY --broadcast
The command above executes the script with our sepolia RPC URL we configured in the foundry.toml file. The --private-key flag sets our account to use for transactions and the --broadcast command to broadcast them out to the network.
If you want to verify your contract on Etherscan to be able to let you and others read and write to your smart contract from the block explorer, you will need to add the --etherscan-api-key YOUR_ETHERSCAN_API_KEY --verify flag to the end of the command above. At the end of this guide, we demonstrate how to read from the proxy, so this will be required if you want to do that step.
Create an account on Etherscan to retrieve an API key.
Upon success, you'll see an output such as:
== Logs ==
Token Implementation Address: 0x195136BA4F105dAe042F96a59E4dbeF9DCAdE773
...
...
✅  [Success]Hash: 0xe097b9397cd7d36bcf8dc379c95b511746b8d6802e4794e4b0b1125e36bf75bf
Contract Address: 0x5FbDB2315678afecb367f032d93F642f64180aa3
Block: 1
Paid: 0.00673602 ETH (1684005 gas * 4 gwei)
Next, let's deploy the Proxy contract.
Open the scripts/deployProxy.s.sol file and input the following code:
// SPDX-License-Identifier: MIT
pragma solidity ^0.8.19;

import "../src/MyToken.sol";
import "@openzeppelin/contracts/proxy/ERC1967/ERC1967Proxy.sol";
import "forge-std/Script.sol";

contract DeployUUPSProxy is Script {
    function run() public {

        address _implementation = YOUR_DEPLOYED_SMART_CONTRACT_ADDRESS; // Replace with your token address
        vm.startBroadcast();

        // Encode the initializer function call
        bytes memory data = abi.encodeWithSelector(
            MyToken(_implementation).initialize.selector,
            msg.sender // Initial owner/admin of the contract
        );

        // Deploy the proxy contract with the implementation address and initializer
        ERC1967Proxy proxy = new ERC1967Proxy(_implementation, data);

        vm.stopBroadcast();
        // Log the proxy address
        console.log("UUPS Proxy Address:", address(proxy));
    }
}
Important: Now, before running the next command, you'll need to update the _implementation variable with your deployed smart contract address (e.g., token address) from the previous step. Remember to save the file.
Then, to deploy the proxy, run the following:
forge script script/deployProxy.s.sol:DeployUUPSProxy --rpc-url sepolia --private-key $PRIVATE_KEY --broadcast
Remember that optionally, you can also add the --etherscan-api-key YOUR_ETHERSCAN_API_KEY --verify flag to the end of the command above to verify your contract. This will be required if you want to interact with your smart contract in the upcoming steps.
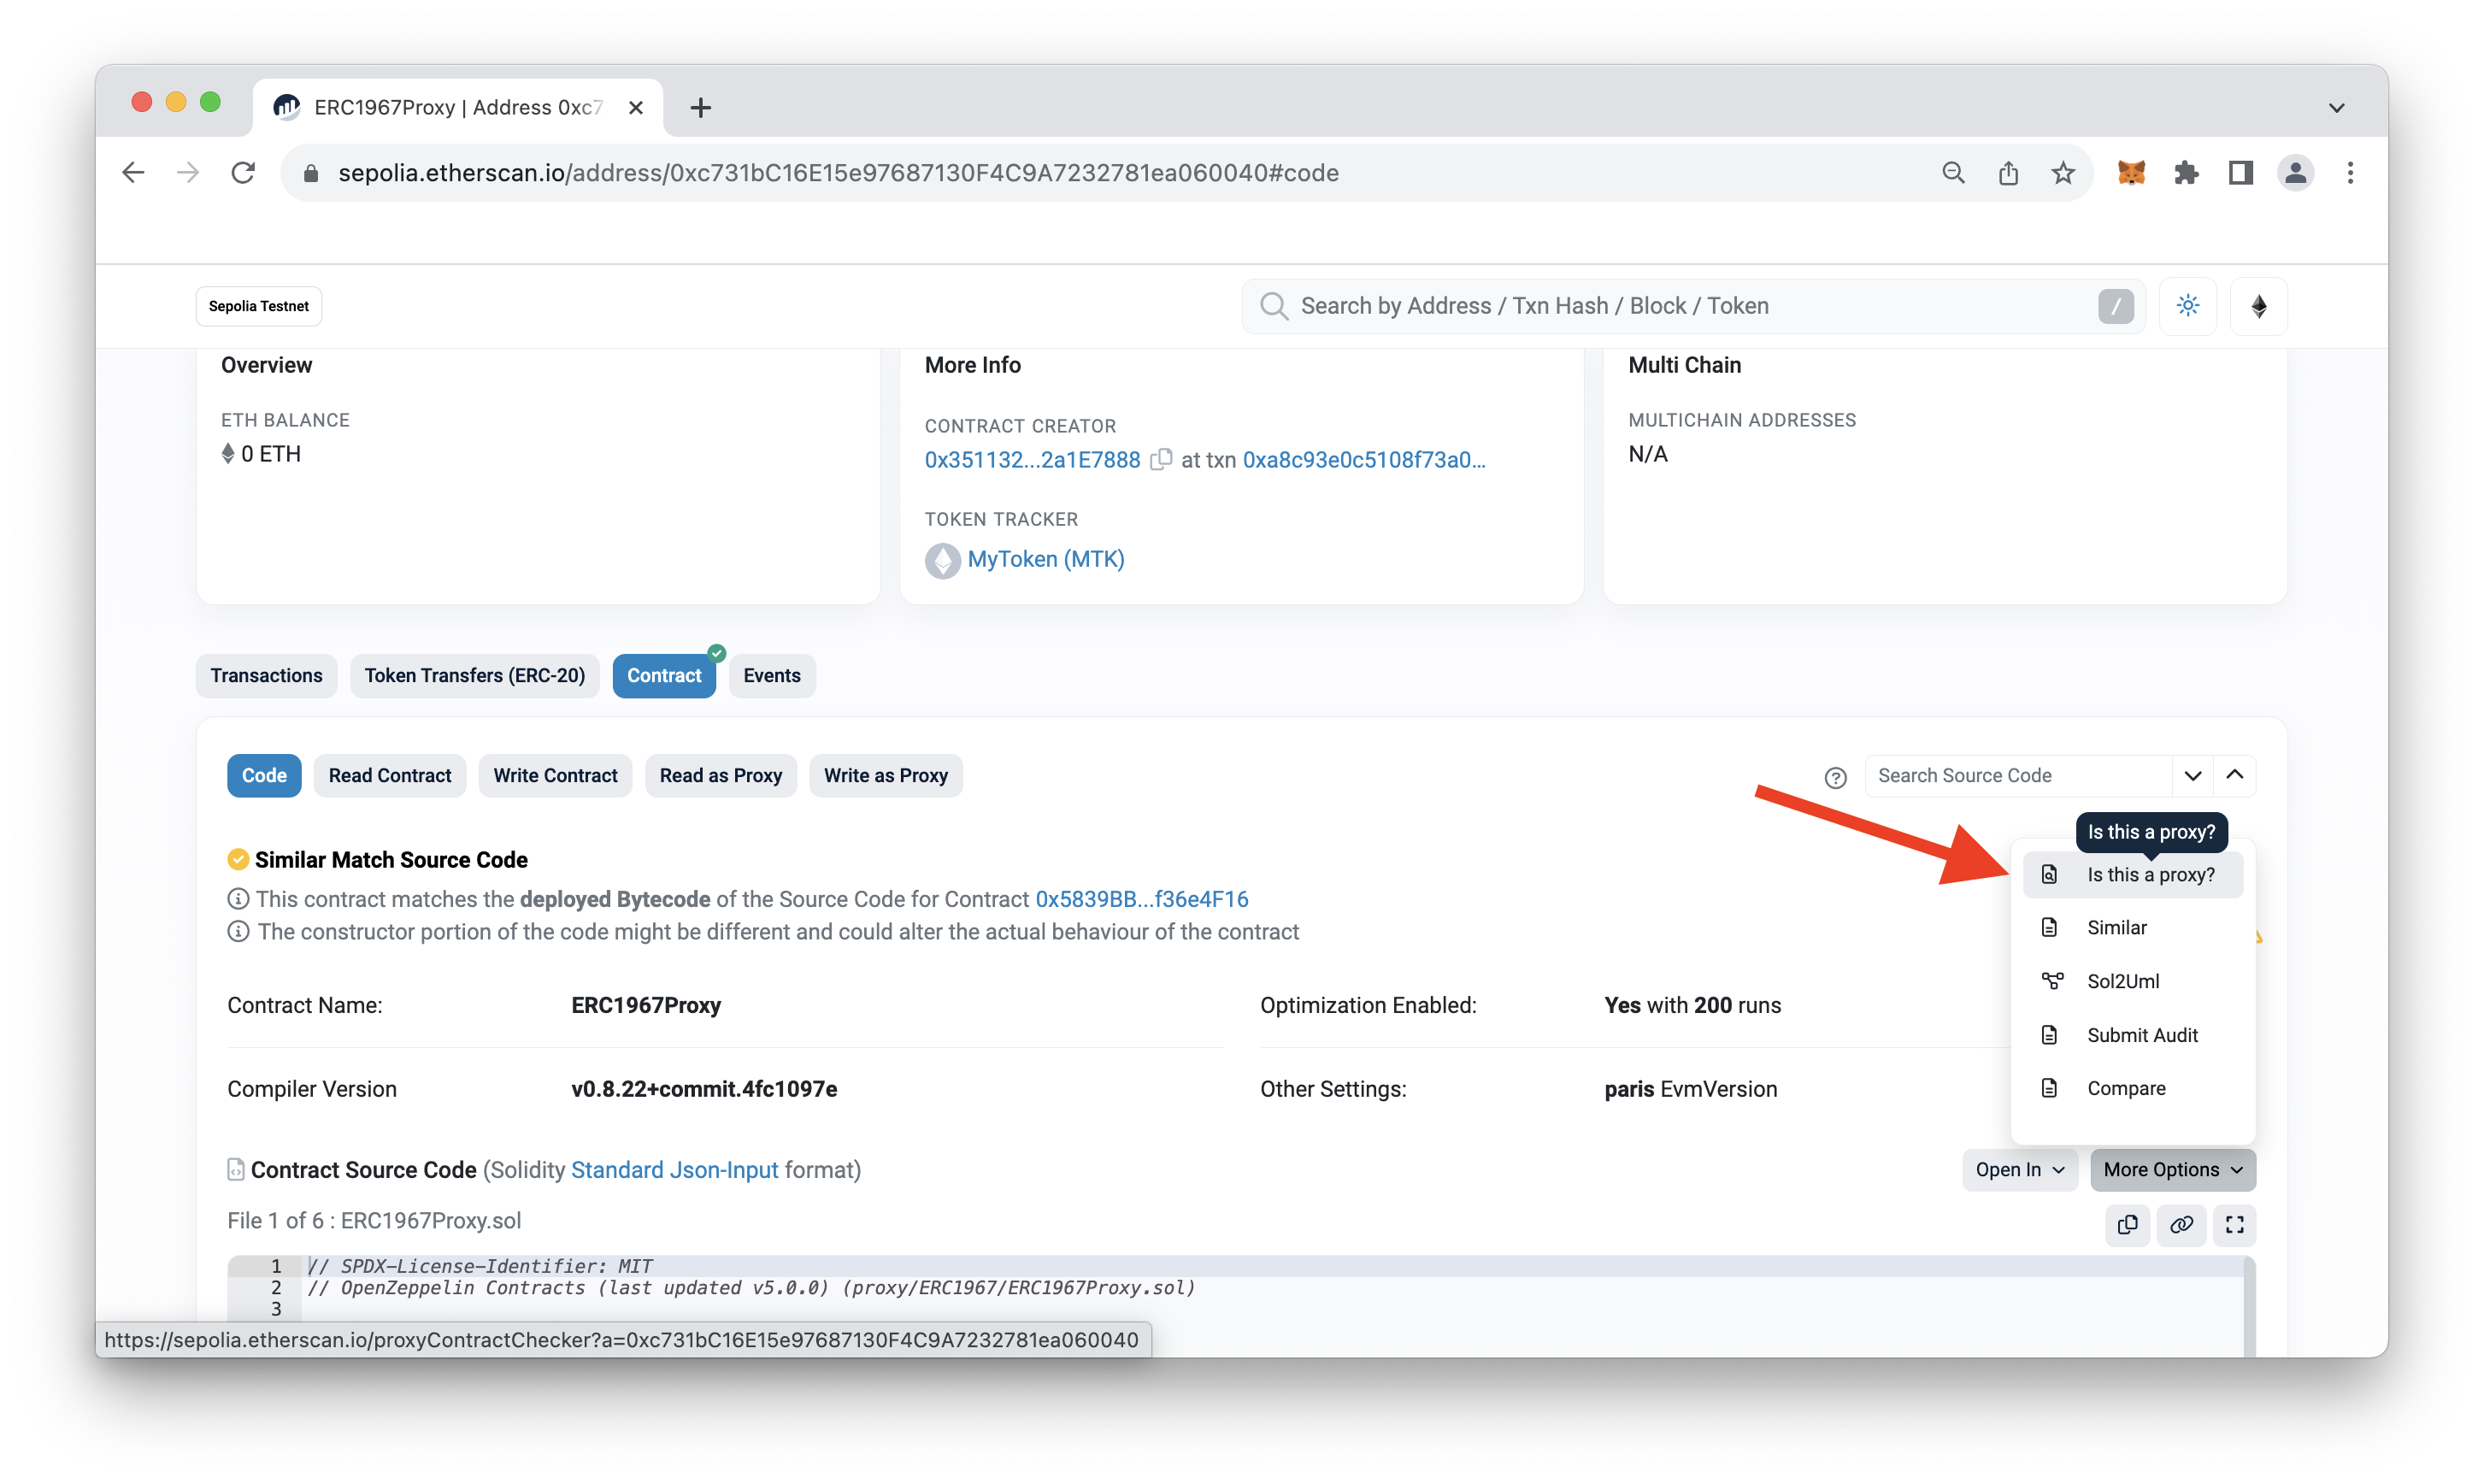
Take a moment to verify your smart contract is deployed by viewing Etherscan. You can verify with Etherscan that the contract is a proxy by navigating to the Code tab, clicking the More Options dropdown, and selecting Is this a proxy?. You will be prompted to verify the address (click Continue), then navigate back to the Code tab, and you should see two new tabs, Read as Proxy & Write as Proxy. You can interact with your ERC-20 Token contract on these tabs via Etherscan if you'd like.
For example, let's use the Read as Proxy tab to view the ERC-20 token balance of an address:
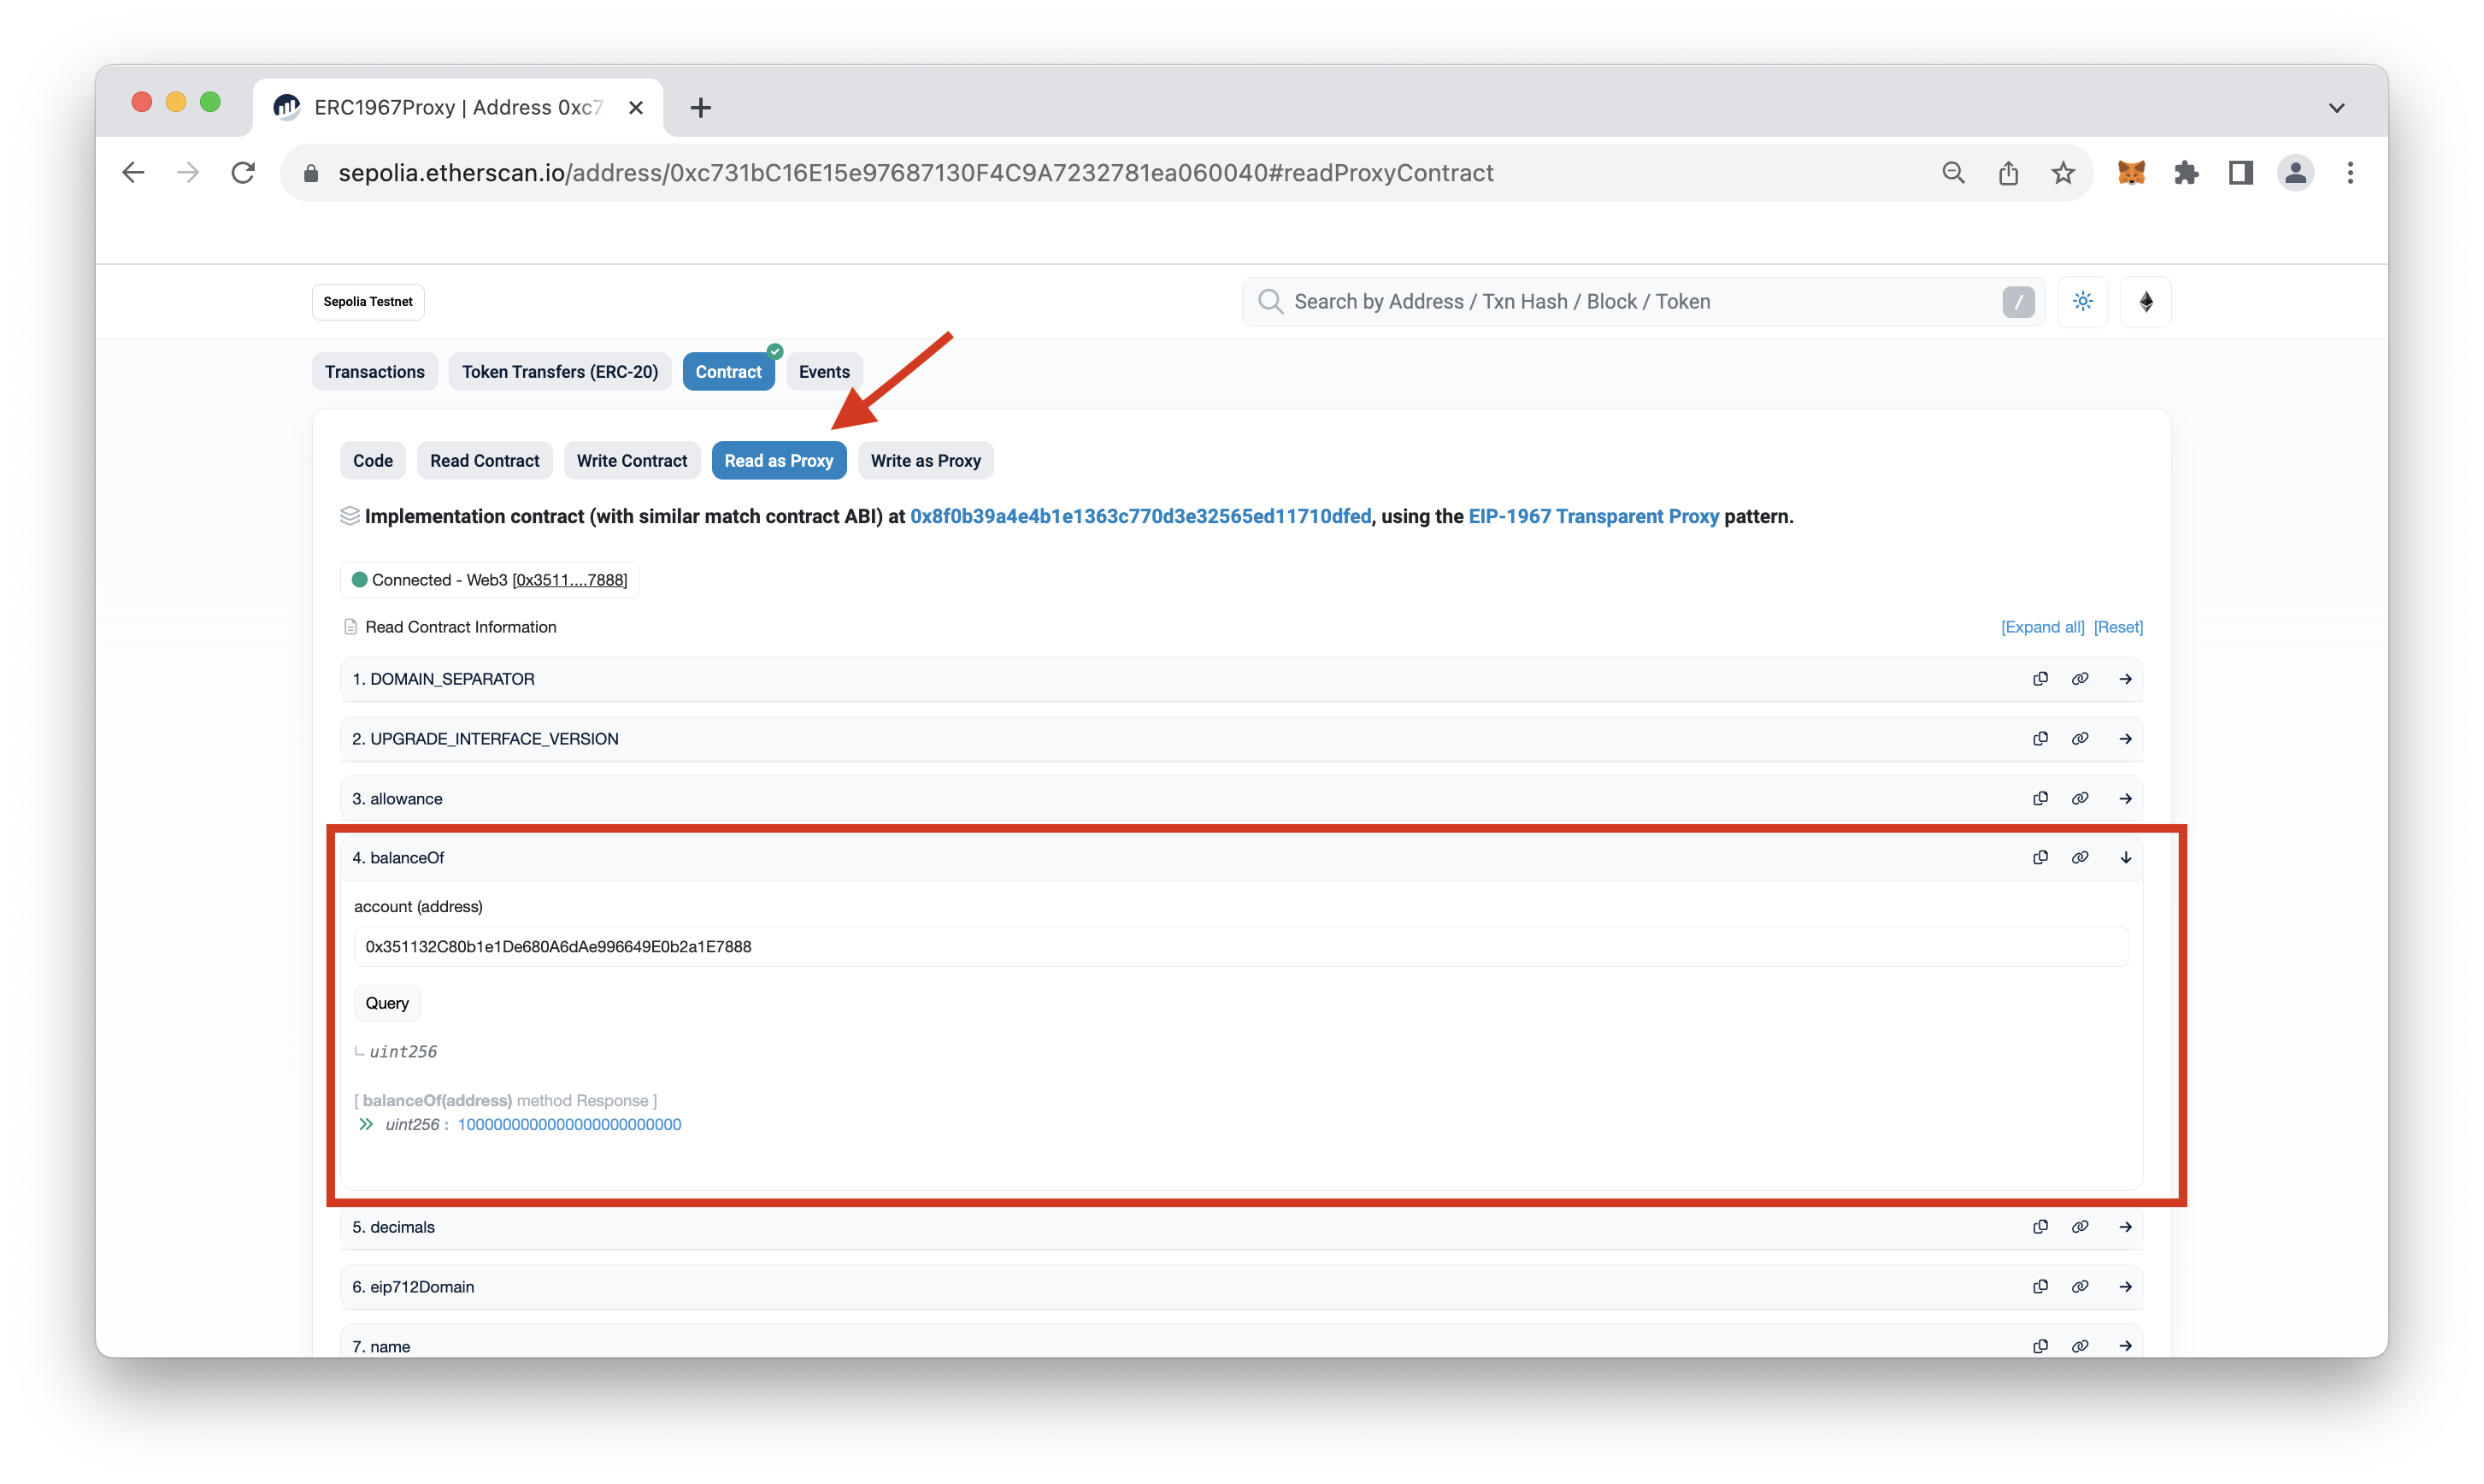
In the image above, we are checking the owner's balance since we minted tokens to it upon deployment.
The next step you can now take is interacting with your smart contract. Since we already covered interaction during the testing section, we'll skip this part for now. However, you can leave some feedback at the end of this guide if you'd like to see a Part 2!
Fetch Token Data using Quicknode's Token API
Before we conclude this guide, let's see how we could easily fetch ERC-20 token metadata and transactions using Quicknode's Token API.
To use the Token API, you can use the Quicknode SDK or implement it any of your favorite web3 SDKs like ethers.js and Eth.go (check out the documentation here)
Here is a quick example of how you can fetch the metadata of your ERC-20 token using cURL:
curl QUICKNODE_ENDPOINT_URL \
  -X POST \
  -H "Content-Type: application/json" \
  --data '{
    "id":67,
    "jsonrpc":"2.0",
    "method":"qn_getTokenMetadataByContractAddress",
    "params": [{
      "contract": "YOUR_TOKEN_ADDRESS"
    }]
  }'
Just paste the code into your terminal and remember to replace the QUICKNODE_ENDPOINT_URL & YOUR_TOKEN_ADDRESS with your actual HTTP Provider URL and token address.
By calling the qn_getTokenMetadataByContractAddress RPC method on our ERC-20 token, we can return token details such as its metadata and transaction information like the genesis block the token was created in.
Example Response:
{
    "jsonrpc": "2.0",
    "id": 67,
    "result": {
        "name": "MyToken",
        "symbol": "MTK",
        "contractAddress": "0xc731bc16e15e97687130f4c9a7232781ea060040",
        "decimals": "18",
        "genesisBlock": "4701990",
        "genesisTransaction": "0xa8c93e0c5108f73a039e1537b02f94e871398b6b3fe3f4efafc97c8782965b8a"
    }
}
Quicknode also offers an NFT API which allows you to retrieve aggregated NFT data such as collection details, transfer history, metadata, and more.
Test Your Knowledge
Want to test your smart contract upgradability and token knowledge? Try the quiz below!
Wrap Up
Give yourself a pat on the back! You have completed this technical guide on creating and deploying an upgradeable ERC-20 token. Along the way, you recapped what upgradeable smart contracts are and the different types of them and then set up a smart contract environment to create, test, and deploy your upgradeable ERC-20 token. If you'd like to check out other smart contract upgrade content, check out this Quicknode guide: How to Create and Deploy an Upgradeable Smart Contract using OpenZeppelin and Hardhat
Subscribe to our newsletter for more articles and guides on Web3 and blockchain. If you have any questions, feel free to use our dedicated channel on Discord or provide feedback using the form below. Stay up to date with the latest by following us on Twitter and our Telegram announcement channel.
We ❤️ Feedback!
Let us know if you have any feedback or requests for new topics. We'd love to hear from you.