16 min read
Overview
EIP-7702 introduces a new transaction type, 0x4, in Ethereum's Pectra upgrade that enables externally owned accounts (EOAs) to execute temporary smart contract functionality. This advancement in Account Abstraction bridges the gap between EOAs and smart contracts enabling key features like batch transactions, sponsored gas payments, and controlled access delegation.
EIP-7702 is now active on Ethereum’s Sepolia testnet as part of the Pectra upgrade. Developers can test EIP-7702 directly on Sepolia testnet and local Foundry environments ahead of the planned mainnet activation, expected in April 2025 if the testnet deployments run smoothly.
This guide will walk you through the technical details of EIP-7702, its use cases, and how to test it using Foundry and Foundry's cheatcodes. By the end of this guide, you'll have a clear understanding of how to leverage EIP-7702 in your projects, see EIP-7702 in action by deploying an implementation contract, and test EIP-7702 features.
What You Will Do
- Learn how to implement
0x4transactions with an EOA - Develop smart accounts by leveraging EIP‑7702
- Test and deploy
0x4transactions on a local network to see EIP‑7702 in action
What You Will Need
- Foundry installed on your system
- Basic knowledge of Foundry, Solidity and smart contract development
- A text editor or an IDE (e.g., VS Code)
EIP-7702 Transactions
While typical Ethereum transactions either transfer funds or interact with smart contracts, the new 0x4 transaction type allows EOAs to execute code directly. This unlocks new possibilities for externally owned accounts (EOAs), enabling them to function more like smart contracts.
With this new standard, EOAs can execute smart contract logic directly from their own address, making possible:
- Batch Transactions: Combine multiple actions into a single atomic transaction (token approvals, swaps, transfers).
- Limited Access Delegation: Grant temporary, scoped permissions without key exposure.
- Gas Sponsorship: Allow a third party (e.g., a paymaster) to cover gas fees for your transactions.
- Wallet Recovery: Implement a recovery mechanism for private key loss.
- Externally Owned Accounts (EOAs): Controlled only by a private key; they hold funds but cannot run code. (e.g., user wallets such as MetaMask)
- Smart Contract Accounts: Hold code and can execute complex operations. (e.g., Uniswap Factory, Uniswap Router)
Learn more about Ethereum account types with this guide.
Signing Authorization
The user (EOA) signs an authorization message that includes the chain ID, nonce, delegation address, and signature parts (y_parity, r, s). This generates a signed authorization, ensuring that only the approved implementation contract can execute transactions and protecting against replay attacks.
For each authorized delegation address, the user (EOA) stores a delegation designator, a pointer to the implementation contract that the EOA will delegate to. When the user (or a sponsor) executes an EIP-7702 transaction, it loads and runs the code from the address indicated by that pointer.
Transaction Construction
In a typical Ethereum transaction, if you want to call a function on a smart contract, you set the to field to that contract's address and include the appropriate data to call its function. With EIP-7702, you set the to field to the EOA's address and include the data to call the implementation contract's function with the signed authorization message.
Anatomy of an EIP-7702 Transaction
The code snippet below demonstrates how to build a batch transaction using Viem’s wallet client for an EIP‑7702 smart account.
- It generates an authorization signature for a specific contract.
- Then, it constructs a transaction where the
tofield is set to the smart account’s own address. - The
datafield is created by encoding a call to theexecutefunction with an array of two call objects. Theexecutefunction should be defined in the implementation contract and handle the batch transaction logic. - Finally, the transaction includes the signed authorization in an
authorizationList, which lets the smart account delegate execution to the implementation contract.
If another wallet (a sponsor) wants to execute this transaction (a sponsored transaction), it can use the same authorization signature to delegate execution to the implementation contract.
Note: Implementation contracts should be designed to handle the batch transactions and other features enabled by EIP-7702. Also, they should include nonce and replay protection mechanisms to prevent unauthorized transactions.
Sending an EIP-7702 Transaction with Viem
import { createWalletClient, http, parseEther } from 'viem'
import { anvil } from 'viem/chains'
import { privateKeyToAccount } from 'viem/accounts'
import { eip7702Actions } from 'viem/experimental'
import { abi, contractAddress } from './contract' // Assuming you have already deployed the contract and exported the ABI and contract address in a separate file

const account = privateKeyToAccount('0x...')

const walletClient = createWalletClient({
  account,
  chain: anvil,
  transport: http(),
}).extend(eip7702Actions())

const authorization = await walletClient.signAuthorization({
  contractAddress,
})

const hash = await walletClient.sendTransaction({
  authorizationList: [authorization],
  data: encodeFunctionData({
    abi,
    functionName: 'execute',
    args: [
      [
        {
          data: '0x',
          to: '0xcb98643b8786950F0461f3B0edf99D88F274574D',
          value: parseEther('0.001'),
        },
        {
          data: '0x',
          to: '0xd2135CfB216b74109775236E36d4b433F1DF507B',
          value: parseEther('0.002'),
        },
      ],
    ]
  }),
  to: walletClient.account.address,
})
Flow of an EIP-7702 Transaction
If EIP-7702 feels abstract or complex, don’t worry! We’ll break it down with a hands-on demo—deploying an implementation contract and testing its features in action.
How to Test EIP-7702 Features with Foundry
In this section, you'll learn how to implement EIP-7702 features using Foundry, a powerful smart contract development tool.
At the time of writing, EIP‑7702 is not yet supported on Ethereum mainnet or public testnets. However, you can experiment with its features on a local network using Foundry. Foundry provides a set of cheatcodes—special commands that modify the behavior of the Ethereum Virtual Machine (EVM) to simplify testing. In this guide, we'll utilize the signDelegation, attachDelegation, and signAndAttachDelegation cheatcodes to test EIP‑7702 features. For more information, check out the Foundry Cheatcodes documentation.
Project Overview
In this project, we deploy an implementation contract called BatchCallAndSponsor that enables:
- Batch Transactions: Execute multiple calls in a single transaction.
- Sponsored Transactions: Allow a sponsor to pay for gas fees.
- Replay Protection: Use nonces to prevent transaction replay.
The project includes the following files:
BatchCallAndSponsor.sol– Contains the core logic for batched and sponsored transactions.BatchCallAndSponsor.t.sol– Includes unit tests for both direct and sponsored execution.BatchCallAndSponsor.s.sol– A script for deploying the contract and executing transactions to the network.MockERC20.sol– A mock ERC-20 token contract used for testing token transfers.
All materials and code in this project are for educational purposes only. They are not intended for production use.
Setting Up the Environment
Step 1: Install Foundry
If you haven't already, install Foundry using the following command:
curl -L https://foundry.paradigm.xyz | bash
Then, restart your terminal and run:
foundryup
This ensures you have the latest version installed.
Step 2: Initialize a Foundry Project
If you want to set up the project from scratch, initialize a new Foundry project:
forge init eip-7702-project
cd eip-7702-project
Alternatively, you can clone the QuickNode sample project:
git clone https://github.com/quiknode-labs/qn-guide-examples.git
cd qn-guide-examples/ethereum/eip-7702
Step 3: Install Required Dependencies
Install the required libraries:
forge install foundry-rs/forge-std
forge install OpenZeppelin/openzeppelin-contracts
forge-std: Provides utility functions for testing.openzeppelin-contracts: Includes ERC-20 implementations and cryptographic utilities.
Step 4: Configure Remappings
To simplify import paths, run the following command. It will create a remappings.txt file in the project root directory including the required remappings.
forge remappings > remappings.txt
This ensures that contract imports like the following work correctly without long relative paths:
import "@openzeppelin/contracts/token/ERC20/ERC20.sol";
Step 5: Update Foundry Configuration for EIP‑7702
Modify foundry.toml to ensure compatibility with EIP‑7702 by setting the Prague hardfork. Add the following line to the [profile.default] section:
evm_version = "prague"
This is necessary because EIP‑7702 is only available from the Prague upgrade onward.
If you use the sample project, you can skip this and following steps in this section.
Step 6: Implement the Smart Contract
Inside the src folder, create a new file named BatchCallAndSponsor.sol and add the contract logic from the EIP-7702 Sample Project. This is a basic implementation contract that supports batch transactions and sponsored gas.
Don't forget to remove any unused files (i.e., Counter.sol) from the src folder.
Details of the implementation contract are provided in the Implementation Contract Walkthrough section.
Step 7: Write Test Cases
Inside the test folder, create a file called BatchCallAndSponsor.t.sol to test the contract. Add the test cases from the EIP-7702 Sample Project.
Don't forget to remove any unused files (i.e., Counter.t.sol) from the test folder.
Details of the test cases are provided in the Test Cases Walkthrough section.
Step 8: Create a Deployment Script
Create a file named BatchCallAndSponsor.s.sol in the script folder to deploy the contract and execute transactions. Add the deployment script from the EIP-7702 Sample Project.
Don't forget to remove any unused files (i.e., Counter.s.sol) from the script folder.
Details of the deployment script are provided in the Deployment Script Walkthrough section.
The project structure looks like this:
├── README.md
├── foundry.toml                    # Foundry configuration file
├── lib                             # Installed packages
│   ├── forge-std
│   └── openzeppelin-contracts
├── remappings.txt                  # Remappings file
├── script
│   └── BatchCallAndSponsor.s.sol   # Deployment script
├── src
│   └── BatchCallAndSponsor.sol     # Implementation contract
└── test
    └── BatchCallAndSponsor.t.sol   # Test cases
If you want to skip the walkthrough and jump straight to the action, go to the Running and Testing the EIP-7702 Project section.
Implementation Contract Walkthrough
The BatchCallAndSponsor contract is a simple implementation contract that supports batch transactions and sponsored gas.
Check the BatchCallAndSponsor.sol file in the project for the complete implementation. The below sections provide a brief overview of the contract's features; however, note the full implementation code is not included.
Batch Execution Logic
The execute function in the contract takes an array of Call structs, each representing a different call and specifies the target address, value (in Ether), and calldata.
struct Call {
    address to;
    uint256 value;
    bytes data;
}

function execute(Call[] calldata calls) external payable {
    require(msg.sender == address(this), "Invalid authority");
    _executeBatch(calls);
}

function _executeBatch(Call[] calldata calls) internal {
    uint256 currentNonce = nonce;
    nonce++;

    for (uint256 i = 0; i < calls.length; i++) {
        _executeCall(calls[i]);
    }

    emit BatchExecuted(currentNonce, calls);
}

function _executeCall(Call calldata callItem) internal {
    (bool success,) = callItem.to.call{value: callItem.value}(callItem.data);
    require(success, "Call reverted");
    emit CallExecuted(msg.sender, callItem.to, callItem.value, callItem.data);
}
Signature Verification Logic
The contract verifies the signature using OpenZeppelin's ECDSA library and MessageHashUtils. The signed message includes the caller's address, the target contract, the calls, and a nonce.
bytes32 digest = keccak256(abi.encodePacked(nonce, encodedCalls));
require(ECDSA.recover(digest, signature) == msg.sender, "Invalid signature");
Handling Direct and Sponsored Execution
Either direct or sponsored execution is supported in the contract.
- Direct Execution: The caller executes the calls themselves.
- Sponsored Execution: A sponsor executes the calls on behalf of the caller after verifying the signature is signed by the EOA.
function execute(Call[] calldata calls) external payable {
    // The caller executes the calls directly
}
function execute(Call[] calldata calls, bytes calldata signature) external payable {
    // A sponsor executes the calls on behalf of the caller
}
Replay Protection with Nonces
The contract uses a nonce to prevent replay attacks. The nonce is incremented after each successful execution. If the nonce would not be implemented, an attacker could replay the same transaction multiple times.
function _executeBatch(Call[] calldata calls) internal {
    uint256 currentNonce = nonce;
    nonce++; // Increment nonce to protect against replay attacks

    for (uint256 i = 0; i < calls.length; i++) {
        _executeCall(calls[i]);
    }

    emit BatchExecuted(currentNonce, calls);
}
Test Cases Walkthrough
The BatchCallAndSponsor.t.sol file contains test cases for the BatchCallAndSponsor contract. The test cases cover direct and sponsored execution scenarios, replay protection, and error handling.
The below sections provide some insights into the test cades, but not all code is included. For a complete test file, refer to the BatchCallAndSponsor.t.sol file.
Direct Execution Test
The testDirectExecution function tests the direct execution of calls by the caller (i.e., Alice). It verifies that Alice send 1 ETH and 100 tokens to Bob, in a single transaction.
In this test, Alice authorizes the implementation contract to execute the transaction on her behalf. We use the signAndAttachDelegation cheatcode to sign the authorization message and attach it to the transaction.
Then, execute function on the Alice's EOA is called with the calls array, which is impossible without EIP-7702, by Alice herself.
function testDirectExecution() public {
    console2.log("Sending 1 ETH from Alice to Bob and transferring 100 tokens to Bob in a single transaction");
    BatchCallAndSponsor.Call[] memory calls = new BatchCallAndSponsor.Call[](2);

    // ETH transfer
    calls[0] = BatchCallAndSponsor.Call({to: BOB_ADDRESS, value: 1 ether, data: ""});

    // Token transfer
    calls[1] = BatchCallAndSponsor.Call({
        to: address(token),
        value: 0,
        data: abi.encodeCall(ERC20.transfer, (BOB_ADDRESS, 100e18))
    });

    vm.signAndAttachDelegation(address(implementation), ALICE_PK);

    vm.startPrank(ALICE_ADDRESS);
    BatchCallAndSponsor(ALICE_ADDRESS).execute(calls);
    vm.stopPrank();

    assertEq(BOB_ADDRESS.balance, 1 ether);
    assertEq(token.balanceOf(BOB_ADDRESS), 100e18);
}
Sponsored Execution Test
The testSponsoredExecution function tests the sponsored execution of calls by a sponsor (i.e., Bob). It verifies that a third party (Bob) can execute the transaction on behalf of Alice. We verify that sender is Bob, not Alice, and the recipient has received the funds.
In this test, Alice signes a delegation allowing implementation to execute transactions on her behalf. Bob attaches the signed delegation from Alice and broadcasts it.
Then, Alice signs the transaction and Bob executes the transaction via Alice's temporarily assigned contract.
Last, execute function on the Alice's EOA is called by Bob, not Alice.
function testSponsoredExecution() public {

    // Arrange the call(s).
    calls[0] = BatchCallAndSponsor.Call({to: recipient, value: 1 ether, data: ""});

    // Alice signs a delegation allowing `implementation` to execute transactions on her behalf.
    Vm.SignedDelegation memory signedDelegation = vm.signDelegation(address(implementation), ALICE_PK);

    // Bob attaches the signed delegation from Alice and broadcasts it.
    vm.startBroadcast(BOB_PK);
    vm.attachDelegation(signedDelegation);

    // Prepare the signature for the transaction.
    (uint8 v, bytes32 r, bytes32 s) = vm.sign(ALICE_PK, MessageHashUtils.toEthSignedMessageHash(digest));
    bytes memory signature = abi.encodePacked(r, s, v);

    // Expect the event. The first parameter should be BOB_ADDRESS.
    vm.expectEmit(true, true, true, true);
    emit BatchCallAndSponsor.CallExecuted(BOB_ADDRESS, calls[0].to, calls[0].value, calls[0].data);

    // As Bob, execute the transaction via Alice's temporarily assigned contract.
    BatchCallAndSponsor(ALICE_ADDRESS).execute(calls, signature);

    vm.stopBroadcast();

    assertEq(recipient.balance, 1 ether);
}
Wrong Signature
The testWrongSignature function tests the scenario where the signature is incorrect. It verifies that the contract reverts if the signature is invalid.
function testWrongSignature() public {
        // Bob attaches the signed delegation from Alice and broadcasts it.
        vm.startBroadcast(BOB_PK);
        vm.attachDelegation(signedDelegation);

        // Sign with the wrong key (Bob's instead of Alice's).
        (uint8 v, bytes32 r, bytes32 s) = vm.sign(BOB_PK, MessageHashUtils.toEthSignedMessageHash(digest));
        bytes memory signature = abi.encodePacked(r, s, v);

        vm.expectRevert("Invalid signature");
        BatchCallAndSponsor(ALICE_ADDRESS).execute(calls, signature);
        vm.stopBroadcast();
    }
Replay Protection Test
The testReplayProtection function tests the replay protection mechanism. It verifies that the contract reverts if the same signature is used multiple times.
function testReplayAttack() public {
    // Bob attaches the signed delegation from Alice and broadcasts it.
    vm.startBroadcast(BOB_PK);
    vm.attachDelegation(signedDelegation);

    uint256 nonceBefore = BatchCallAndSponsor(ALICE_ADDRESS).nonce();
    bytes32 digest = keccak256(abi.encodePacked(nonceBefore, encodedCalls));
    (uint8 v, bytes32 r, bytes32 s) = vm.sign(ALICE_PK, MessageHashUtils.toEthSignedMessageHash(digest));
    bytes memory signature = abi.encodePacked(r, s, v);

    // First execution: should succeed.
    BatchCallAndSponsor(ALICE_ADDRESS).execute(calls, signature);
    vm.stopBroadcast();

    // Attempt a replay: reusing the same signature should revert because nonce has incremented.
    vm.expectRevert("Invalid signature");
    BatchCallAndSponsor(ALICE_ADDRESS).execute(calls, signature);
}
Deployment Script Walkthrough
The BatchCallAndSponsor.s.sol file contains a test script for the BatchCallAndSponsor contract. The script deploys the contract, mints tokens, and tests the batch execution and sponsored execution features. We will use this script to deploy the contract and test its features on a local network.
Check the BatchCallAndSponsor.s.sol file in the project for the complete deployment script. The below sections provide a brief overview, but not all code is included.
function run() external {
    // Start broadcasting transactions with Alice's private key.
    vm.startBroadcast(ALICE_PK);

    // Deploy the delegation contract (Alice will delegate calls to this contract).
    implementation = new BatchCallAndSponsor();

    // Deploy an ERC-20 token contract where Alice is the minter.
    token = new MockERC20();

    // // Fund accounts
    token.mint(ALICE_ADDRESS, 1000e18);

    vm.stopBroadcast();

    // Perform direct execution
    performDirectExecution();

    // Perform sponsored execution
    performSponsoredExecution();
}
Running and Testing the EIP-7702 Project
Step 1: Run a Local Network
Run the following command on your terminal to start a local network with the Prague hardfork.
anvil --hardfork prague
Step 2: Install Dependencies
On another terminal, run the following command to install dependencies.
forge install
Step 3: Build the Contract
Then, run the following command to build the contract.
forge build
Step 4: Run the Test Cases
After building the contract, run the following command to run the test cases. If you want to display stack traces for all tests, use -vvvv flag instead of -vvv.
forge test -vvv
The output should look like this:
Ran 4 tests for test/BatchCallAndSponsor.t.sol:BatchCallAndSponsorTest
[PASS] testDirectExecution() (gas: 128386)
Logs:
  Sending 1 ETH from Alice to Bob and transferring 100 tokens to Bob in a single transaction

[PASS] testReplayAttack() (gas: 114337)
Logs:
  Test replay attack: Reusing the same signature should revert.

[PASS] testSponsoredExecution() (gas: 110461)
Logs:
  Sending 1 ETH from Alice to a random address while the transaction is sponsored by Bob

[PASS] testWrongSignature() (gas: 37077)
Logs:
  Test wrong signature: Execution should revert with 'Invalid signature'.

Suite result: ok. 4 passed; 0 failed; 0 skipped;
Step 5: Run the Script
Now that you’ve set up the project, it’s time to run the deployment script. This script deploys the contract, mints tokens, and tests both batch execution and sponsored execution features.
We use the following command:
--broadcast: Broadcasts the transactions to your local network.--rpc-url 127.0.0.1:8545: Connects to your local network.--tc BatchCallAndSponsorScript: Specifies the target contract for the script.
forge script ./script/BatchCallAndSponsor.s.sol --tc BatchCallAndSponsorScript --broadcast --rpc-url 127.0.0.1:8545
A warning message may appear similar to the following:
Warning: Script contains a transaction to 0x70997970C51812dc3A010C7d01b50e0d17dc79C8 which does not contain any code.
Do you wish to continue?
This warning is expected because, before EIP‑7702 is applied, EOAs do not have any on-chain code. Simply type y to continue.
After the script completes, you will see log messages indicating that on-chain execution was successful. The transactions are saved in the broadcast folder, and any sensitive values are stored in the cache folder.
ONCHAIN EXECUTION COMPLETE & SUCCESSFUL.

Transactions saved to: /project-path/broadcast/...
Sensitive values saved to: /project-path/cache/...
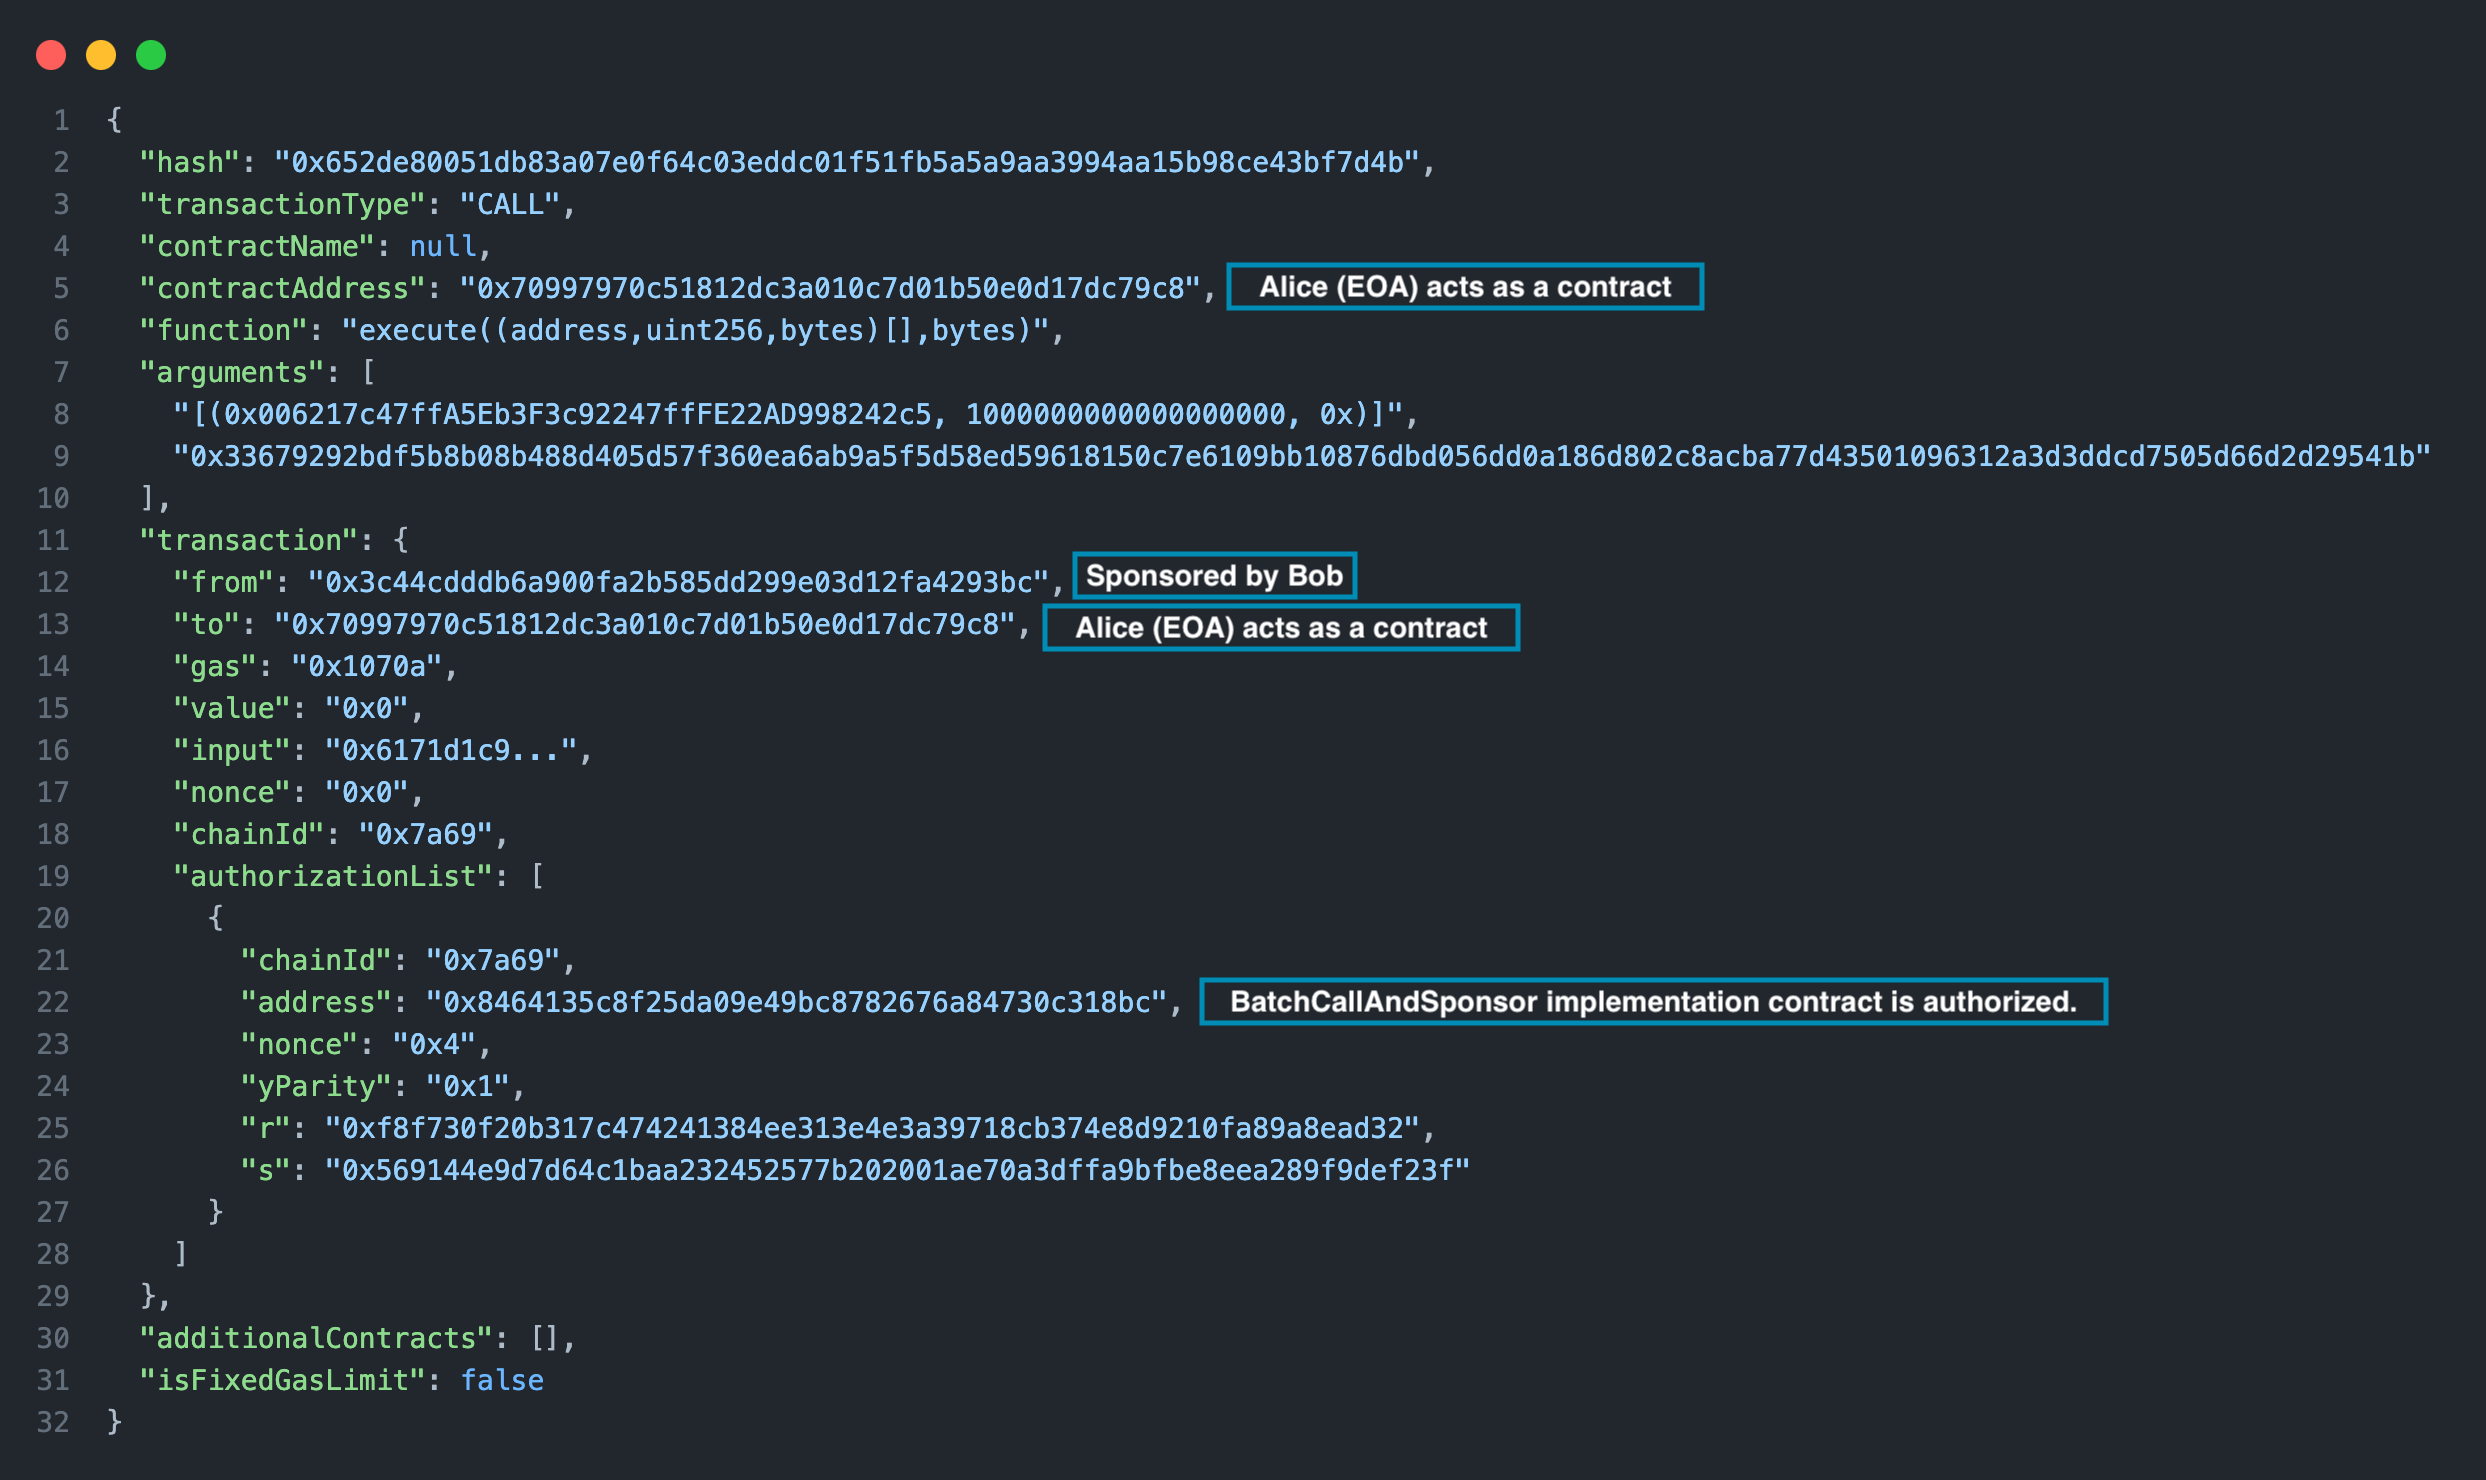
You can check the saved transactions to learn more about how EIP-7702 transactions are executed.
You can review the saved transactions to learn more about how EIP‑7702 transactions are executed. For example, in the latest sponsored execution transaction, Bob is the sender while the contract address is Alice's. Additionally, this transaction includes an authorizationList containing the signed authorizations.
Congratulations! You have successfully deployed and tested EIP-7702 features using Foundry.
References and Acknowledgments
The development and exploration of EIP-7702 have been made possible by the contributions of many individuals and projects within the Ethereum ecosystem. We would like to extend our gratitude to the following:
-
Viem: For adding experimental support for EIP-7702 and providing comprehensive documentation to help developers understand and implement this proposal.
-
Foundry: For providing a powerful and flexible development toolkit for smart contracts and cheatcodes for EIP-7702.
-
Adam Fuller: For creating a foundational scaffold on top of Scaffold-Eth2, which serves as an excellent starting point for experimenting with EIP-7702.
-
Ithaca: For their insightful examples, such as EXP-0001: Account Delegation with EIP-7702, and their contributions to the Odyssey testnet.
-
The Authors of EIP-7702: Special thanks to the authors of this proposal, including Vitalik Buterin, for their vision and efforts in advancing account abstraction and improving the Ethereum user experience.
Conclusion
EIP-7702 opens the door to innovative use cases like batch transactions, delegated execution, and sponsored transactions. It's a very novel feature and we're excited to see how it will transform the way we interact with smart contracts.
In this guide, we covered the basics of EIP-7702, its use cases, and how to implement it using Foundry. We also tested EIP-7702 features by deploying an implementation contract and testing its features on a local network. We hope this guide has provided you with a solid understanding of EIP-7702 and its potential applications.
Subscribe to our newsletter for more articles and guides on Web3 and blockchain. If you have any questions or need further assistance, feel free to join our Discord server or provide feedback using the form below. Stay up to date with the latest by following us on Twitter (@QuickNode) and our Telegram announcement channel.
We ❤️ Feedback!
Let us know if you have any feedback or requests for new topics. We'd love to hear from you.