22 min read
Overview
One hard rule about developing on EVM blockchains is that any smart contracts that are deployed cannot be altered. Smart contracts are often called "immutable" which ensures that the code that developers are interacting with is tamper-proof and transparent. This philosophy is beneficial to those interacting with smart contracts but not always to those writing them. Developers writing smart contracts must always ensure that it is all-encompassing, error-free, and covers every edge case. This is often the case, but not always, and that is where the need for upgradeable smart contracts arises.
Using the upgradeable smart contract approach, if there is an error, faulty logic or a missing feature in your contract, a developer has the option to upgrade this smart contract and deploy a new one to be used instead.
In this tutorial, we will demonstrate exactly how this is done by creating and deploying an upgradeable smart contract from scratch using OpenZeppelin and Hardhat.
What We Will Do
- Create an upgradeable smart contract using OpenZeppelin’s Hardhat Upgrades plugin
- Compile and deploy the contract on Polygon PoS (Amoy testnet) using Hardhat 3
- Verify the proxy and implementation on Polygonscan (Amoy)
- Upgrade the contract and verify the results
What You Will Need
- Node.js v22+ and a package manager (npm, yarn, or pnpm)
- MetaMask with Polygon PoS (Amoy) added (see Polygon’s MetaMask guide)
- Amoy testnet POL from a faucet (e.g., Quicknode Polygon Amoy faucet)
- A Quicknode endpoint for Polygon PoS → Amoy (create one from the Quicknode Polygon PoS page)
- Prior experience with Solidity
- Familiarity with upgradeable proxies (see An Introduction to Upgradeable Smart Contracts)
Setting up the Development Environment
We will need a new folder locally where our project for this tutorial will live. We will name ours UpgradeableContracts, but you can call it anything you like. Run these commands in your terminal to create the folder and navigate into it:
mkdir UpgradeableContracts
cd UpgradeableContracts
Great! Now that we have a blank canvas to work on, let us get down to painting it. Enter the following command to create your Hardhat project:
npx hardhat --init
You will be prompted with a few questions:
- If prompted with what version of Hardhat you want to use, select the Hardhat 3 option which is selected by default.
- When prompted
What type of project would you like to initialize?, select themocha-ethersoption. - You will be asked to install dependencies. Type
Yand hit enter. - Following the instructions on screen, your workspace should look something like this:
 Hardhat Configuration Setup
Congratulations! You just successfully installed and initialized Hardhat!
Once the installation is complete, you should now have everything you need to develop, test and deploy smart contracts on the blockchain. Since we’ll be working with upgradeable smart contracts, we will need to install a few more dependencies. Execute the following lines in your terminal:
npm i -D @nomicfoundation/hardhat-ethers @nomicfoundation/hardhat-verify
npm i @openzeppelin/contracts dotenv
@openzeppelin/contracts is the package that allows us to deploy our smart contracts in a way that allows them to be upgradeable. @nomicfoundation/hardhat-verify is a hardhat plugin that allows us to verify our contracts in the blockchain. This allows anyone to interact with your deployed contracts and provides transparency. Using the hardhat plugin is the most convenient way to verify our contracts. @nomicfoundation/hardhat-ethers is a plugin that brings the ethers.js library into Hardhat, allowing us to interact with the blockchain.
The dotenv package will be used for environment variable management. Create an .env file in the root directory of your project. This file will be used to store sensitive data such as your private key and API keys. Make sure to add .env to your .gitignore file so that you do not accidentally push it to a public repository if you are using Git. Here is how your .env file should look like:
RPC_URL="YOUR_QUICKNODE_RPC_URL"
PRIVATE_KEY="YOUR_METAMASK_PRIVATE_KEY"
ETHERSCAN_API_KEY="YOUR_ETHERSCAN_API_KEY"
Kudos if you were able to follow the tutorial up to here. You just set up a smart contract development environment using Hardhat and installed additional dependencies that will allow us to deploy and verify upgradeable smart contracts.
Accessing a Polygon Amoy Testnet Node
We'll need to deploy our contracts on the Polygon Amoy Testnet. We can simply sign up for a free Quicknode trial here and create a Polygon Amoy Testnet endpoint.
 Quicknode Endpoints page
Copy the HTTPS URL and paste it into a RPC_URL variable in your .env file. If you do not have an .env file, create one in the root directory of your project. This file will be used to store sensitive data such as your private key and API keys.
Next, go to your profile on Etherscan and navigate to the API KEYS tab. If you do not have an account, create one here. Here you will create an API key that will help you verify your smart contracts on the blockchain. Copy the API key and paste it into the ETHERSCAN_API_KEY variable in your .env file.
Note: Etherscan has upgraded their API to v2. When you create an API key on Etherscan, it can also be used for multiple chains that Etherscan supports, including Polygon. So you do not need to create a separate API key for PolygonScan.
Lastly, go into your MetaMask and copy the private key of one of your accounts. To learn how to access your private key, check out this short guide. Paste this private key into the PRIVATE_KEY variable in your .env file.
You will also need to have a few Amoy Testnet MATIC in your account to deploy your contracts. You can get some at this faucet.
Finally, open your hardhat.config.ts file, and replace the entire code with this:
import type { HardhatUserConfig } from "hardhat/config";

import hardhatToolboxMochaEthersPlugin from "@nomicfoundation/hardhat-toolbox-mocha-ethers";
import hardhatVerify from "@nomicfoundation/hardhat-verify";
import 'dotenv/config';

const config: HardhatUserConfig = {
  plugins: [
    hardhatToolboxMochaEthersPlugin,
    hardhatVerify,
  ],
  paths: {
    sources: "./contracts",
    tests: "./test",
    cache: "./cache",
    artifacts: "./artifacts",
  },
  solidity: {
    profiles: {
      default: {
        version: "0.8.22",
      },
    },
  },
  verify: {
    etherscan: {
      apiKey: process.env.ETHERSCAN_API_KEY,
    }
  },
  networks: {
    amoy: {
      type: "http",
      url: process.env.RPC_URL!,
      accounts: [process.env.PRIVATE_KEY!],
    },
  },
};

export default config;
The first few lines we've used to import several libraries we'll need.
To confirm everything runs correctly, save all your files and compile the contracts once more by running the command:
npx hardhat compile
If you followed all the steps correctly, Hardhat will compile your contracts and give you a confirmation message. We’re now ready to deploy our contracts.
Creating our Smart Contracts
In this section, we will create four smart contracts. The first two contracts will be our implementation contracts, which we will name V1.sol and V2.sol. The third contract will be the TransparentUpgradeableProxy.sol contract, which is the proxy contract that will point to our implementation contracts. The fourth contract will be the ProxyAdmin.sol contract, which has ownership of the proxy and will be used to manage the proxy contract.
Go into the contracts folder, and delete the pre-existing Counter.sol file. That is a default smart contract template provided by Hardhat and we don’t need it. Create four new files in the contracts folder, and name them V1.sol, V2.sol, TransparentUpgradeableProxy.sol and ProxyAdmin.sol. Paste the following code into each of the files respectively.
cd contracts
touch V1.sol V2.sol TransparentUpgradeableProxy.sol ProxyAdmin.sol
- V1.sol
- V2.sol
- TransparentUpgradeableProxy.sol
- ProxyAdmin.sol
// SPDX-License-Identifier: MIT
pragma solidity ^0.8.22;

contract V1 {
   uint public number;

   function initialValue(uint _num) external {
       number=_num;
   }

   function increase() external {
       number += 1;
   }
}
// SPDX-License-Identifier: MIT
pragma solidity ^0.8.22;

contract V2 {
   uint public number;

   function initialValue(uint _num) external {
       number=_num;
   }

   function increase() external {
       number += 1;
   }

   function decrease() external {
       number -= 1;
   }
}
// SPDX-License-Identifier: MIT
// OpenZeppelin Contracts (last updated v5.2.0) (proxy/transparent/TransparentUpgradeableProxy.sol)

pragma solidity ^0.8.22;

import {ERC1967Utils} from "@openzeppelin/contracts/proxy/ERC1967/ERC1967Utils.sol";
import {ERC1967Proxy} from "@openzeppelin/contracts/proxy/ERC1967/ERC1967Proxy.sol";
import {IERC1967} from "@openzeppelin/contracts/interfaces/IERC1967.sol";
import {ProxyAdmin} from "./ProxyAdmin.sol";

/**
 * @dev Interface for {TransparentUpgradeableProxy}. In order to implement transparency, {TransparentUpgradeableProxy}
 * does not implement this interface directly, and its upgradeability mechanism is implemented by an internal dispatch
 * mechanism. The compiler is unaware that these functions are implemented by {TransparentUpgradeableProxy} and will not
 * include them in the ABI so this interface must be used to interact with it.
 */
interface ITransparentUpgradeableProxy is IERC1967 {
    /// @dev See {UUPSUpgradeable-upgradeToAndCall}
    function upgradeToAndCall(address newImplementation, bytes calldata data) external payable;
}

/**
 * @dev This contract implements a proxy that is upgradeable through an associated {ProxyAdmin} instance.
 *
 * To avoid https://medium.com/nomic-labs-blog/malicious-backdoors-in-ethereum-proxies-62629adf3357[proxy selector
 * clashing], which can potentially be used in an attack, this contract uses the
 * https://blog.openzeppelin.com/the-transparent-proxy-pattern/[transparent proxy pattern]. This pattern implies two
 * things that go hand in hand:
 *
 * 1. If any account other than the admin calls the proxy, the call will be forwarded to the implementation, even if
 * that call matches the {ITransparentUpgradeableProxy-upgradeToAndCall} function exposed by the proxy itself.
 * 2. If the admin calls the proxy, it can call the `upgradeToAndCall` function but any other call won't be forwarded to
 * the implementation. If the admin tries to call a function on the implementation it will fail with an error indicating
 * the proxy admin cannot fallback to the target implementation.
 *
 * These properties mean that the admin account can only be used for upgrading the proxy, so it's best if it's a
 * dedicated account that is not used for anything else. This will avoid headaches due to sudden errors when trying to
 * call a function from the proxy implementation. For this reason, the proxy deploys an instance of {ProxyAdmin} and
 * allows upgrades only if they come through it. You should think of the `ProxyAdmin` instance as the administrative
 * interface of the proxy, including the ability to change who can trigger upgrades by transferring ownership.
 *
 * NOTE: The real interface of this proxy is that defined in `ITransparentUpgradeableProxy`. This contract does not
 * inherit from that interface, and instead `upgradeToAndCall` is implicitly implemented using a custom dispatch
 * mechanism in `_fallback`. Consequently, the compiler will not produce an ABI for this contract. This is necessary to
 * fully implement transparency without decoding reverts caused by selector clashes between the proxy and the
 * implementation.
 *
 * NOTE: This proxy does not inherit from {Context} deliberately. The {ProxyAdmin} of this contract won't send a
 * meta-transaction in any way, and any other meta-transaction setup should be made in the implementation contract.
 *
 * IMPORTANT: This contract avoids unnecessary storage reads by setting the admin only during construction as an
 * immutable variable, preventing any changes thereafter. However, the admin slot defined in ERC-1967 can still be
 * overwritten by the implementation logic pointed to by this proxy. In such cases, the contract may end up in an
 * undesirable state where the admin slot is different from the actual admin. Relying on the value of the admin slot
 * is generally fine if the implementation is trusted.
 *
 * WARNING: It is not recommended to extend this contract to add additional external functions. If you do so, the
 * compiler will not check that there are no selector conflicts, due to the note above. A selector clash between any new
 * function and the functions declared in {ITransparentUpgradeableProxy} will be resolved in favor of the new one. This
 * could render the `upgradeToAndCall` function inaccessible, preventing upgradeability and compromising transparency.
 */
contract TransparentUpgradeableProxy is ERC1967Proxy {
    // An immutable address for the admin to avoid unnecessary SLOADs before each call
    // at the expense of removing the ability to change the admin once it's set.
    // This is acceptable if the admin is always a ProxyAdmin instance or similar contract
    // with its own ability to transfer the permissions to another account.
    address private immutable _admin;

    /**
     * @dev The proxy caller is the current admin, and can't fallback to the proxy target.
     */
    error ProxyDeniedAdminAccess();

    /**
     * @dev Initializes an upgradeable proxy managed by an instance of a {ProxyAdmin} with an `initialOwner`,
     * backed by the implementation at `_logic`, and optionally initialized with `_data` as explained in
     * {ERC1967Proxy-constructor}.
     */
    constructor(address _logic, address initialOwner, bytes memory _data) payable ERC1967Proxy(_logic, _data) {
        _admin = address(new ProxyAdmin(initialOwner));
        // Set the storage value and emit an event for ERC-1967 compatibility
        ERC1967Utils.changeAdmin(_proxyAdmin());
    }

    /**
     * @dev Returns the admin of this proxy.
     */
    function _proxyAdmin() internal view virtual returns (address) {
        return _admin;
    }

    /**
     * @dev If caller is the admin process the call internally, otherwise transparently fallback to the proxy behavior.
     */
    function _fallback() internal virtual override {
        if (msg.sender == _proxyAdmin()) {
            if (msg.sig != ITransparentUpgradeableProxy.upgradeToAndCall.selector) {
                revert ProxyDeniedAdminAccess();
            } else {
                _dispatchUpgradeToAndCall();
            }
        } else {
            super._fallback();
        }
    }

    /**
     * @dev Upgrade the implementation of the proxy. See {ERC1967Utils-upgradeToAndCall}.
     *
     * Requirements:
     *
     * - If `data` is empty, `msg.value` must be zero.
     */
    function _dispatchUpgradeToAndCall() private {
        (address newImplementation, bytes memory data) = abi.decode(msg.data[4:], (address, bytes));
        ERC1967Utils.upgradeToAndCall(newImplementation, data);
    }
}
// SPDX-License-Identifier: MIT
// OpenZeppelin Contracts (last updated v5.2.0) (proxy/transparent/ProxyAdmin.sol)

pragma solidity ^0.8.22;

import {ITransparentUpgradeableProxy} from "@openzeppelin/contracts/proxy/transparent/TransparentUpgradeableProxy.sol";
import {Ownable} from "@openzeppelin/contracts/access/Ownable.sol";

/**
 * @dev This is an auxiliary contract meant to be assigned as the admin of a {TransparentUpgradeableProxy}. For an
 * explanation of why you would want to use this see the documentation for {TransparentUpgradeableProxy}.
 */
contract ProxyAdmin is Ownable {
    /**
     * @dev The version of the upgrade interface of the contract. If this getter is missing, both `upgrade(address,address)`
     * and `upgradeAndCall(address,address,bytes)` are present, and `upgrade` must be used if no function should be called,
     * while `upgradeAndCall` will invoke the `receive` function if the third argument is the empty byte string.
     * If the getter returns `"5.0.0"`, only `upgradeAndCall(address,address,bytes)` is present, and the third argument must
     * be the empty byte string if no function should be called, making it impossible to invoke the `receive` function
     * during an upgrade.
     */
    string public constant UPGRADE_INTERFACE_VERSION = "5.0.0";

    /**
     * @dev Sets the initial owner who can perform upgrades.
     */
    constructor(address initialOwner) Ownable(initialOwner) {}

    /**
     * @dev Upgrades `proxy` to `implementation` and calls a function on the new implementation.
     * See {TransparentUpgradeableProxy-_dispatchUpgradeToAndCall}.
     *
     * Requirements:
     *
     * - This contract must be the admin of `proxy`.
     * - If `data` is empty, `msg.value` must be zero.
     */
    function upgradeAndCall(
        ITransparentUpgradeableProxy proxy,
        address implementation,
        bytes memory data
    ) public payable virtual onlyOwner {
        proxy.upgradeToAndCall{value: msg.value}(implementation, data);
    }
}
Note: The TransparentUpgradeableProxy.sol and ProxyAdmin.sol contracts are directly taken from OpenZeppelin's GitHub repository. You can find these contracts here.
The V1 contract is pretty simple. It has one state variable of type unsigned integer and two functions. The function initialValue() simply sets the initial value of the variable, while the function increase() increments its value by 1.
Initially, our proxy points to the V1 implementation. We will be upgrading it to the V2 implementation. In the V2 contract, we merely add a function decrease(), which will decrease the value of the variable by 1.
Save the files that you have been working with and navigate back to the terminal. Confirm that you are in the project directory (e.g, UpgradeableContracts) and then run this command in your terminal:
npx hardhat compile
If you did everything correctly, the terminal should tell you that it has compiled two solidity files successfully. We are now ready to configure our deployment tools. The next section will teach you the best practices when it comes to deploying your contracts.
Hardhat Ignition Modules
We will be utilizing Hardhat Ignition modules to prepare to deploy our contracts. Modules make it easy to configure and group smart contract instances that we wish to deploy. We will be creating a module called ProxyModule.
The ProxyModule will describe the deployments of the V1 and V2 implementation contracts, the TransparentUpgradeableProxy proxy contract, and the ProxyAdmin contract. We will also set an initialValue of 10 for the V1 contract in this module.
In the ignition/modules folder, delete the pre-existing Counter.ts file. Create a file named proxyModule.ts and paste the following code:
- proxyModule.ts
import { buildModule } from "@nomicfoundation/hardhat-ignition/modules";

const proxyModule = buildModule("ProxyModule", (m) => {
  const proxyAdminOwner = m.getAccount(0);

  const v1 = m.contract("V1");
  const v2 = m.contract("V2");

  const proxy = m.contract("TransparentUpgradeableProxy", [
    v1,
    proxyAdminOwner,
    "0x",
  ]);

  const proxyAdminAddress = m.readEventArgument(
    proxy,
    "AdminChanged",
    "newAdmin"
  );

  const proxyAdmin = m.contractAt("ProxyAdmin", proxyAdminAddress);

  return { implementation: v1, proxyAdmin, proxy };
});

const v1Module = buildModule("V1Module", (m) => {
  const { implementation, proxy, proxyAdmin } = m.useModule(proxyModule);

  const v1 = m.contractAt("V1", proxy);
  m.call(v1, "initialValue", [10]);

  return { implementation, v1, proxy, proxyAdmin };
});

export default v1Module;
Now that we have created our modules, we will now move on to deploying our contracts!
Deploying the Contracts
We are now ready to deploy our upgradeable smart contract! Execute the following command to begin the deployment process:
npx hardhat ignition deploy ignition/modules/ProxyModule.ts --network amoy --verify
The --network flag specifies the network we wish to deploy our contracts to. In this case, we are deploying to the Polygon Amoy testnet.
The --verify flag will automatically verify our contracts on Polygonscan after they are deployed.
Note: If you deployed already or something went wrong, add the
--resetflag to the command above to force a redeployment.
 Terminal output from deploying our module
Output Breakdown
If you followed the steps correctly, you should see something similar to the image above in your terminal. The terminal output shows that the V1, V2, TransparentUpgradeableProxy, and ProxyAdmin contracts have been deployed successfully with their respective addresses.
| Contract Name | Description |
|---|---|
| ProxyModule#V1 | The first version of our implementation contract with an initial value and an increase. Recall we set the initial value to 10 in the module |
| ProxyModule#V2 | The second version of our implementation contract with an added decrease function. |
| ProxyModule#TransparentUpgradeableProxy | The proxy contract that points to our current implementation contract. Currently, it points to V1. |
| ProxyModule#ProxyAdmin | The contract that can upgrade the proxy. Only the owner of the ProxyAdmin can upgrade the TransparentUpgradeableProxy implementation. |
IMPORTANT: Make sure to keep note of the
ProxyModule#TransparentUpgradeableProxy, ProxyModule#V2, ProxyModule#ProxyAdminaddresses under theDeployed Addressessection in the terminal as we will need them later.
You may be wondering what exactly is happening behind the scenes. Let’s pause and find out.
Peeking Under the Hood
We will take a better look of the contracts we deployed. First, go to MetaMask and copy the public address of the account that you used to deploy the smart contracts. Open the Amoy Testnet explorer, and search for your account address.
You will see that your account has made 4 transactions:
- The first two transactions are the deployment of the
V1andV2implementation contracts. - The third transaction is the deployment of the
TransparentUpgradeableProxyandProxyAdmincontracts - The fourth transaction is setting the initial value of 10 in our proxy contract.
 PolygonScan Account Transactions Page
To see each individual contract, you can click the Contract Creation link under the To field on the Transactions tab.
Let's take a look at the TransparentUpgradeableProxy contract. Click on the To link in the third transaction (highlighted above). This will take you to the contract page. Then head over to the Contract tab with a check mark. You should see something like this:
 PolygonScan Contract Proxy Tab
On this page, we can see the source code of our TransparentUpgradeableProxy contract meaning it has been verified successfully. But how do we know if the implementation of this proxy contract is indeed our V1 contract? Click the More Options dropdown right above the source code (as shown above). Click Is this a Proxy?
 Polygonscan Proxy Verification
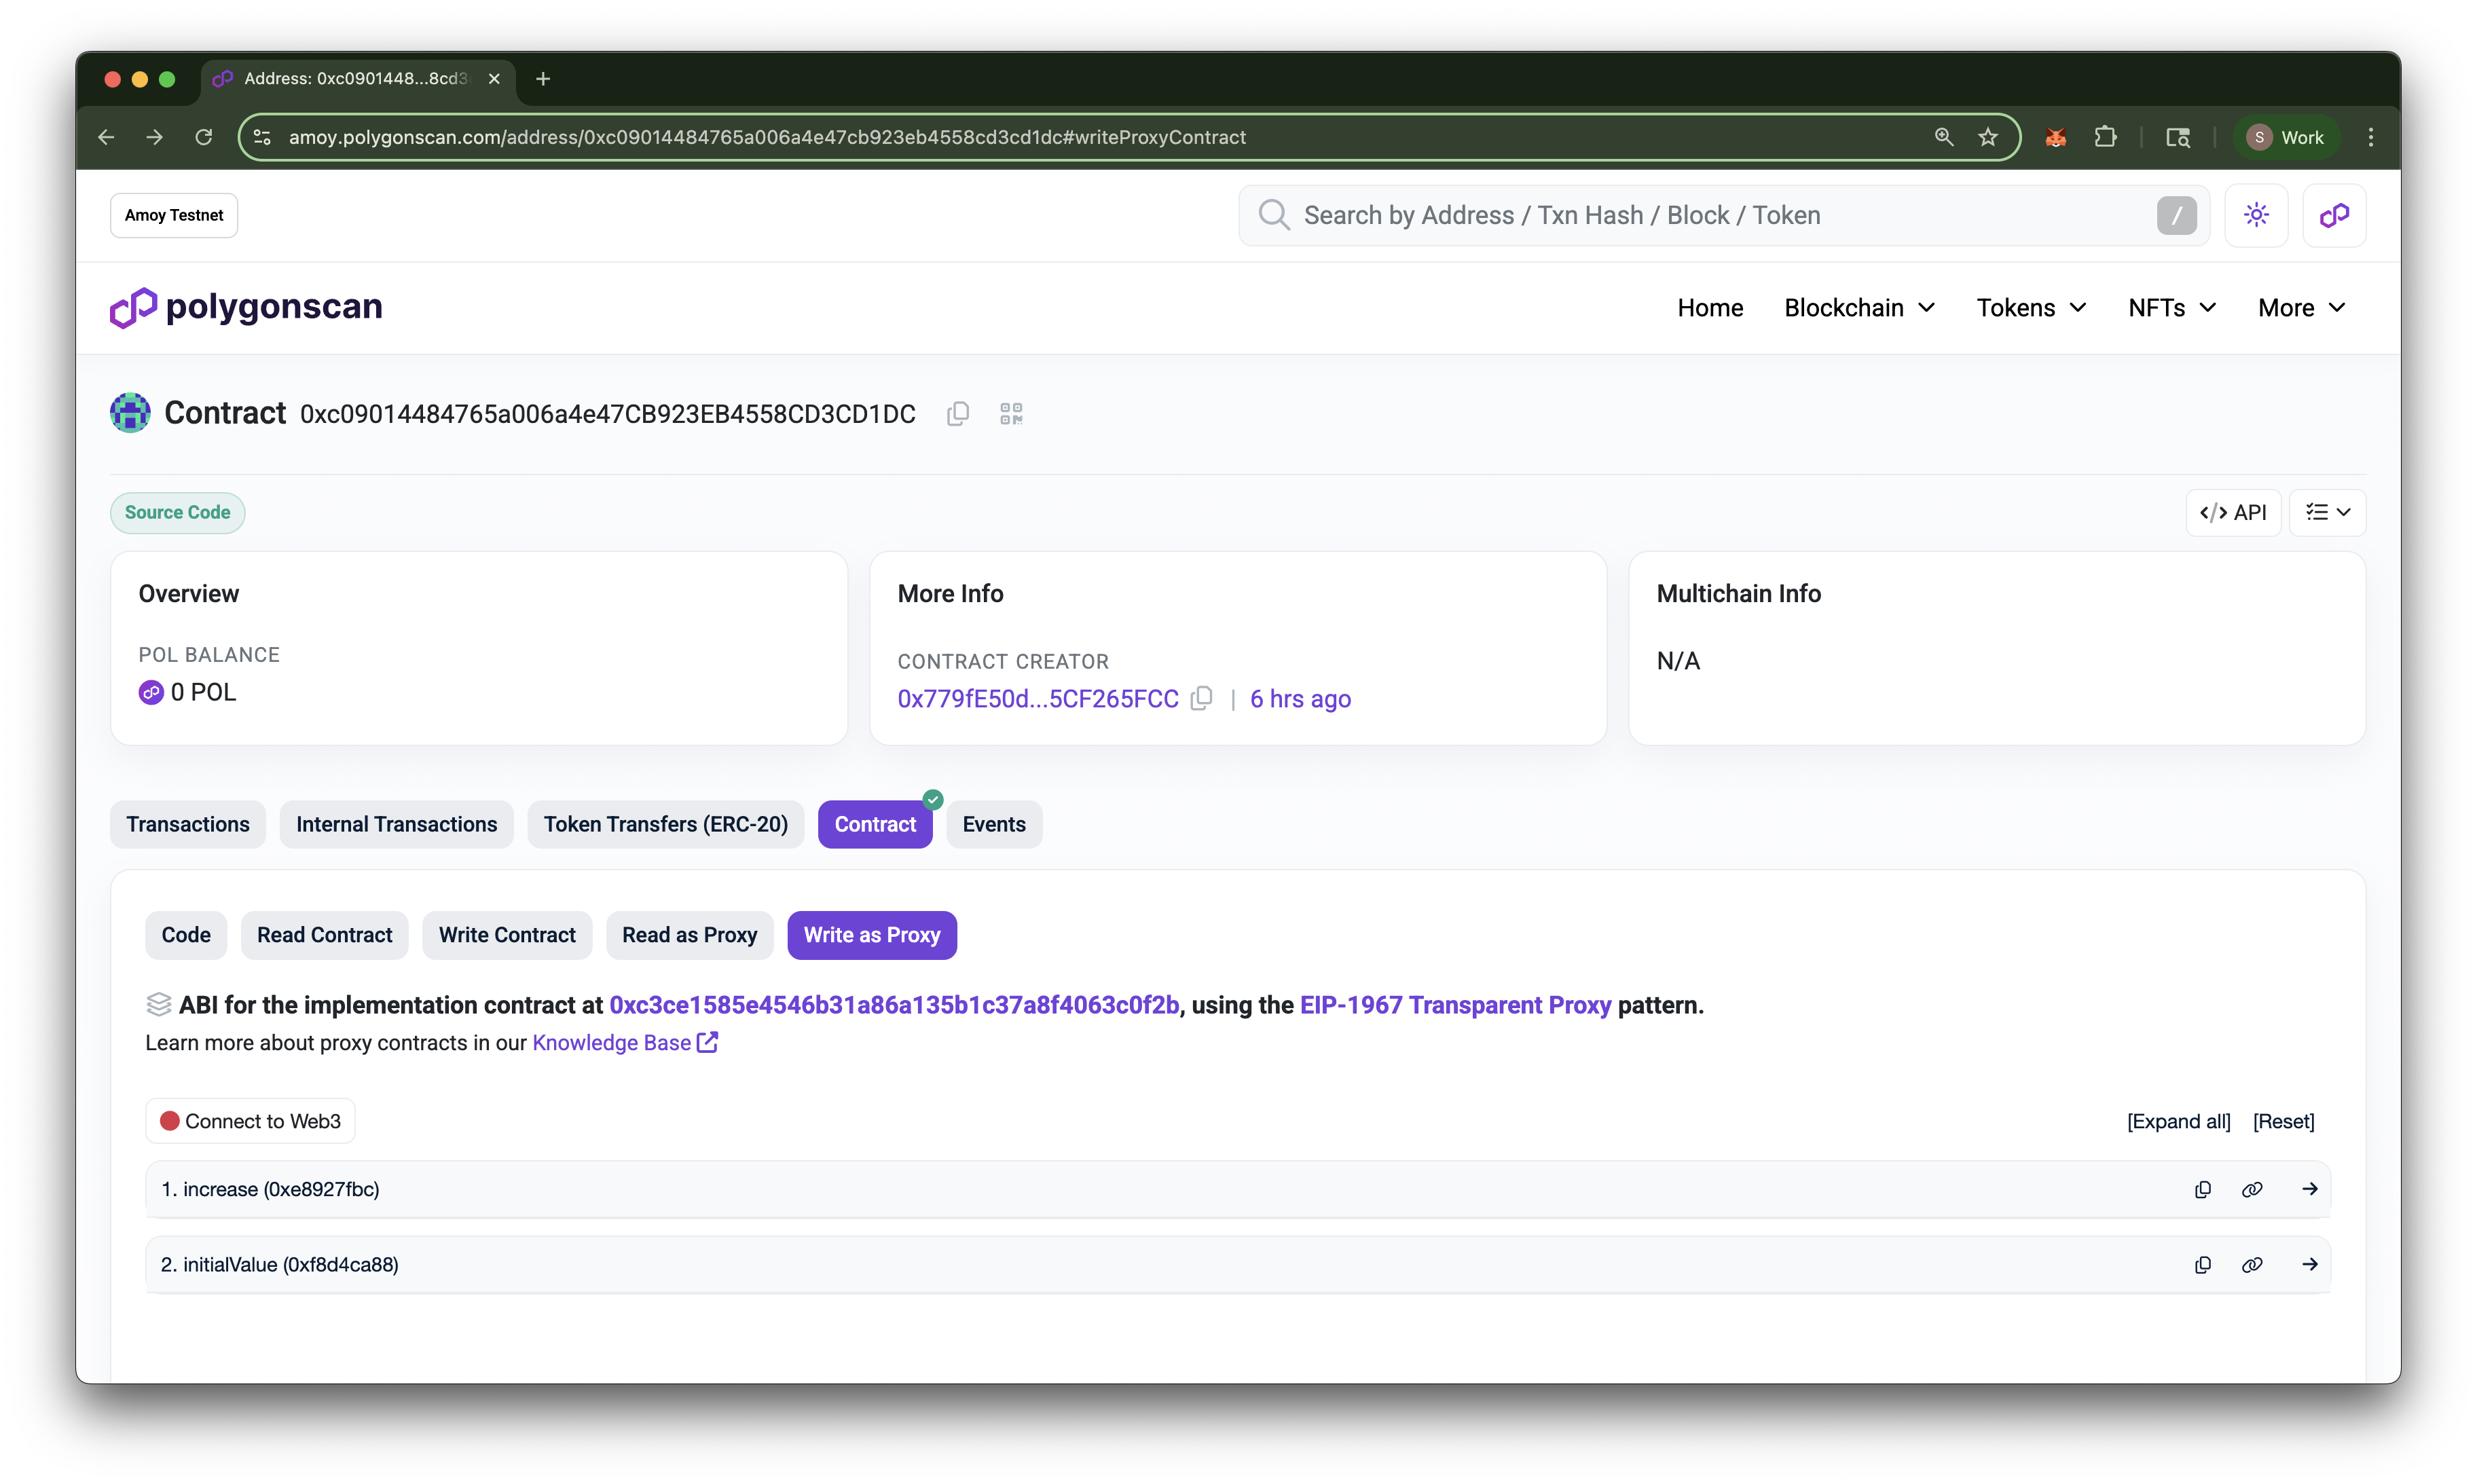
You will then be asked to verify the contract as a proxy. Click Verify. A popup will appear and will display the implementation address. You will notice that this is the same address as our V1 contract! Click Save then go back to our TransparentUpgradeableProxy contract page. You should now see two new tabs! Read as Proxy and Write as Proxy.
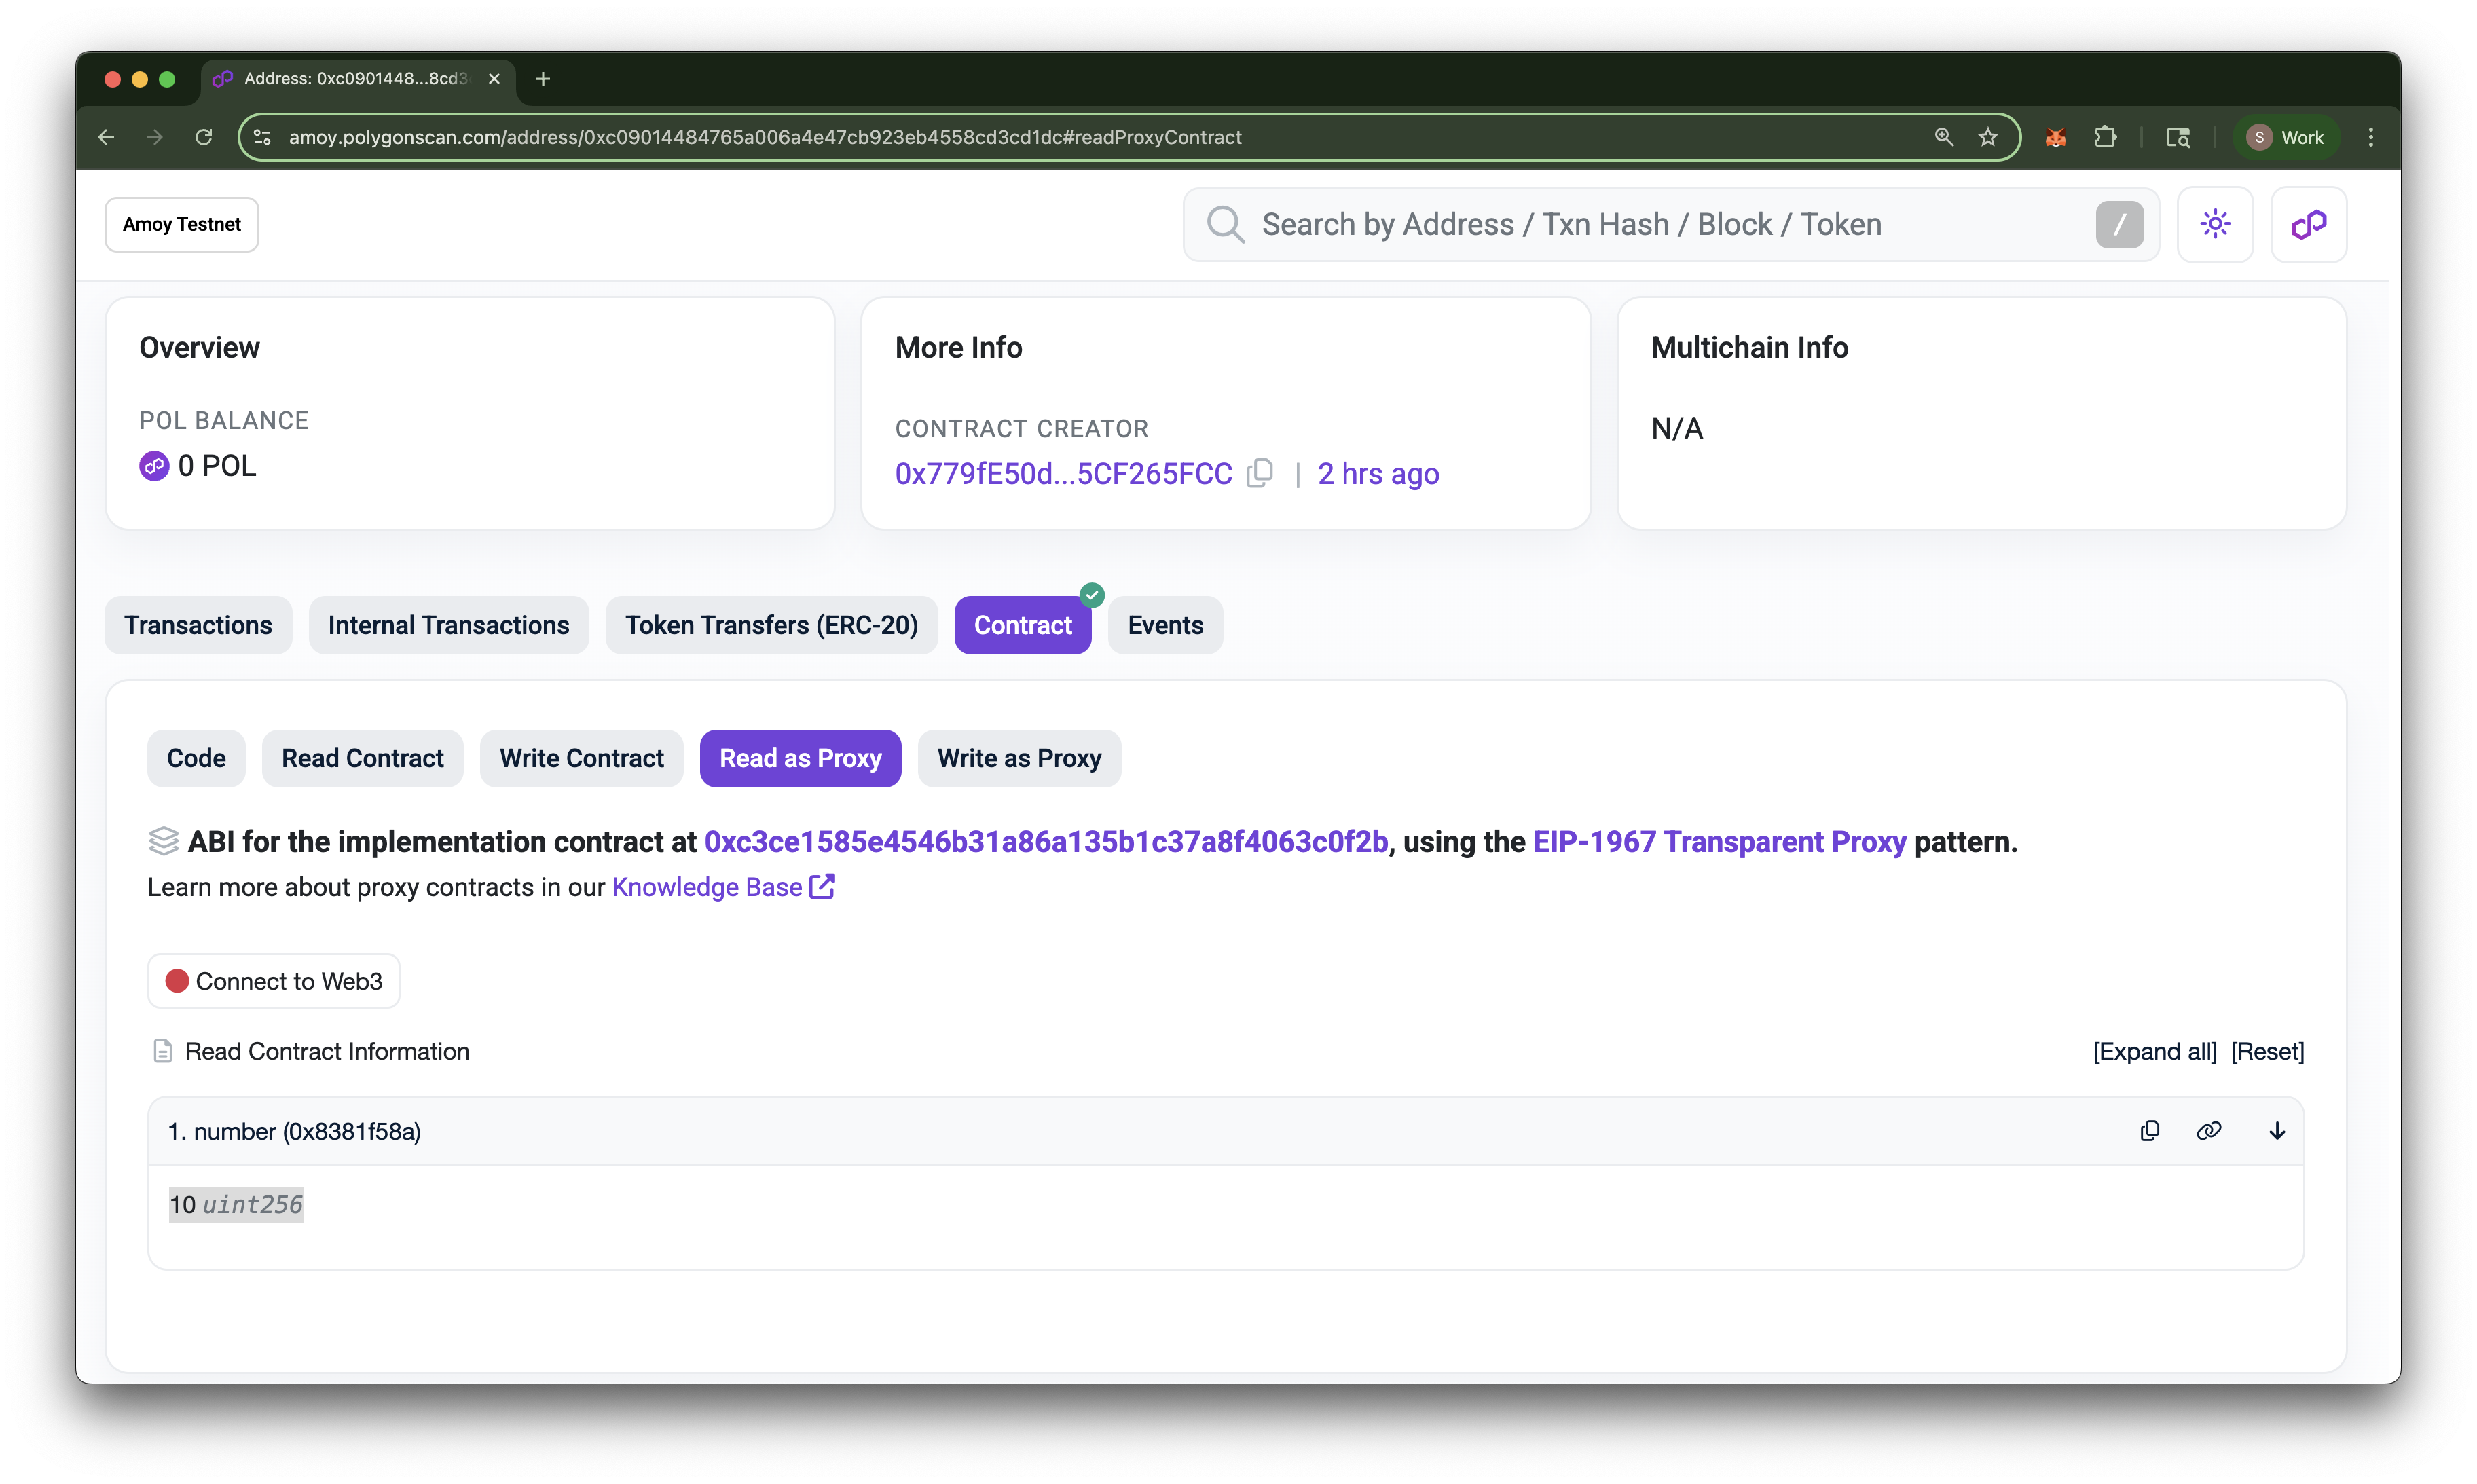
Click on the number function under the Read as Proxy tab. You should see the value 10, which is the initial value we set earlier. If you click on Write as Proxy, you will see the V1 contract's functions. This confirms that our proxy contract indeed points to our V1 implementation contract.
Proxy Contract Breakdown
The ProxyModule described multiple smart contracts to be deployed, namely the TransparentUpgradeableProxy and ProxyAdmin contracts. TransparentUpgradeableProxy is the main contract here. This contract holds all the state variable changes for our implementation contract. This means that the implementation contract does not maintain its own state and actually relies on the proxy contract for storage.
As a demonstration, search up the V1 contract address you noted down earlier on the Amoy block explorer. If you head over to the Contract tab and click on Read Contract, you will see that the value of the state variable number is 0! Recall that we saw the value of number as 10 when we read it from the proxy contract. This shows that the implementation contract does not maintain its own state but solely serves as a logic contract.
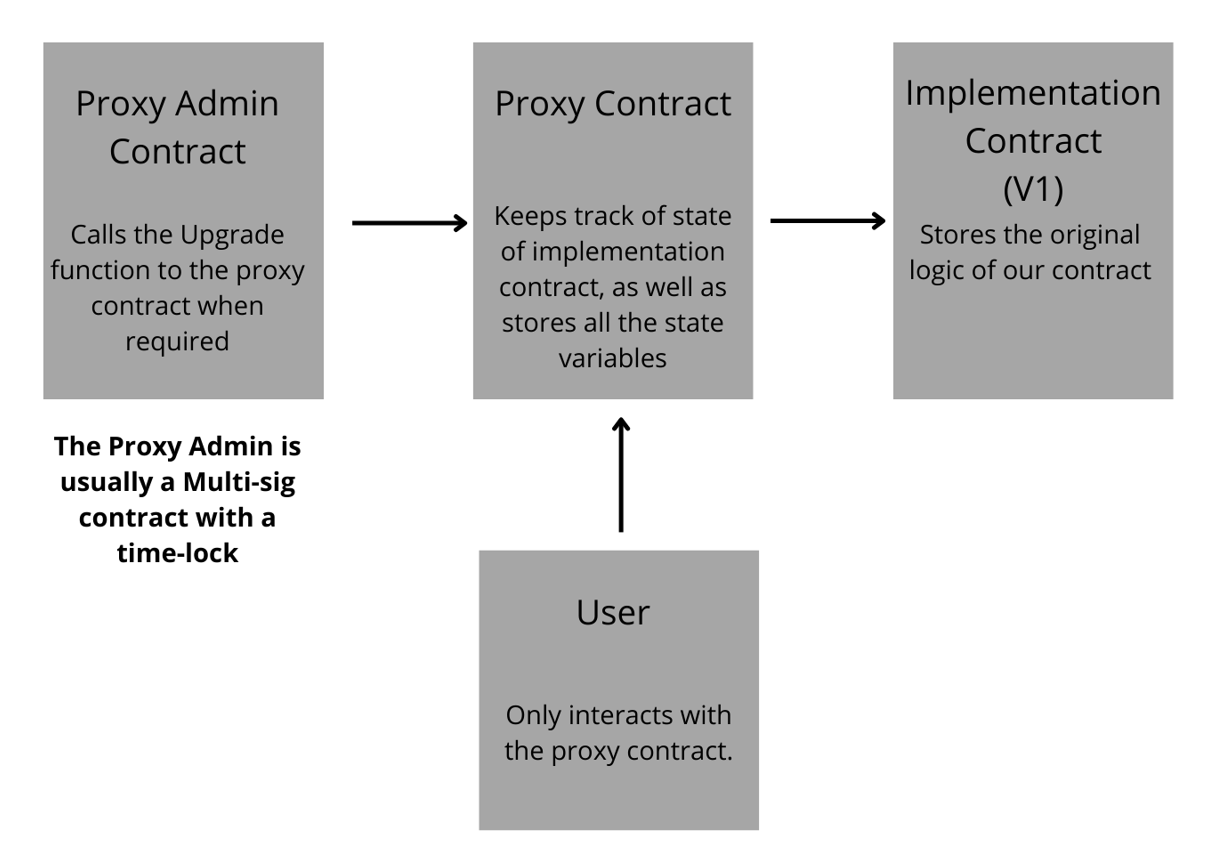
In this scenario, the proxy contract (TransparentUpgradeableProxy) is the wrapper for our implementation contract (V1), and if and when we need to upgrade our smart contract (via ProxyAdmin), we simply deploy another contract and have our proxy contract point to that contract, thus upgrading its state and future functionality. How cool is that!
In the end, we did not actually alter the code in any of our smart contracts, yet from the user’s perspective, the main contract has been upgraded. This flow chart will give you a better understanding:
 Upgradeable Smart Contracts Flowchart
Upgrading Contract V1 to V2
Now that we have a solid understanding of what's happening on the backend, let us return to our code and upgrade our contract! Under the scripts folder, create a new file named upgrade.ts. Inside, paste the following code:
- upgrade.ts
import hre from "hardhat";

async function main() {
    const { ethers } = await hre.network.connect({
        network: "amoy",
    });

    const [currentAccount] = await ethers.getSigners();
    console.log("Current account:", currentAccount.address);

    const proxy = "<INSERT_YOUR_PROXY_ADDRESS_HERE>";
    const proxyAdmin = "<INSERT_YOUR_PROXY_ADMIN_ADDRESS_HERE>";
    const v2Implementation = "<INSERT_YOUR_V2_IMPLEMENTATION_ADDRESS_HERE>";

    const proxyAdminContract = await ethers.getContractAt("ProxyAdmin", proxyAdmin);
    const v2 = await ethers.getContractAt("V2", v2Implementation);

    const encodedFunctionCall = v2.interface.encodeFunctionData("decrease");

    console.log("Upgrading to V2...");
    const upgradeTx = await proxyAdminContract.connect(currentAccount).upgradeAndCall(proxy, v2Implementation, encodedFunctionCall);
    await upgradeTx.wait();
    console.log("Upgraded to V2");

    const v2Proxy = await ethers.getContractAt("V2", proxy);
    const currentValue = await v2Proxy.number();
    console.log("Current value after upgrade and call:", currentValue.toString());
}

main().catch((error) => {
  console.error(error);
  process.exitCode = 1;
});
IMPORTANT: Before we upgrade our contract, remember to paste your
TransparentUpgradeableProxy,ProxyAdmin, andV2contract addresses in the respective variables in the code above.
Now, let us run this script in the terminal:
npx hardhat run scripts/upgrade.ts --network amoy
Upgrade Breakdown
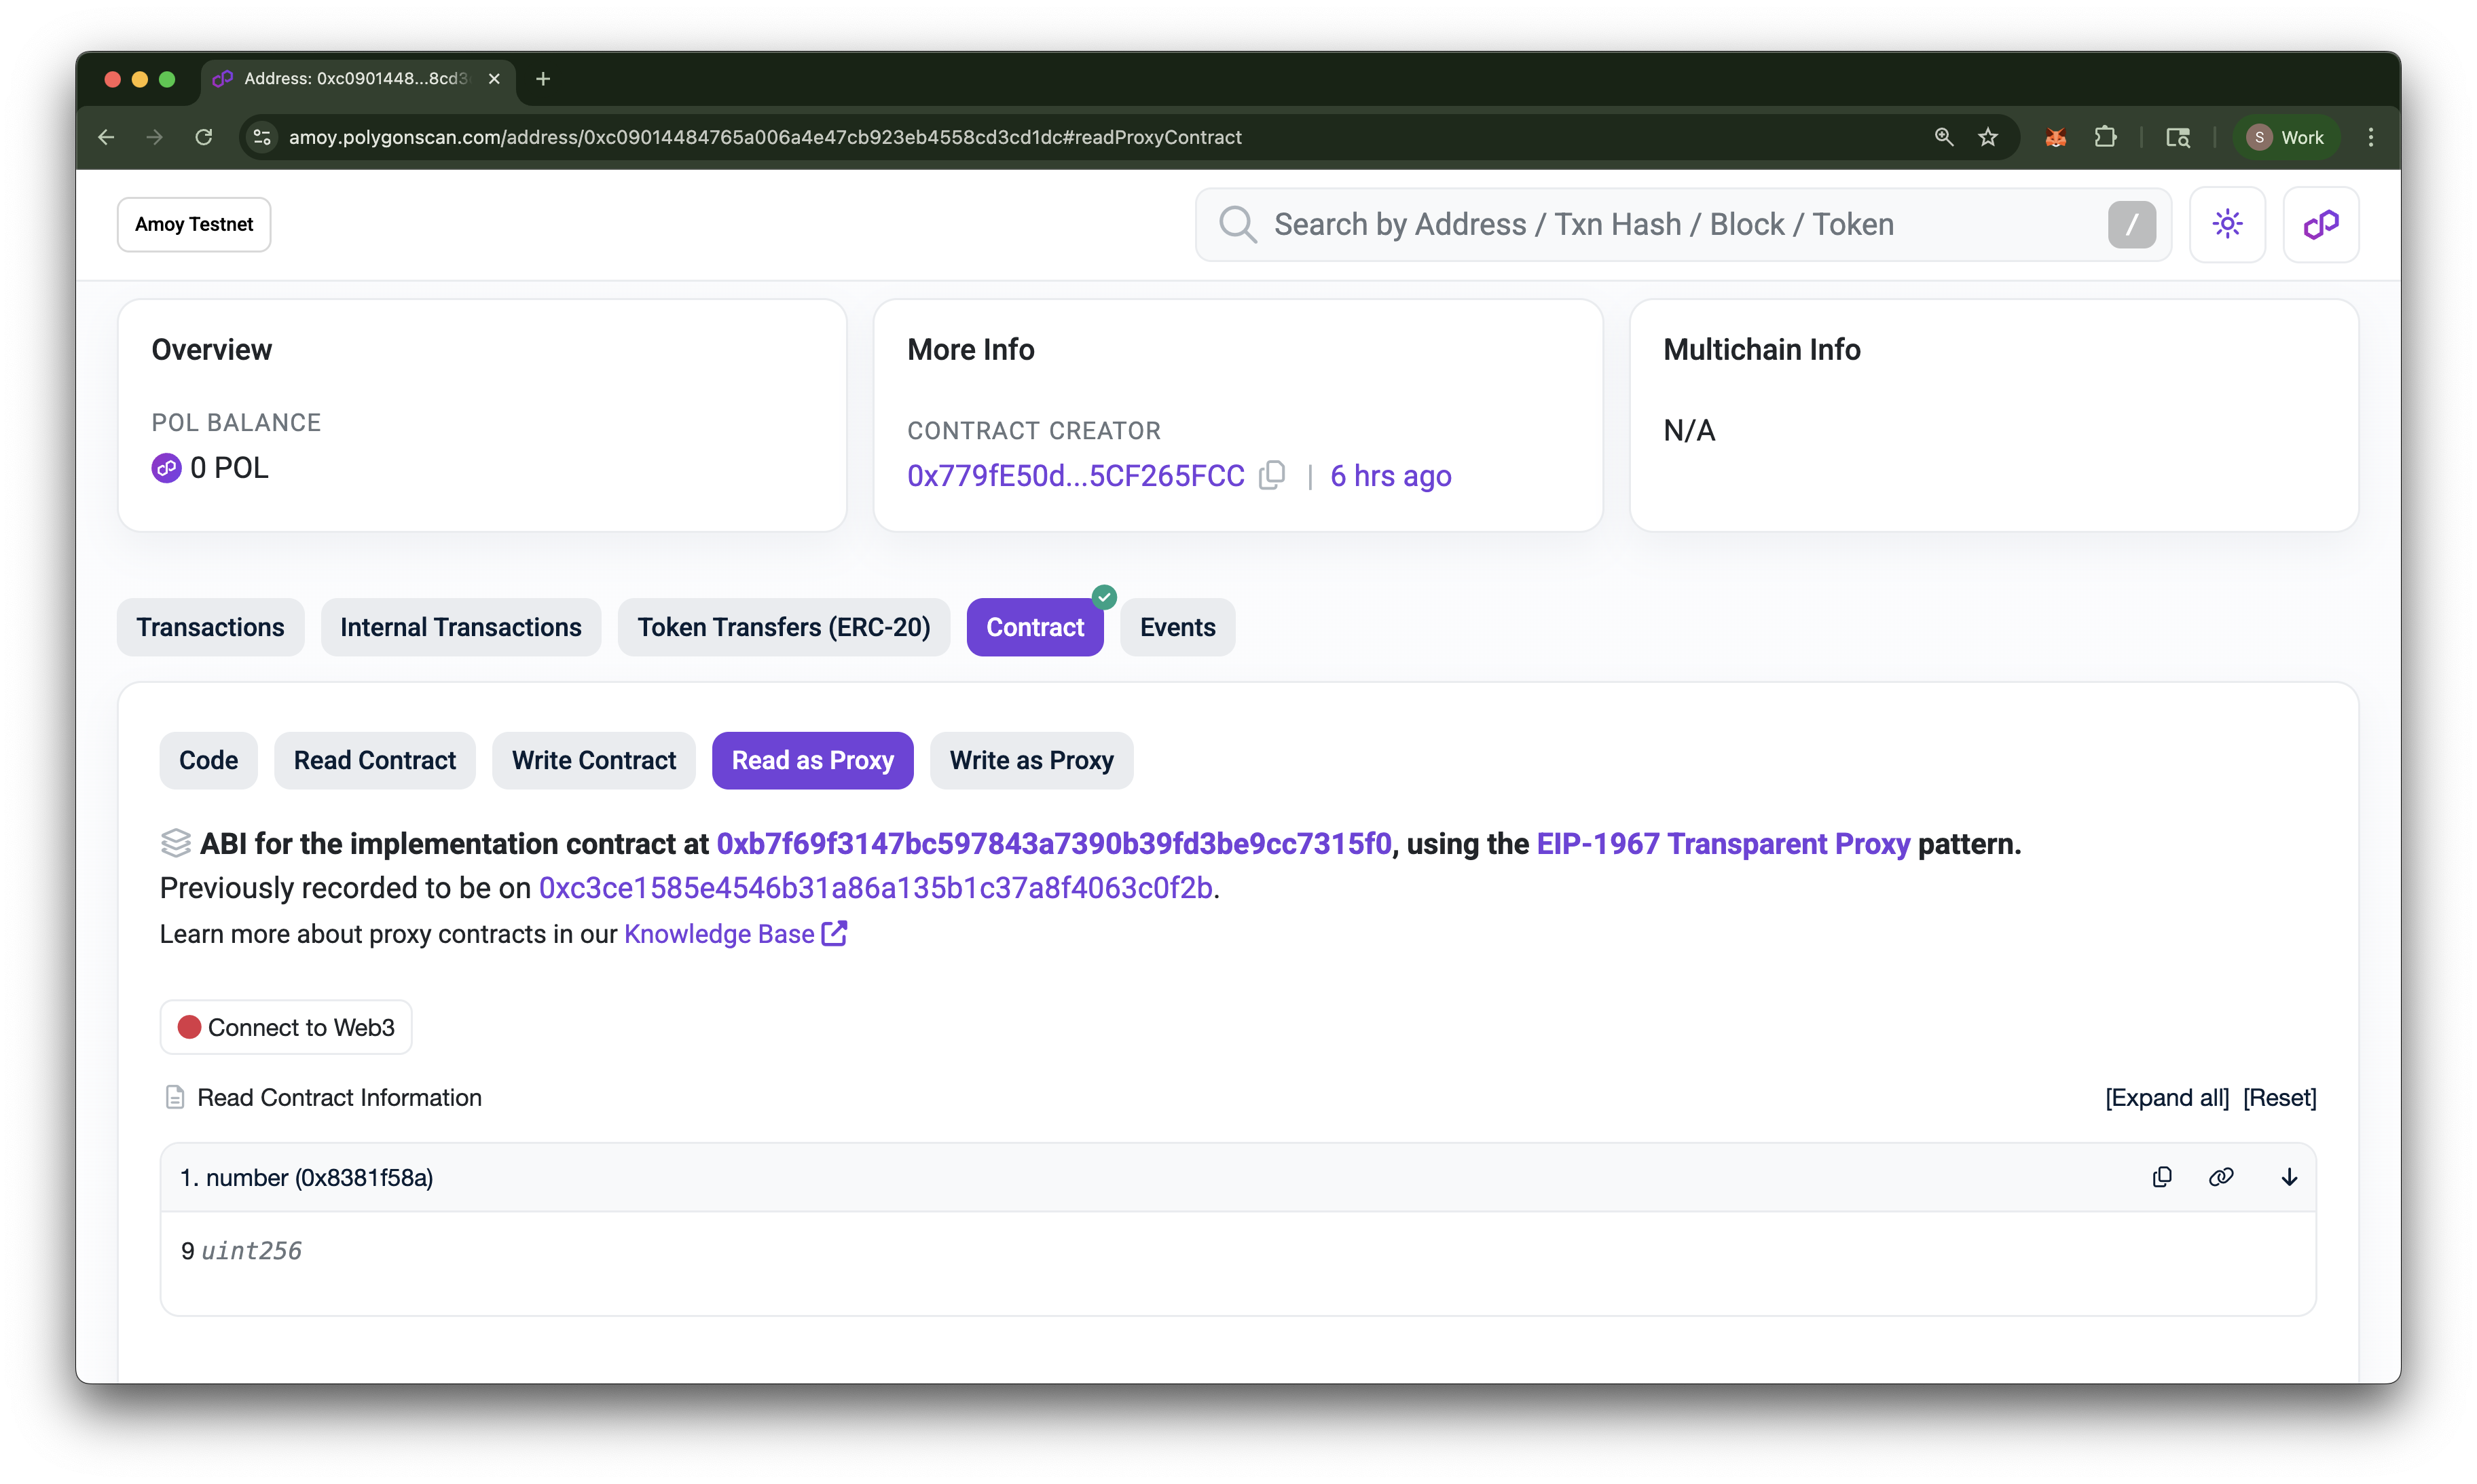
What basically happened here is that we called the upgradeAndCall function inside the ProxyAdmin contract to first upgrade the implementation contract then call the decrease function. If you check the terminal output, you will see that the current value is now 9, which means that the decrease function was successfully called after the upgrade. To further confirm that the decrease function call succeeded, if you return to the Read as Proxy tab of the TransparentUpgradeableProxy contract on the Amoy block explorer, you will see that the value of number is now 9!
- Terminal Output
- Polygonscan Read as Proxy
> npx hardhat run scripts/upgrade.ts --network amoy

Compiling your Solidity contracts...
Compiled 4 Solidity files with solc 0.8.22 (evm target: shanghai)

Current account: 0x779fE50d4A9d0Eb760dD0d315b91d6A5CF265FCC
Upgrading to V2...
Upgraded to V2
Current value after upgrade and call: 9
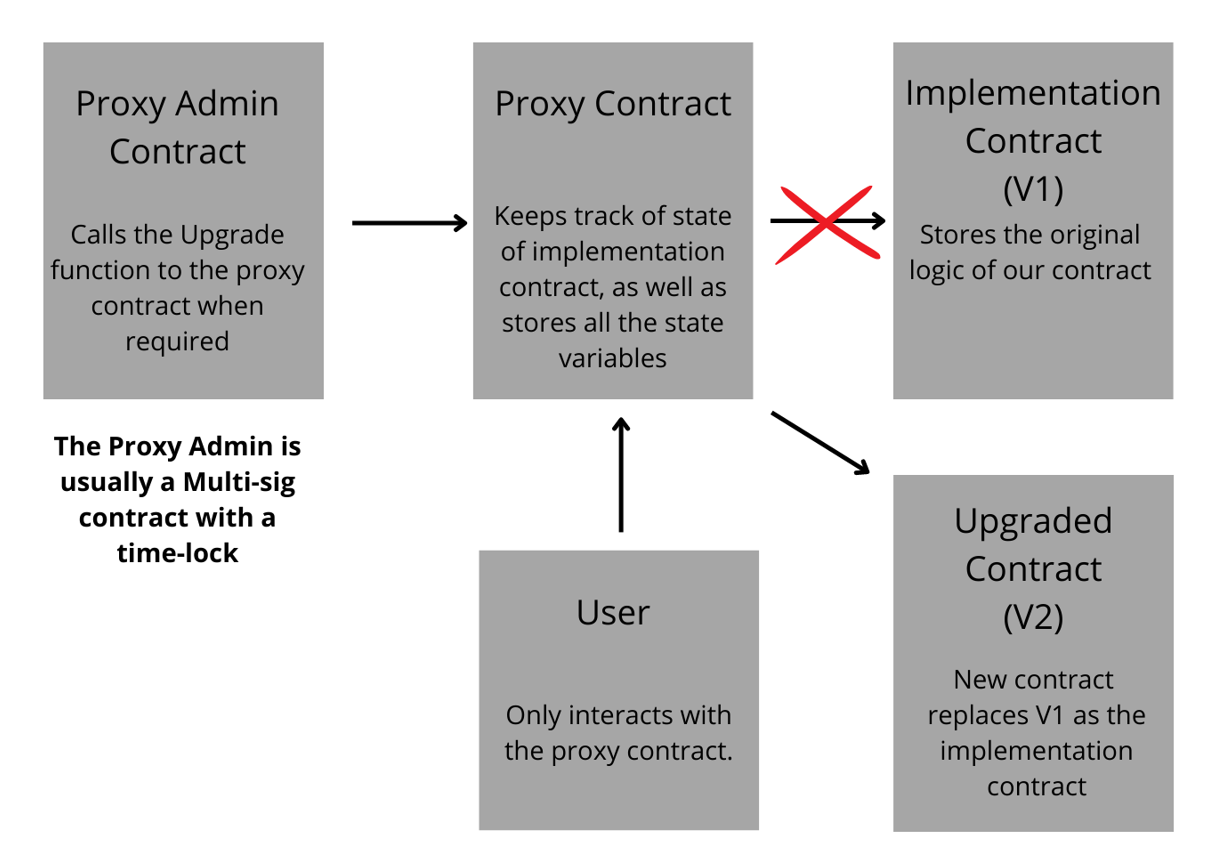
Do note that only the account that deployed the proxy contracts can call the upgrade function, and that is for obvious reasons. The TransparentUpgradeableProxy contract now points to the address of the newly deployed V2 contract. Check out the flow chart below:
 Upgradeable Smart Contracts Flowchart
Please note that the address of the user who calls a particular function (msg.sender) is critical. The address determines the entire logic flow.
If the msg.sender is any other user besides the admin, then the proxy contract will simply delegate the call to the implementation contract, and the relevant function will execute. Thus, the proxy contract calls the appropriate function from the implementation contract on behalf of msg.sender, the end-user. As explained before, the state of the implementation contract is meaningless, as it does not change. What does change is the state of the proxy contract, which is determined on the basis of what is returned from the implementation contract when the required function executes.
This means that if the caller is not an admin, the proxy contract will not even consider executing any sort of upgrade function. If the caller is not an admin, the call is forwarded or delegated to the implementation contract without any further delay. This is called a delegate call and is an important concept to understand. If the caller is however the admin, in this case, our ProxyAdmin contract, the call is not automatically delegated, and any of the functions of the proxy contract can be executed, including the upgrade function.
Verifying the Upgrade
Now, go back to the Amoy block explorer and search for your TransparentUpgradeableProxy contract address. Go to the Contract tab and click on Write as Proxy. You should now see the new V2 implementation contract address followed by the previous V1 implementation address. You will also see the decrease function available for use. This tells us that the proxy contract now points to the new implementation contract! Here's a before and after comparison:
- Before Upgrade
- After Upgrade

That’s it. You just deployed an upgradeable smart contract and then upgraded it to include a new function. Now push the code to Github and show it off! One last caveat, remember how we used a .env file to store our sensitive data? The purpose of the file was to prevent our sensitive data from being published publicly, thus compromising our assets on the blockchain. After verifying that you have the .env file name listed in your .gitignore, you can then push your code to GitHub without worries since you have no private data in your hardhat.config.ts file.
Conclusion
Give yourselves a pat on the back. You have earned it. This was a fairly advanced tutorial, and if you followed it thoroughly, you now understand how to deploy a basic upgradeable contract using the OpenZeppelin library.
Subscribe to our newsletter for more articles and guides on Polygon. If you have any feedback, feel free to reach out to us via X. You can always chat with us on our Discord community server, featuring some of the coolest developers you’ll ever meet 😊
We ❤️ Feedback!
If you have any feedback or questions about this documentation, let us know. We'd love to hear from you!